

Bravewolf Customs parts and accessories for your thunderstroke model Indian
38 products
38 products


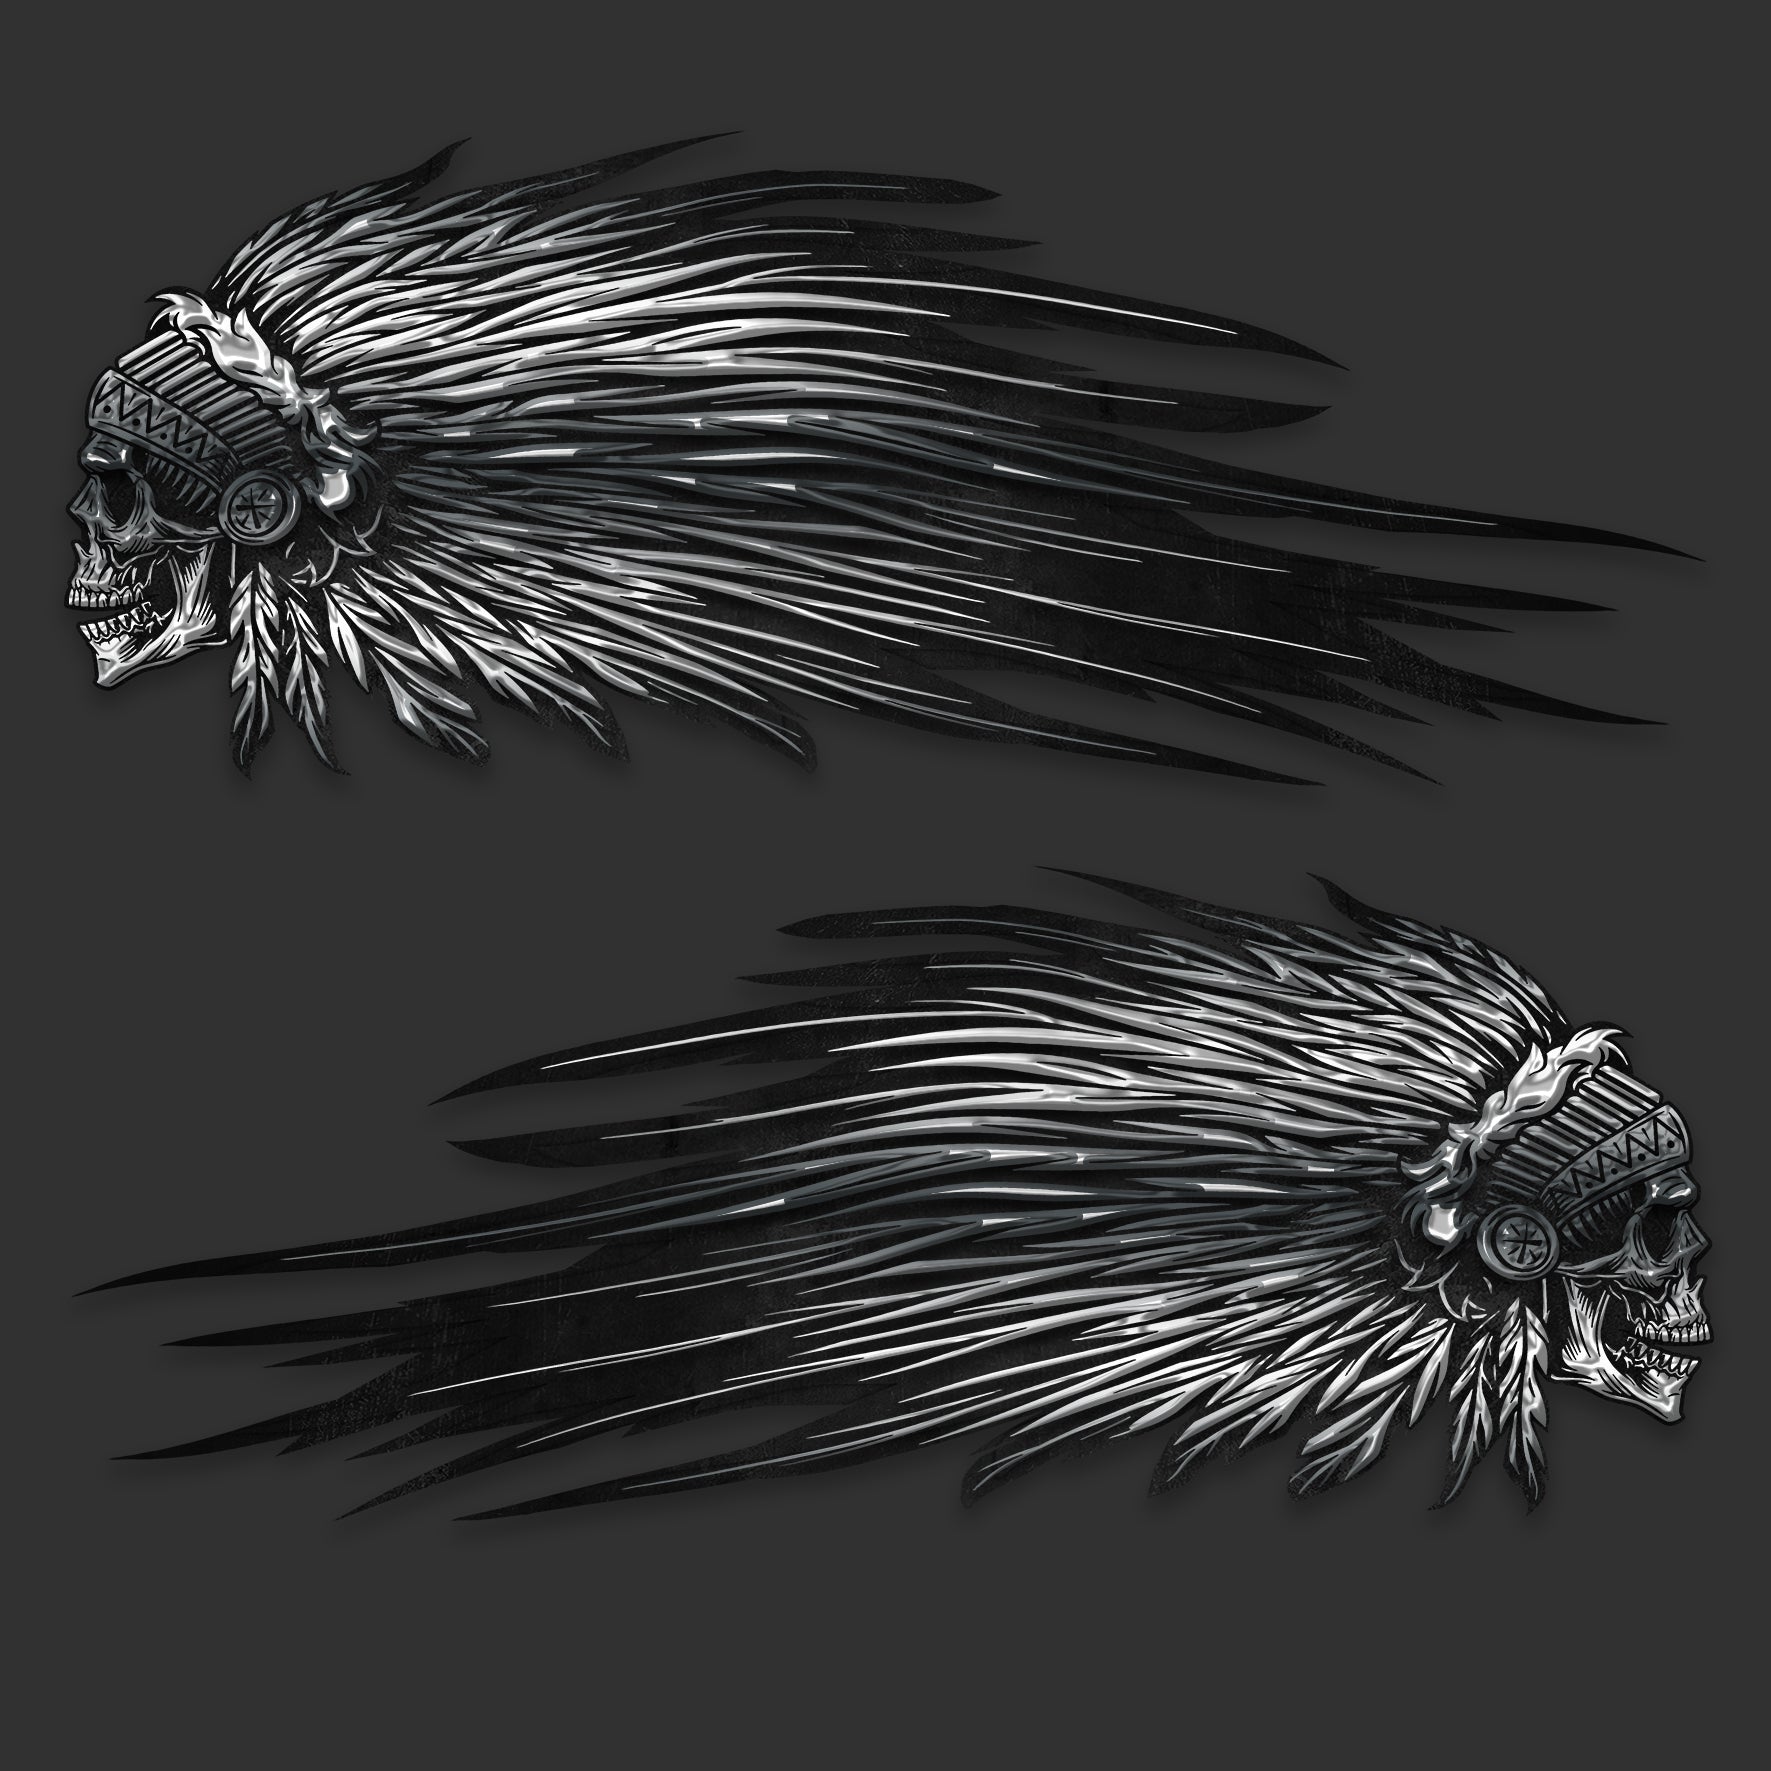
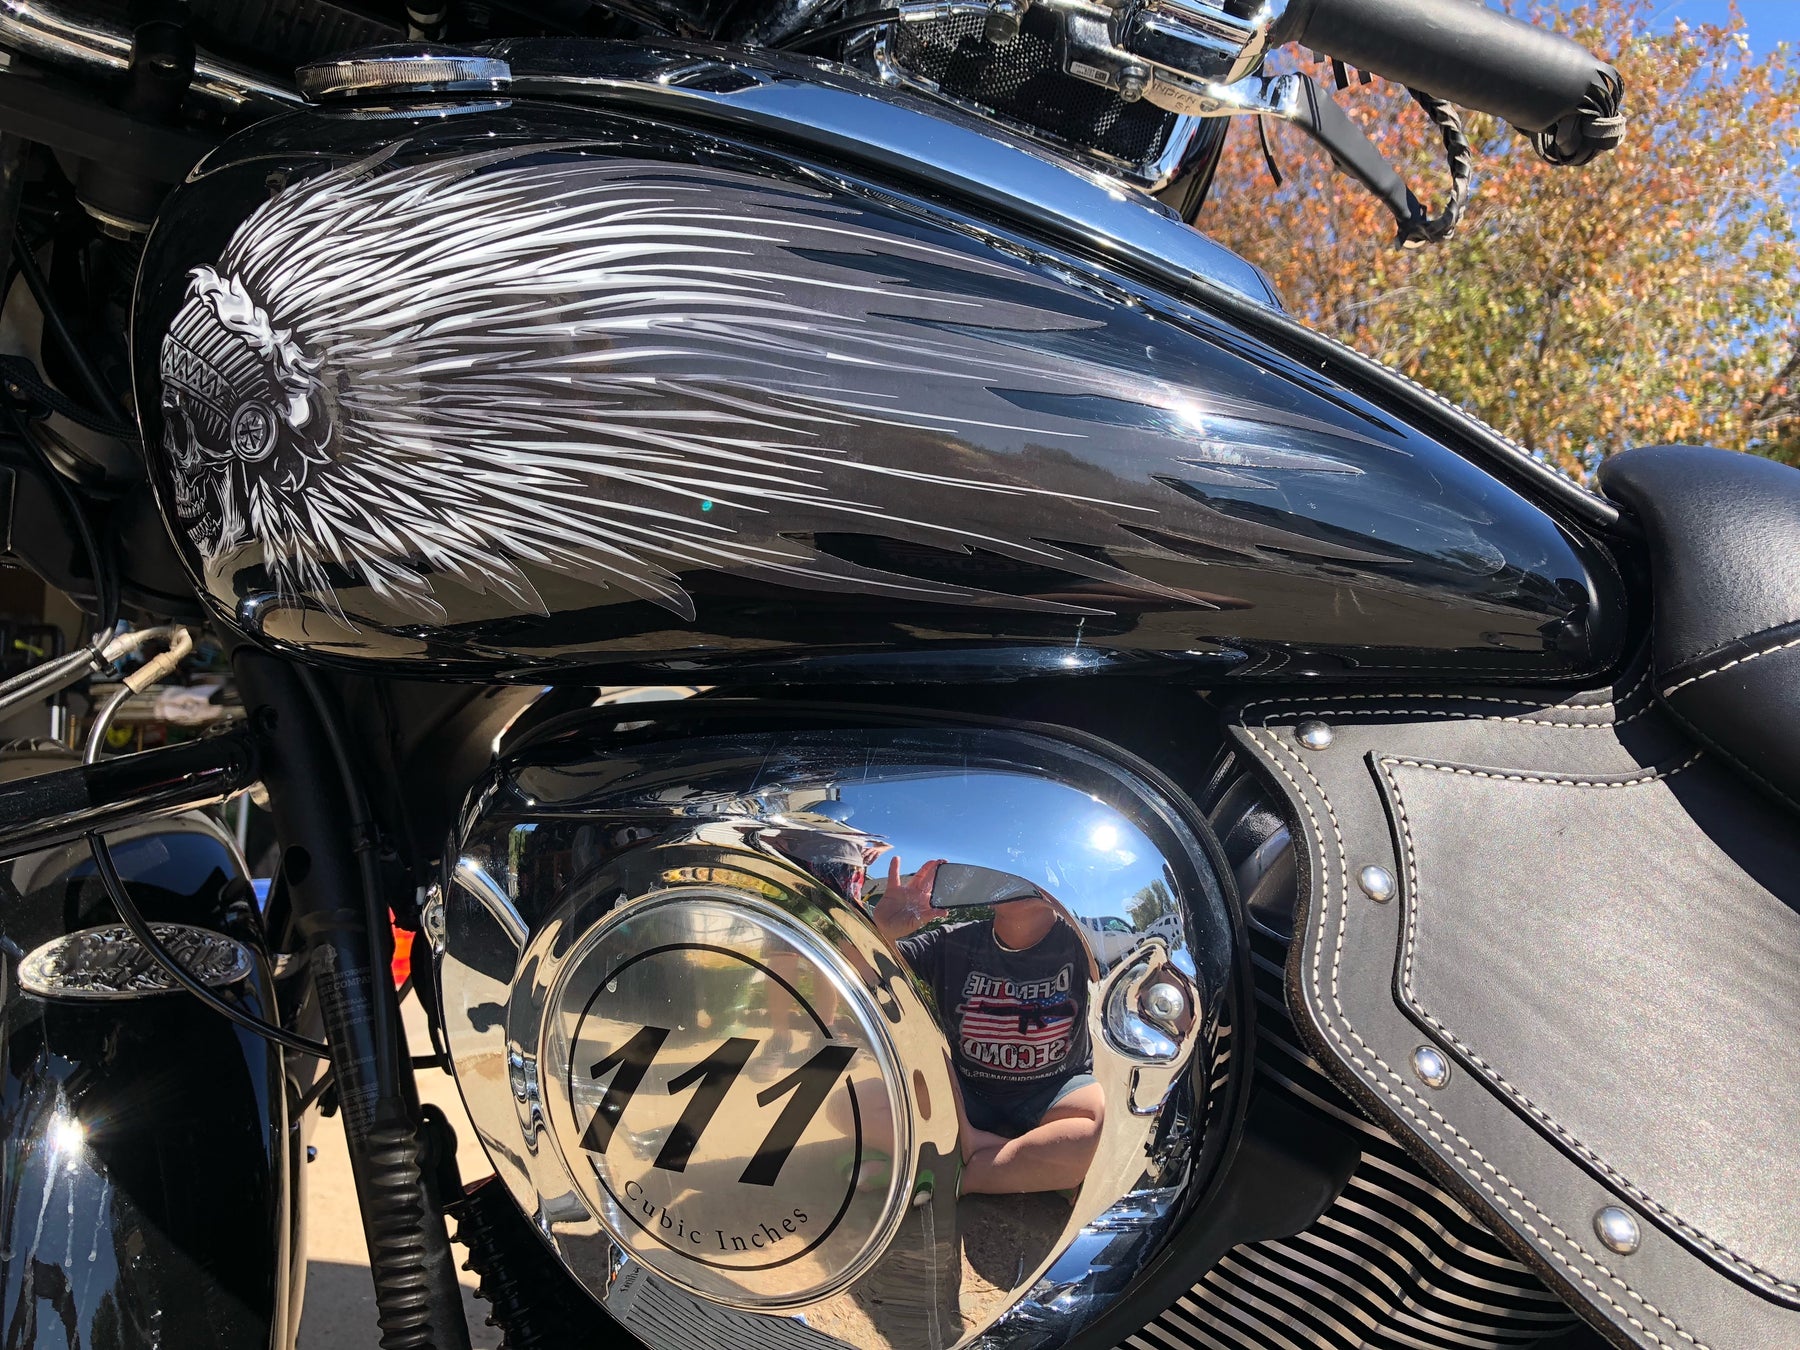
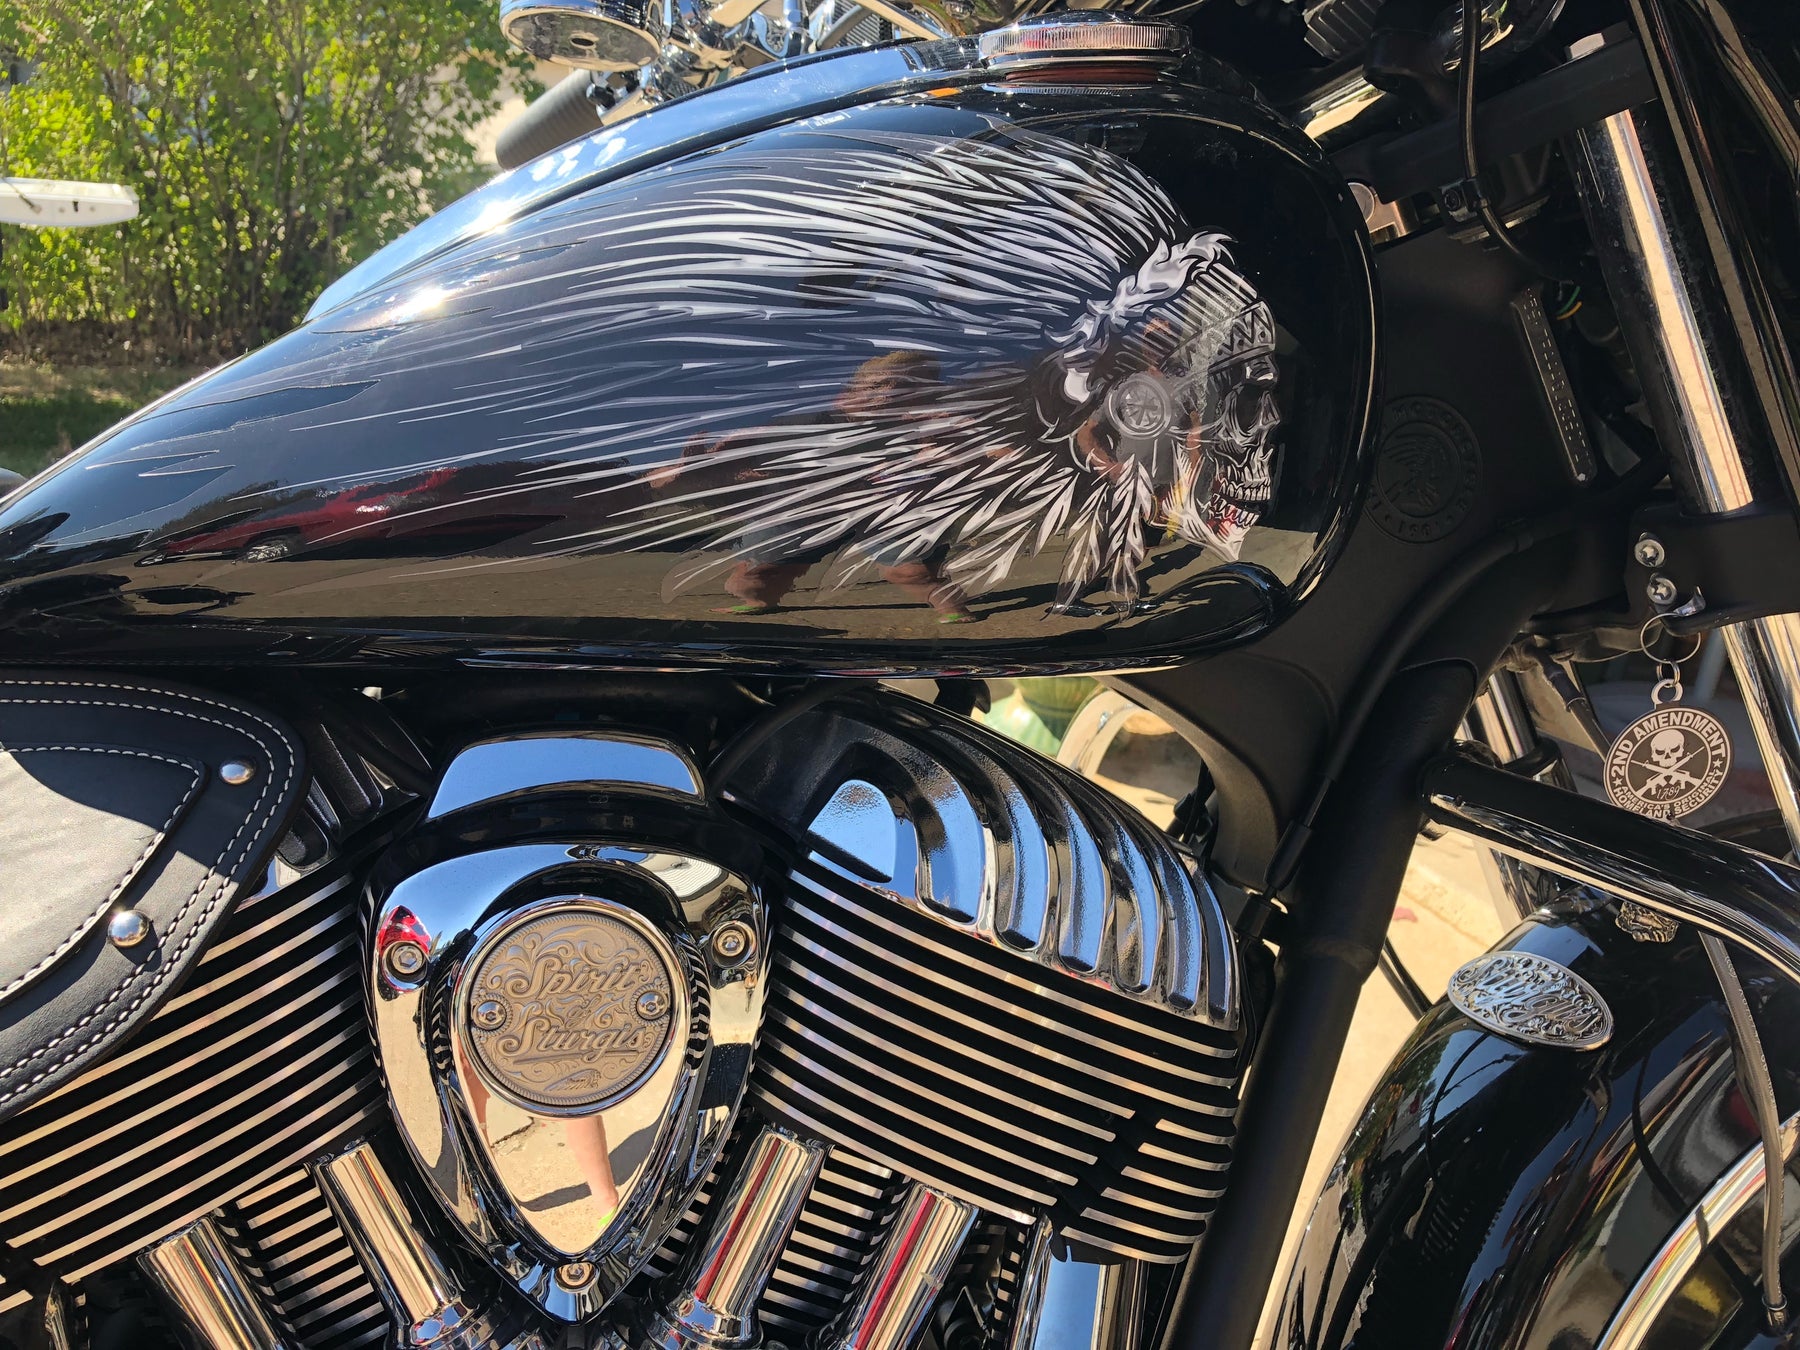
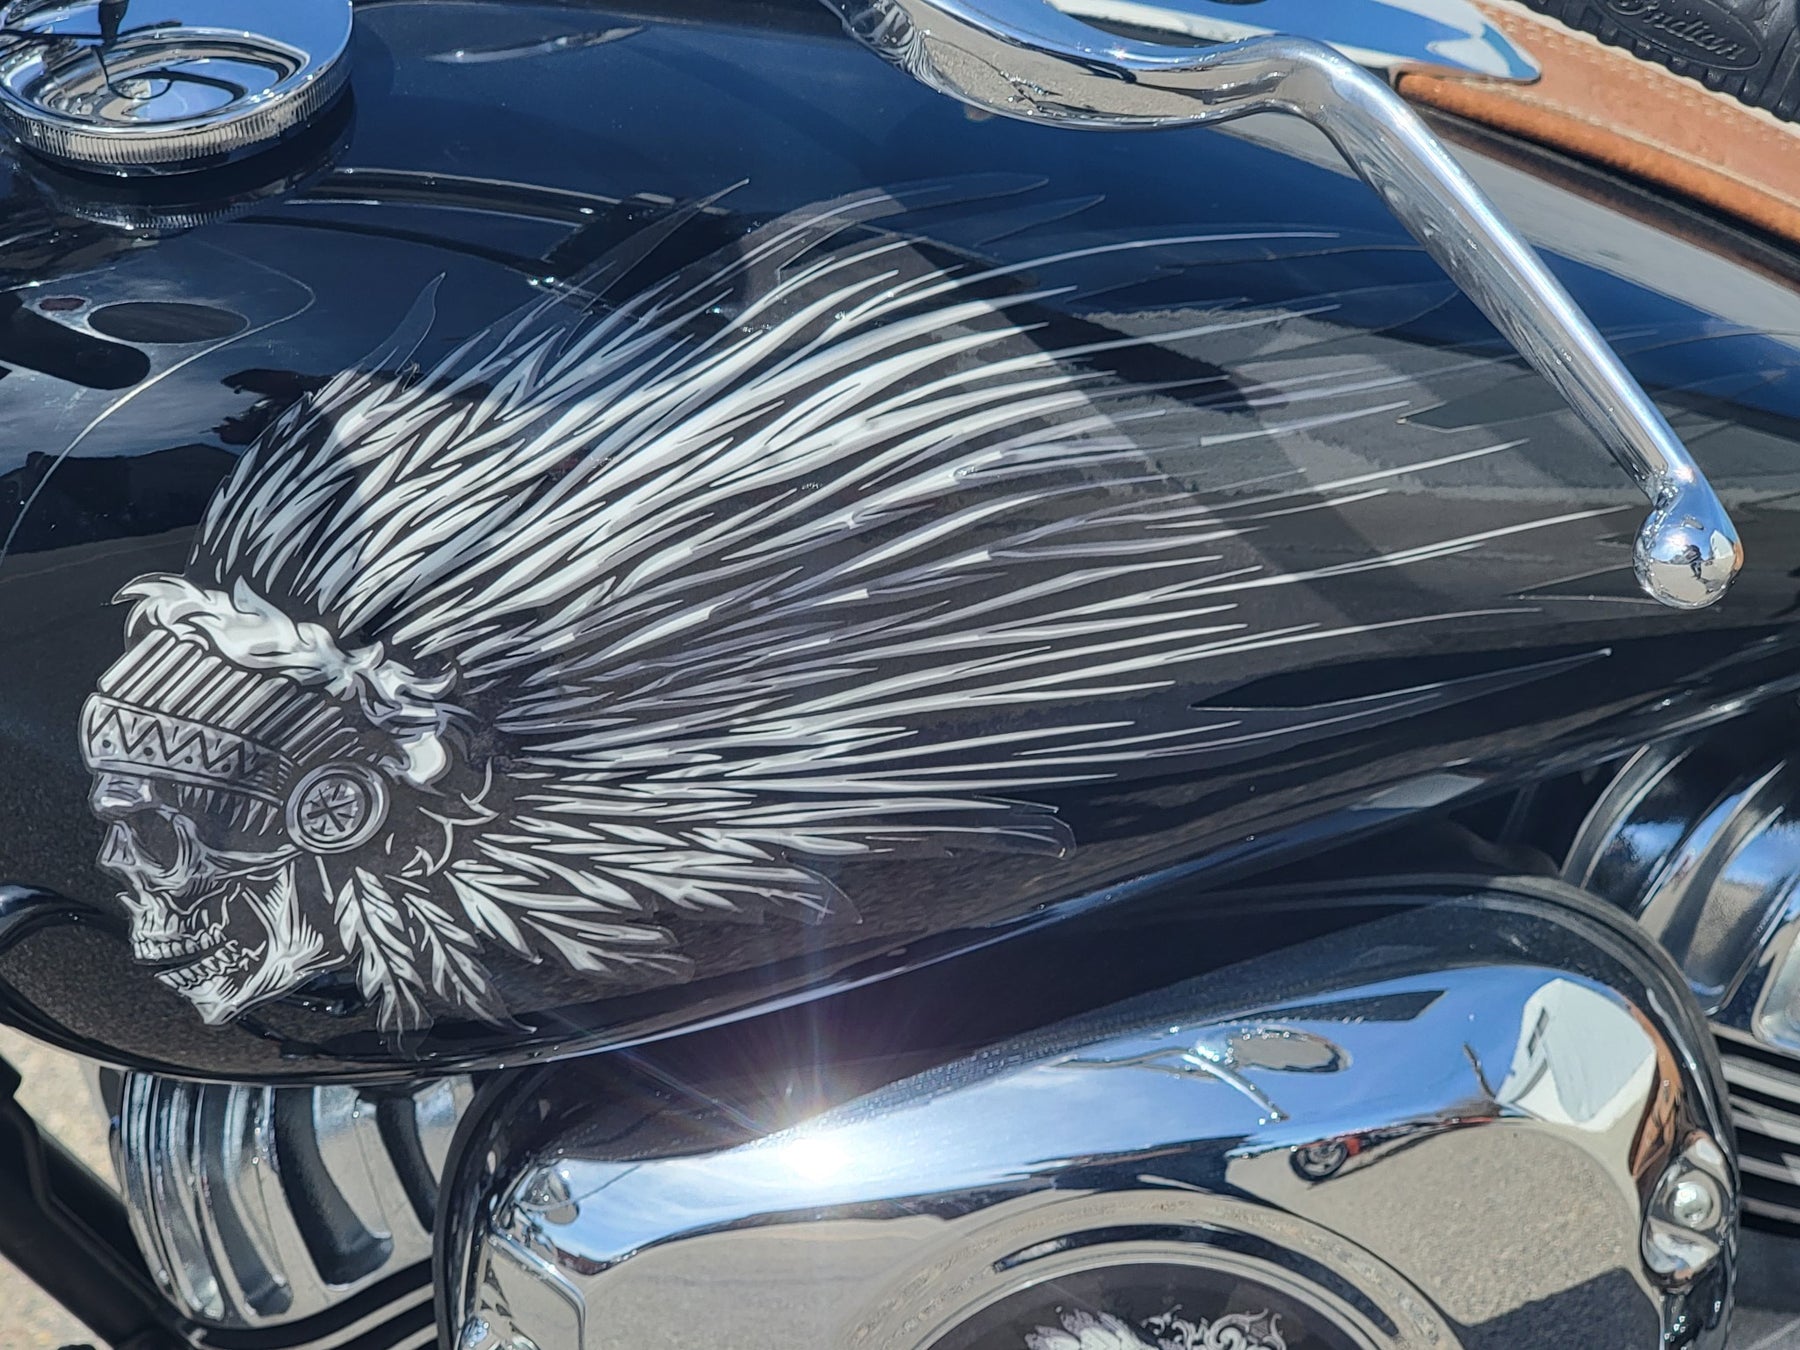
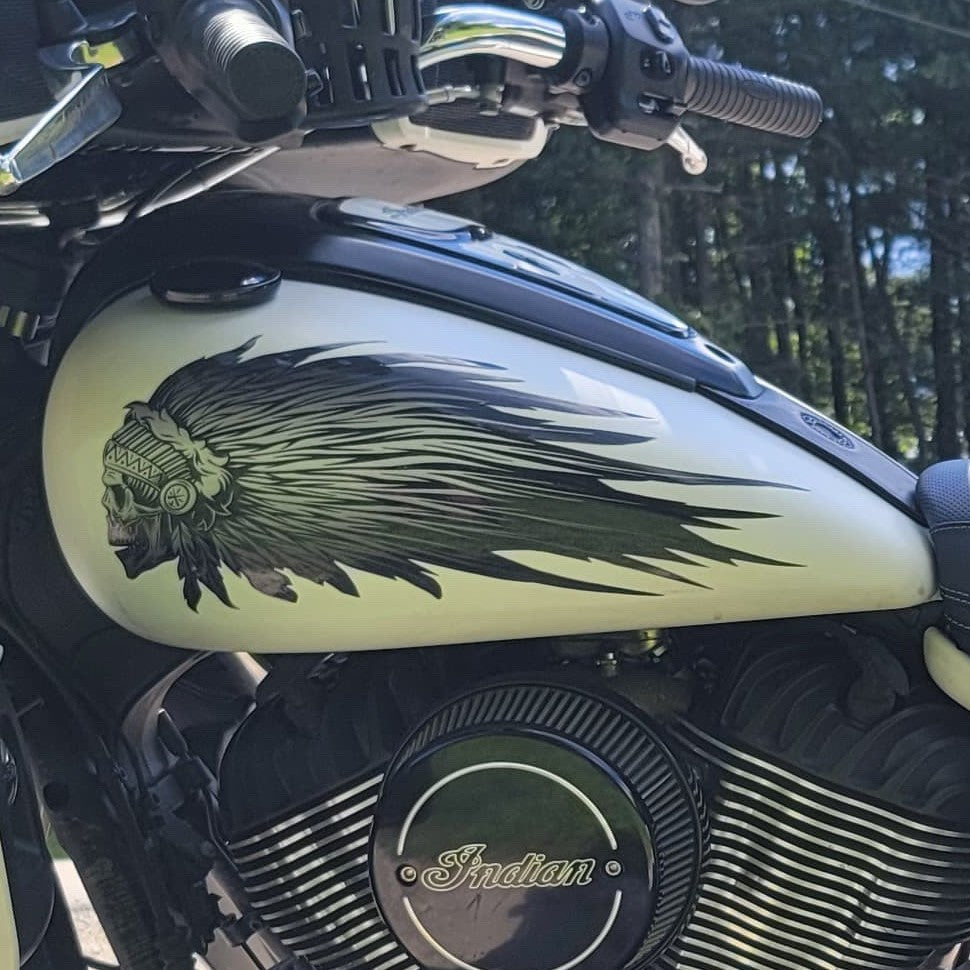
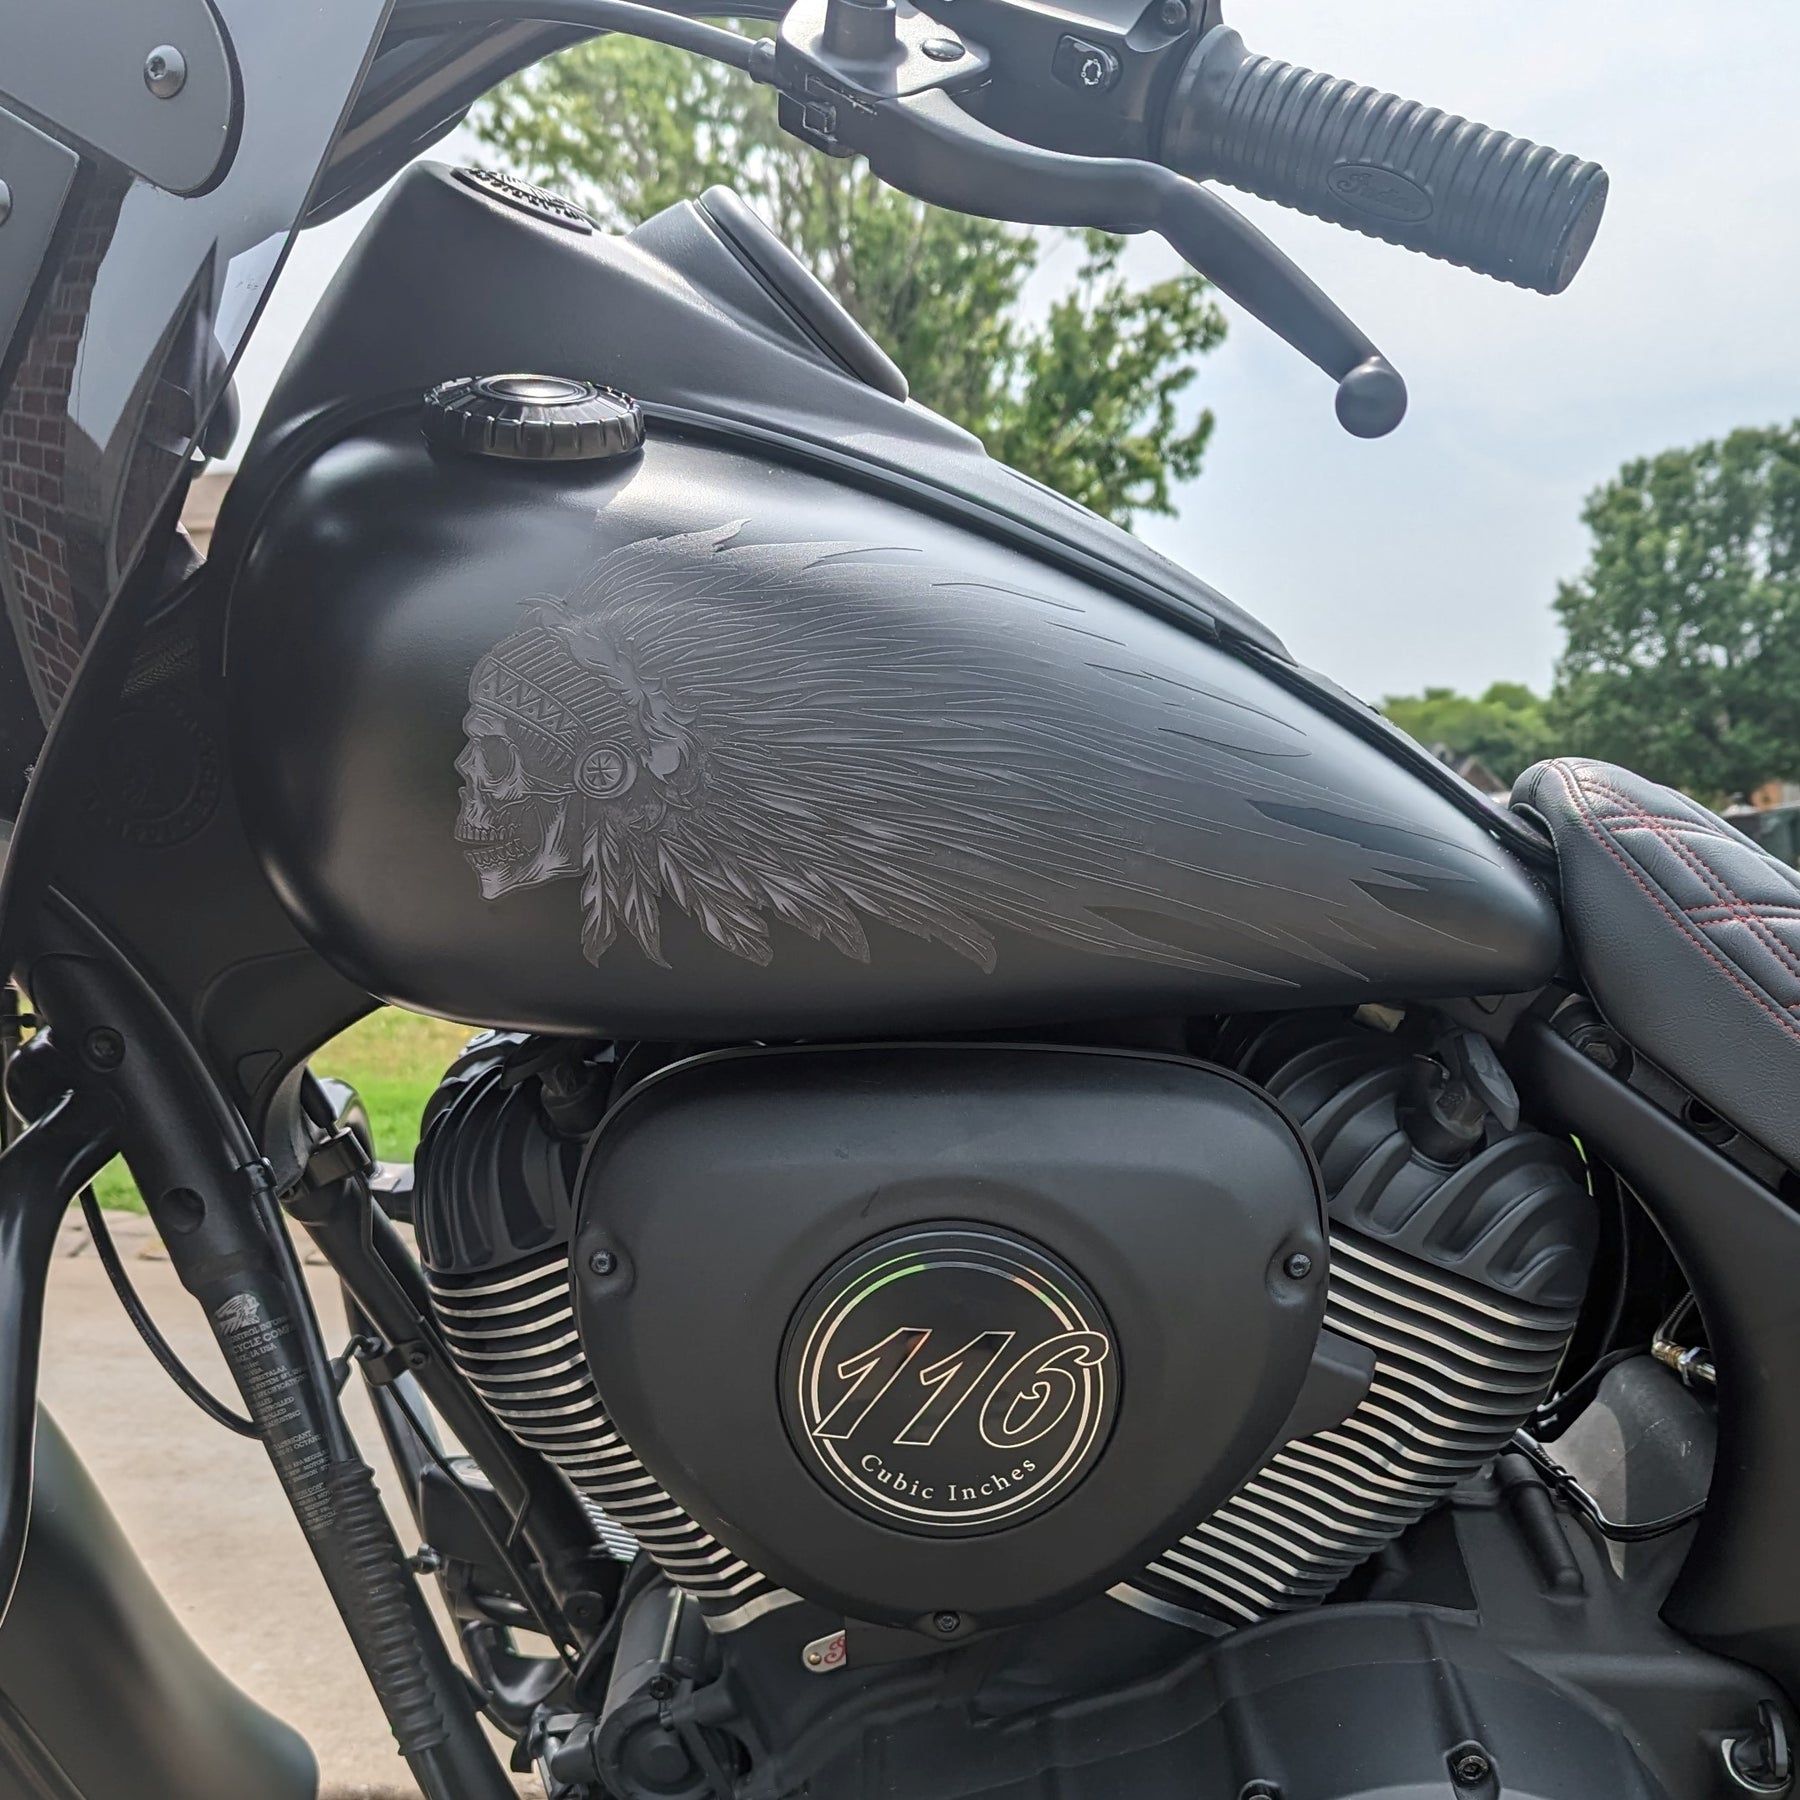
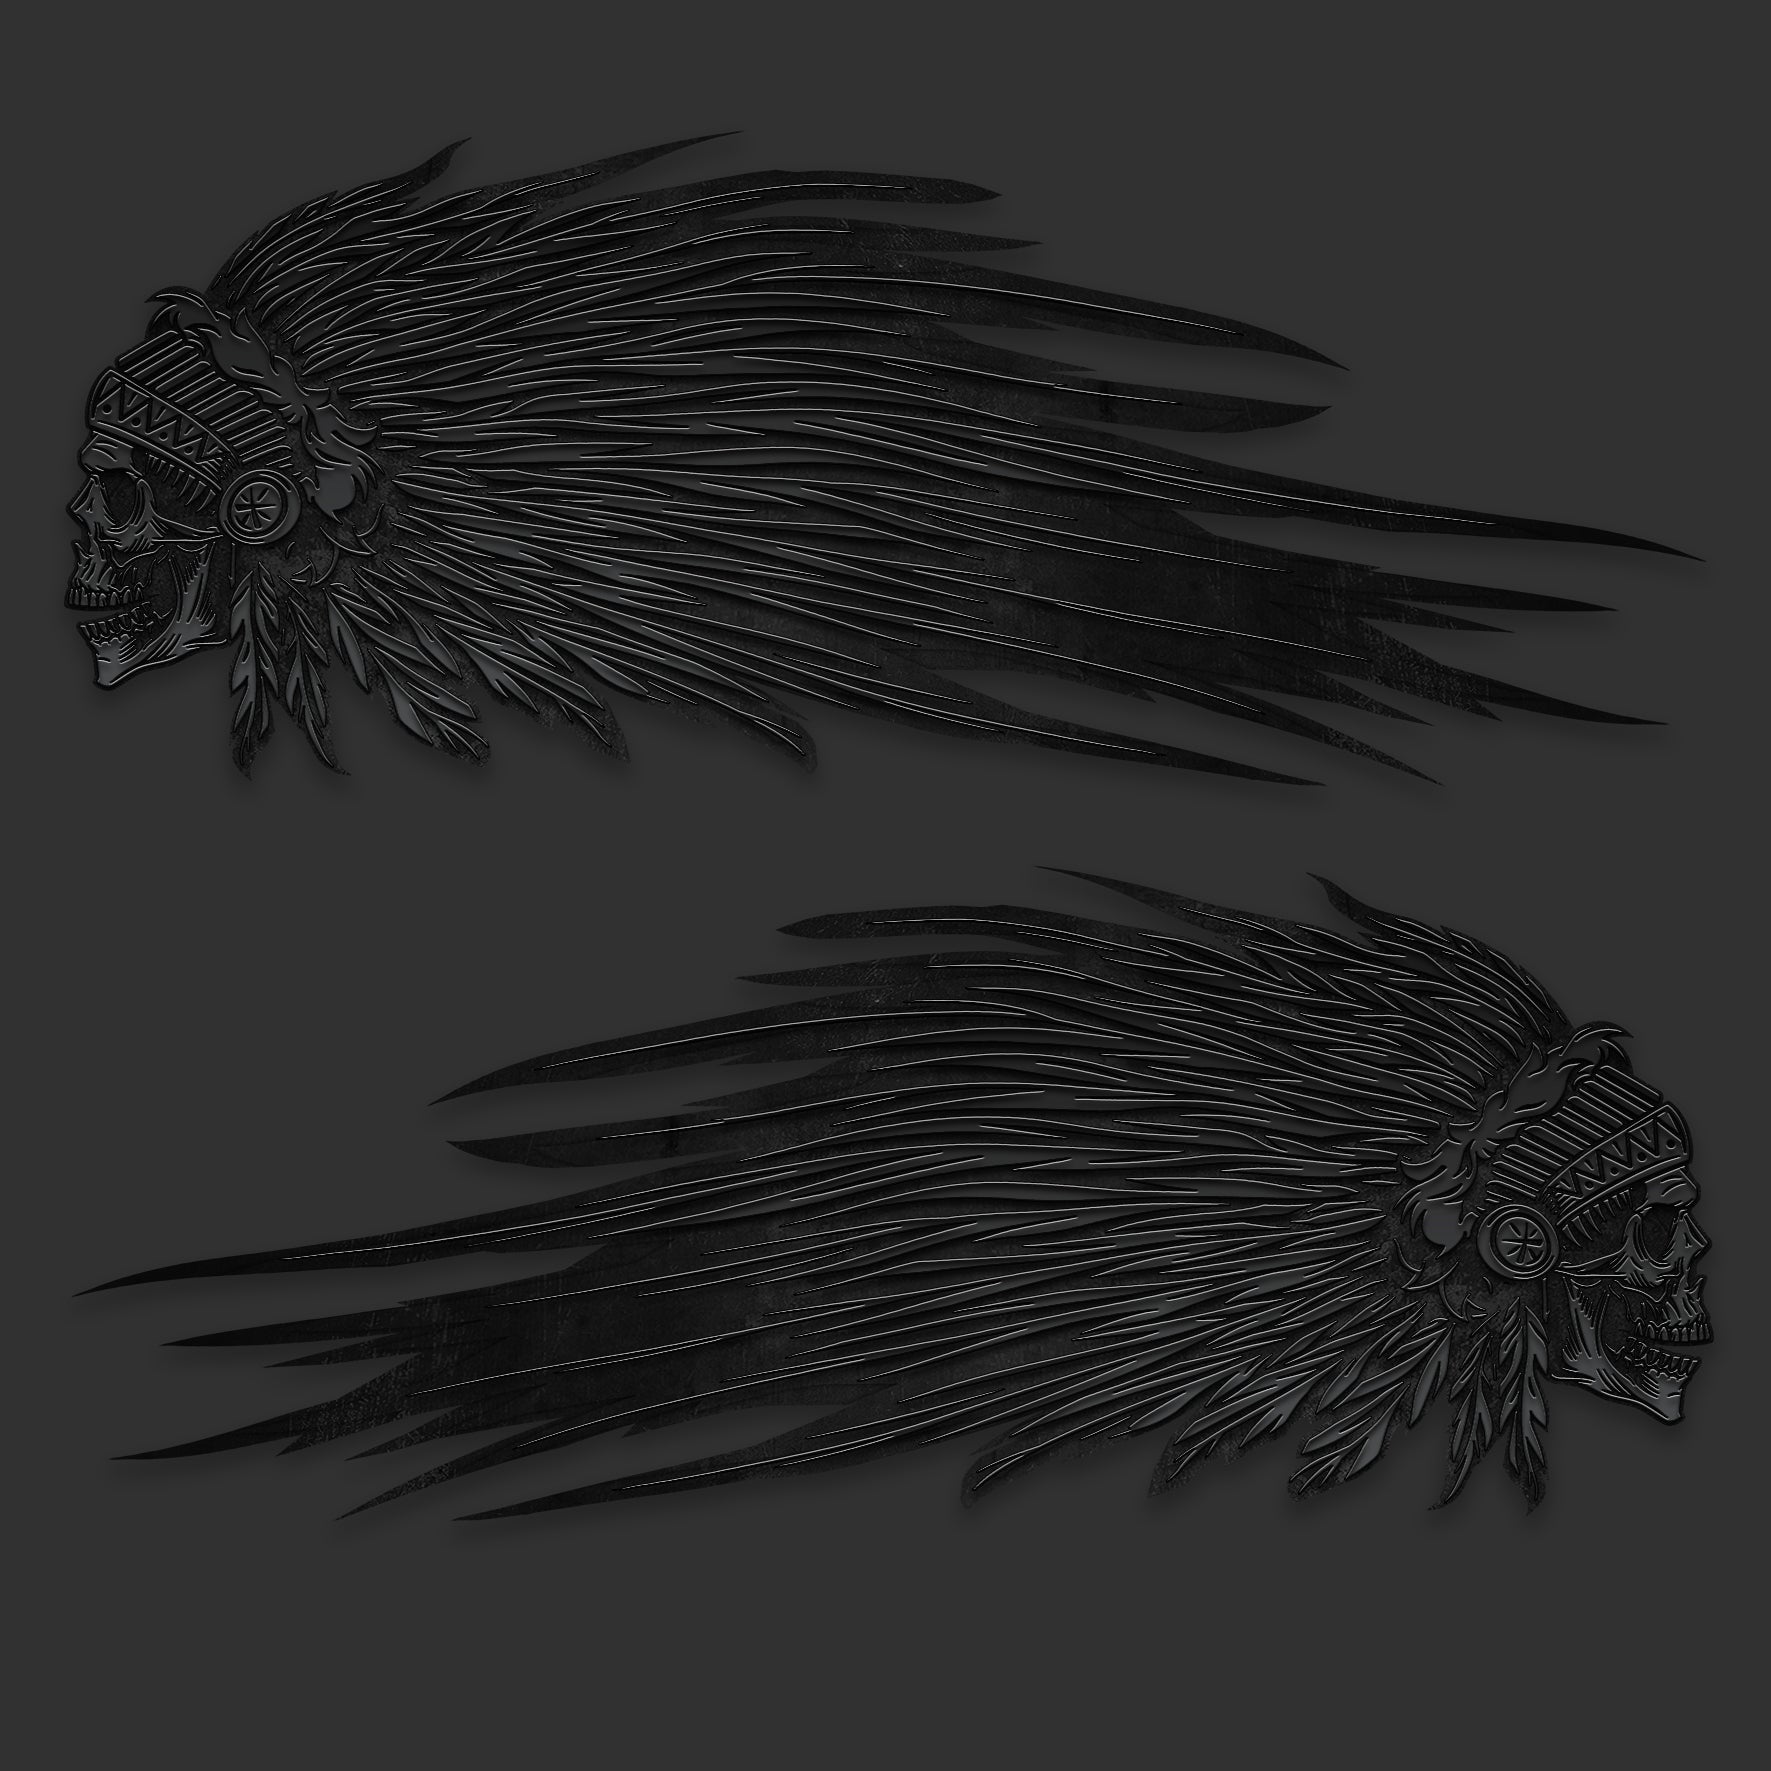
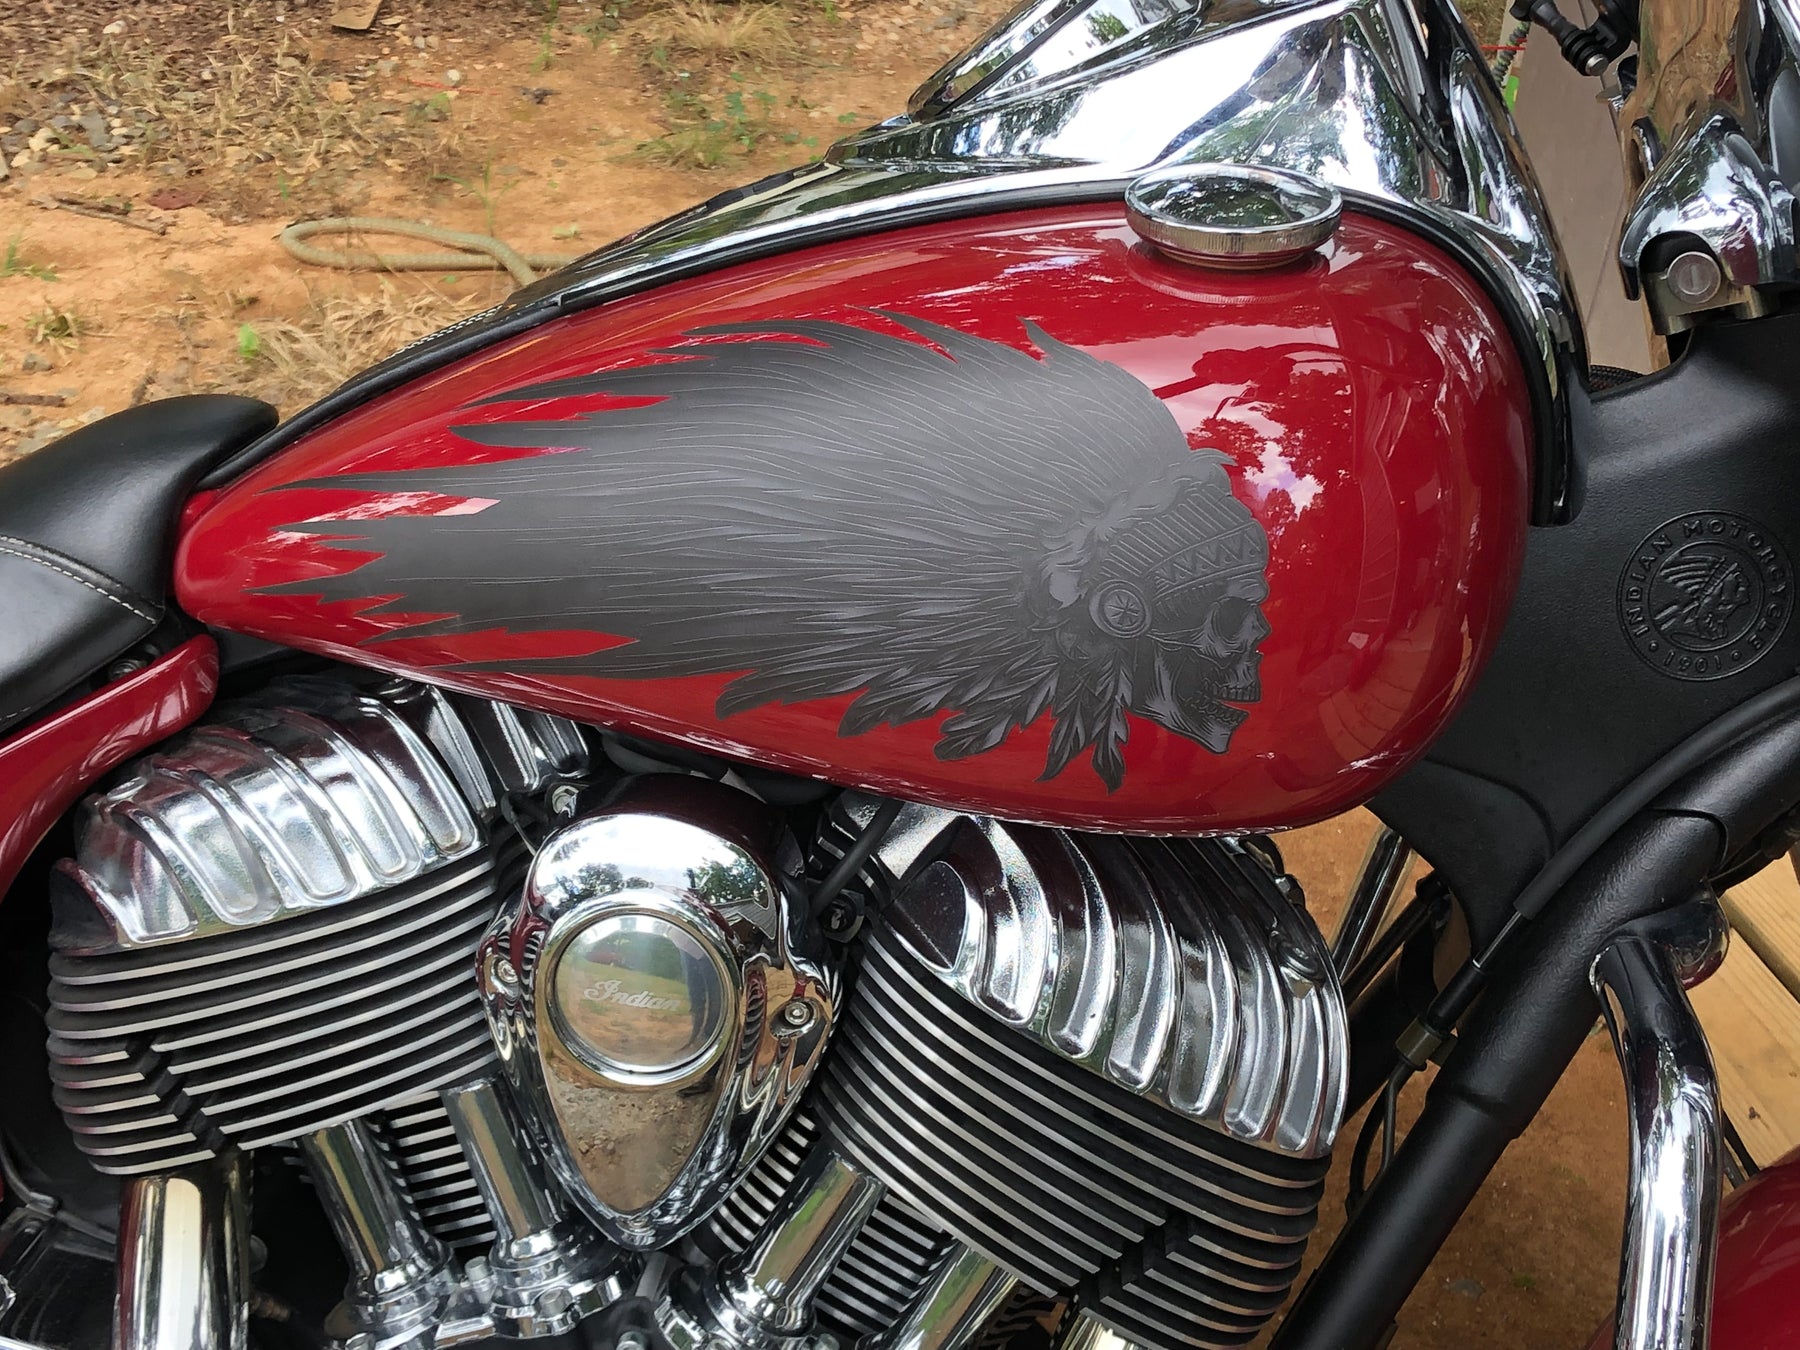
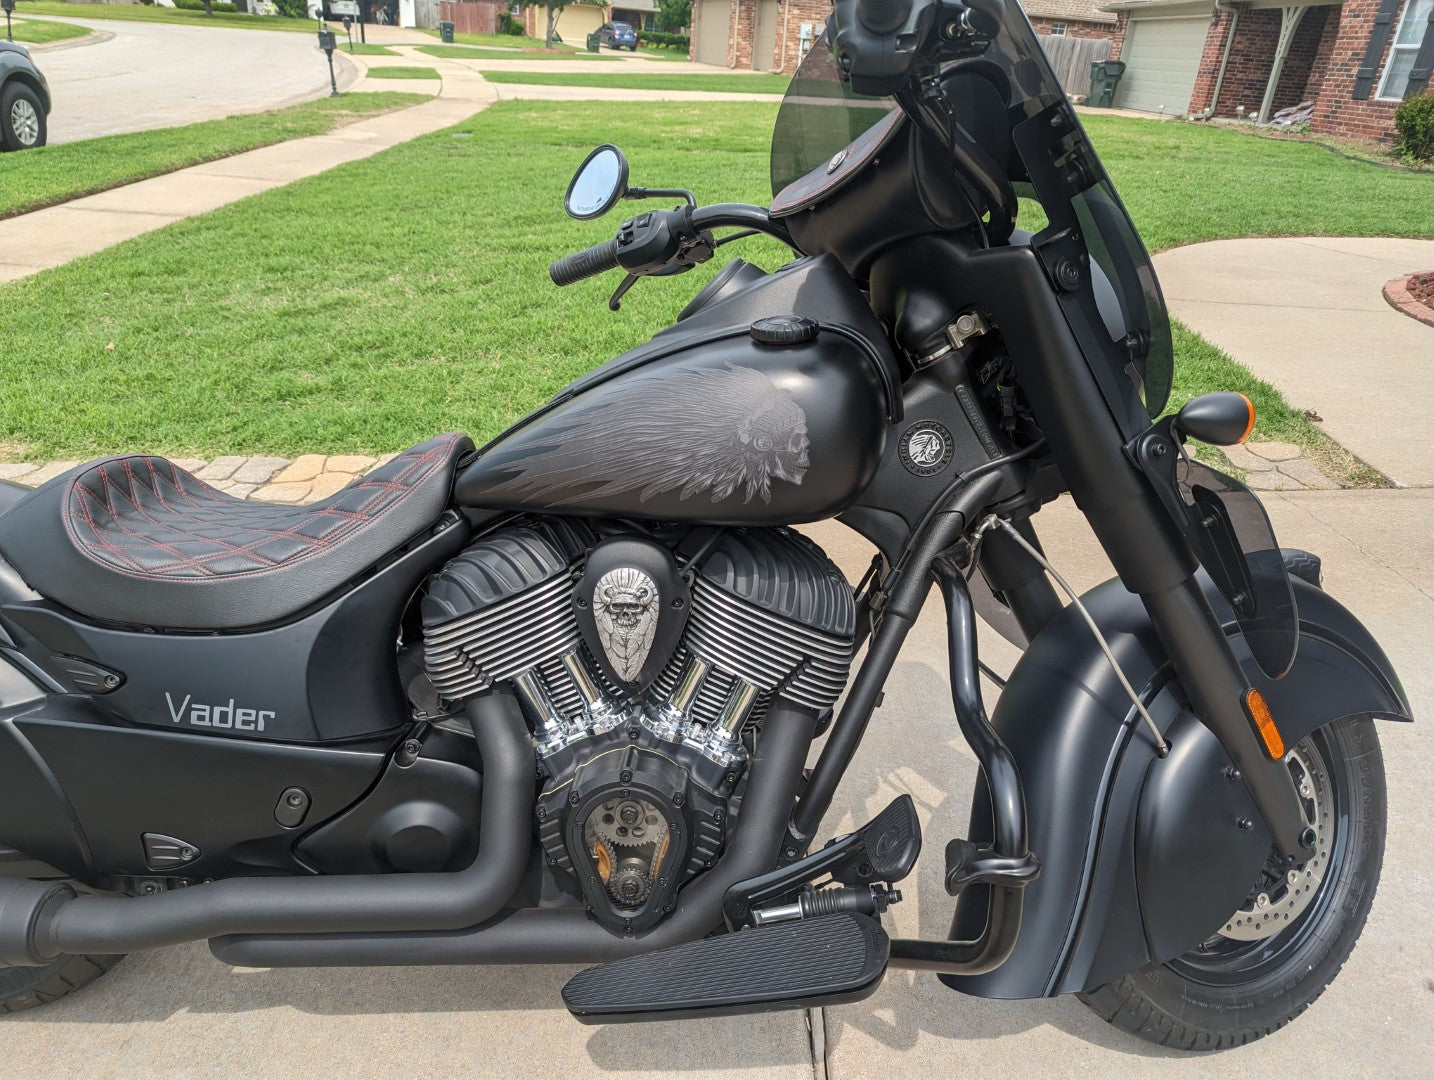
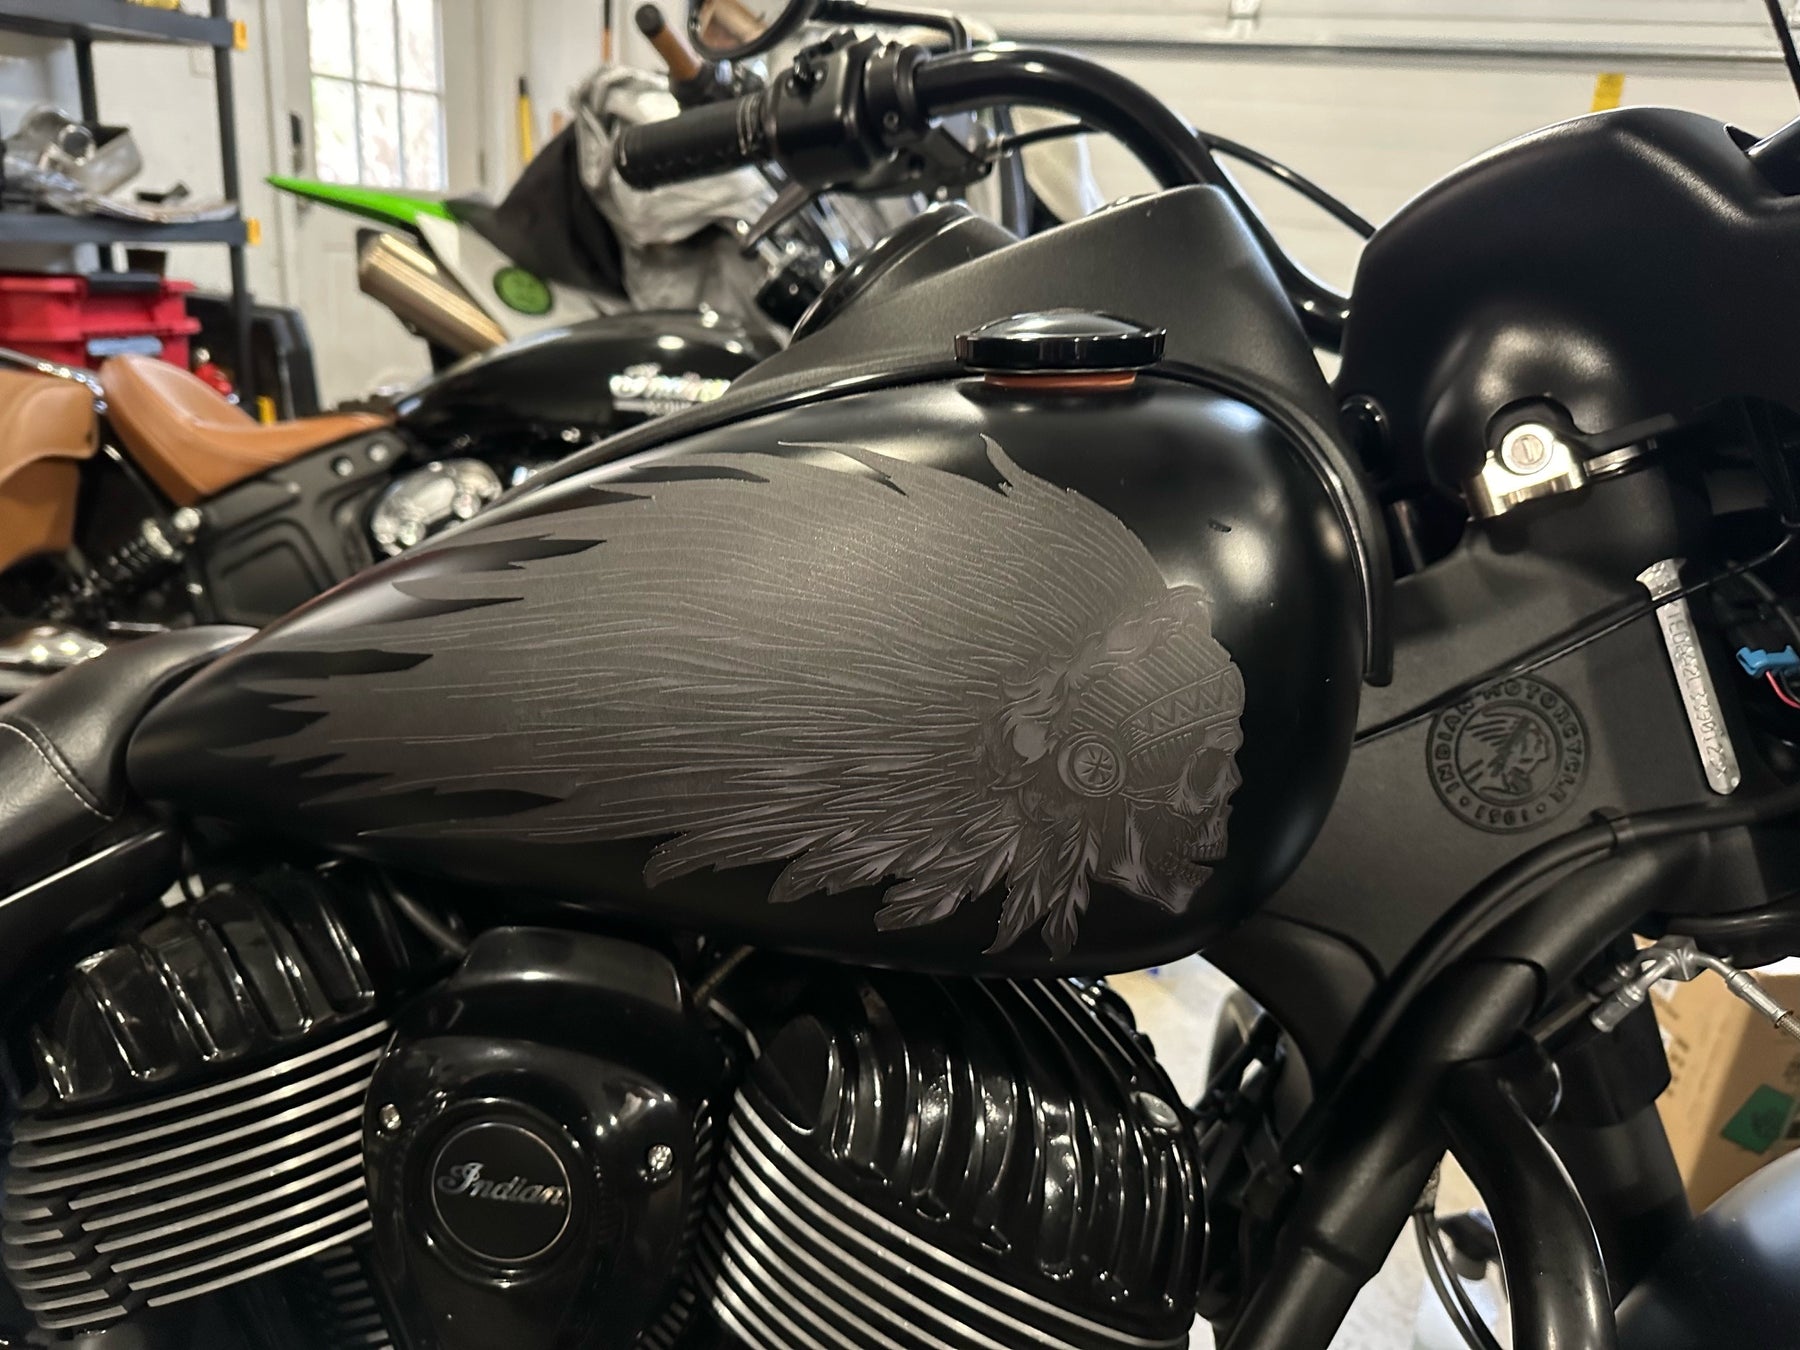
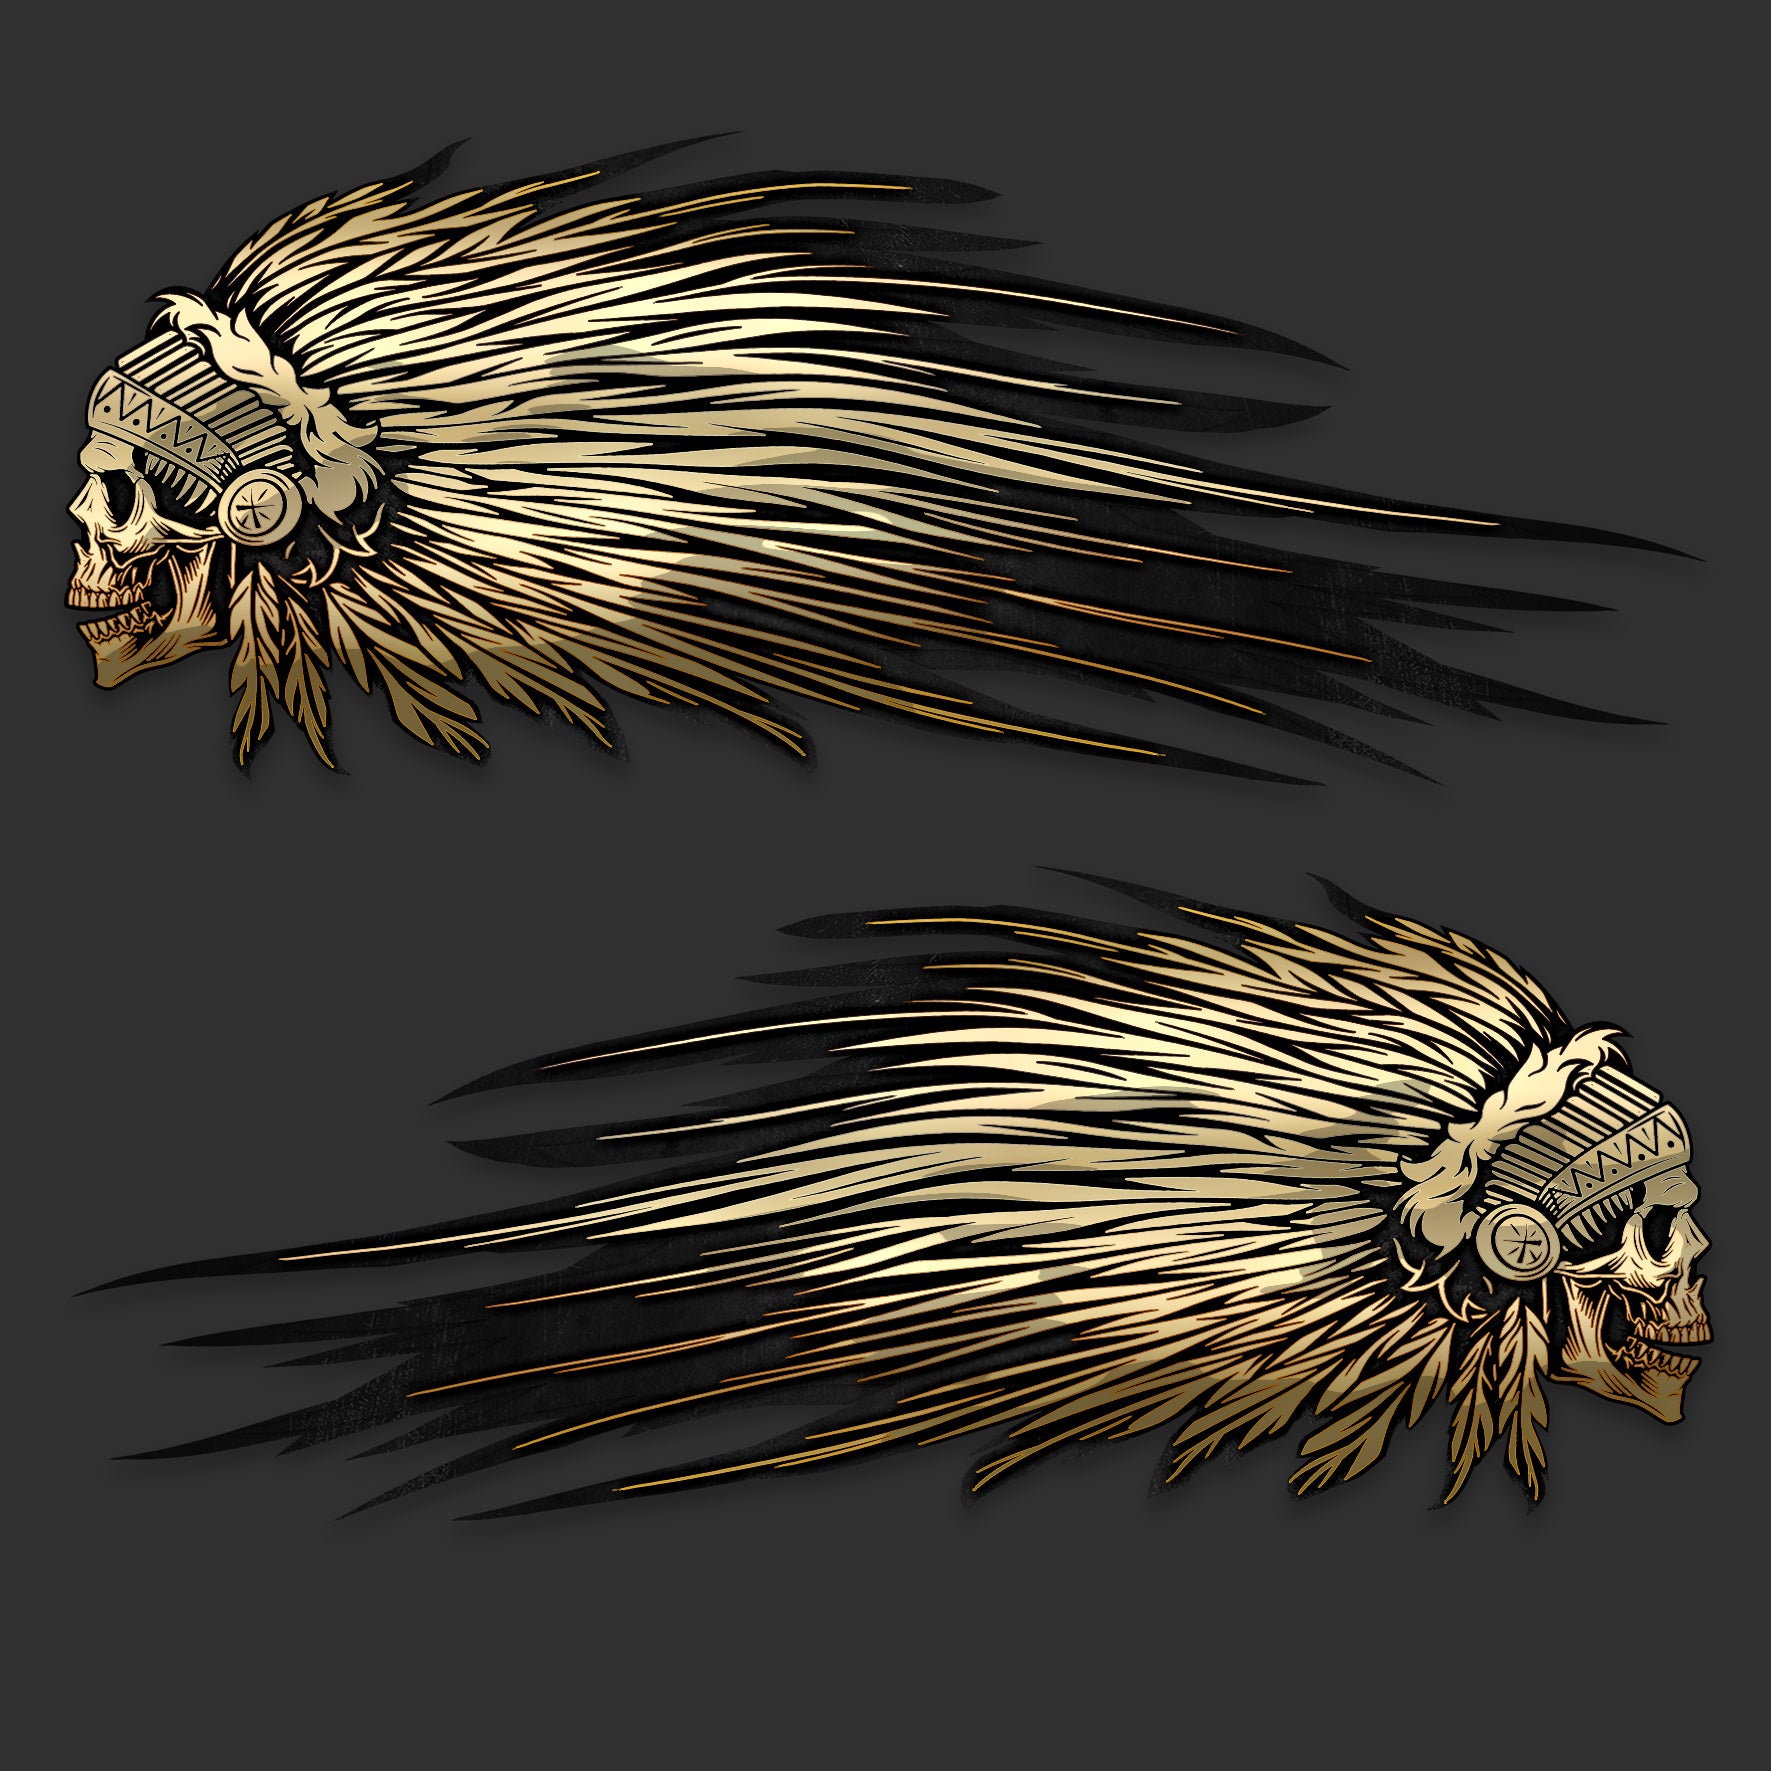
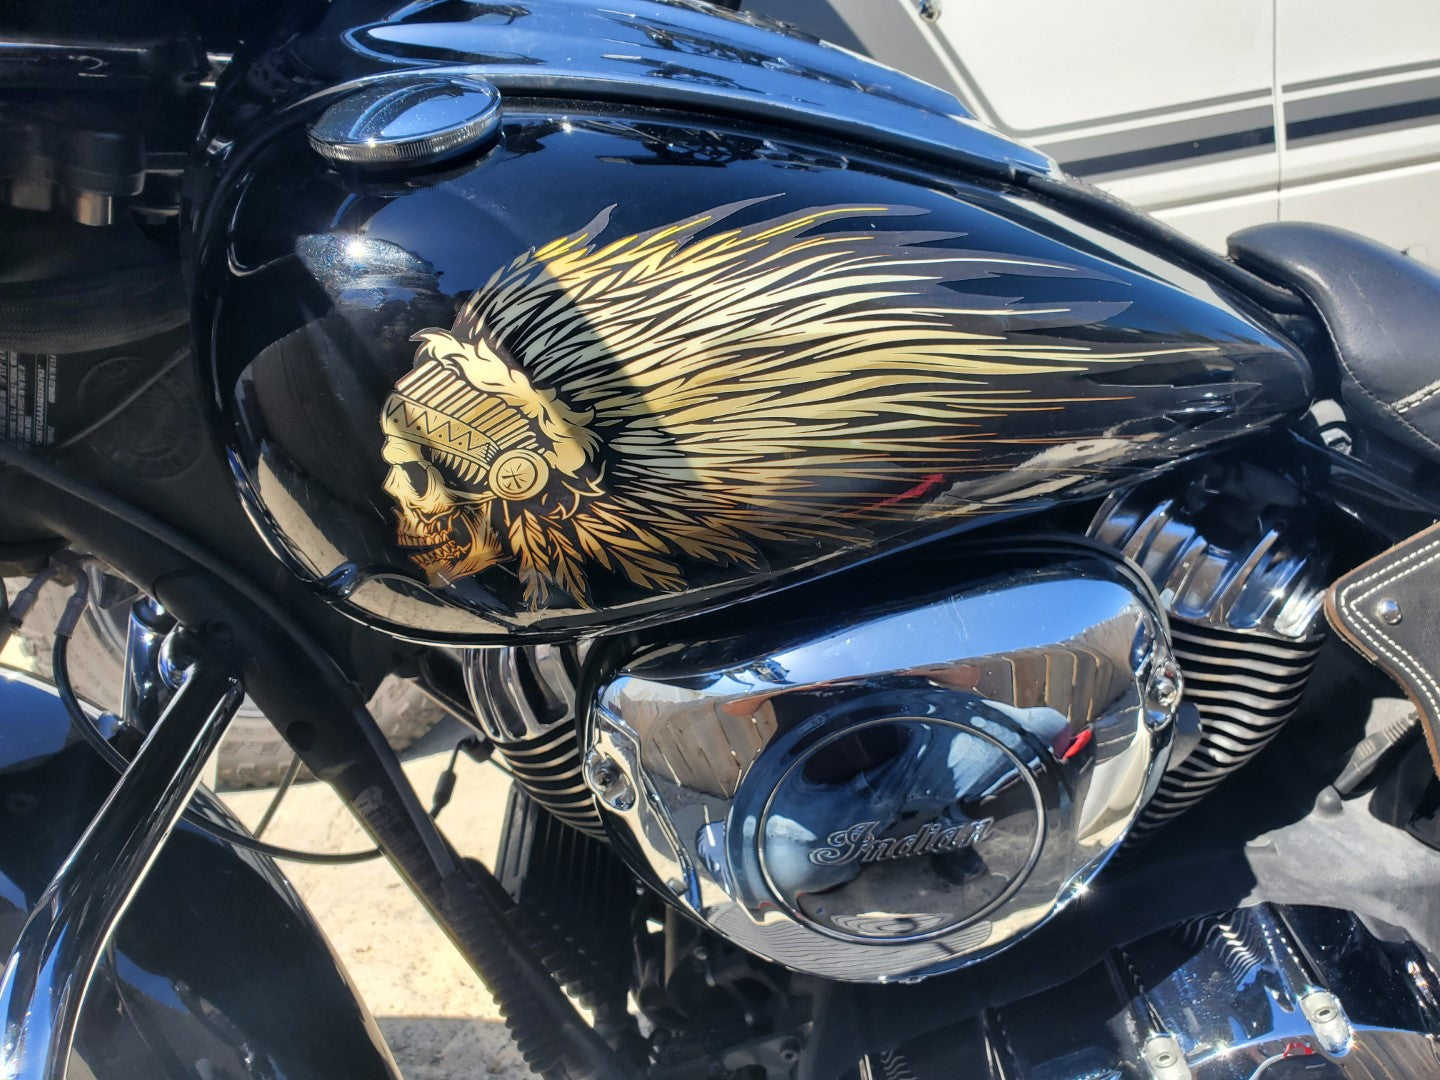
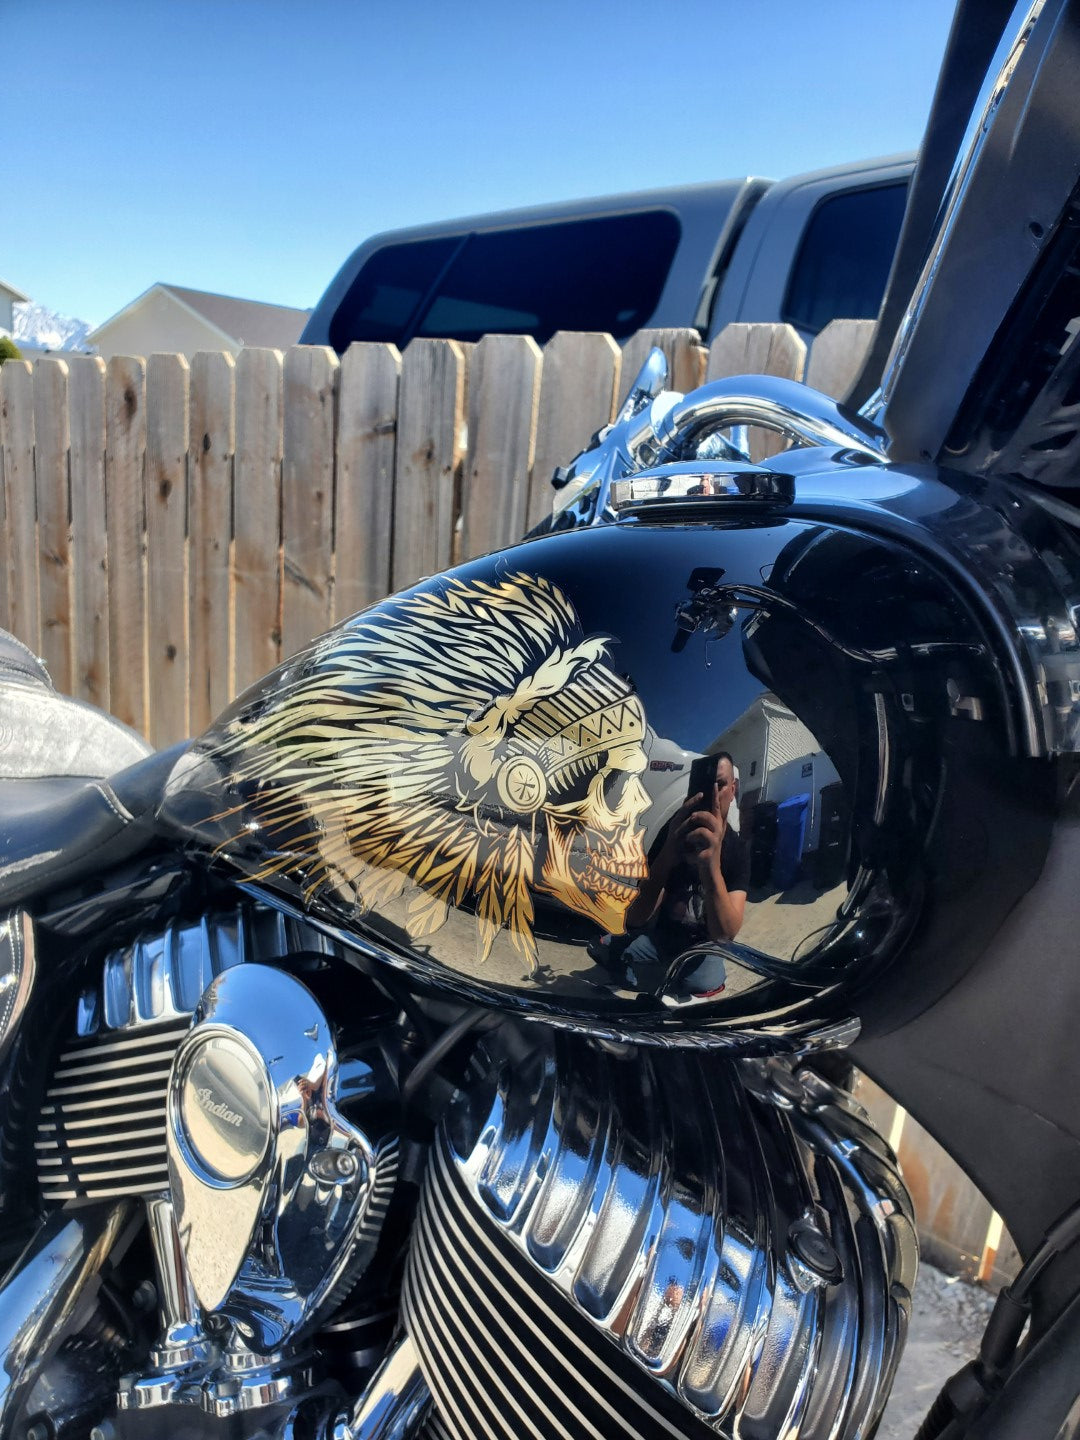
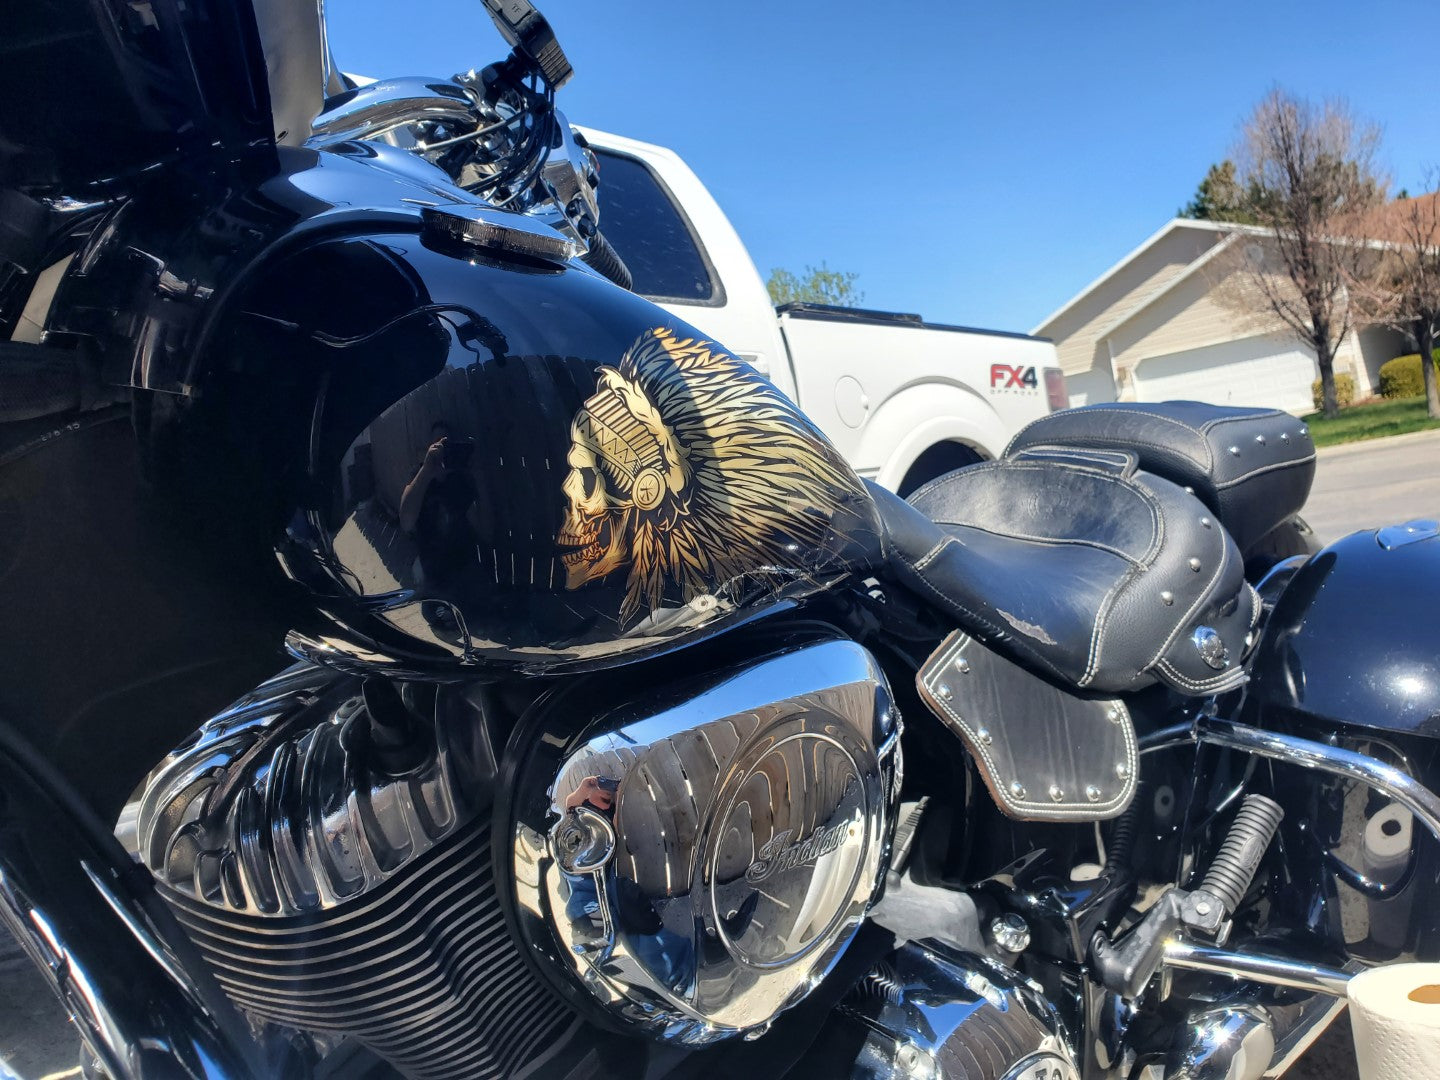
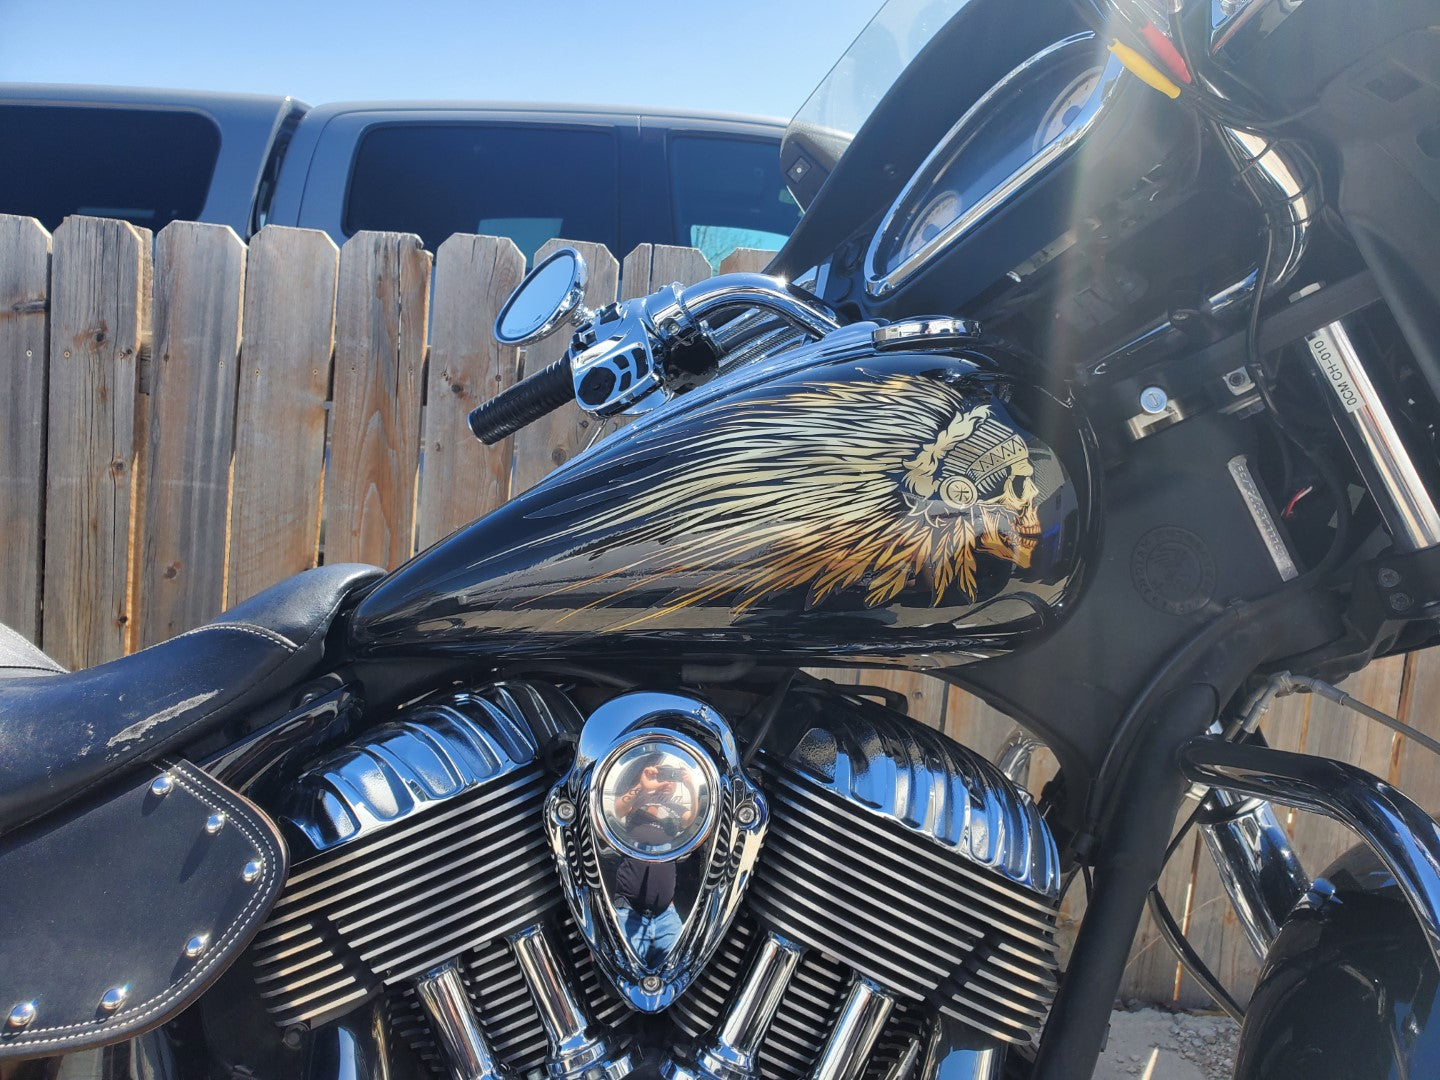
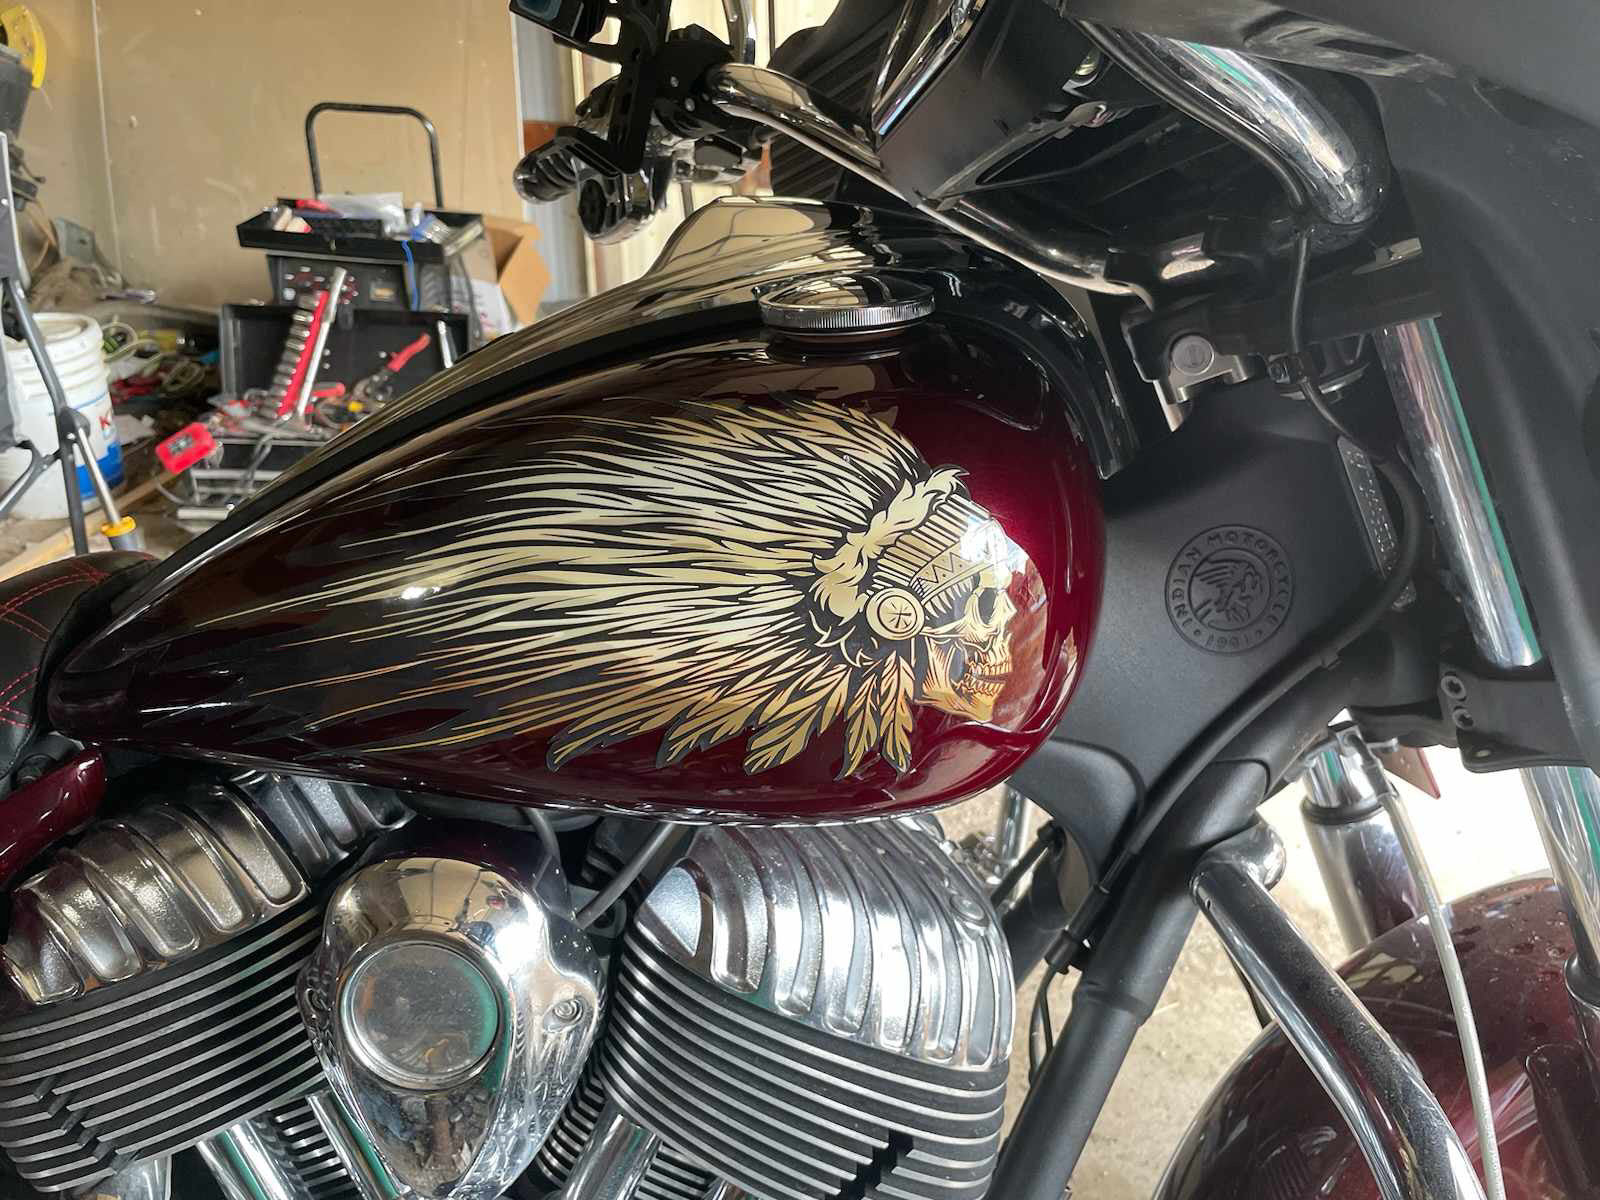
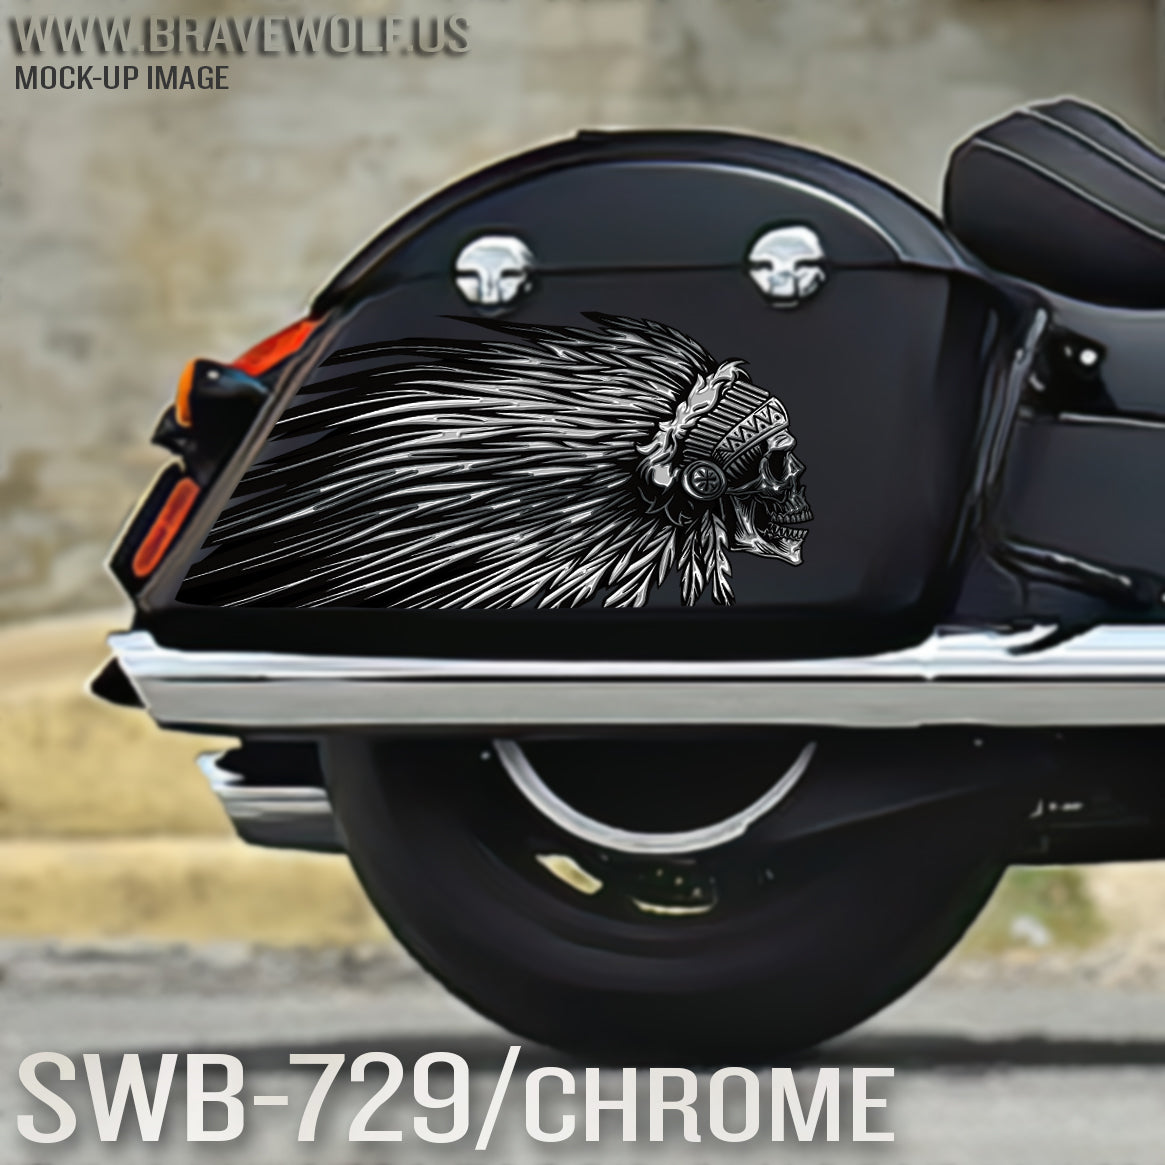
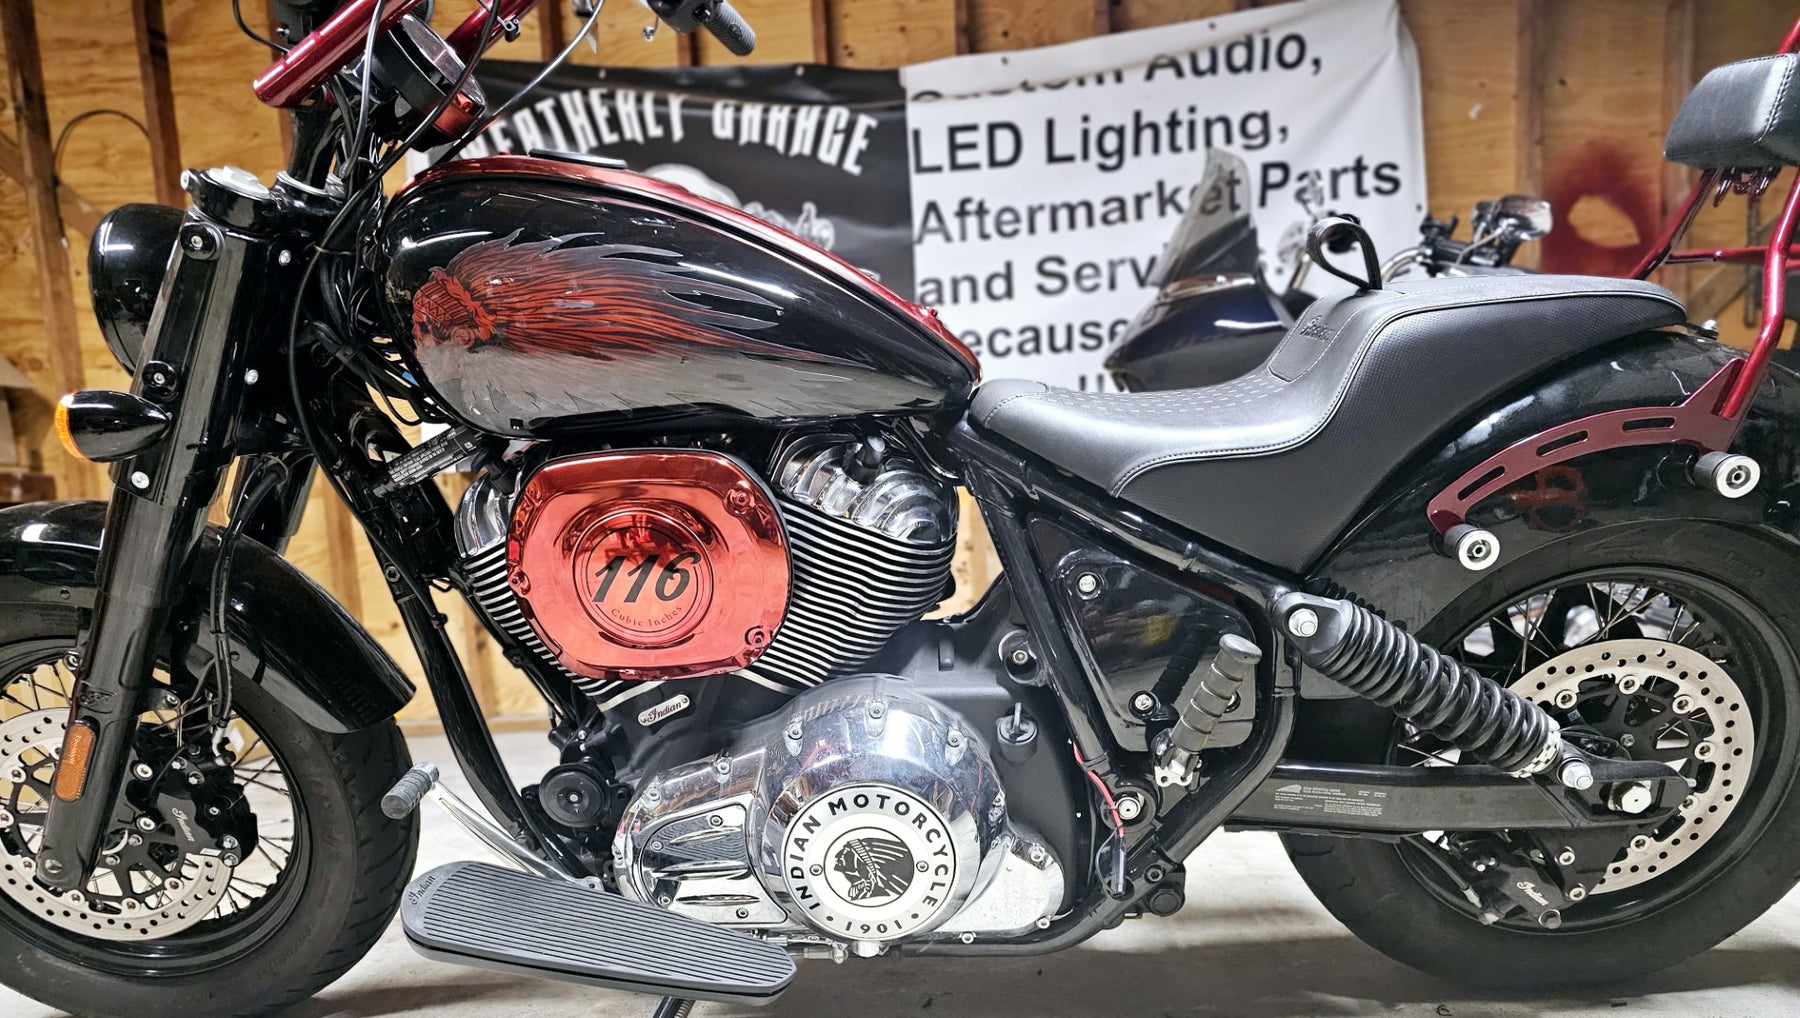
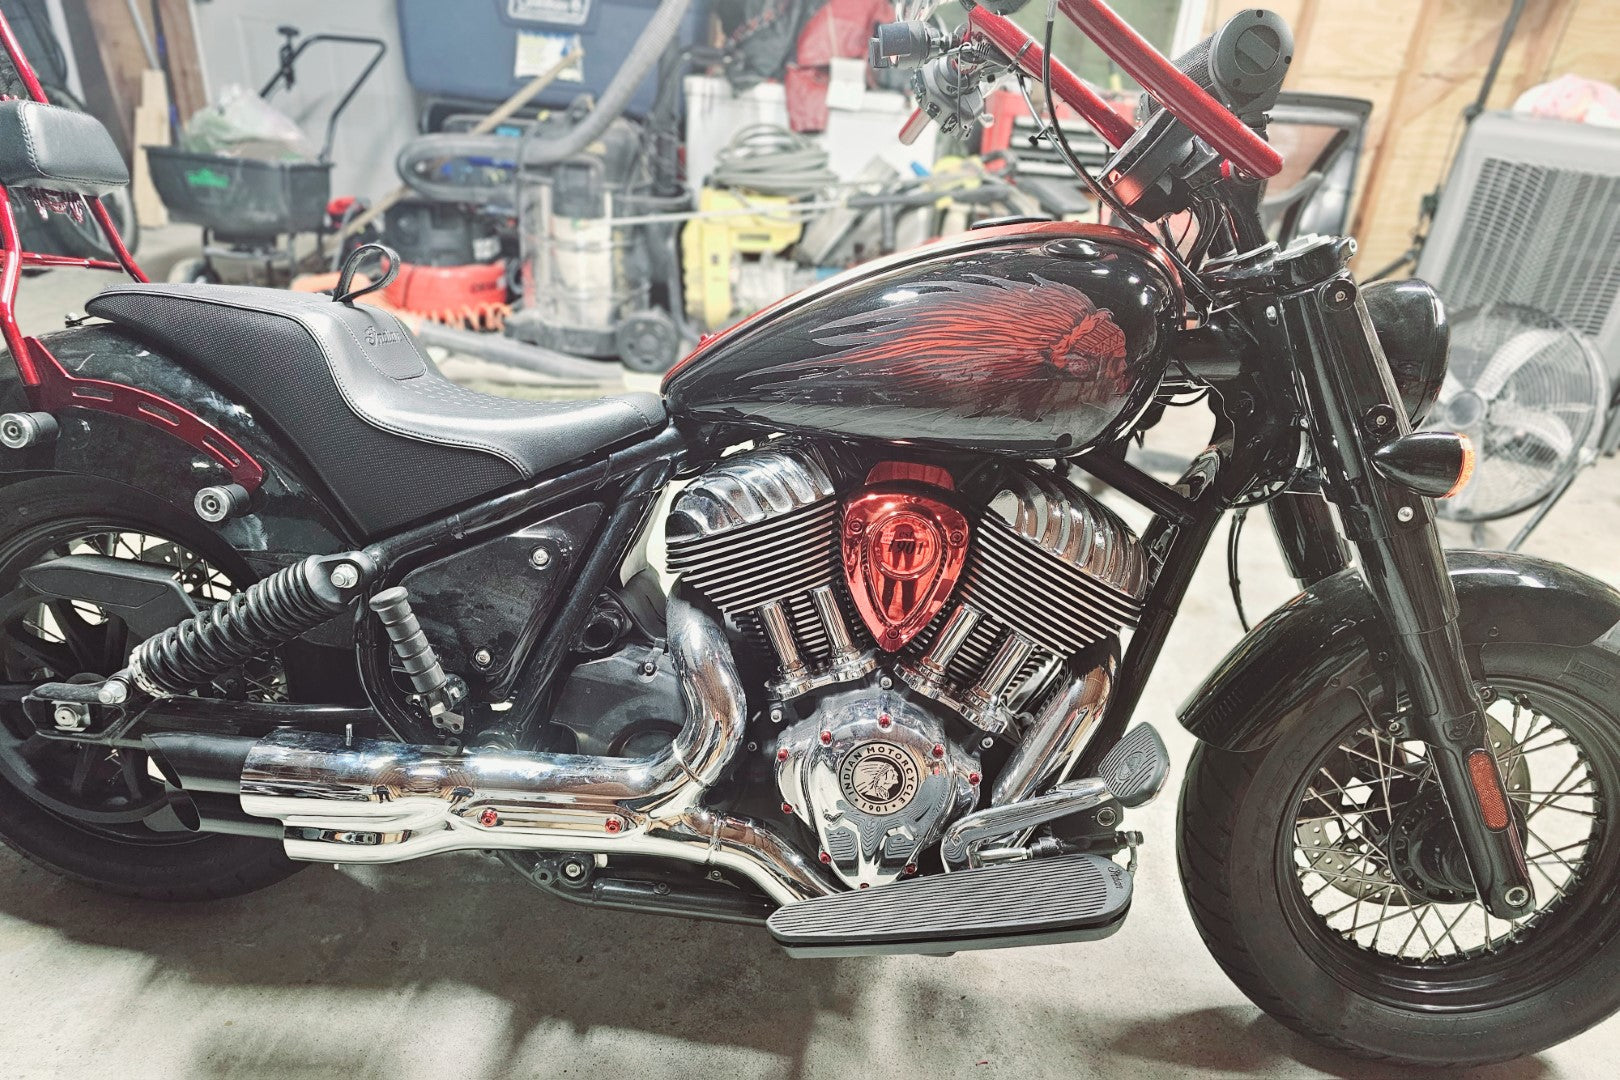
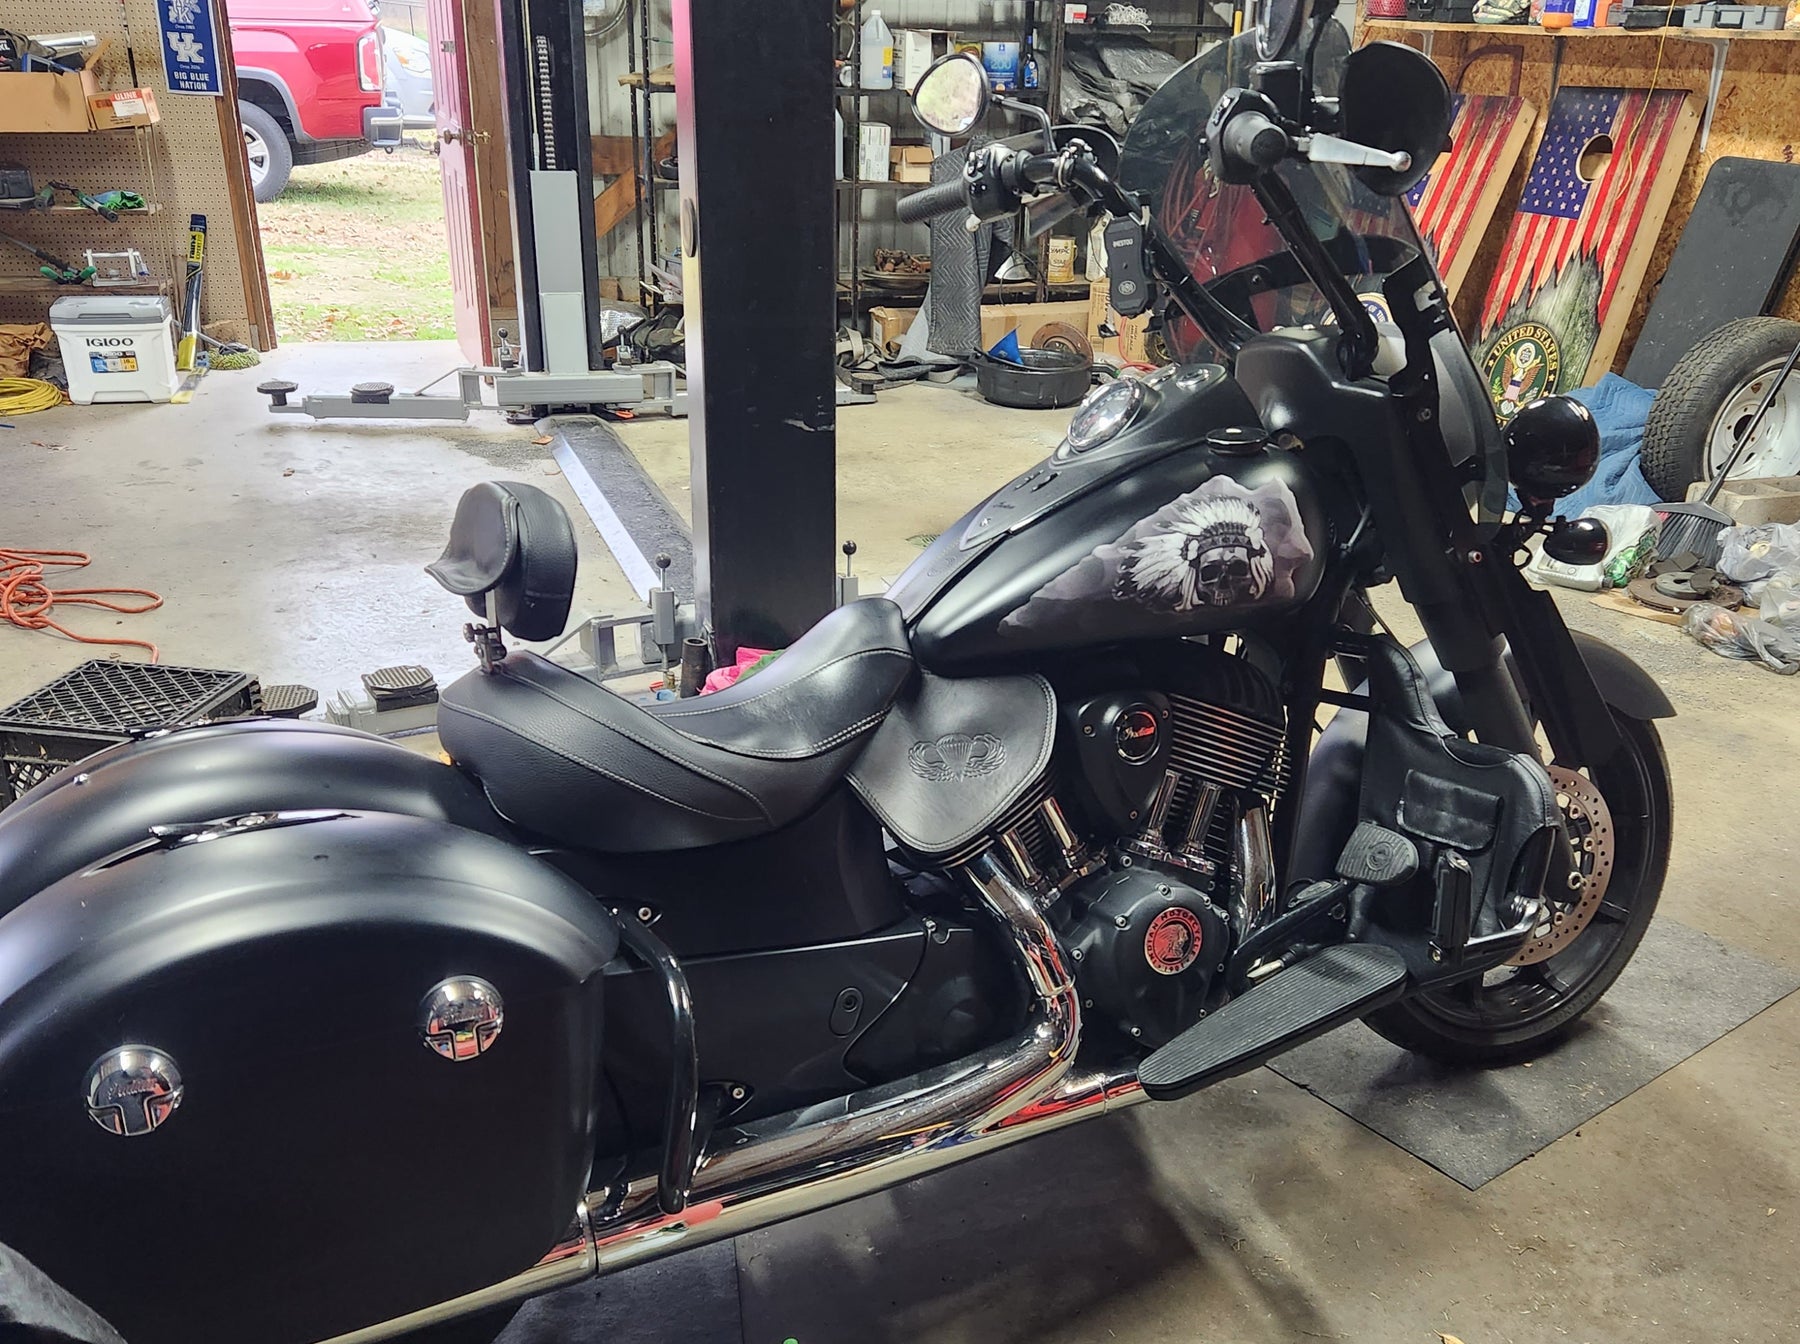
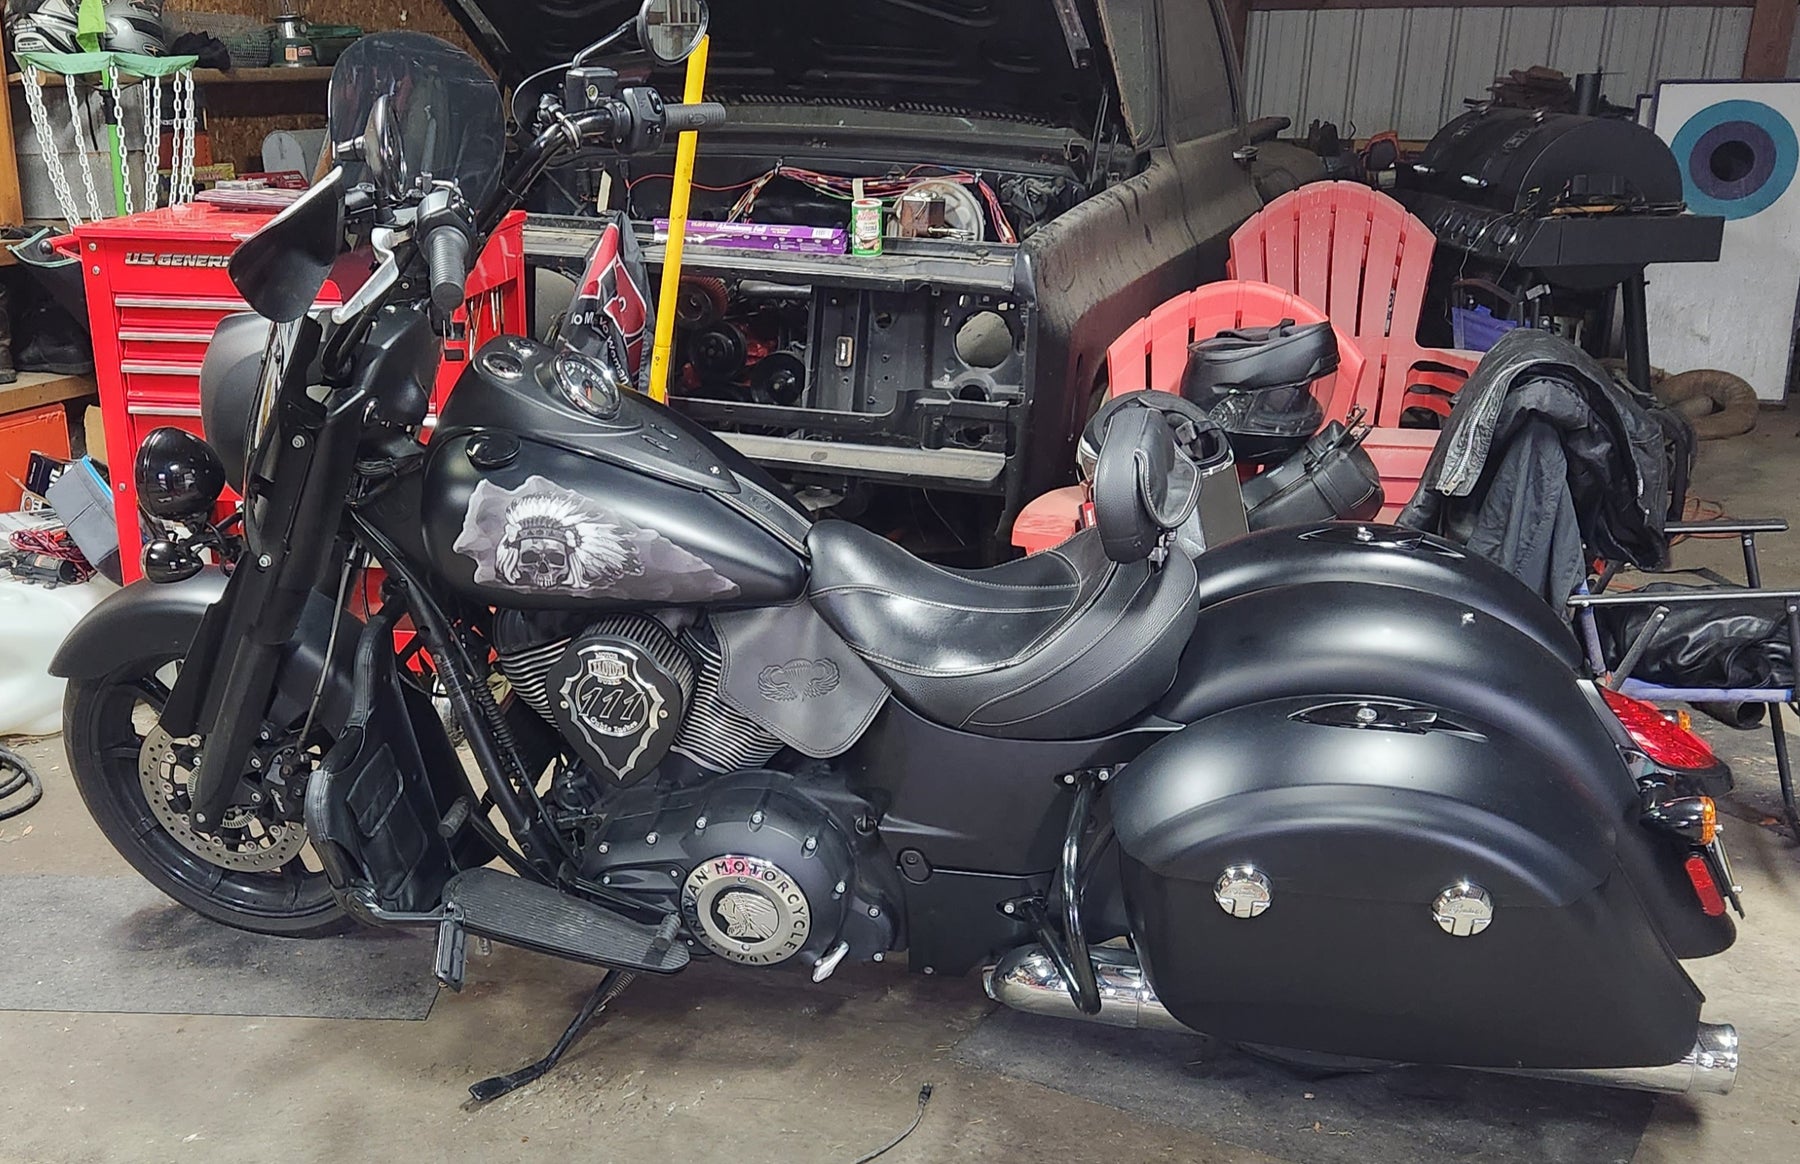
SWB-729-Indian Thunderstroke- Chrome
Regular price $100.00
Shipping calculated at checkout.
Usually in stock (may take 2-3 weeks before shipping if we don't have in stock at the time of your order)
“Chrome" SWB-729 Tank Decal for Indian Thunderstroke Models (IE: Roadmaster, Chieftain, Chief, Springfield, Classic, etc)
Also fits the Indian FTR
Size: Covers the OEM headdress on models that have it. For models that have emblem badges or script, this will need to be removed before applying the decals.
Weatherproof laminated decals are self adhesive.


How To Install: <-Visit our How To page for videos
We recommend using the wet method to install larger decals: A spray bottle with water and dish soap can be used to wet the tank and the back of the decal, allowing you to slide the decal into place. To get the proper soap/water mix, start with a squirt of soap into your spray bottle. Shake it up and then spray it on your hand. Rub your finger tips together. You should feel the slipperiness of the soap. If it just feels like water, add more soap and try again. Once you have it aligned properly, use a squeegee or some non-abrasive tool (even your fingers) to push the moisture out from behind the decal and it will adhere to your tank. A plastic putty scraper with a thin cloth wrapped around it will work great and prevent scratching your decals.


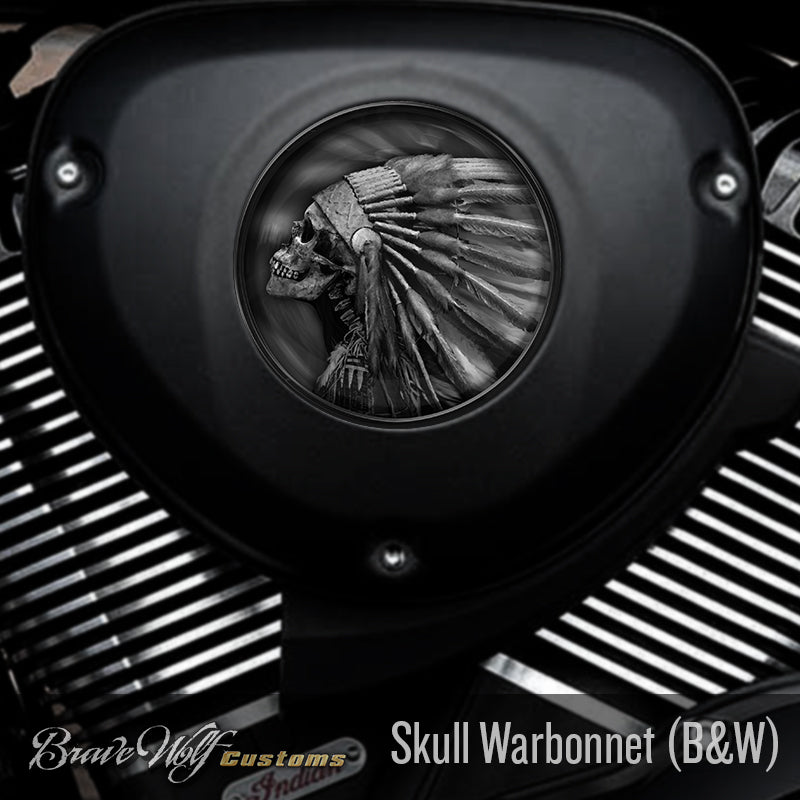

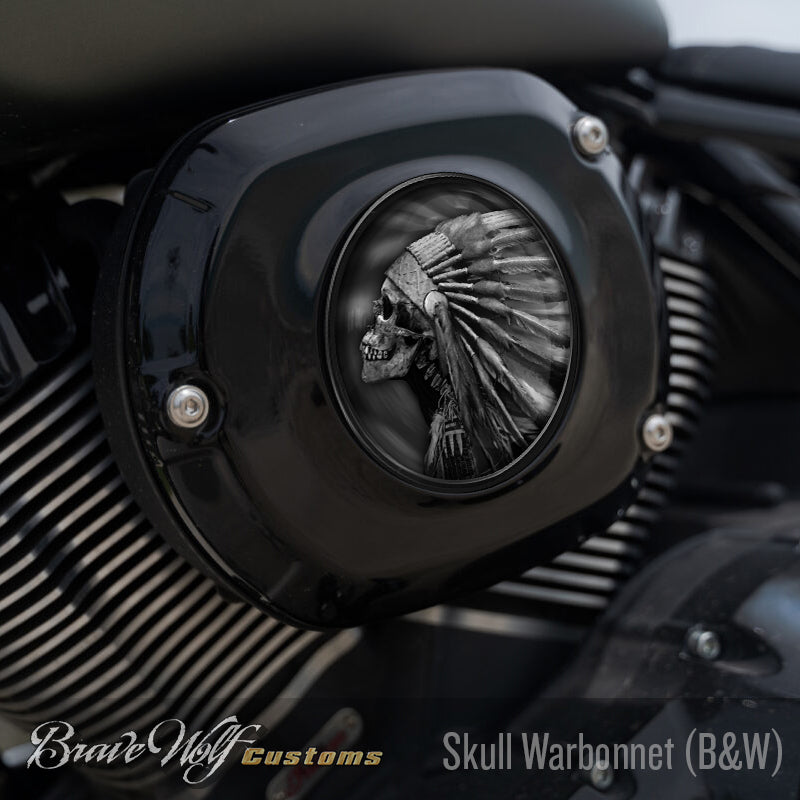
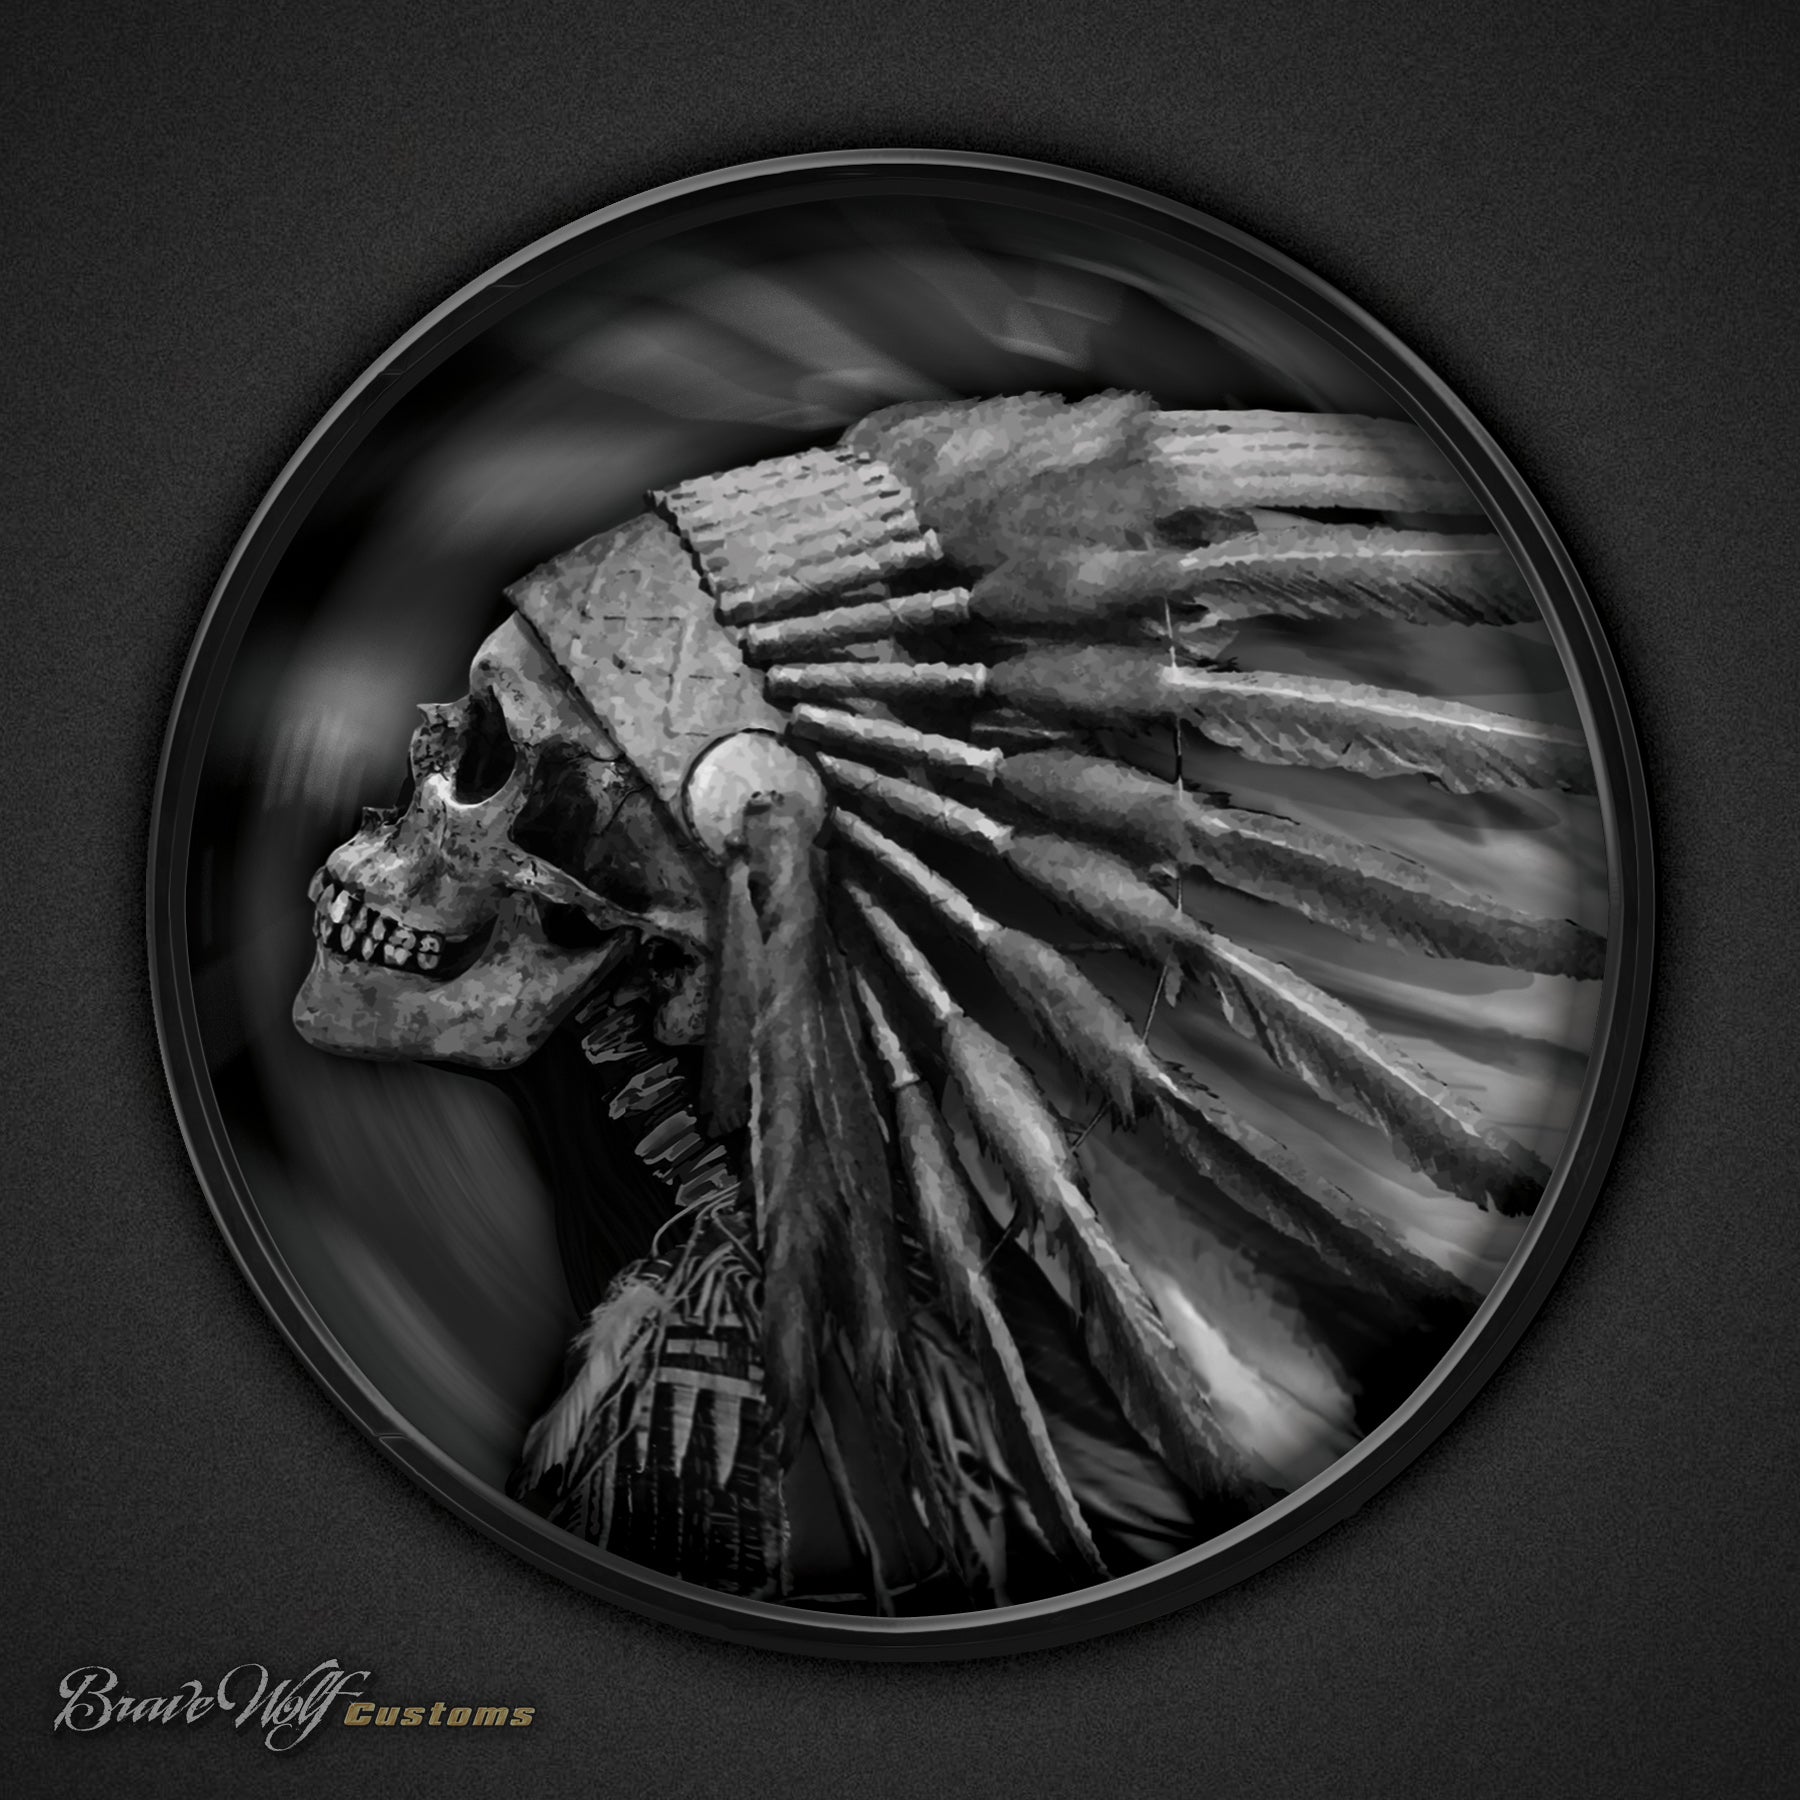
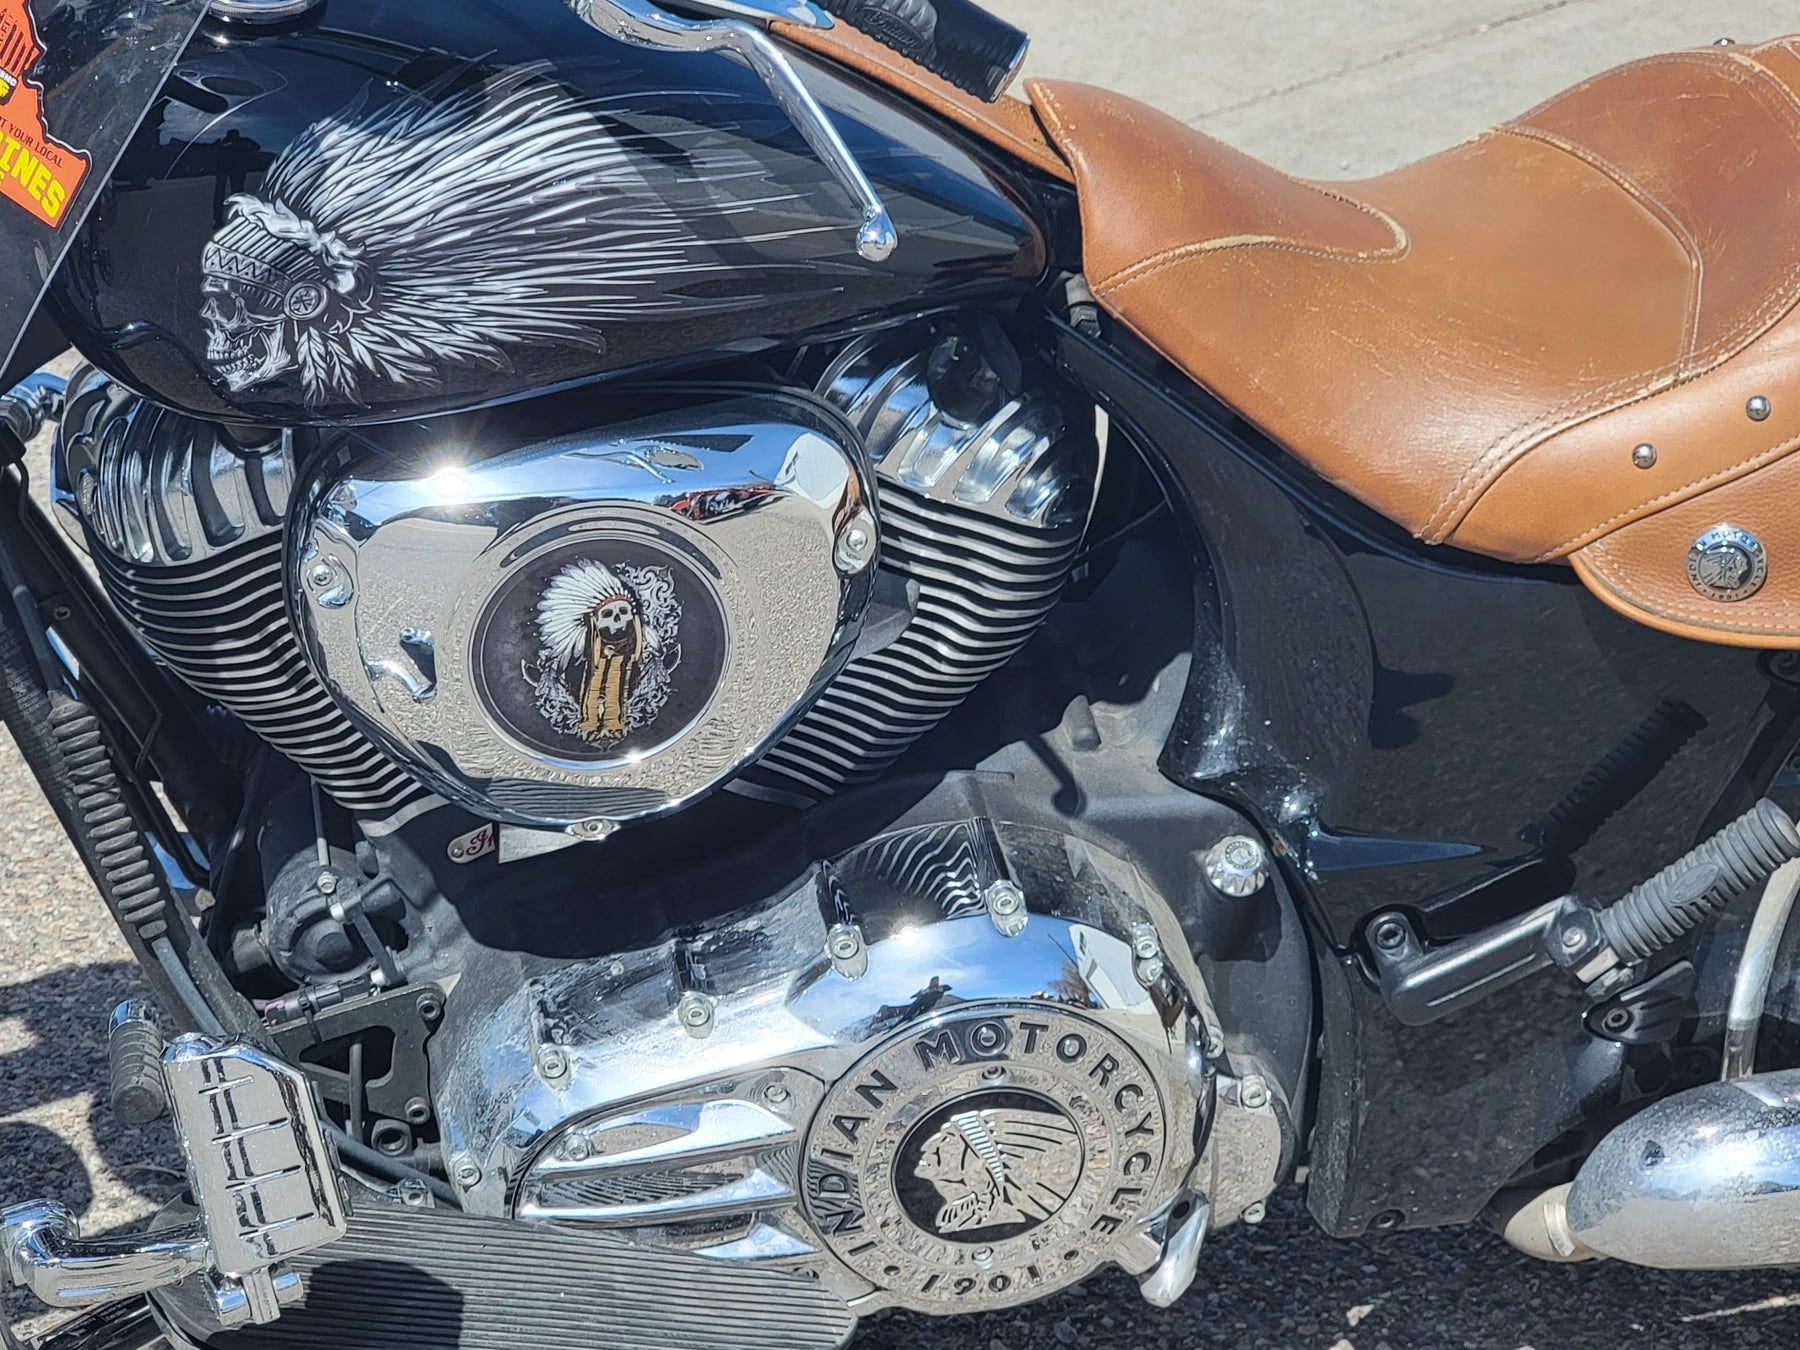
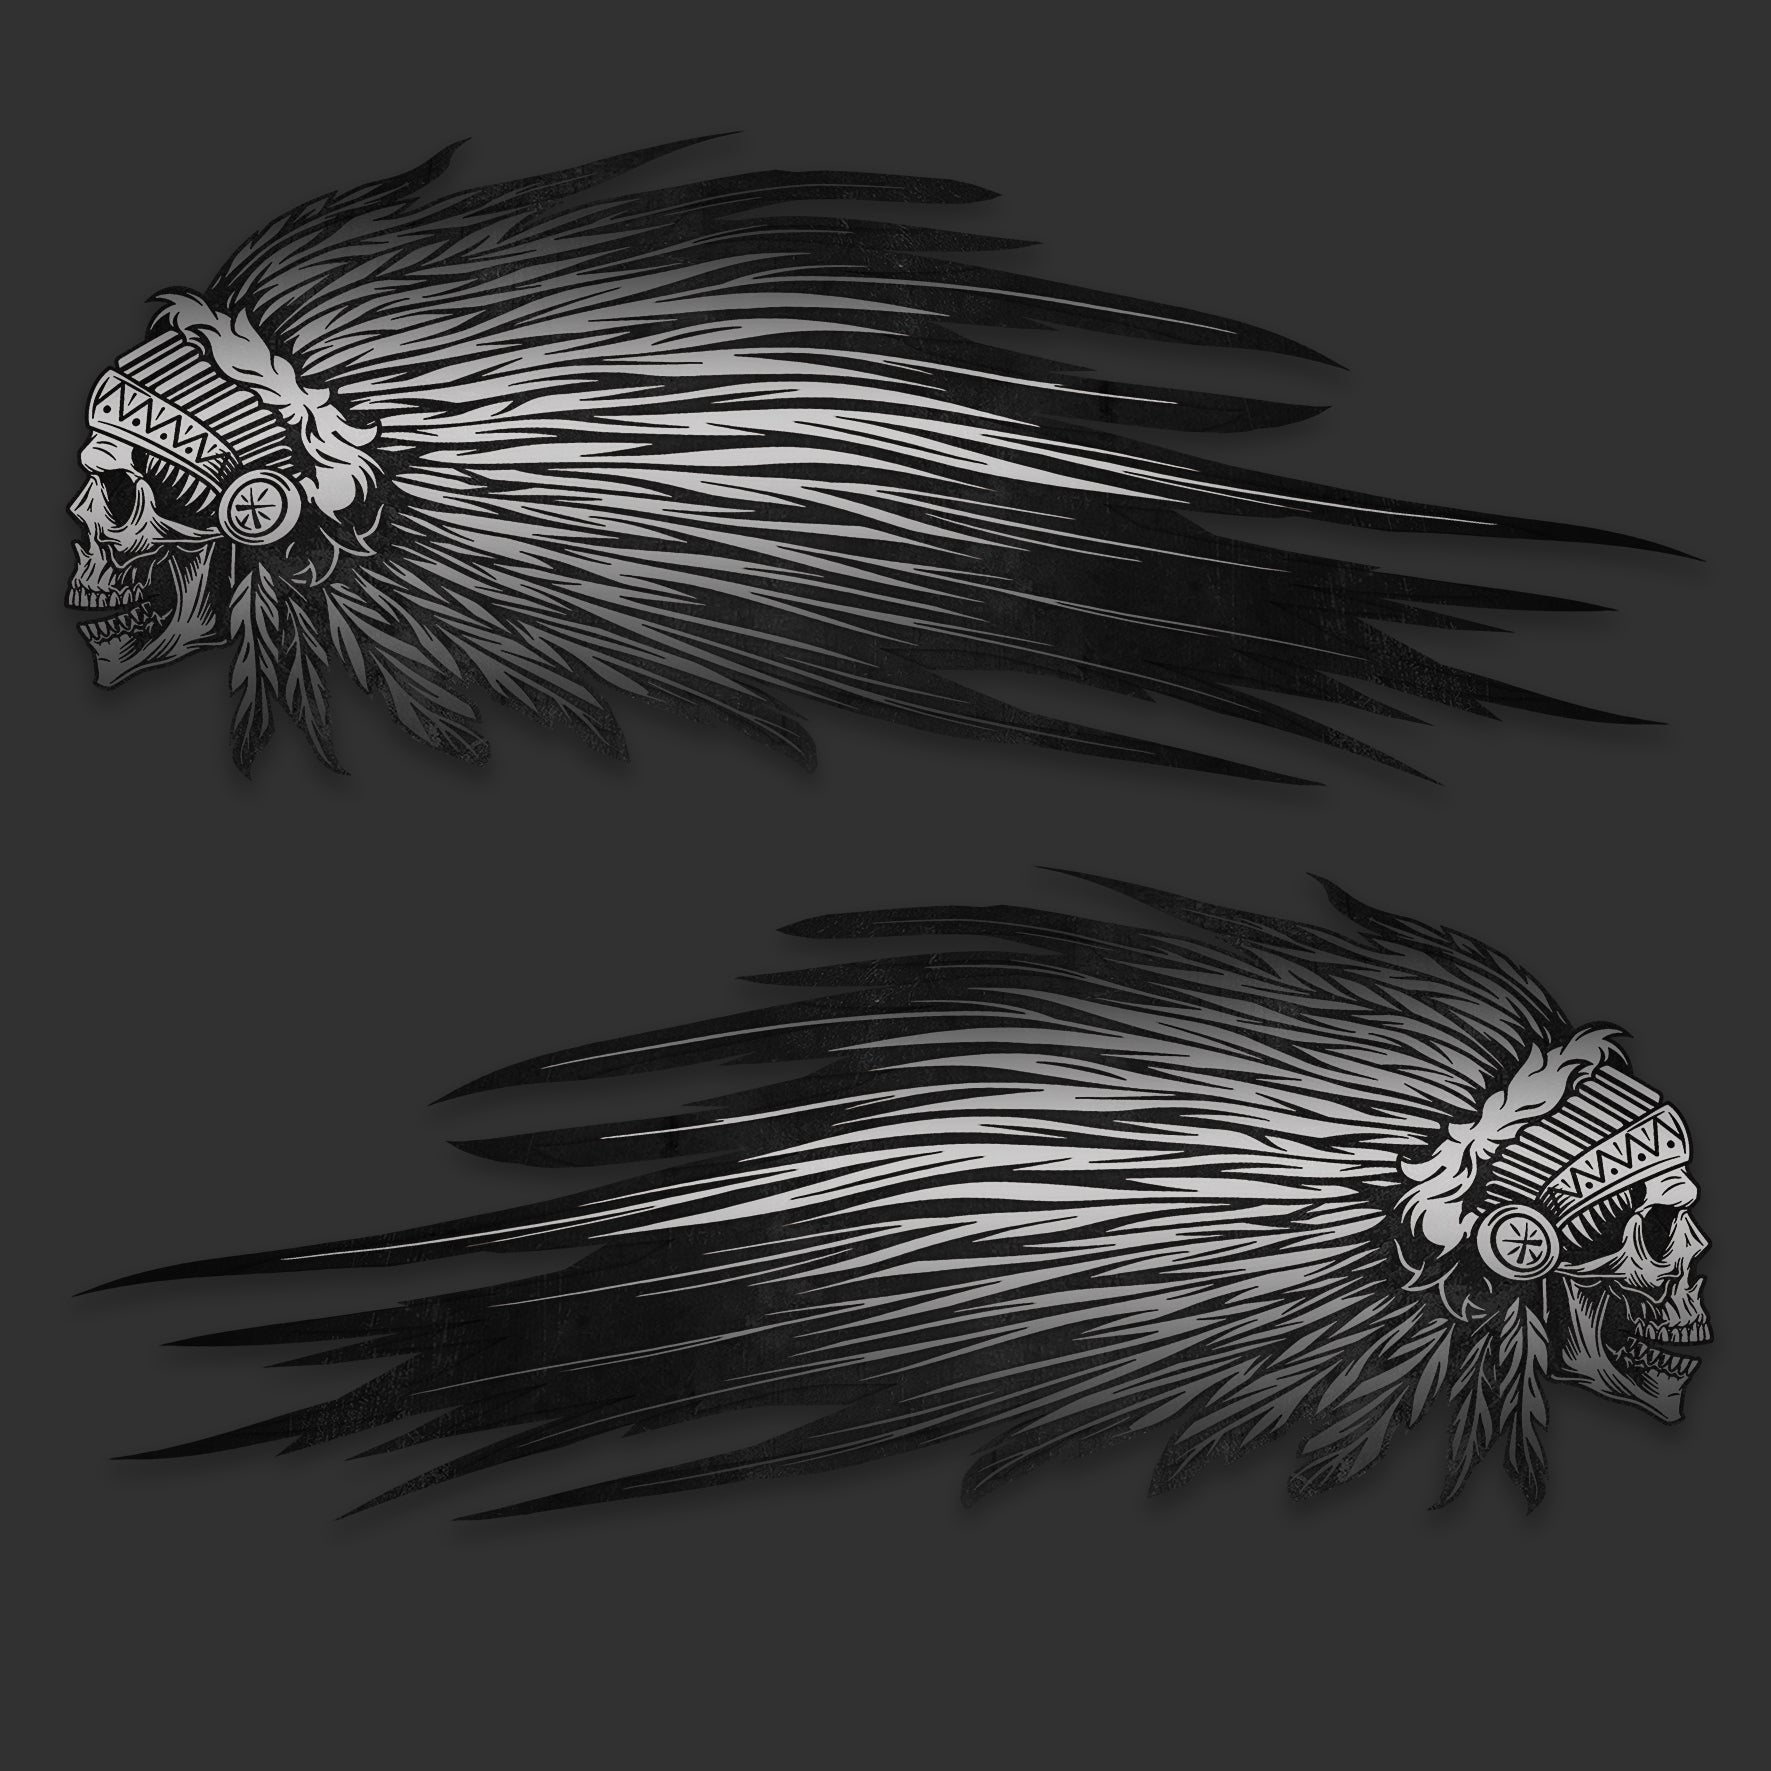
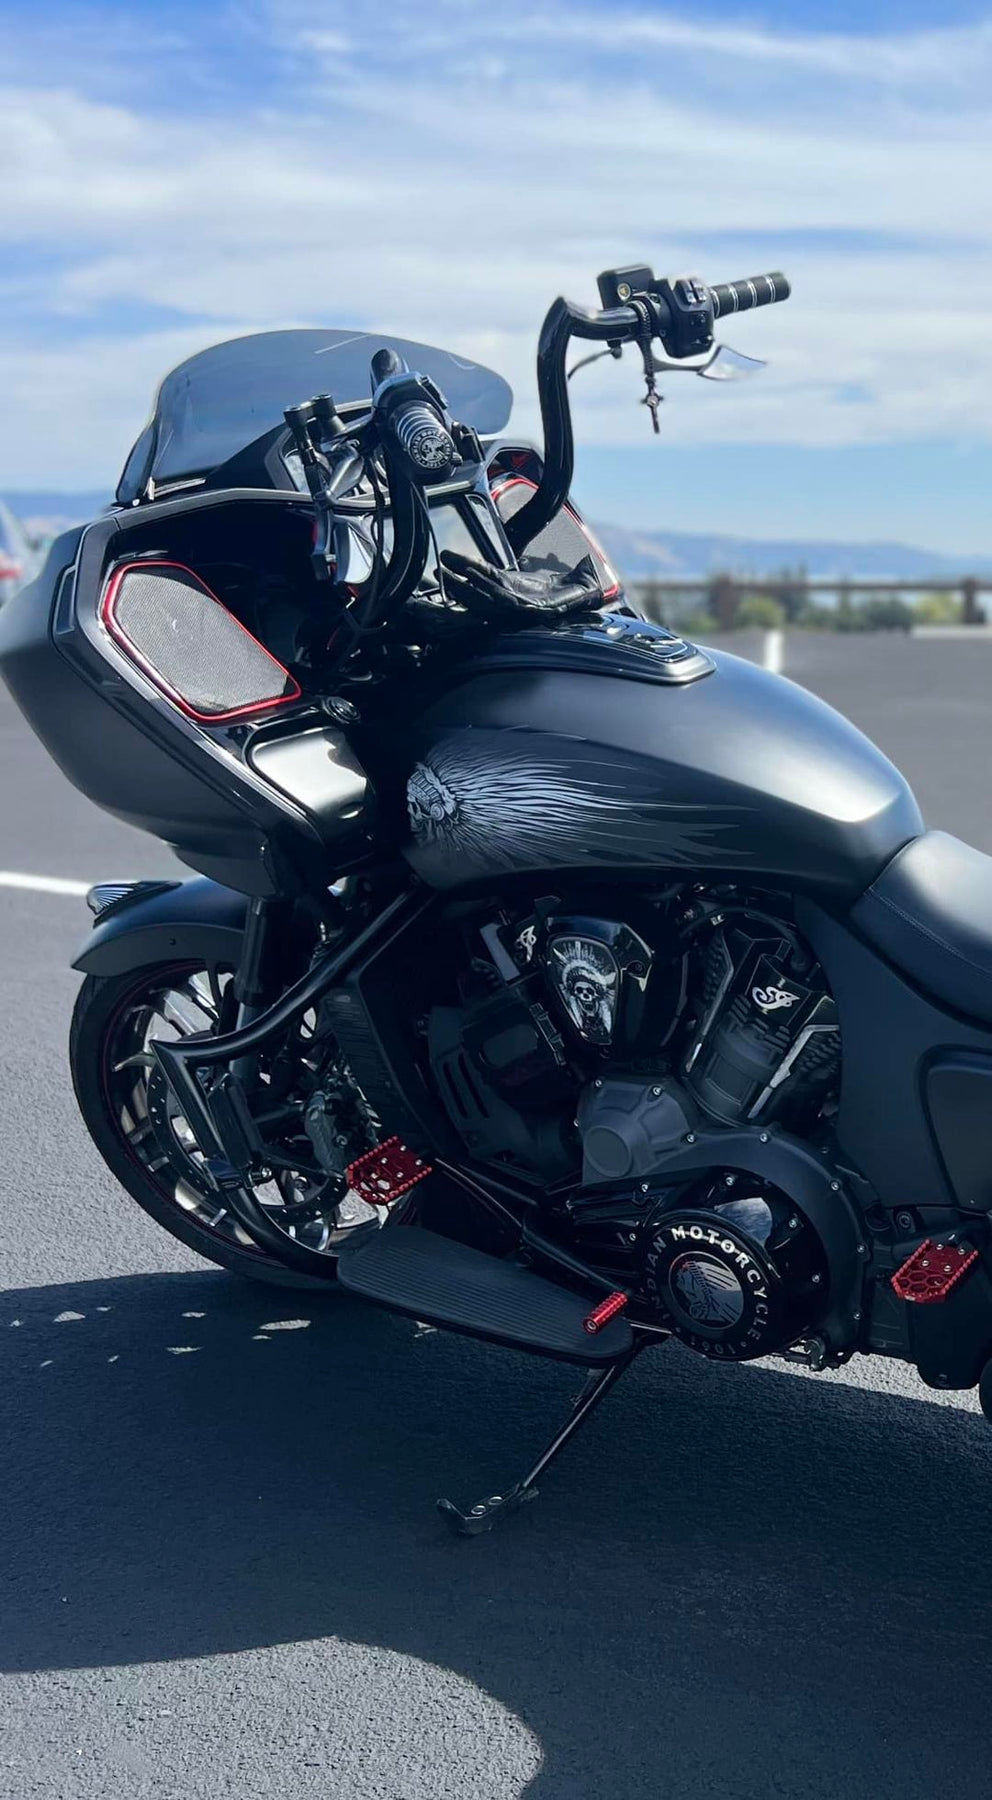
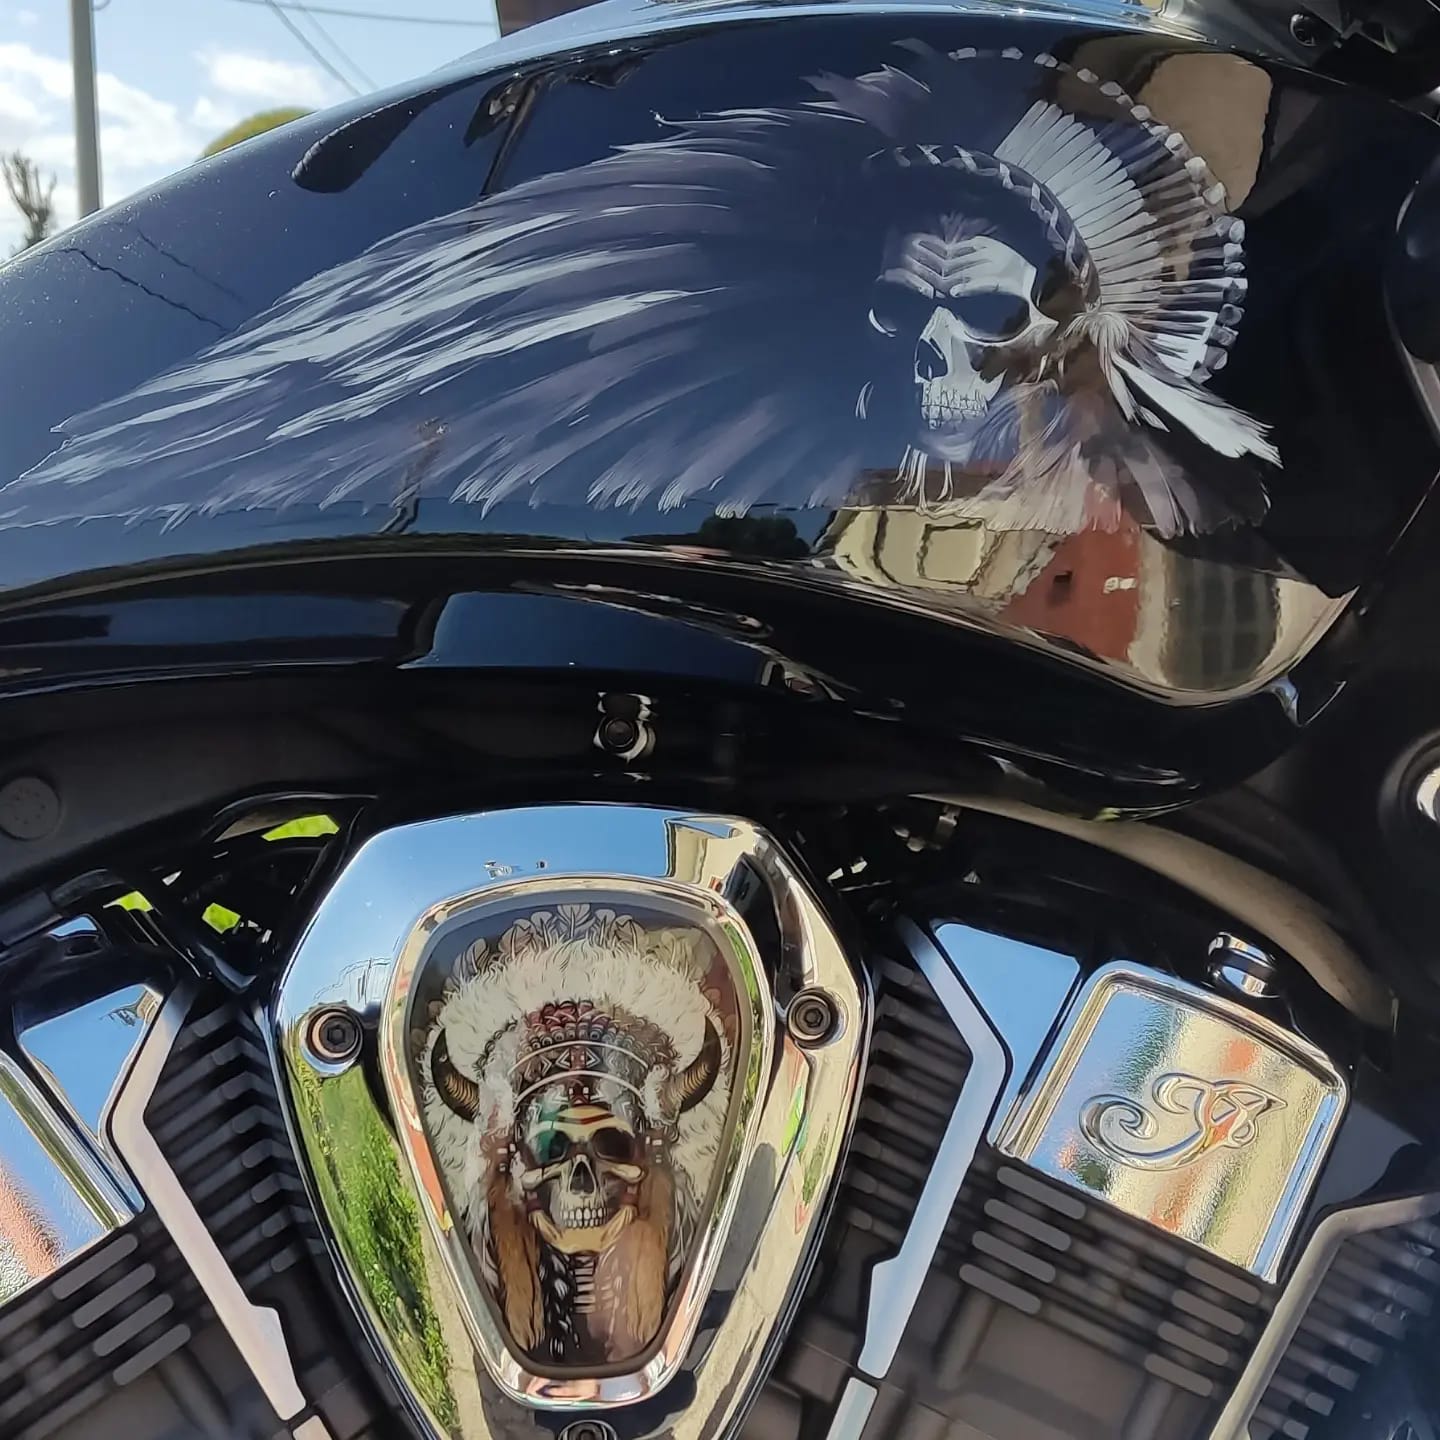
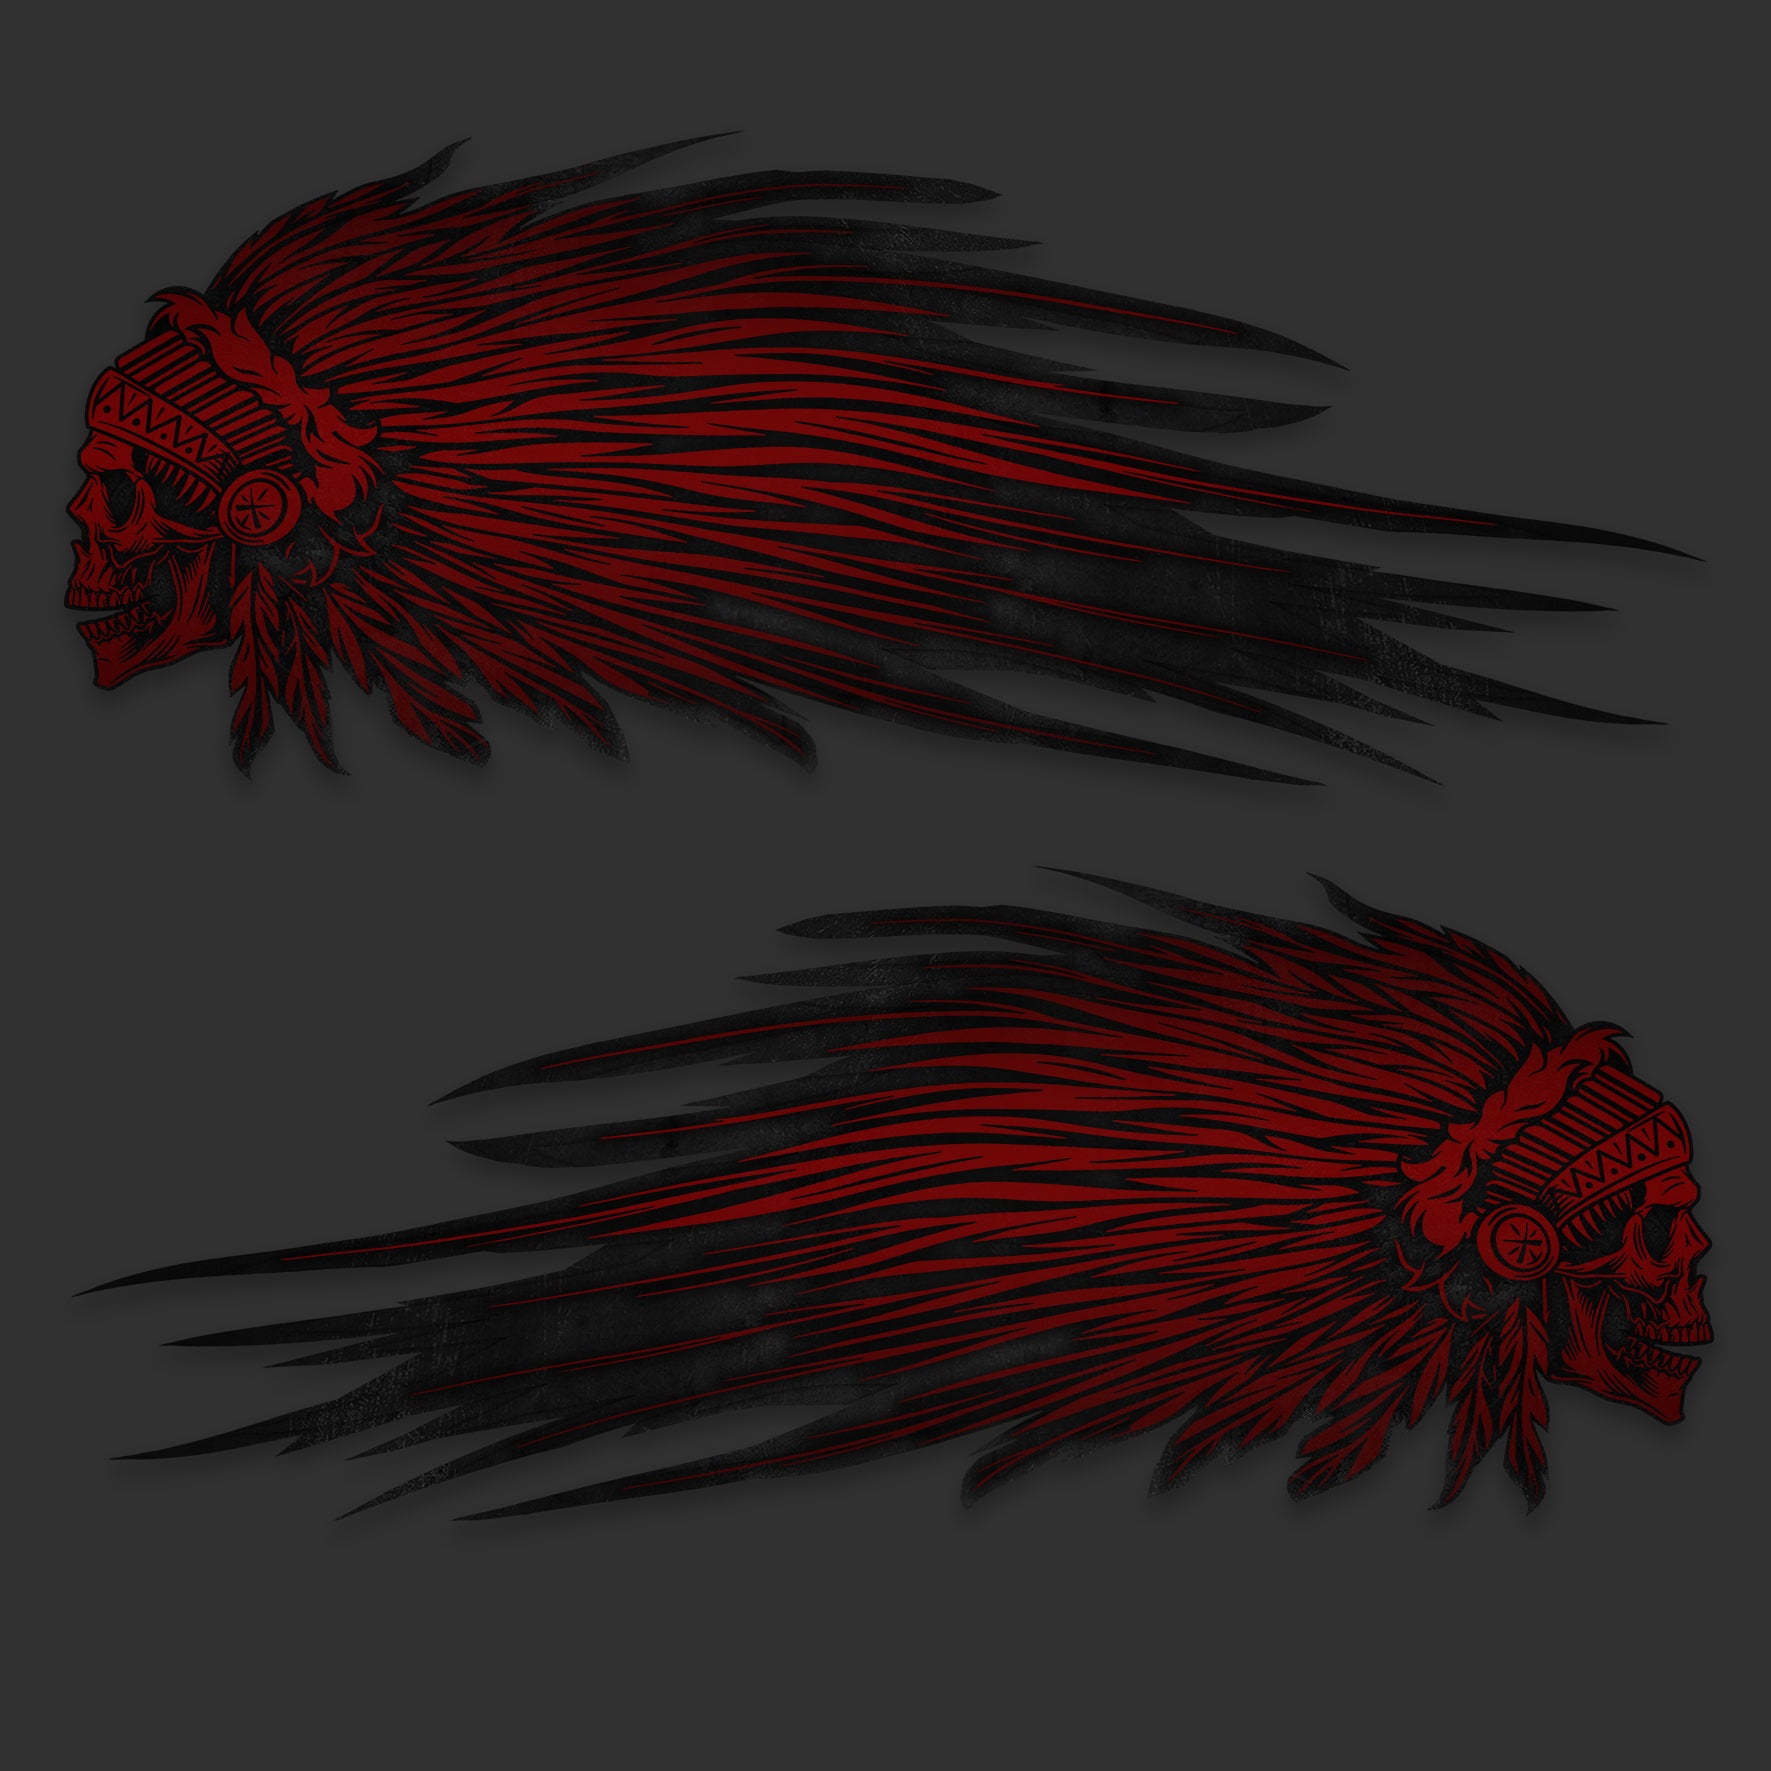
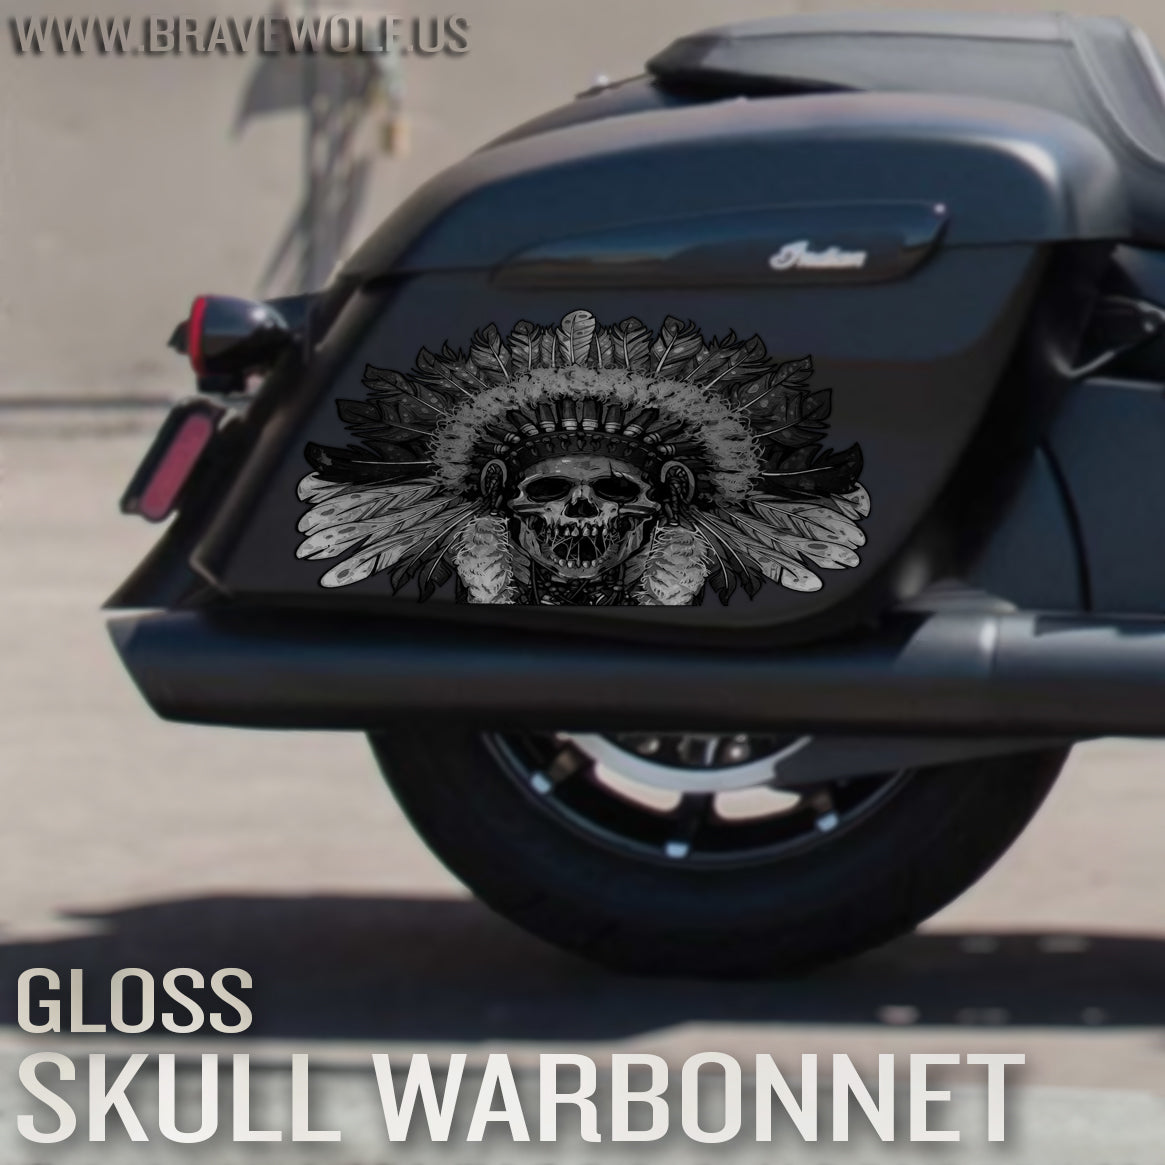
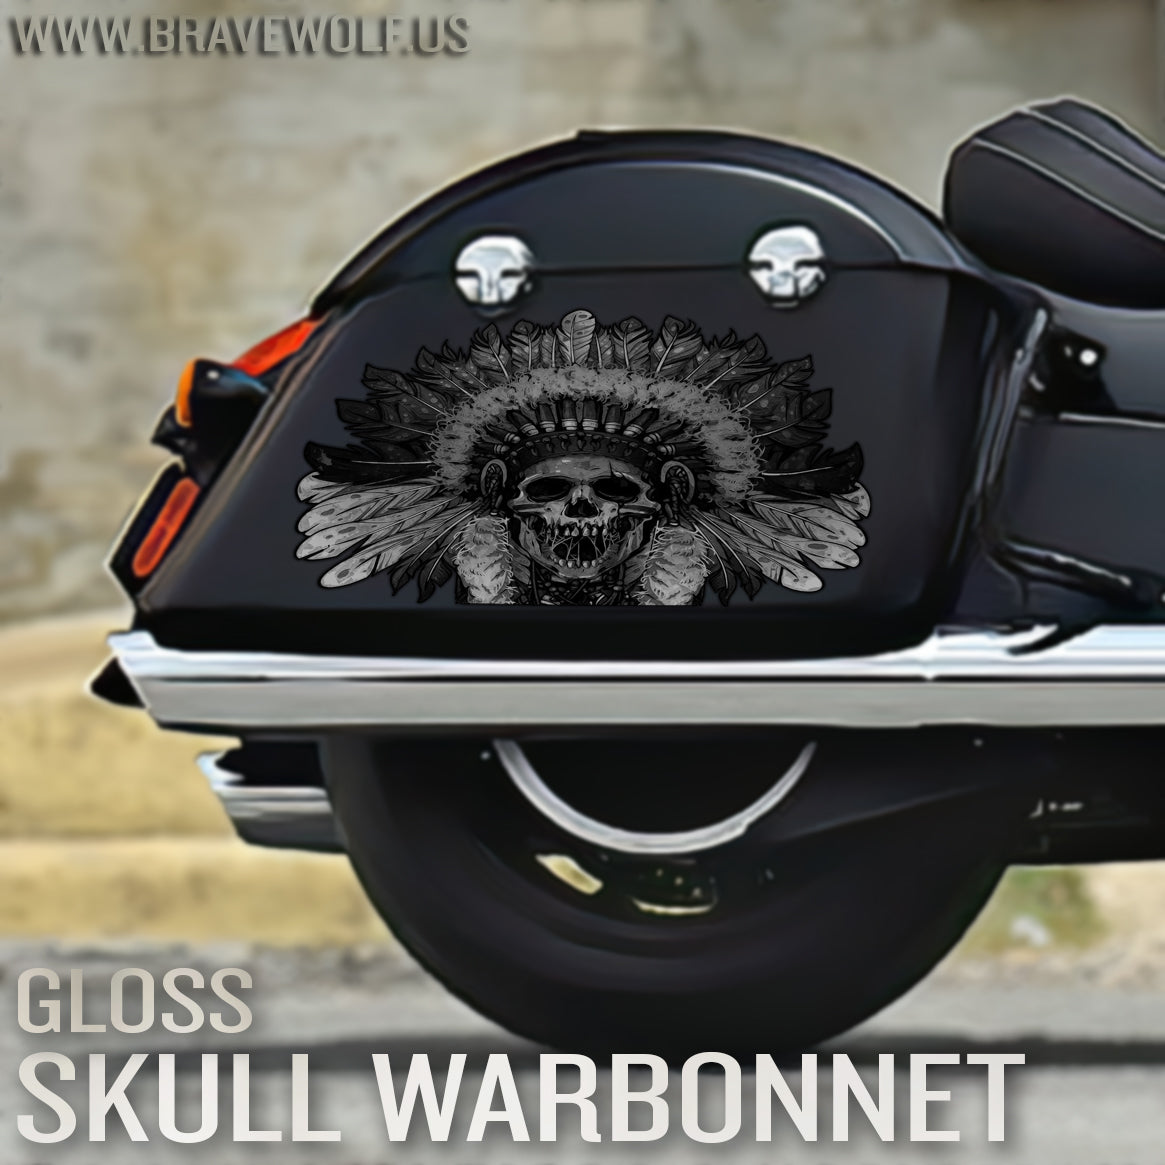
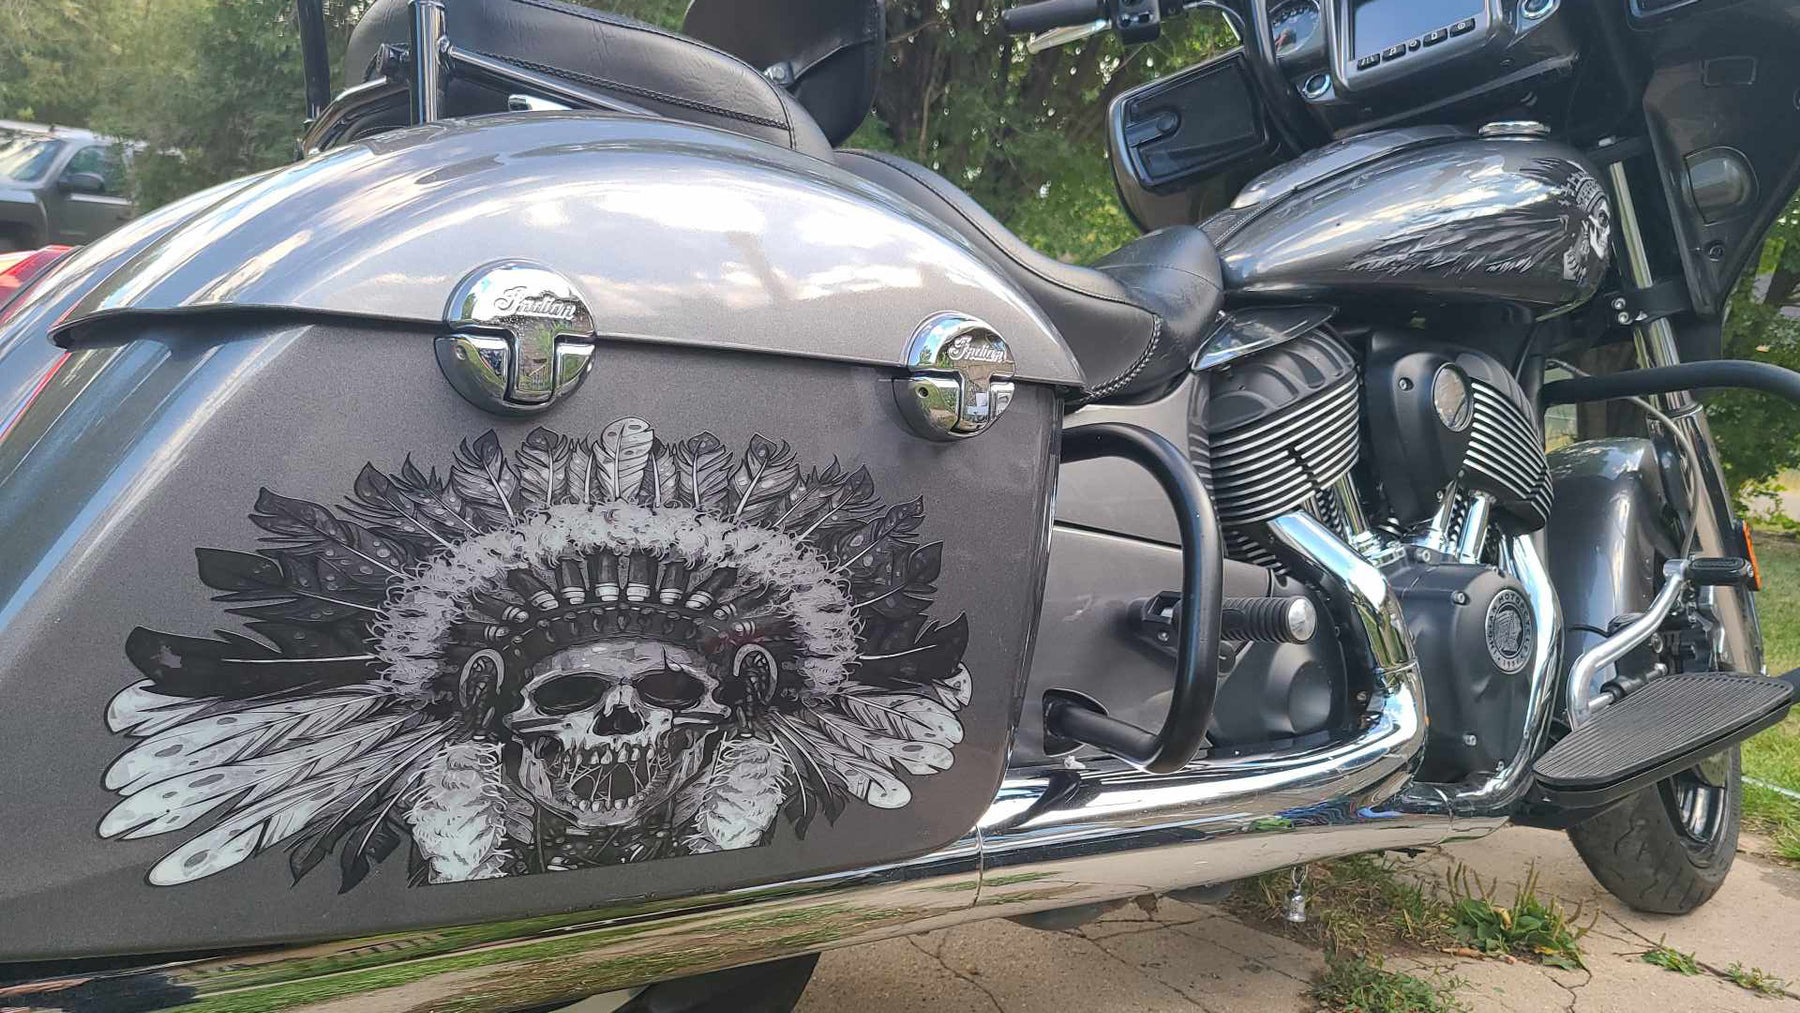
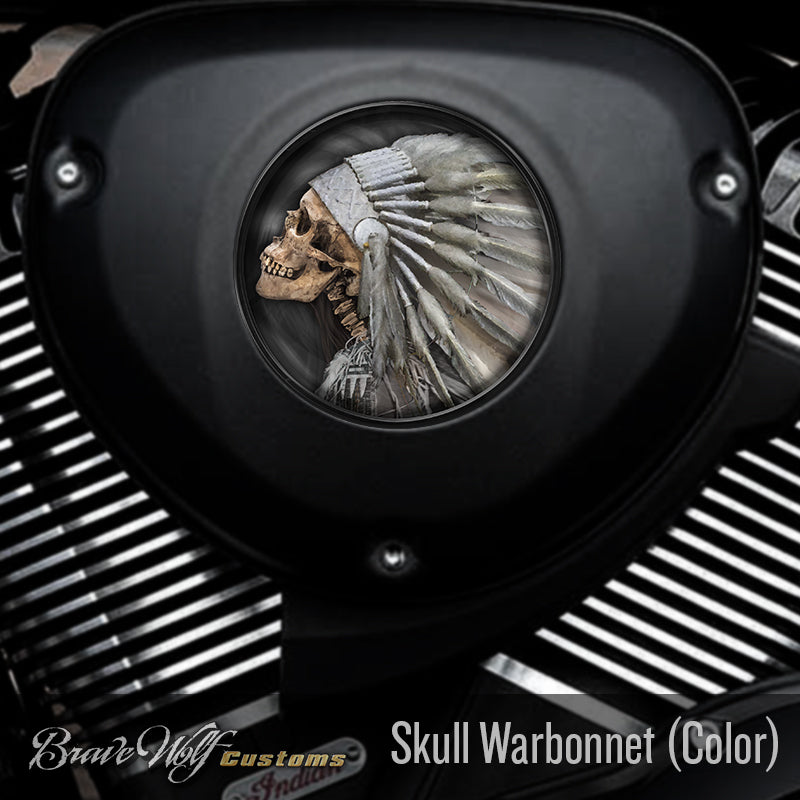
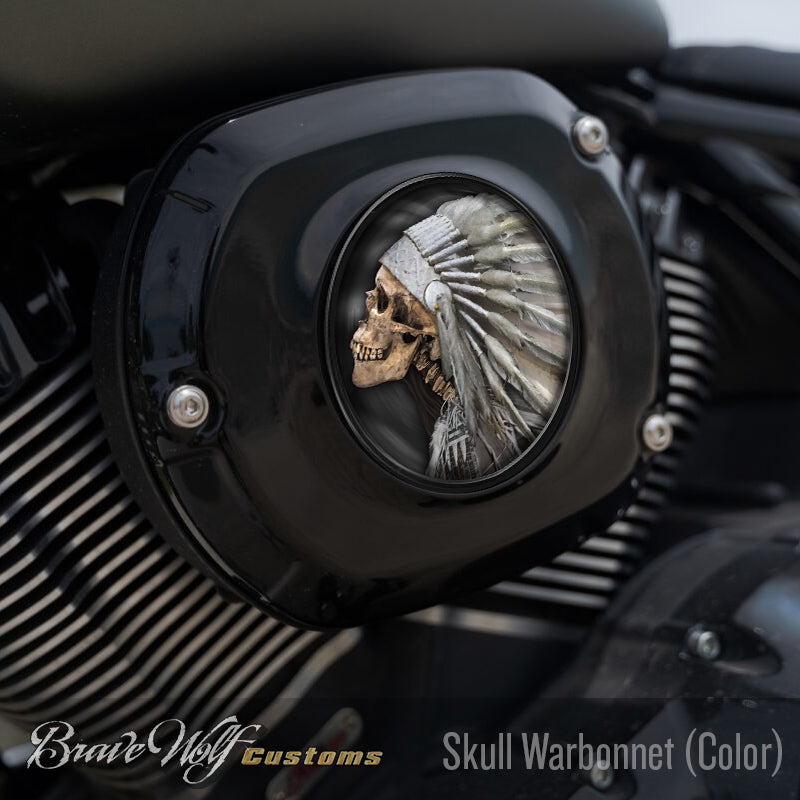
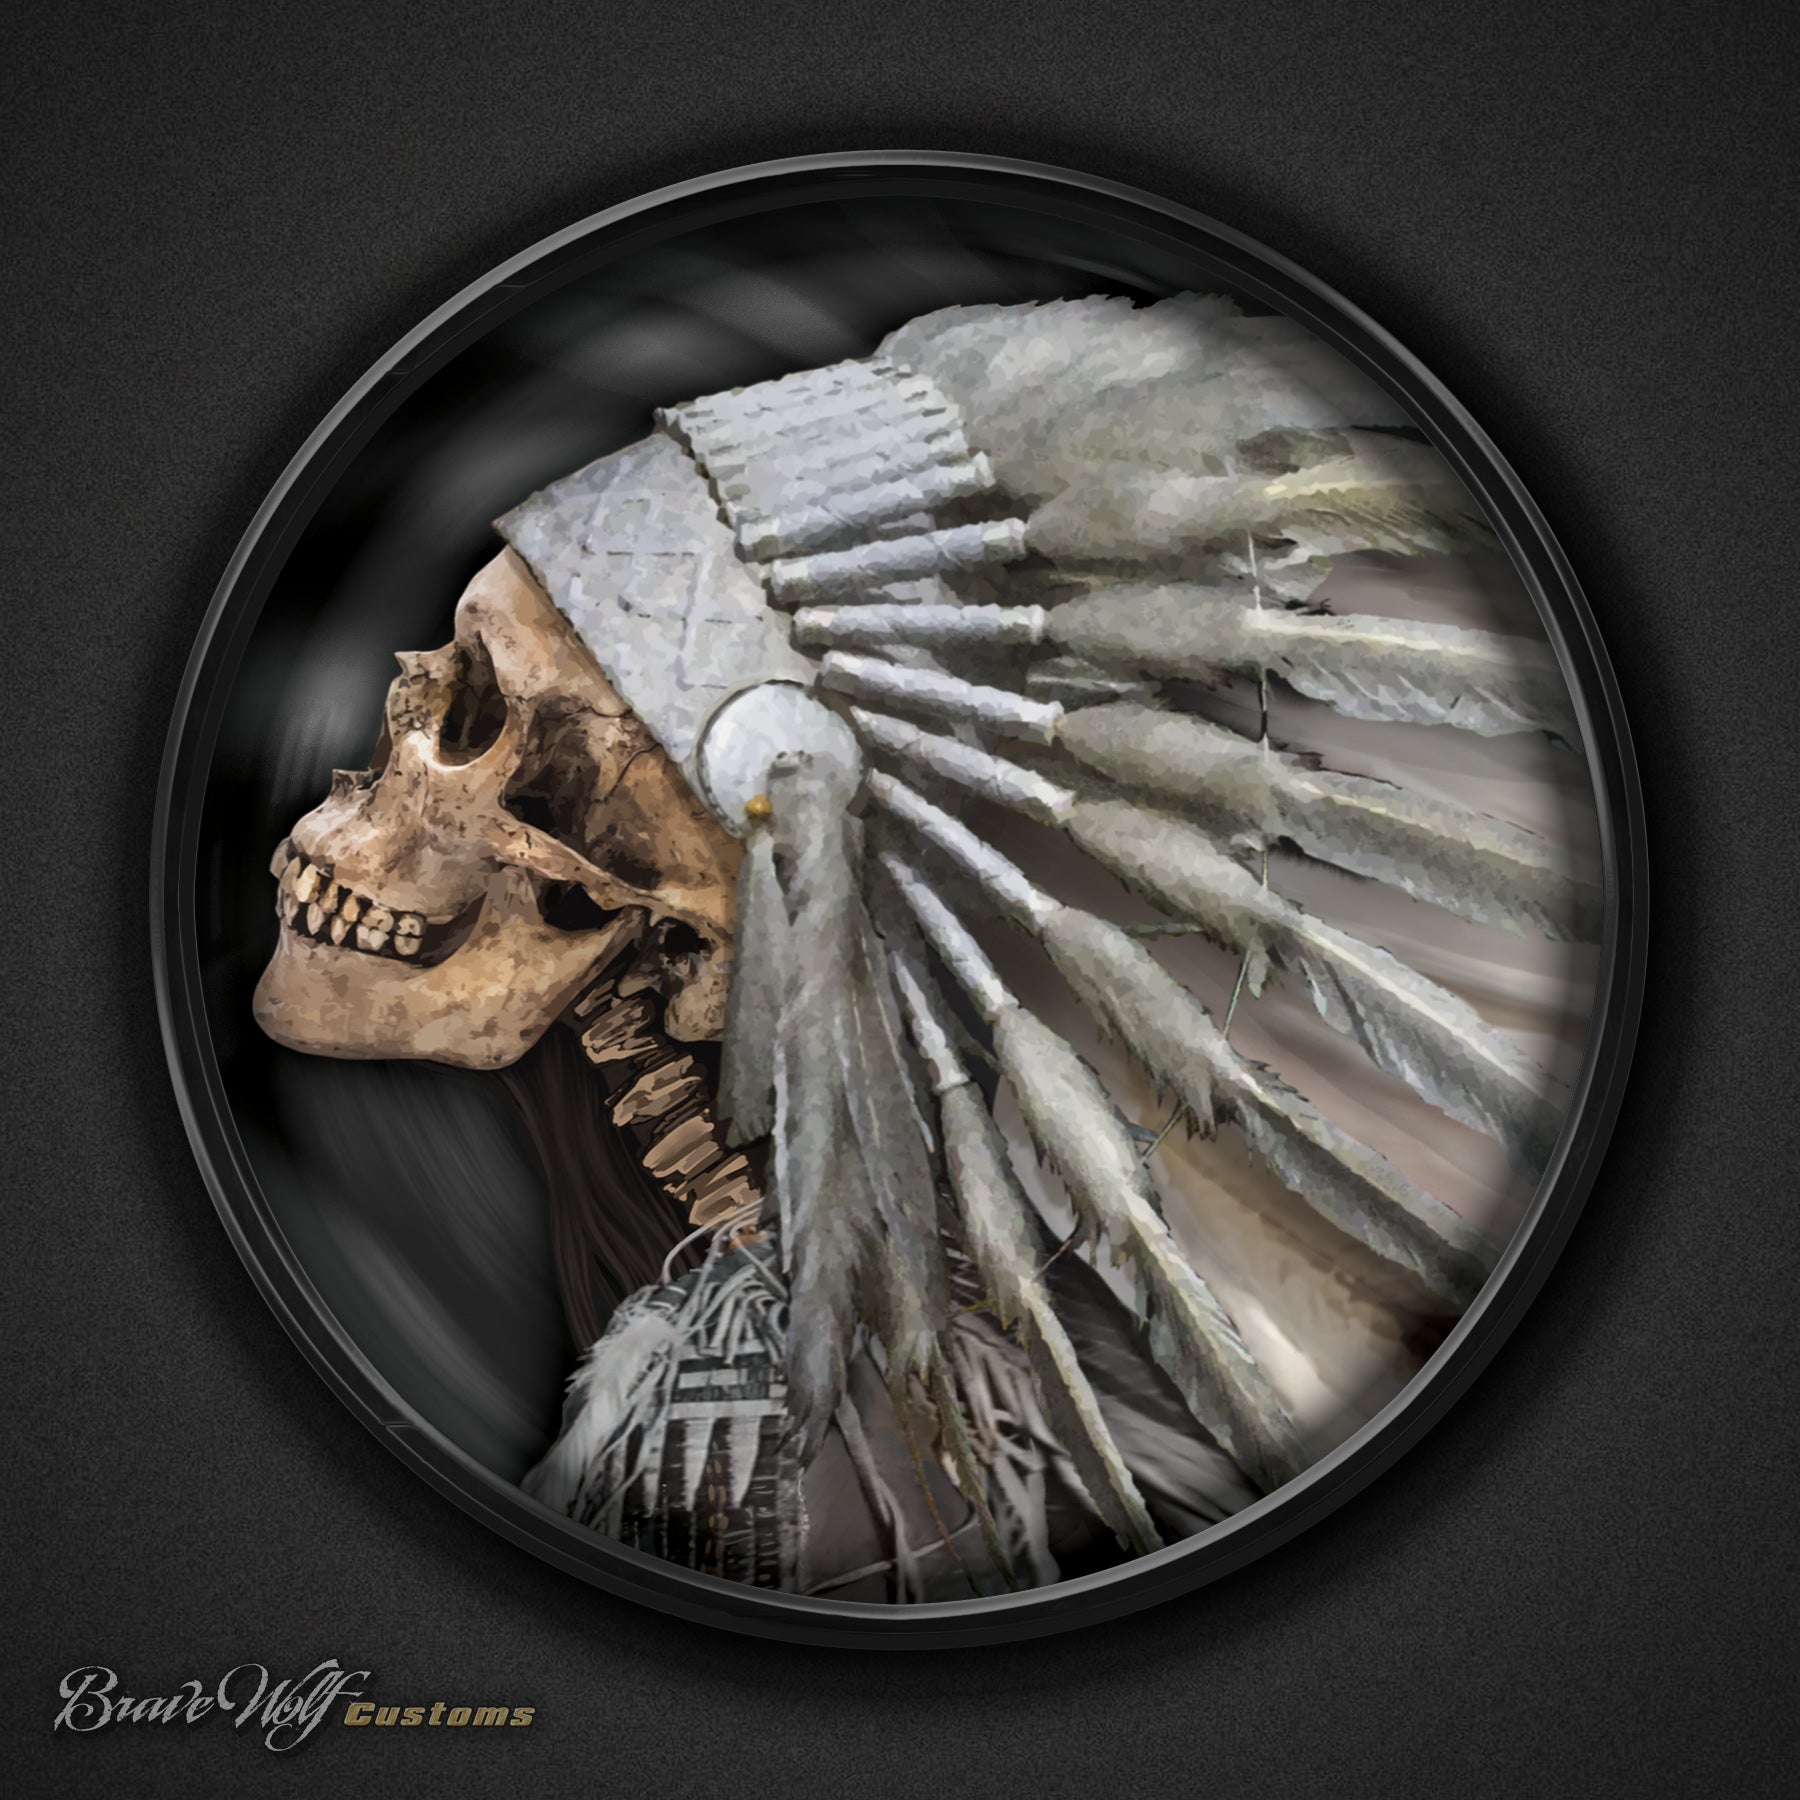
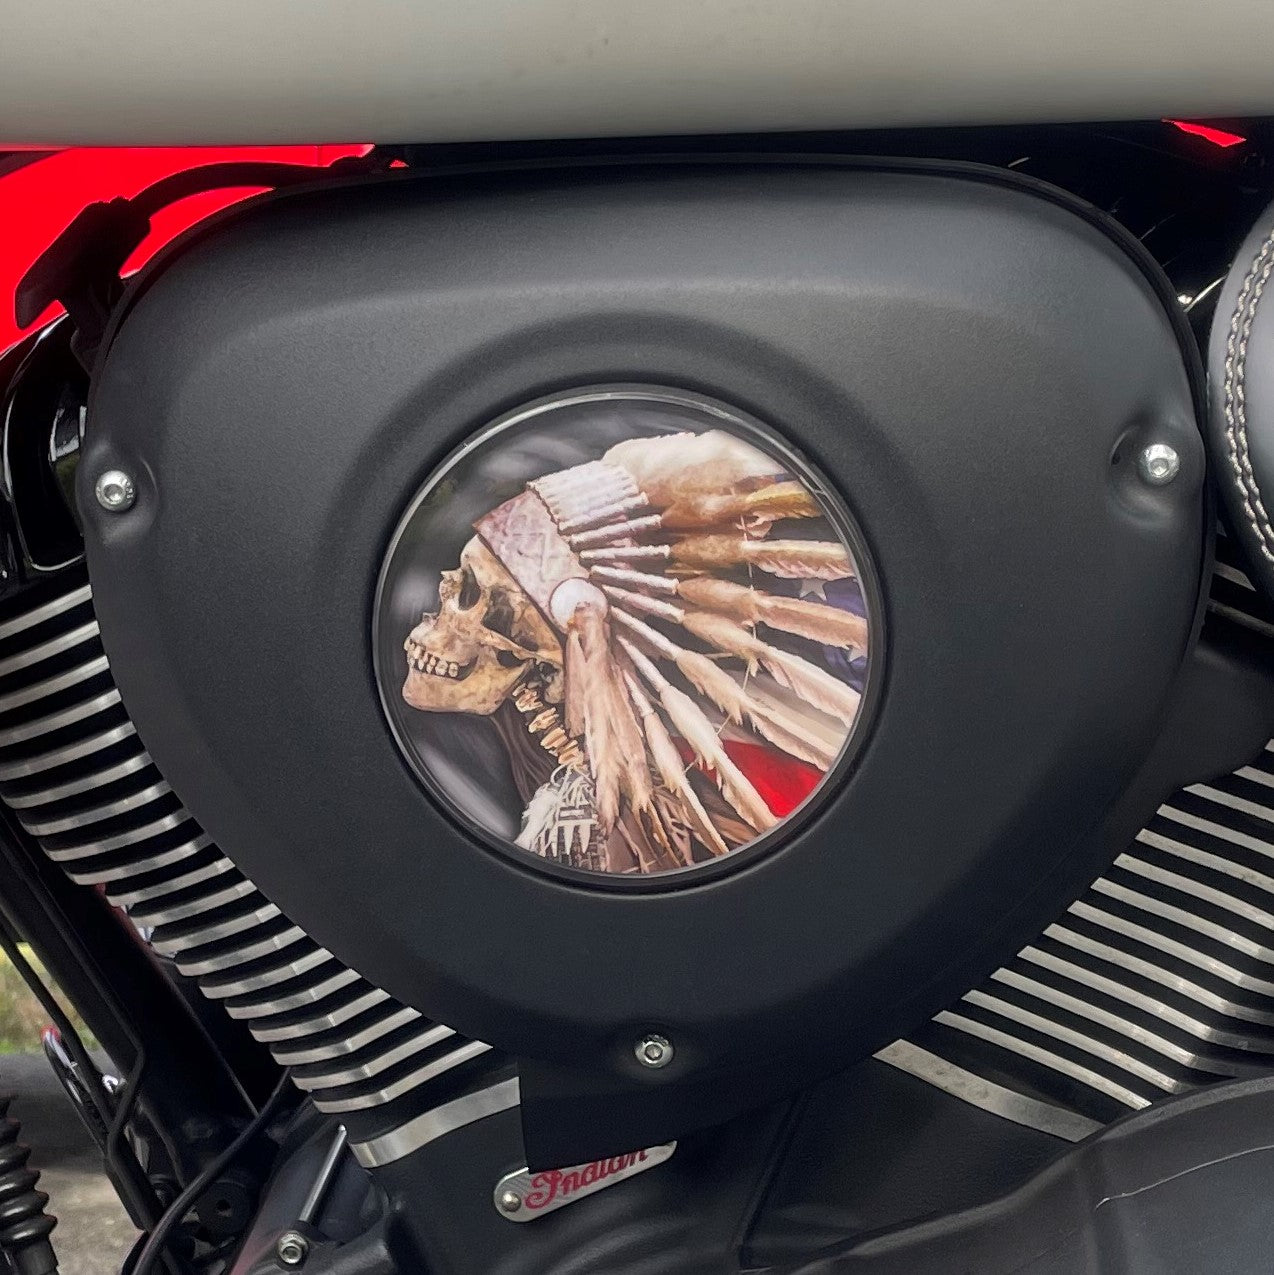
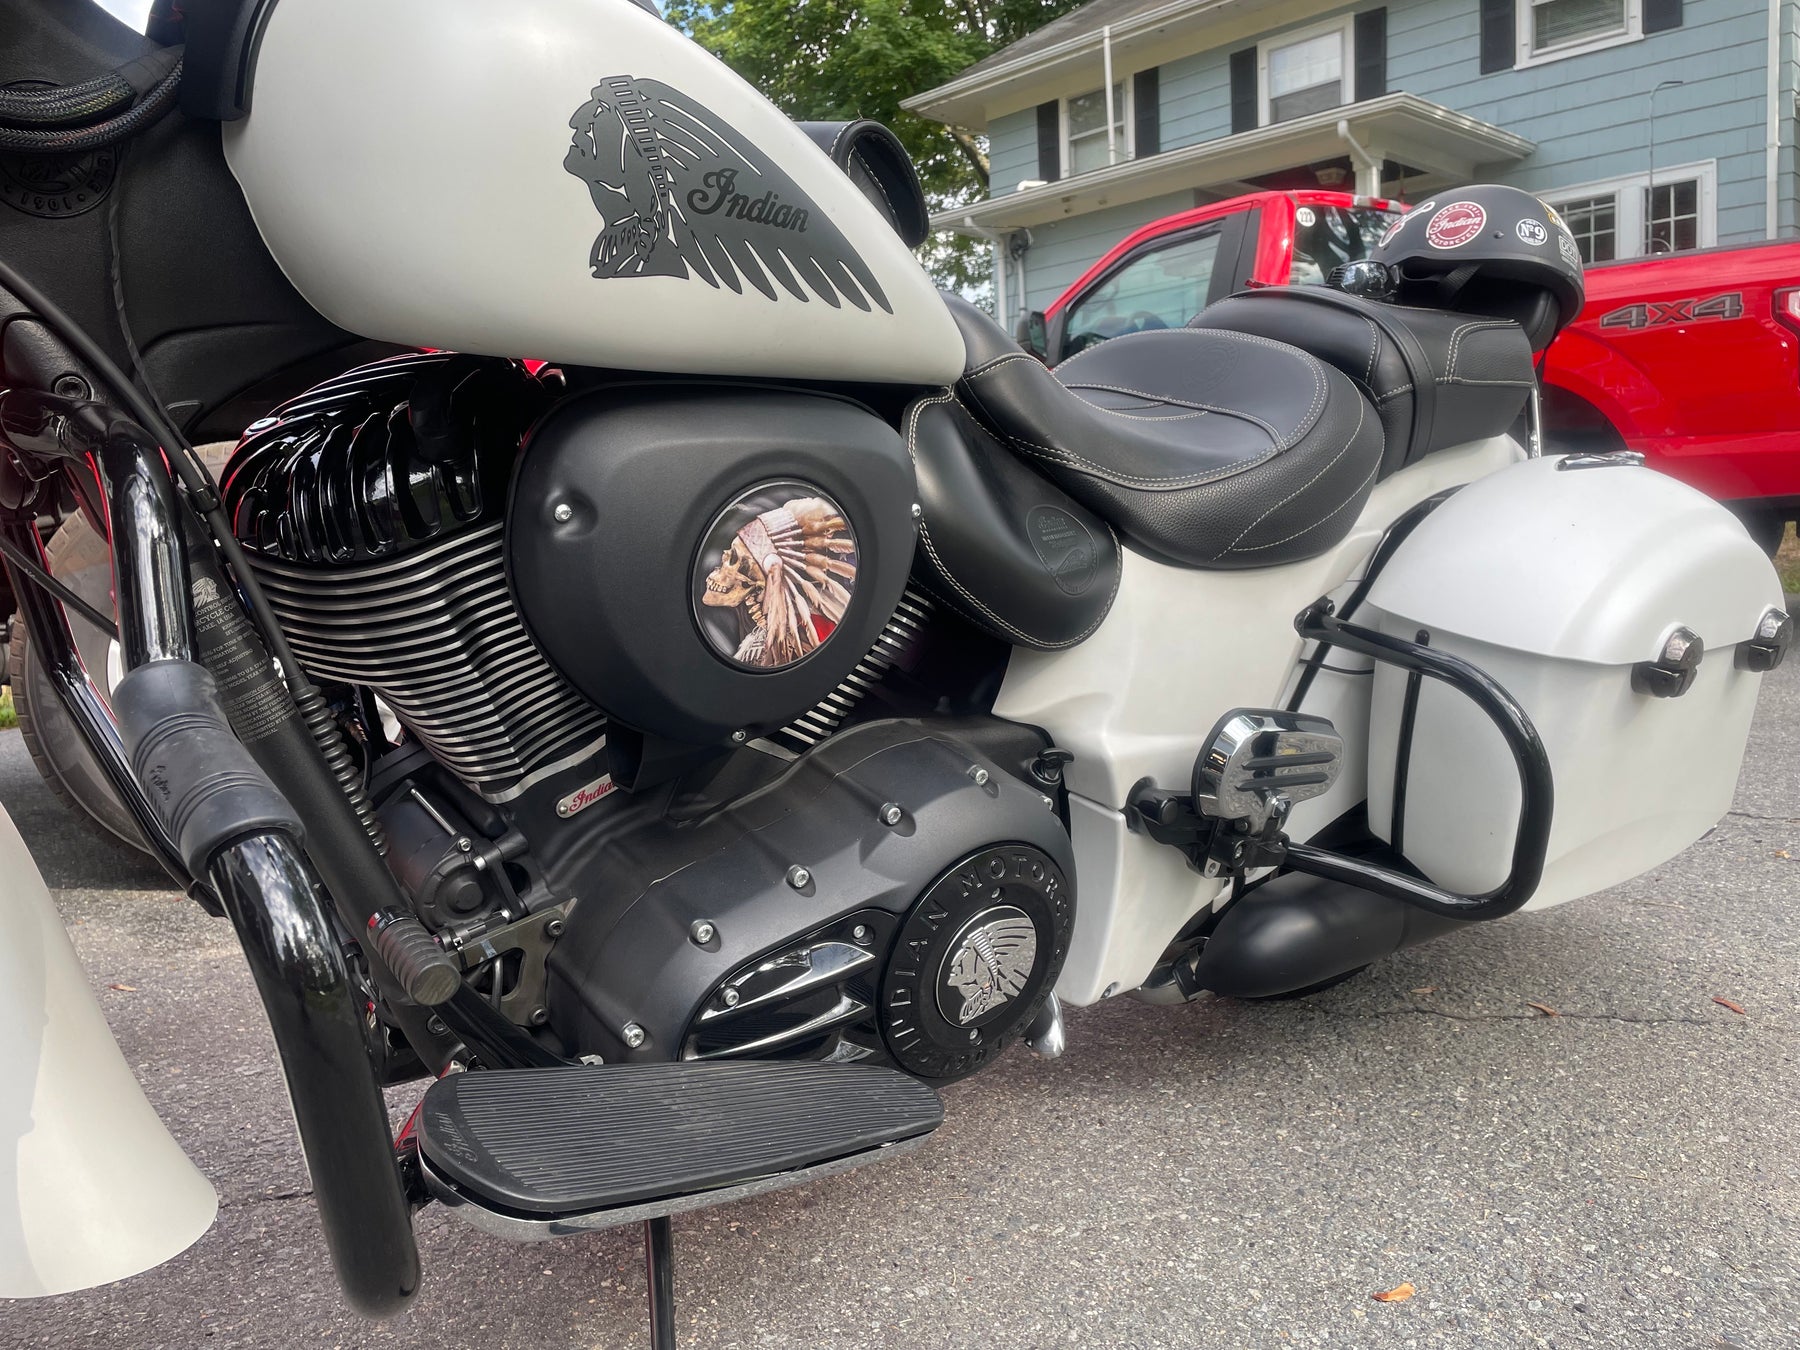
Skull Warbonnet - 5 Inch Decal (B&W)
Regular price $20.00
Shipping calculated at checkout.
New Item - Special Order (may take up to two weeks before shipping)
“Skull Warbonnet (B&W)” 5 inch Decal
These decal inserts have a 5 inch diameter which makes them a perfect fit for the Thunderstroke engine airbox (for models with a round emblem). Check out the photos, and if your bike has the same style airbox, these are a match!
Size: 5 inch diameter circle
Weatherproof laminated decals are self adhesive. We recommend using the wet method to install these decals: A spray bottle with water and dish soap can be used to wet the surface and the back of the decal, allowing you to slide the decal into place. Once you have it aligned properly, use your thumbs to push the moisture out from behind the decal, working from the center outwards to the edges and it will adhere to your bike. Using the wet method allows the decal surface to evenly distribute over the curved surface. A hair dryer to apply heat will make the process easier since the vinyl becomes more soft and flexible when warm.

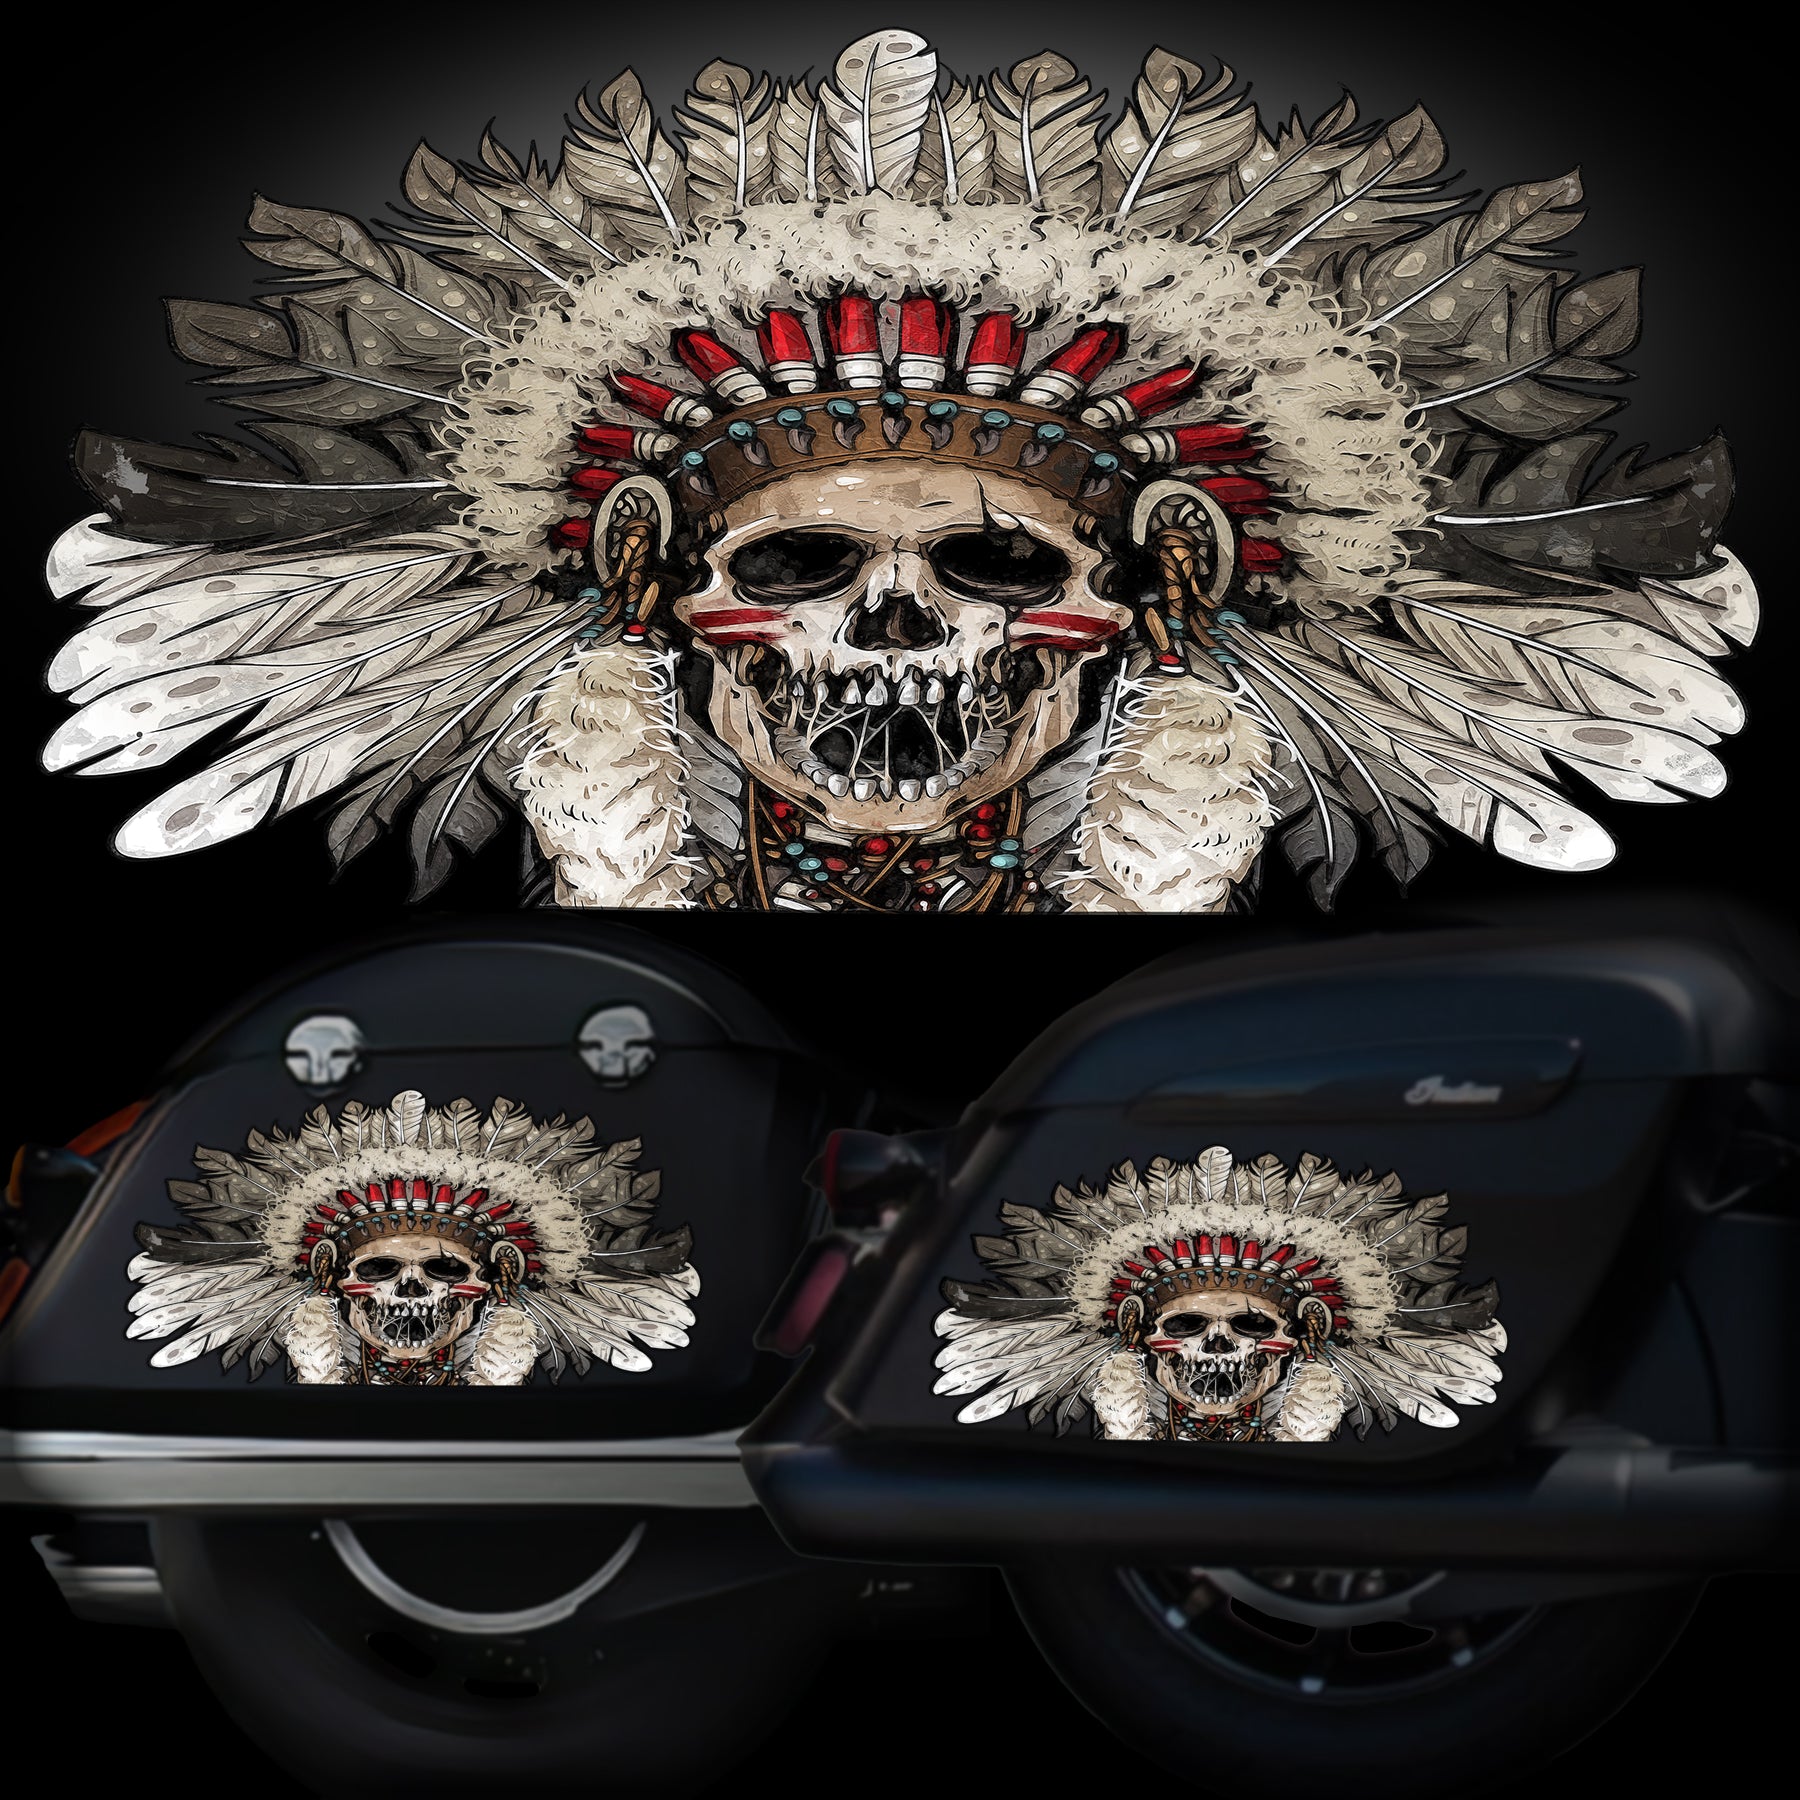
Photo courtesy of Henry Rivera


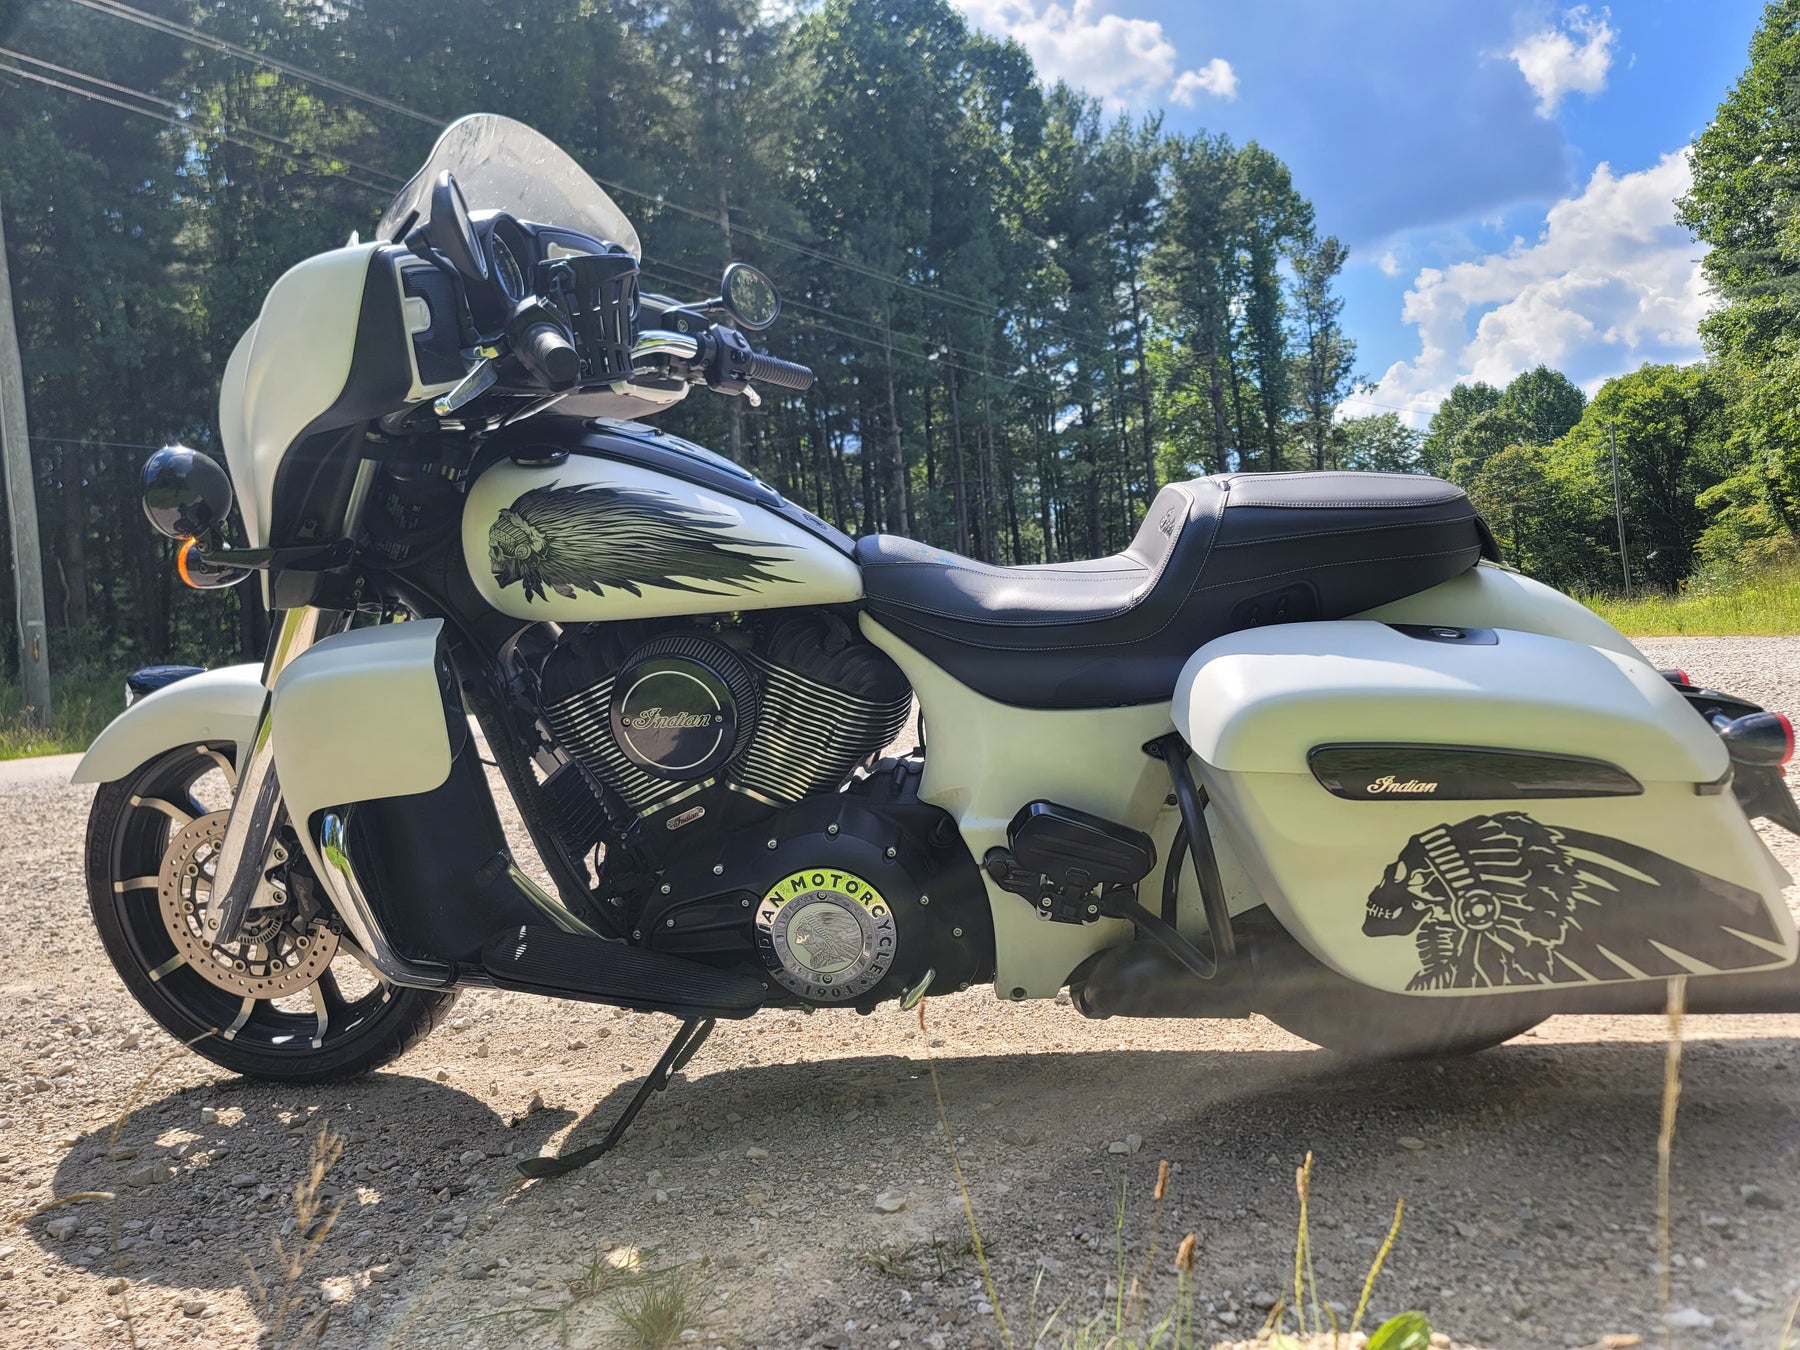
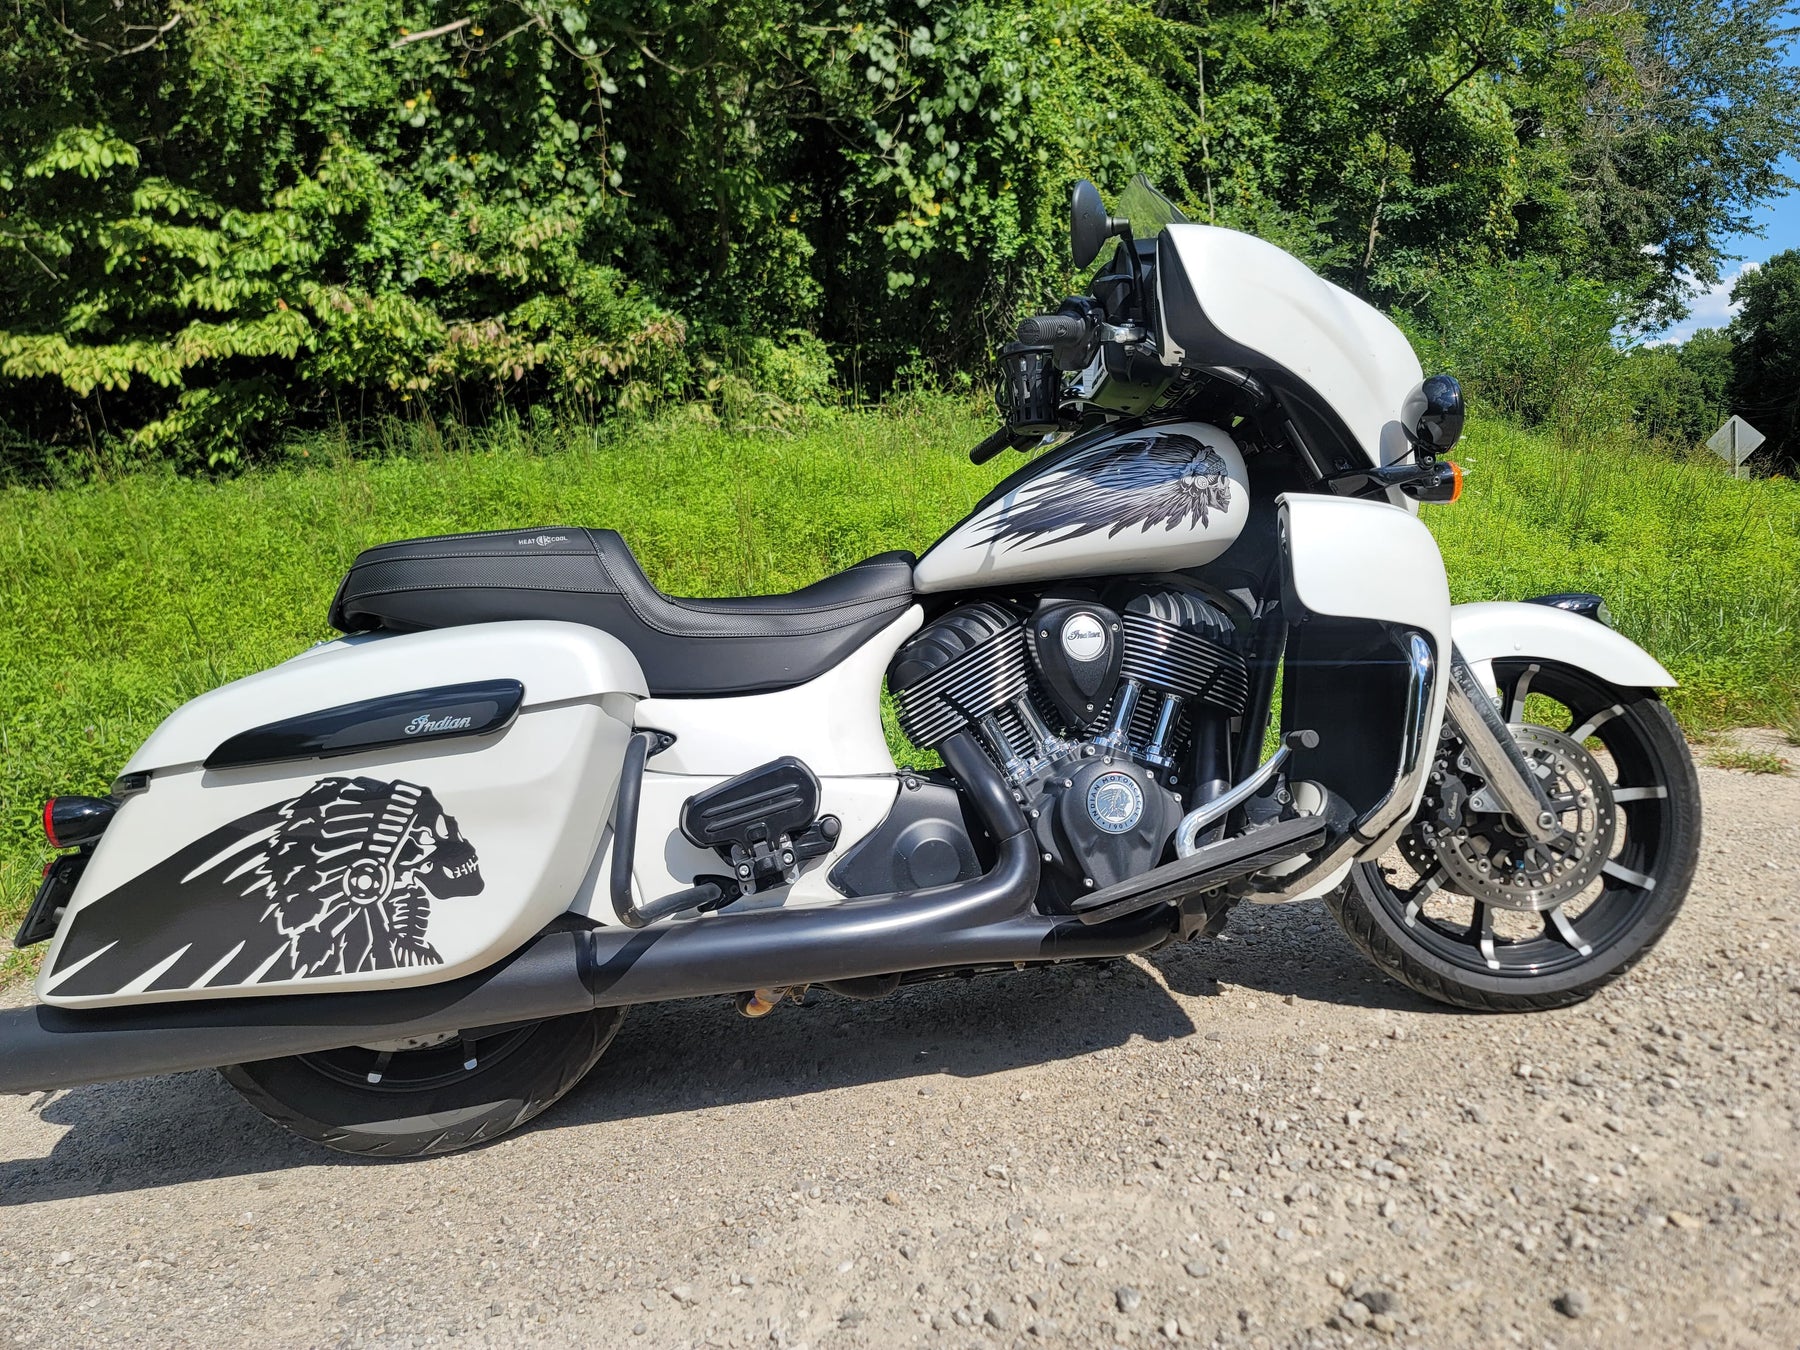
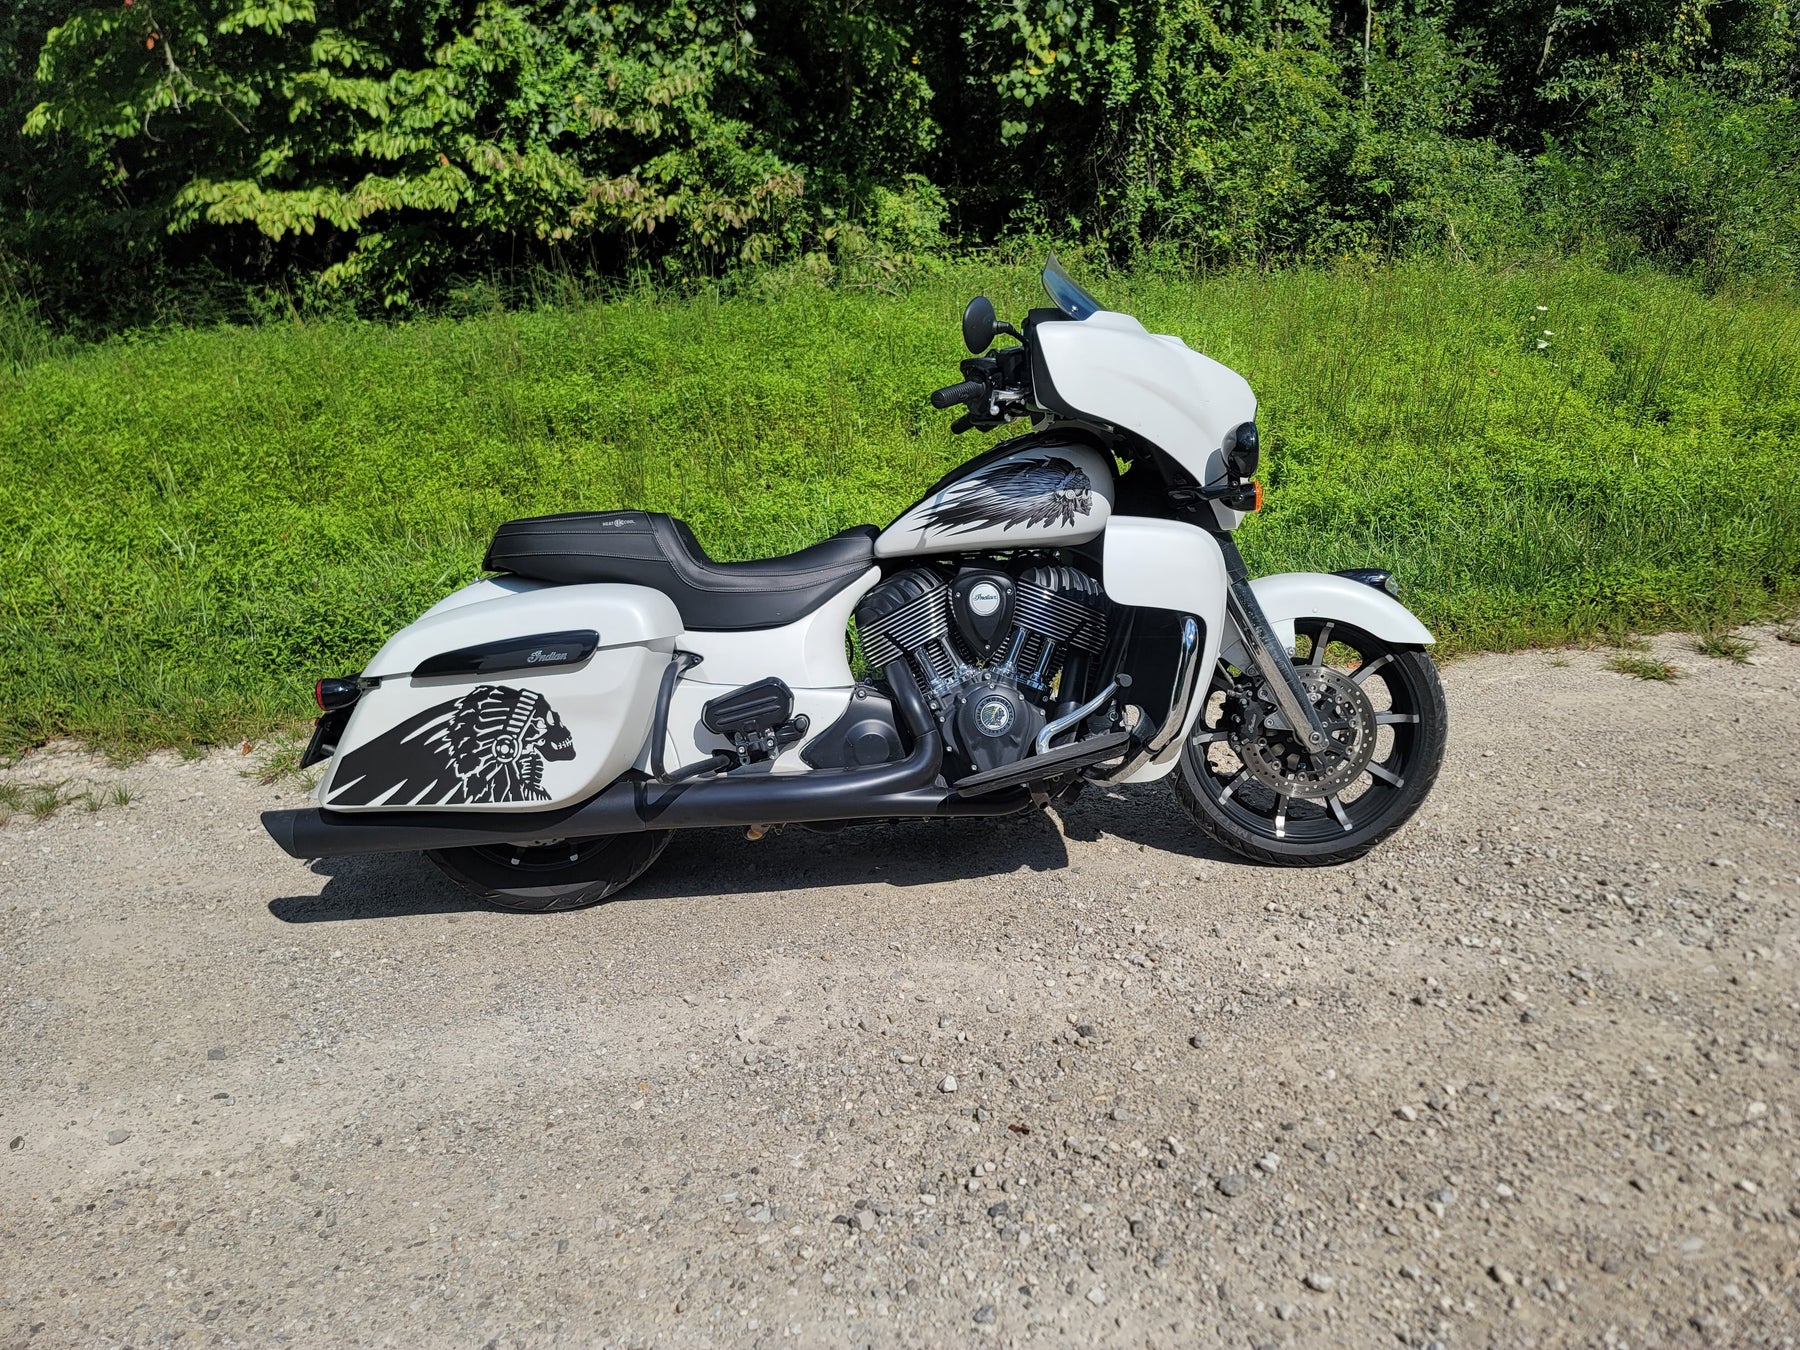
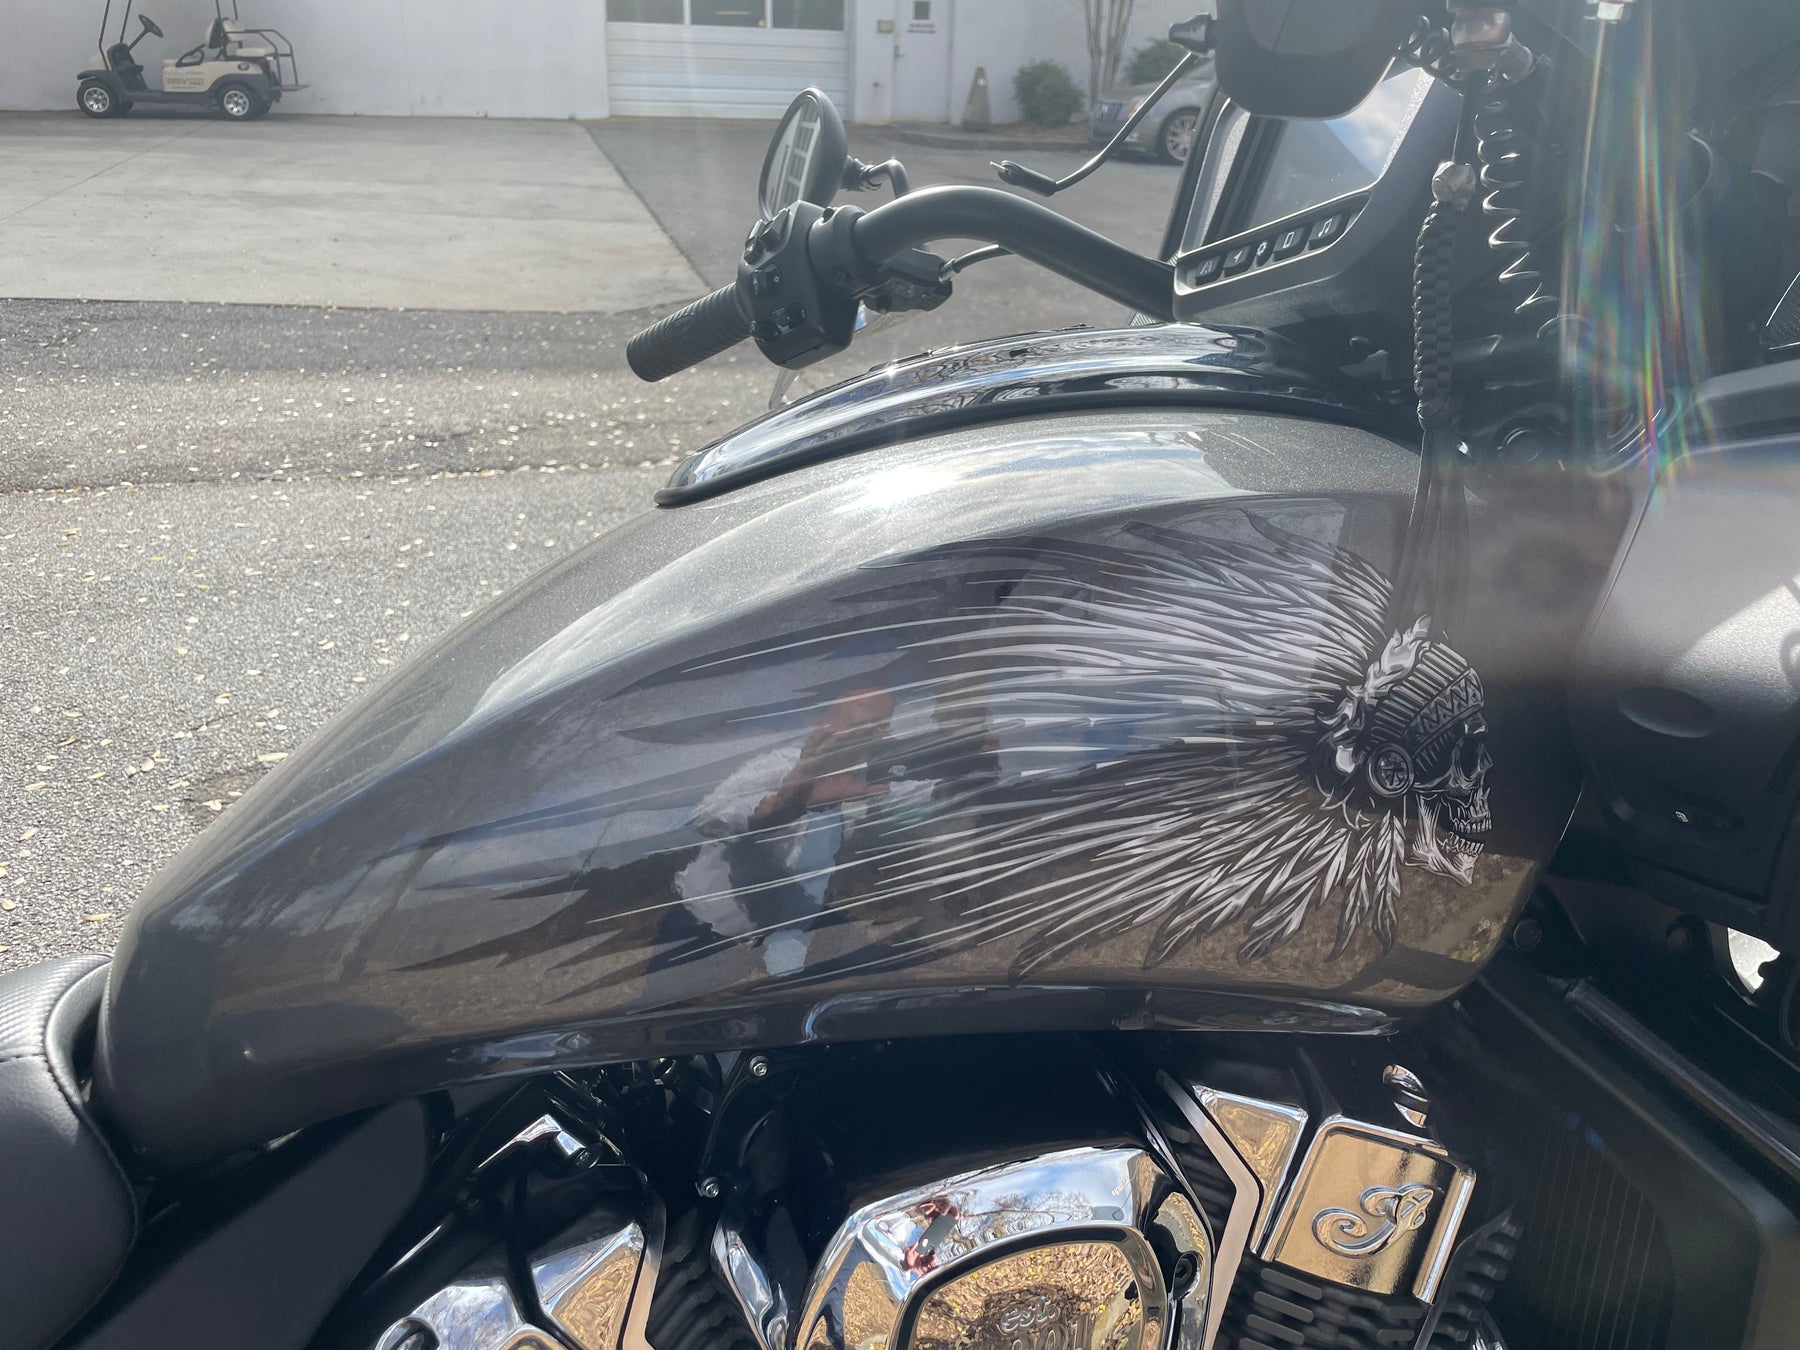
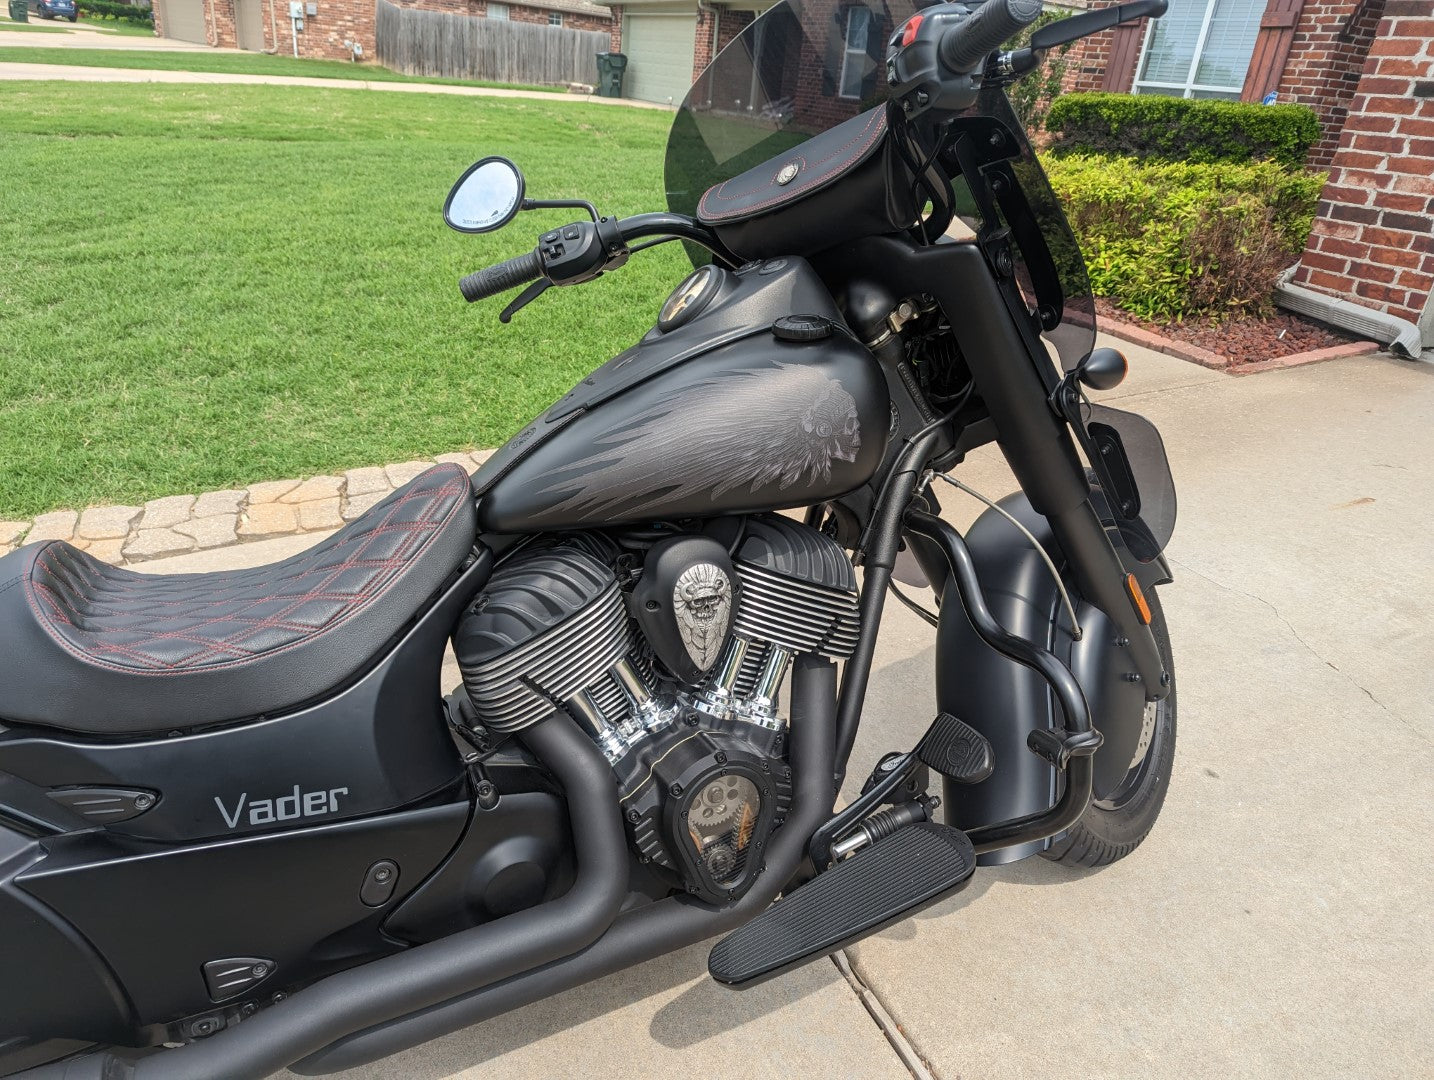
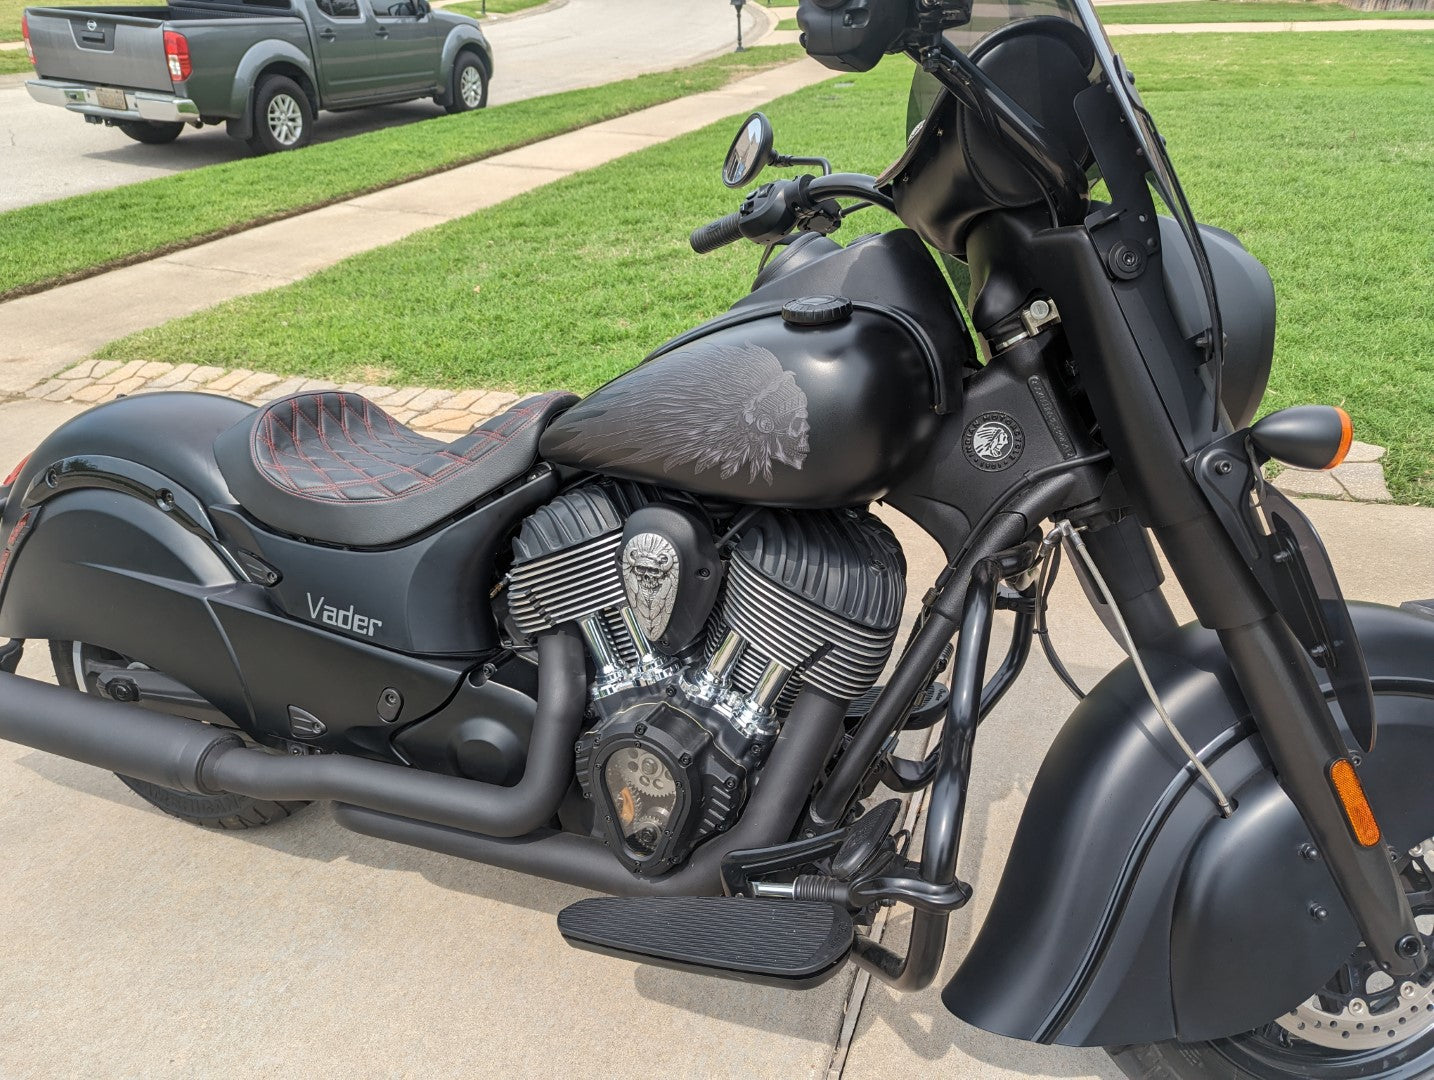
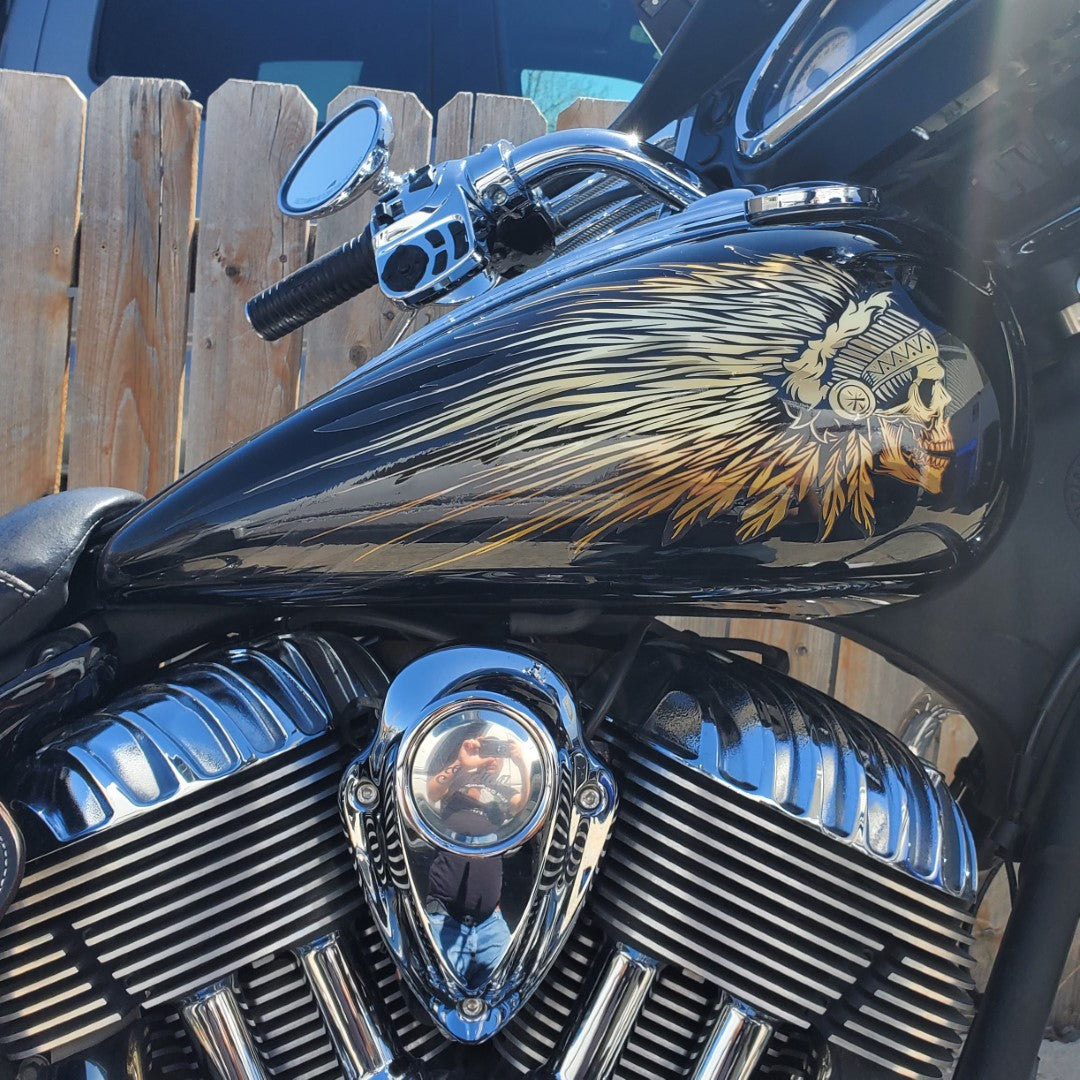
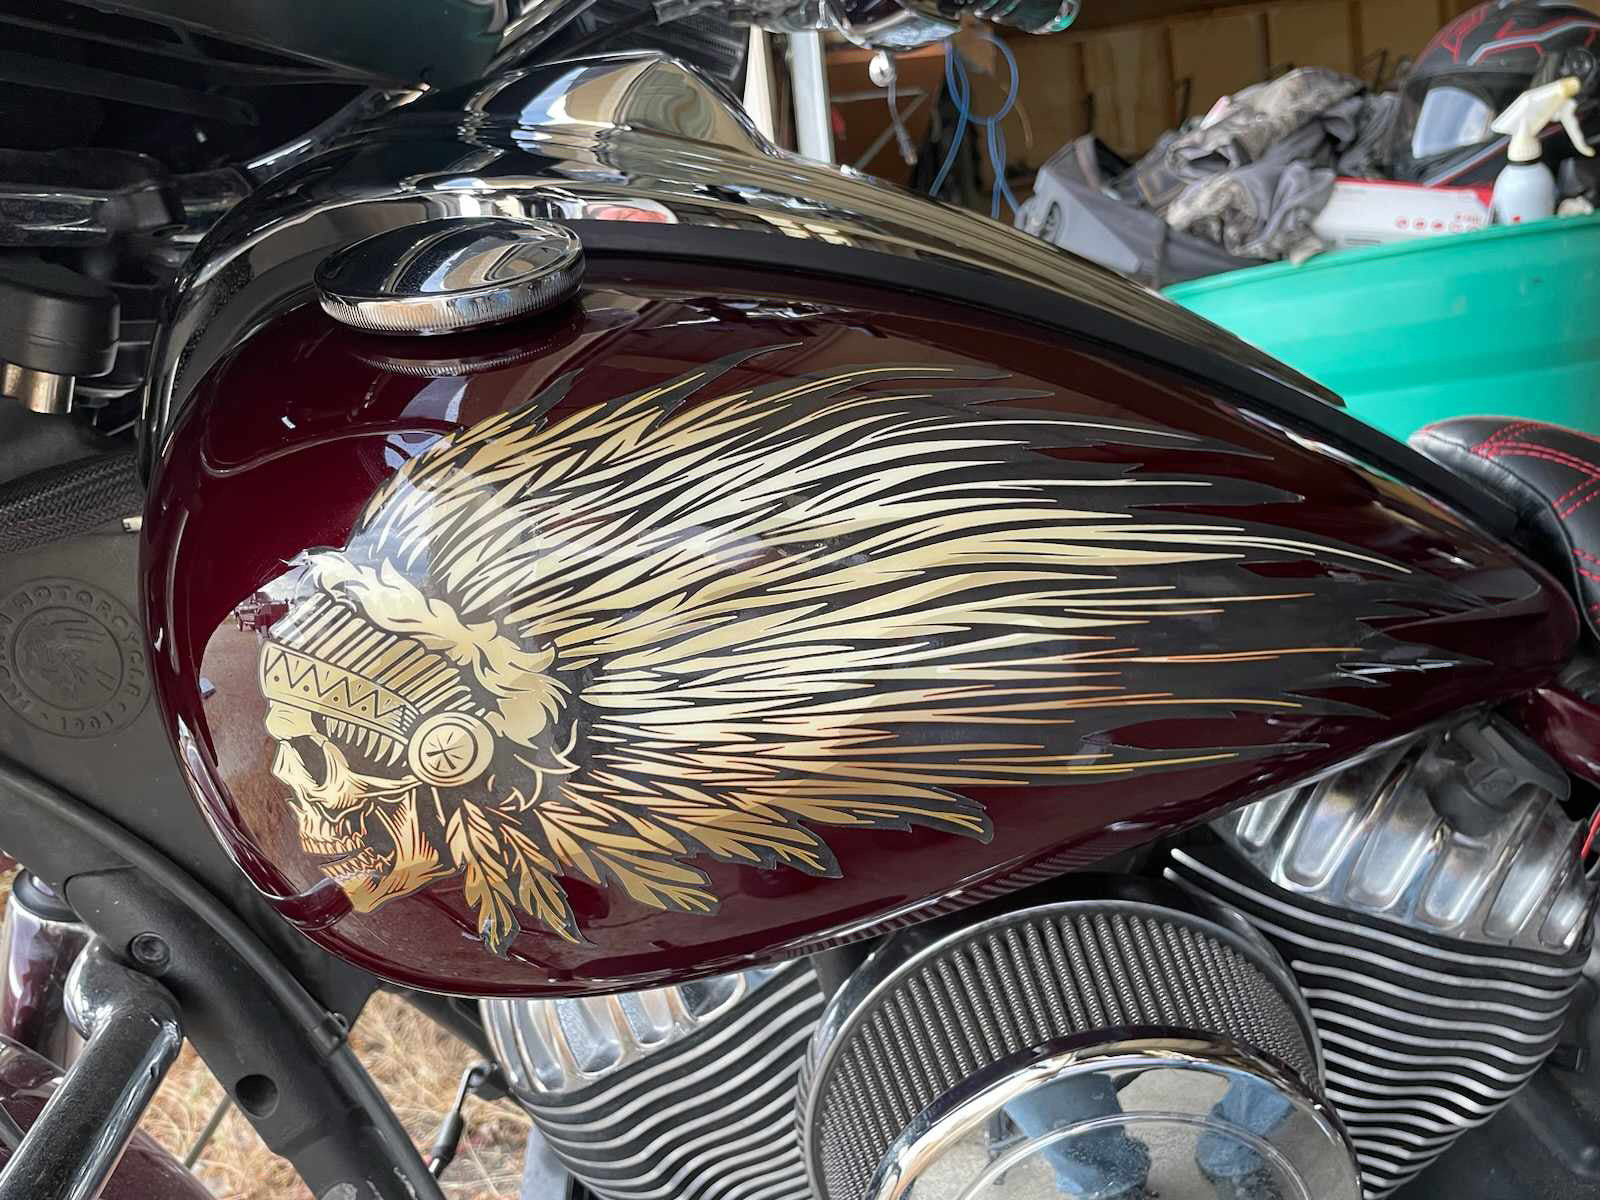
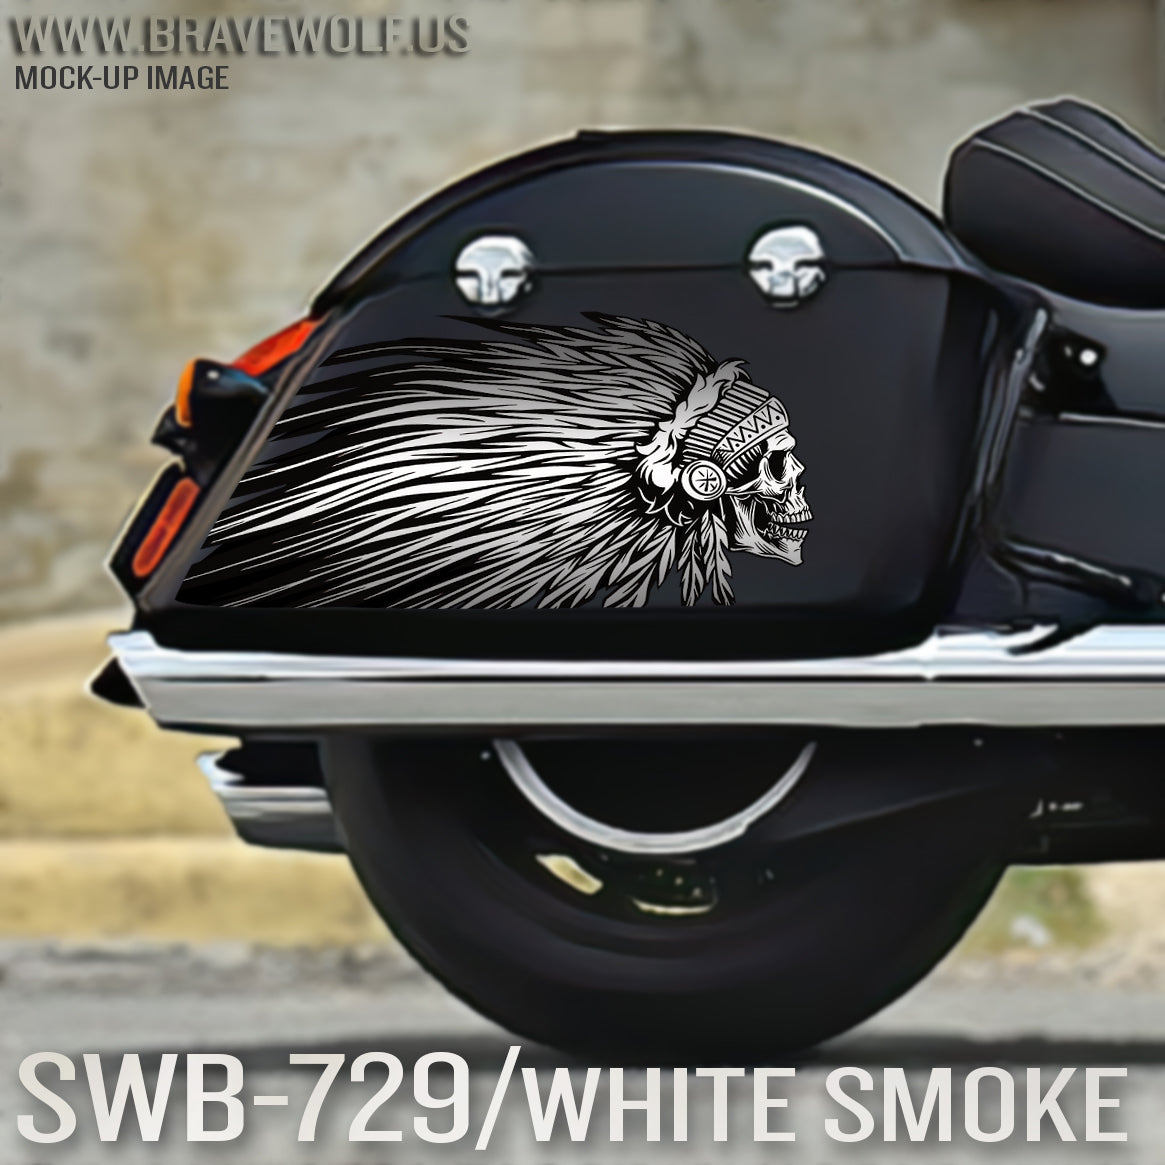
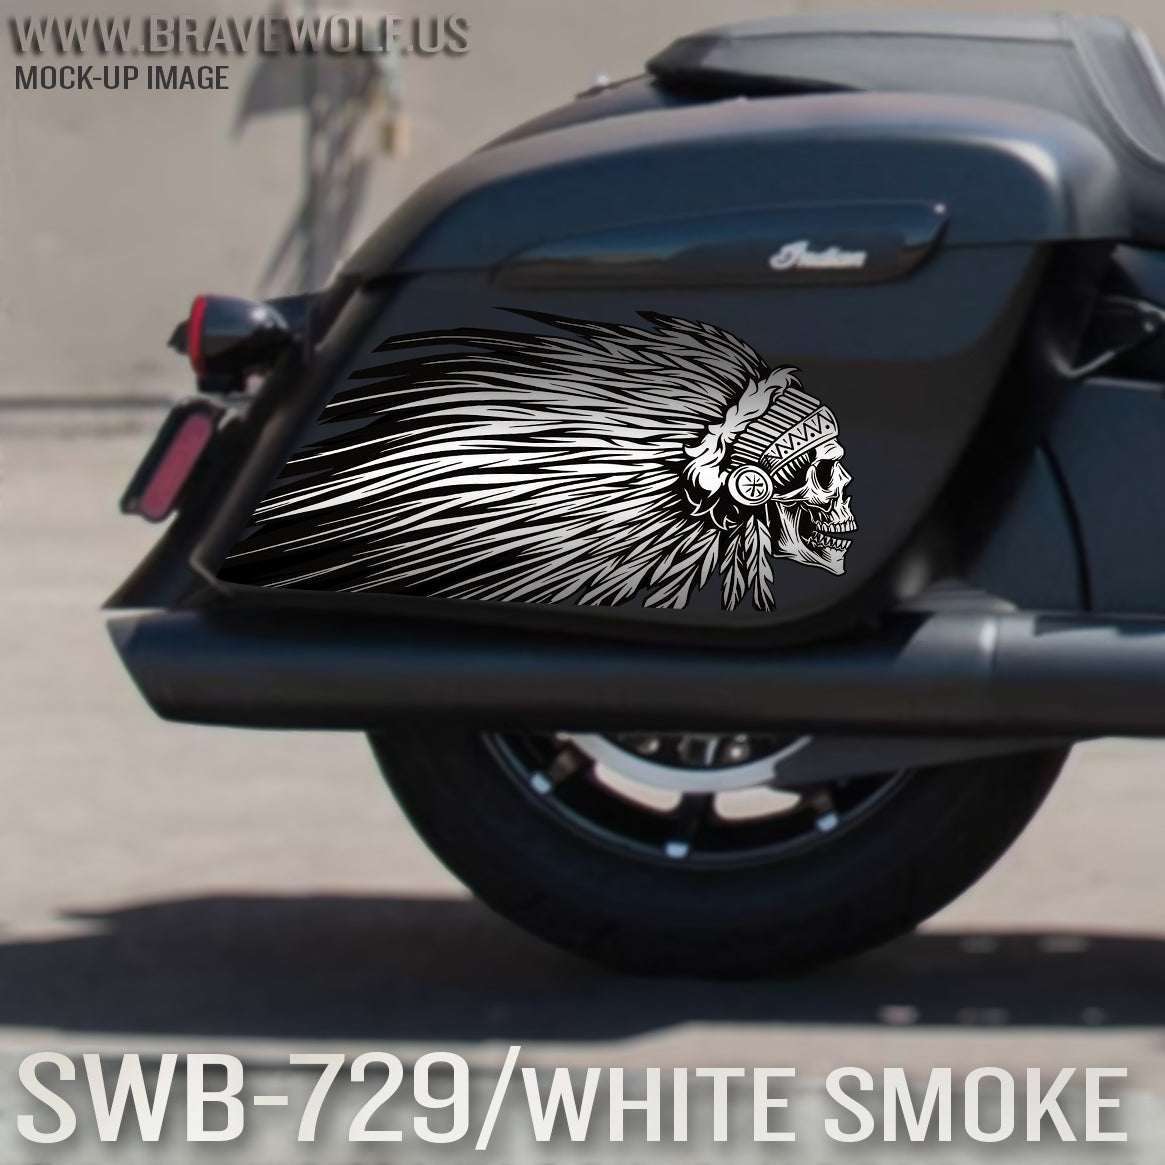
SWB-729-Indian Thunderstroke- White Smoke
Regular price $100.00
Shipping calculated at checkout.
Stock Notice - Usually in stock (may take approximately 2-3 weeks before shipping if not in stock at time of order)
“White Smoke" SWB-729 Tank Decal for Indian Thunderstroke Models (IE: Roadmaster, Chieftain, Chief, Springfield, Classic, etc)
Also fits the Indian FTR
Can be installed on Challenger or Pursuit but original logo may show a little underneath the decals.
Size: Covers the OEM headdress on models that have it. For models that have emblem badges or script, this will need to be removed before applying the decals.
Weatherproof laminated decals are self adhesive.

Photo courtesy of Kelly Gruidl
How To Install: <-Visit our How To page for videos
We recommend using the wet method to install larger decals: A spray bottle with water and dish soap can be used to wet the tank and the back of the decal, allowing you to slide the decal into place. To get the proper soap/water mix, start with a squirt of soap into your spray bottle. Shake it up and then spray it on your hand. Rub your finger tips together. You should feel the slipperiness of the soap. If it just feels like water, add more soap and try again. Once you have it aligned properly, use a squeegee or some non-abrasive tool (even your fingers) to push the moisture out from behind the decal and it will adhere to your tank. A plastic putty scraper with a thin cloth wrapped around it will work great and prevent scratching your decals.


Dreamcatcher Skull Warbonnet - Universal Tank Decal-B&W
Regular price $100.00
Shipping calculated at checkout.
Stock Notice: (may take approximately 3-4 weeks before shipping if we don't have it in stock at the time of your order)
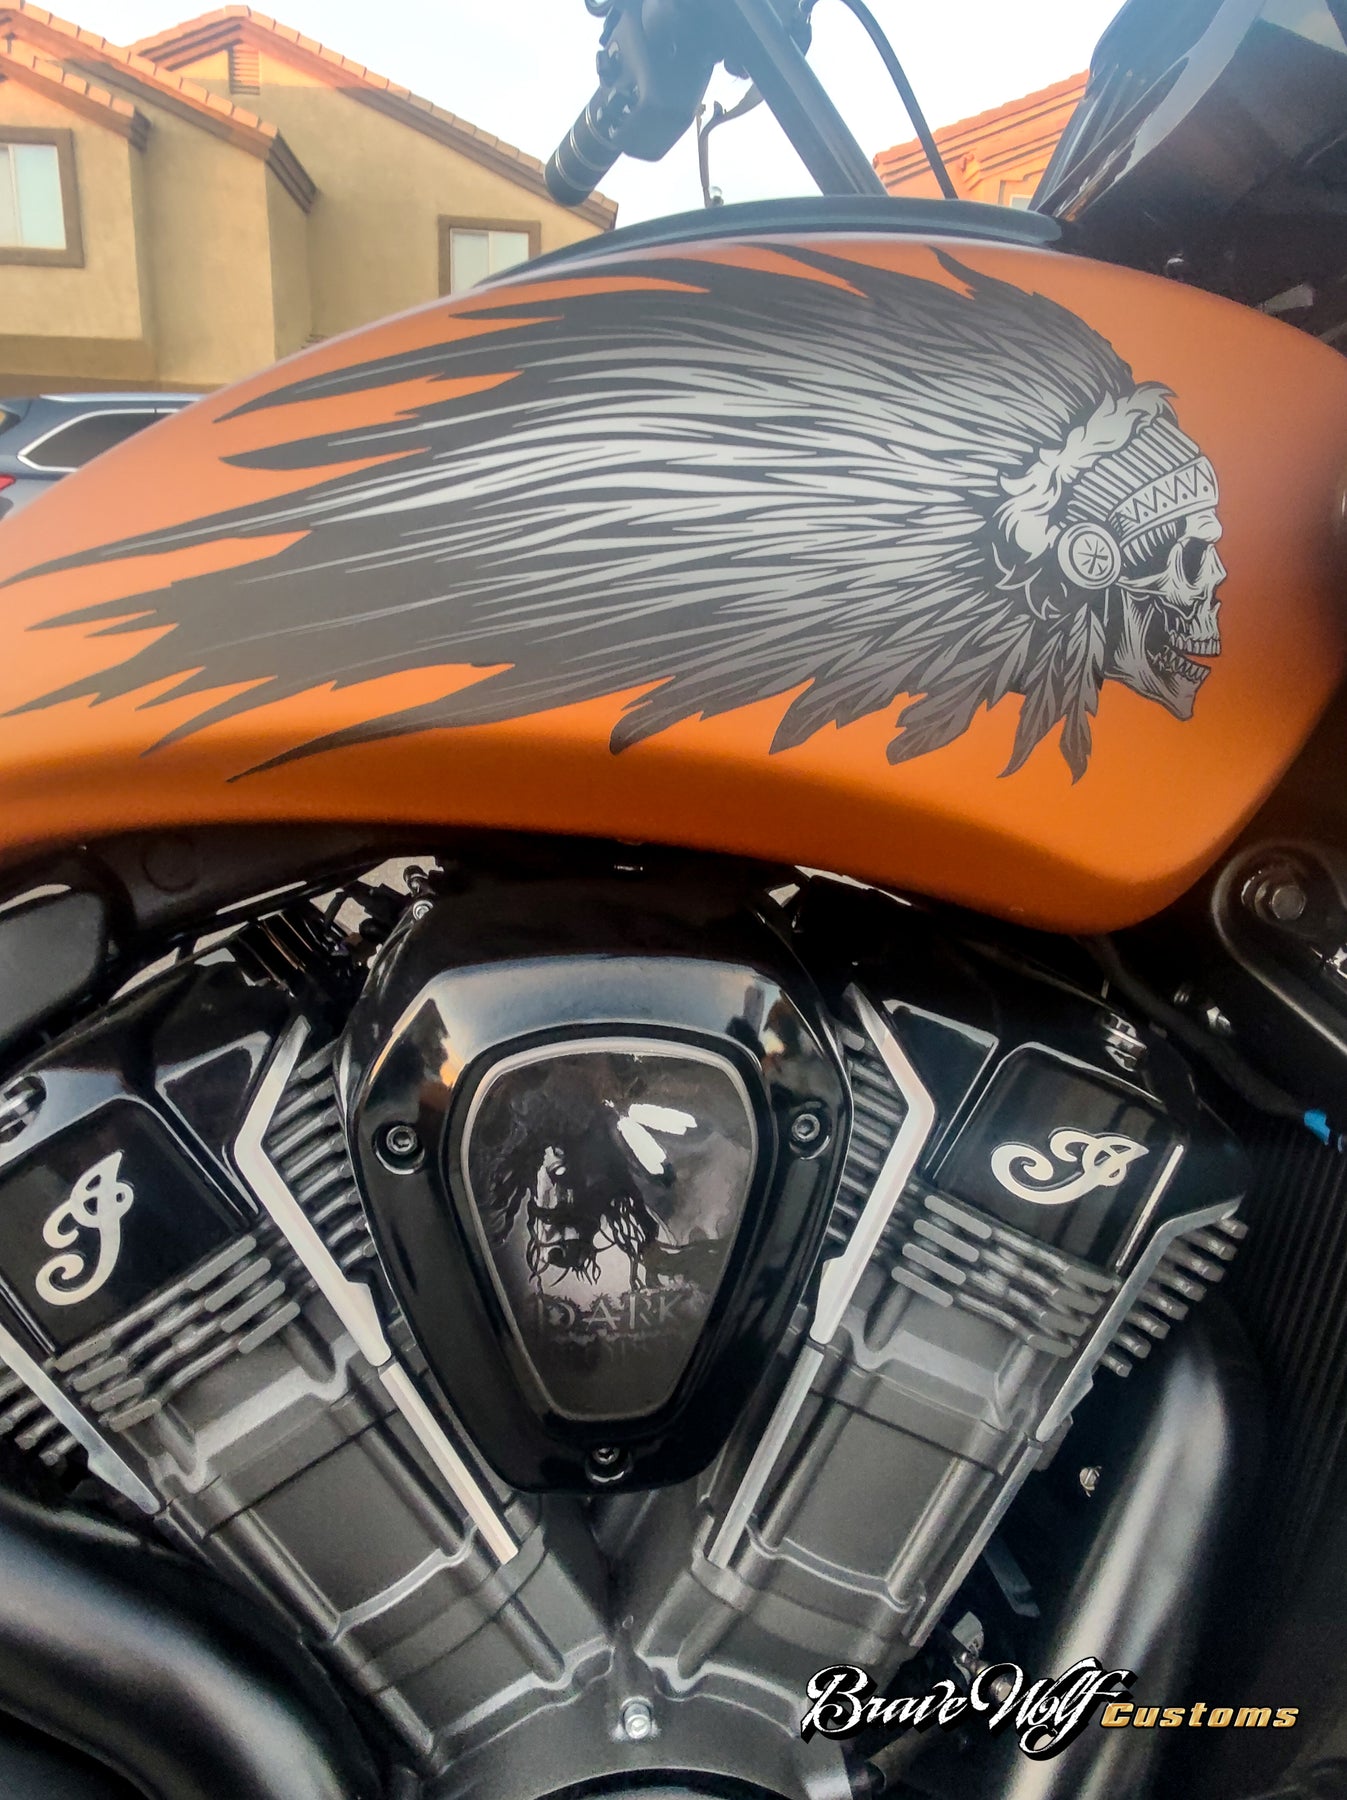
“Dreamcatcher Skull Warbonnet" Universal Tank Decals for all Brands and Models of Motorcycles
Dreamcatchers have long been a highly requested theme from my audience. I decided to start that theme off as a combination with my other most popular theme, the skull warbonnet. There will be more dreamcatchers, but this is the first. - Jason
These decals were designed to cover the original headdress on Indian Motorcycles but can be used by any brand or model of bike.
Size: 6.4 inches x 14.9 inches

Fitment over INDIAN OEM headdress logo

These decals are designed for all brands/models of motorcycles. Check the measurements to ensure a proper fit on your bike before ordering. If your tank already has a graphic, we can’t guarantee these decals will cover it completely. To verify fit and coverage, print out the template below, cut it out and tape it to your tank. (Print out template will be added soon)
How To Install: <-Visit our How To page for videos
Weatherproof HD Gloss finish vinyl decals are self adhesive. We recommend using the wet method to install these decals: A spray bottle with water and dish soap can be used to wet the surface and the back of the decal, allowing you to slide the decal into place. Once you have it aligned properly, use your thumbs to push the moisture out from behind the decal, working from the center outwards to the edges and it will adhere to your bike. Using the wet method allows the decal surface to evenly distribute over the curved surface. A hair dryer to apply heat will make the process easier since the vinyl becomes more soft and flexible when warm.

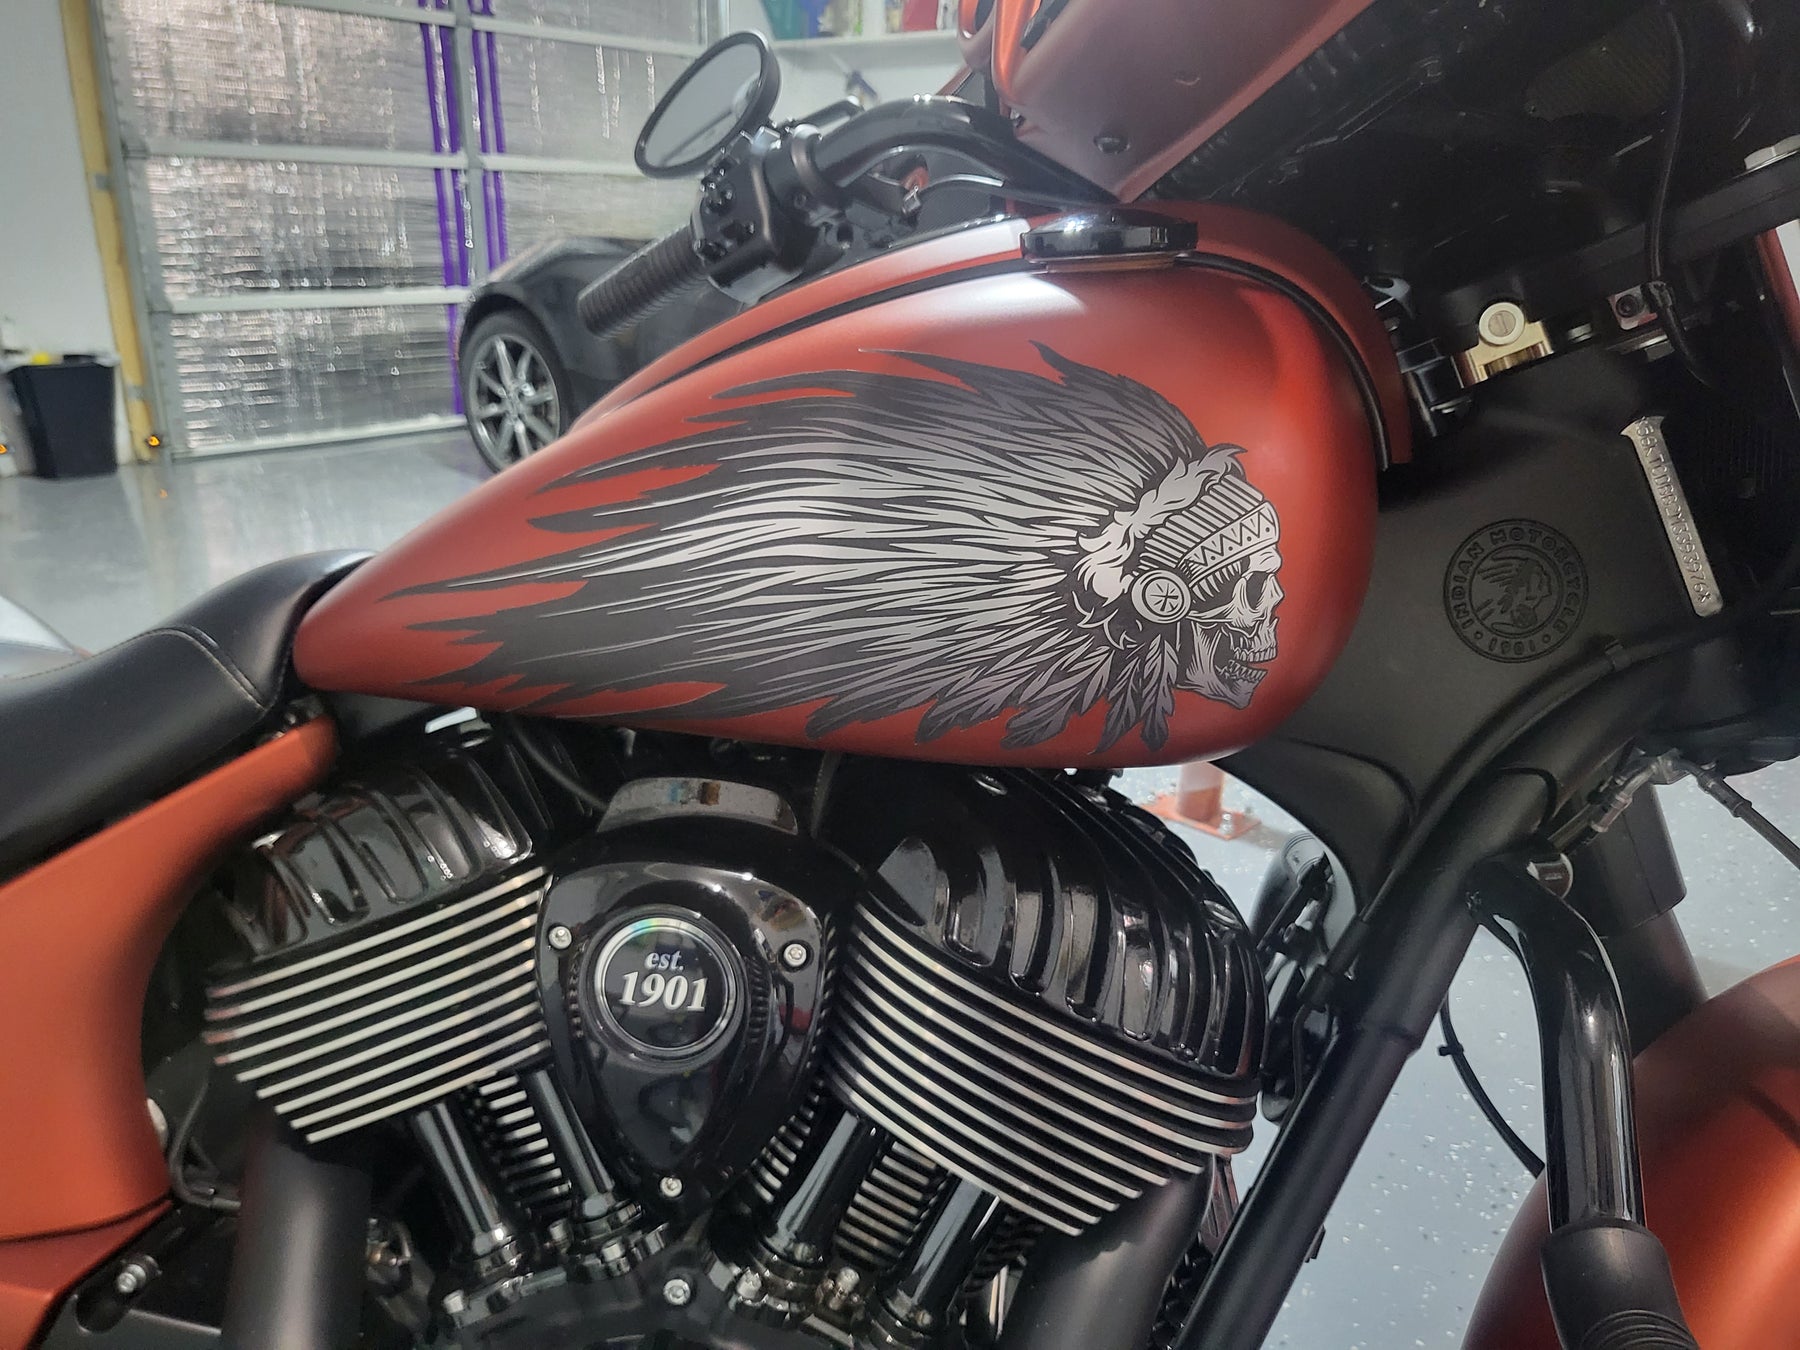
Dreamcatcher Skull Warbonnet - Universal Tank Decal-Red & White
Regular price $100.00
Shipping calculated at checkout.
Stock Notice: (may take approximately 2-3 weeks before shipping if we don't have it in stock at the time of your order)
“Dreamcatcher Skull Warbonnet" Universal Tank Decals for all Brands and Models of Motorcycles
Dreamcatchers have long been a highly requested theme from my audience. I decided to start that theme off as a combination with my other most popular theme, the skull warbonnet. There will be more dreamcatchers, but this is the first. - Jason
These decals were designed to cover the original headdress on Indian Motorcycles but can be used by any brand or model of bike.
If you have an Indian Scout, we recommend purchasing our Scout version which is slightly smaller in order fit on the tank side without extending over the border.
Size: 6.4 inches x 14.9 inches
Fitment over INDIAN OEM headdress logo
These decals are designed for all brands/models of motorcycles. Check the measurements to ensure a proper fit on your bike before ordering. If your tank already has a graphic, we can’t guarantee these decals will cover it completely. To verify fit and coverage, print out the template below, cut it out and tape it to your tank. (Print out template will be added soon)
How To Install: <-Visit our How To page for videos
Weatherproof HD Gloss finish vinyl decals are self adhesive. We recommend using the wet method to install these decals: A spray bottle with water and dish soap can be used to wet the surface and the back of the decal, allowing you to slide the decal into place. Once you have it aligned properly, use your thumbs to push the moisture out from behind the decal, working from the center outwards to the edges and it will adhere to your bike. Using the wet method allows the decal surface to evenly distribute over the curved surface. A hair dryer to apply heat will make the process easier since the vinyl becomes more soft and flexible when warm.


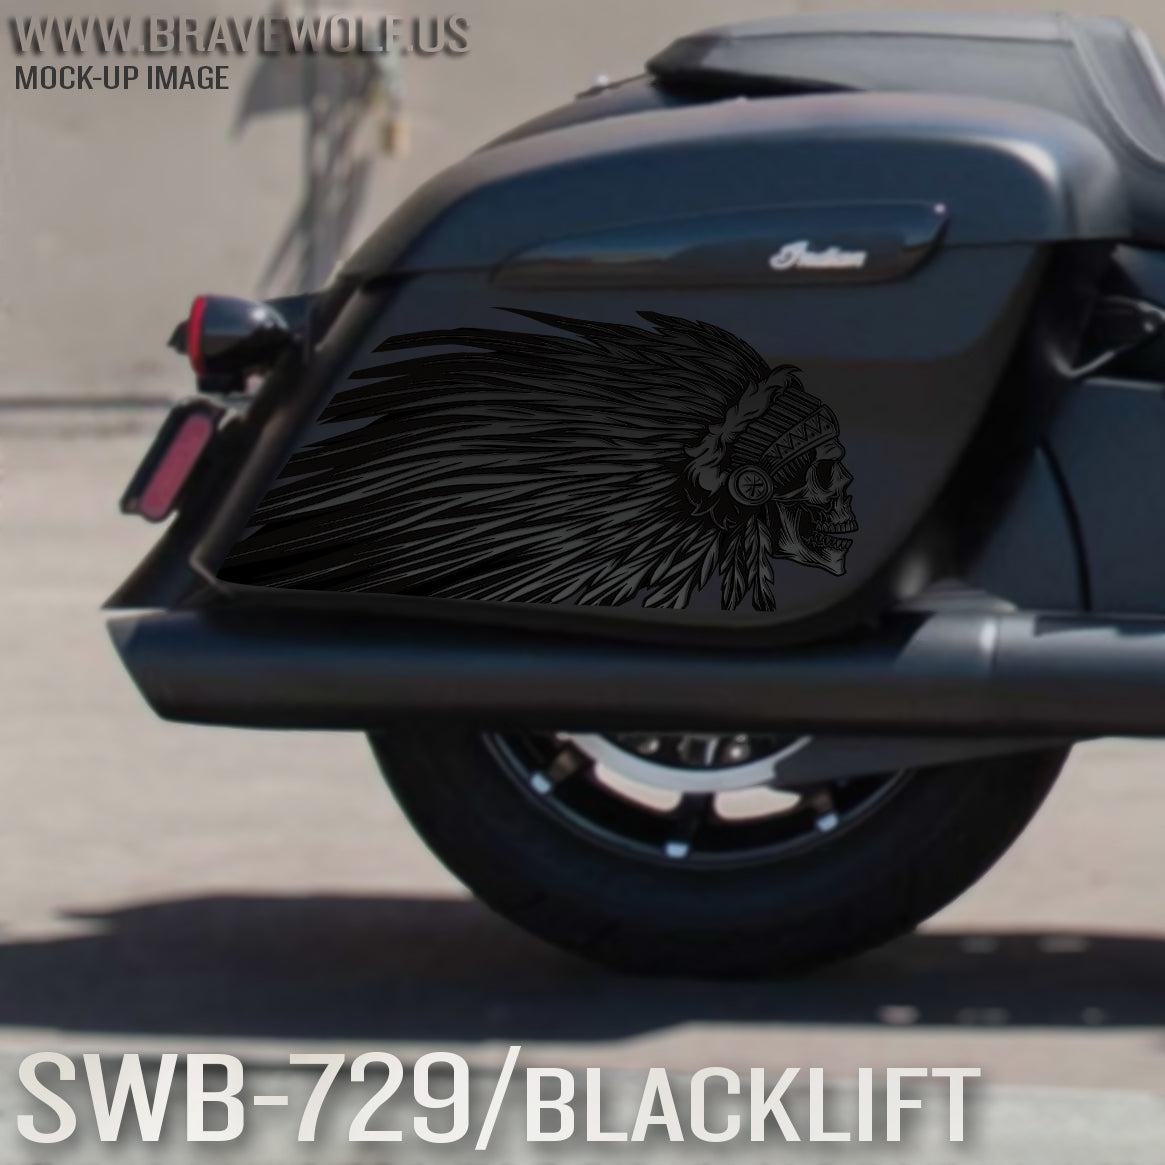
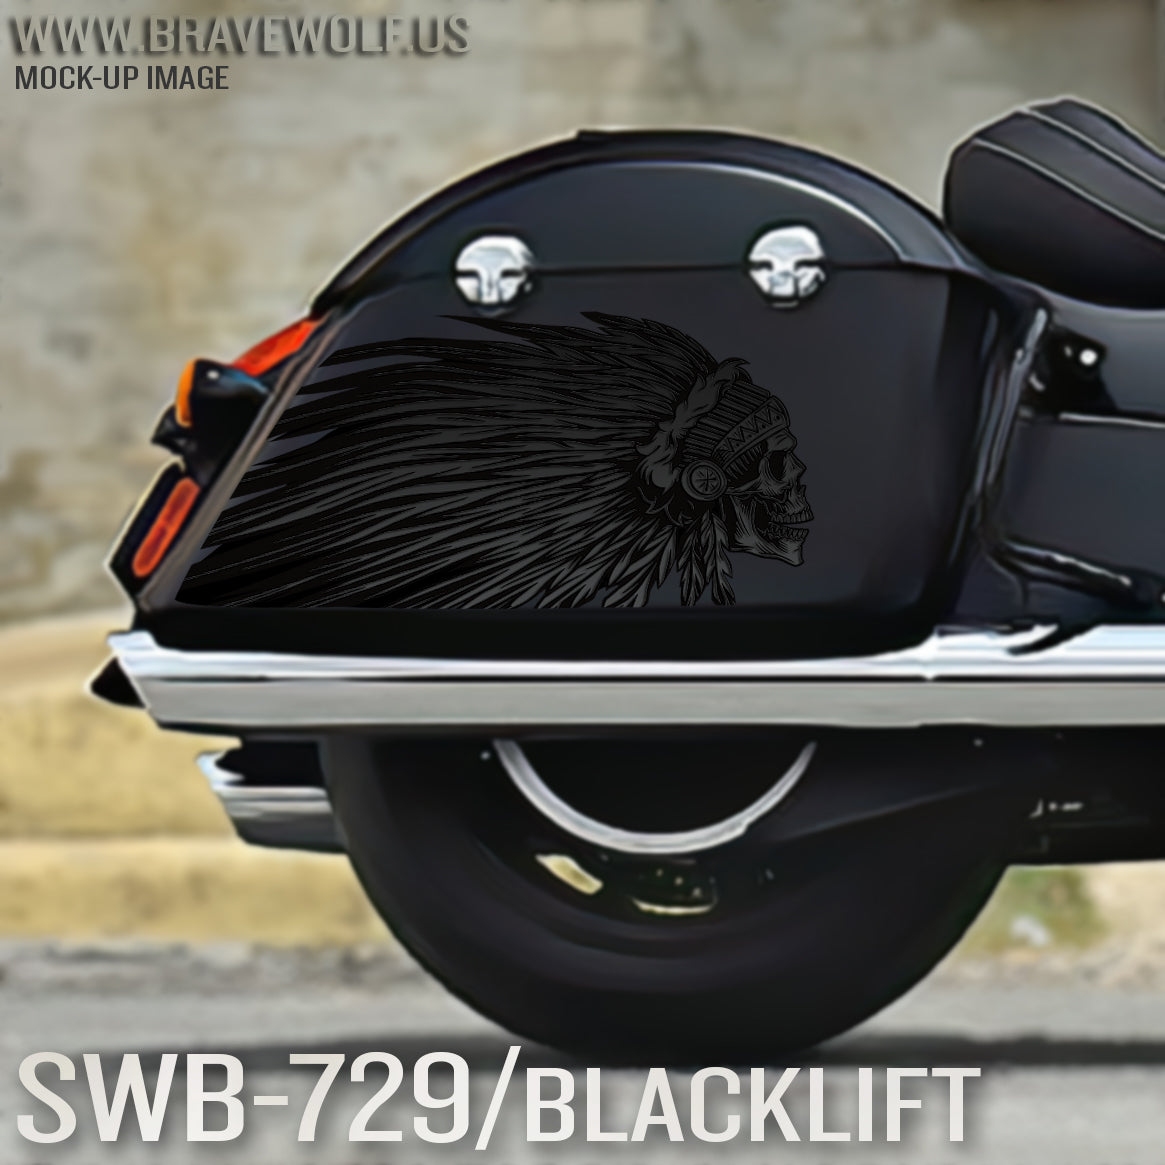
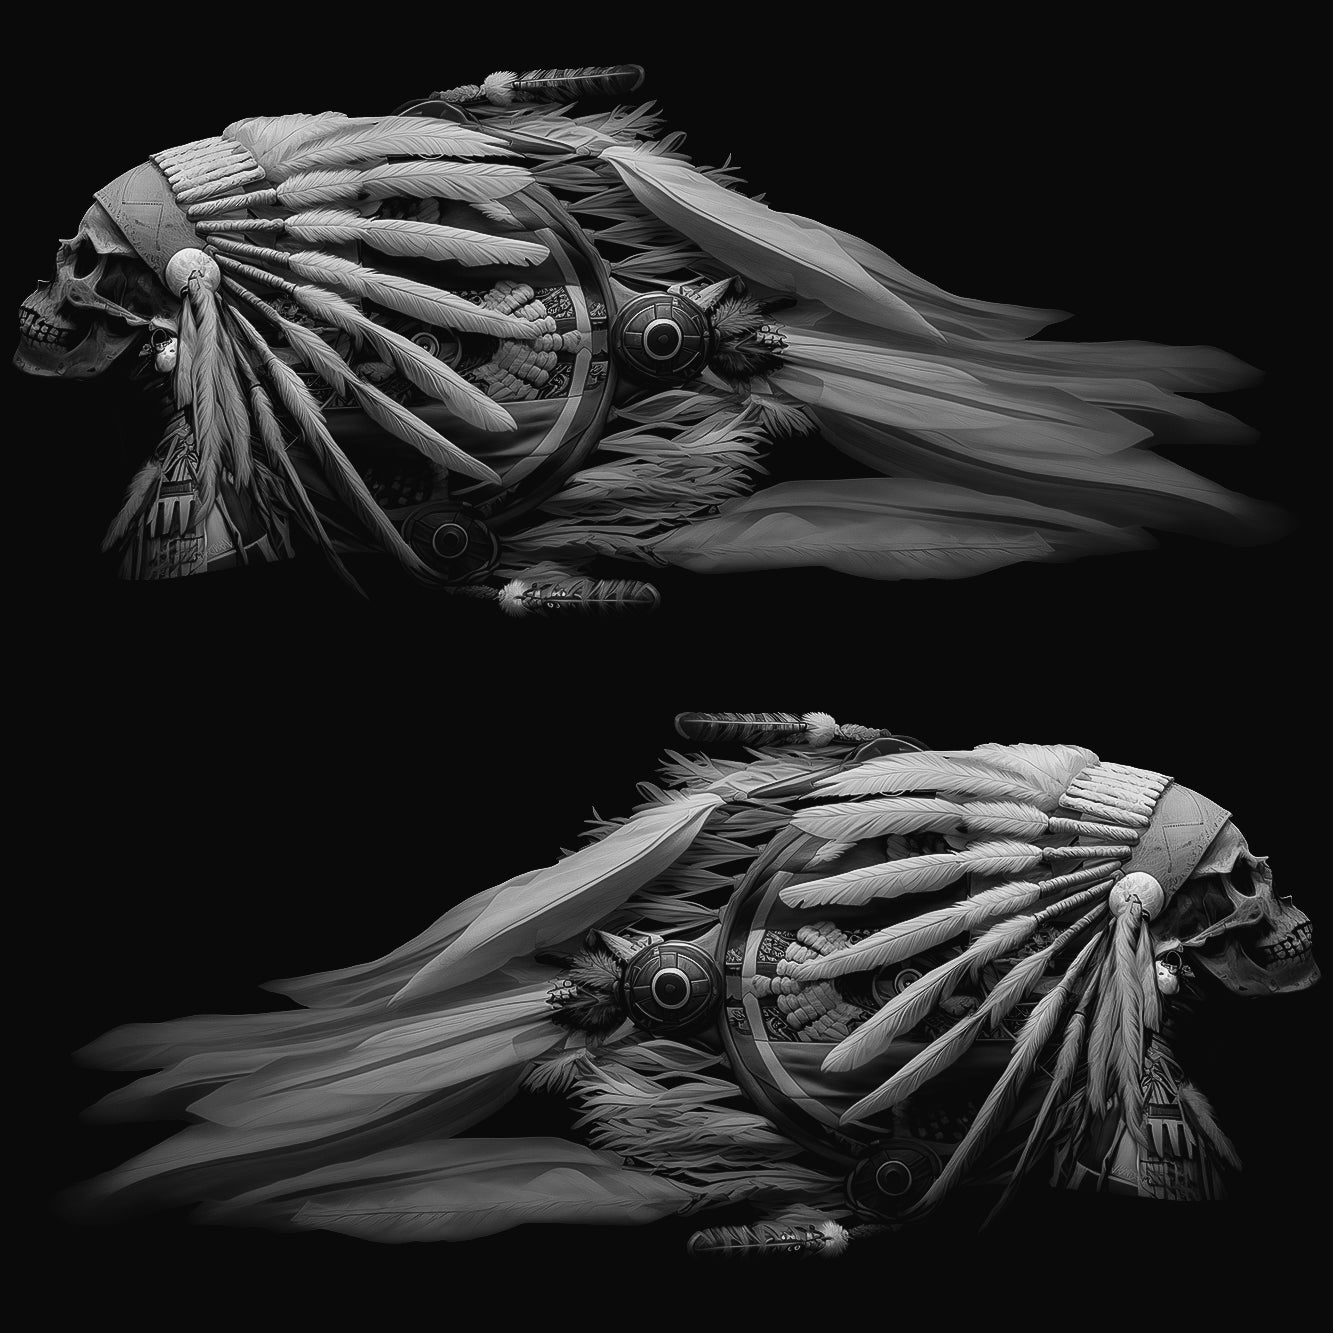
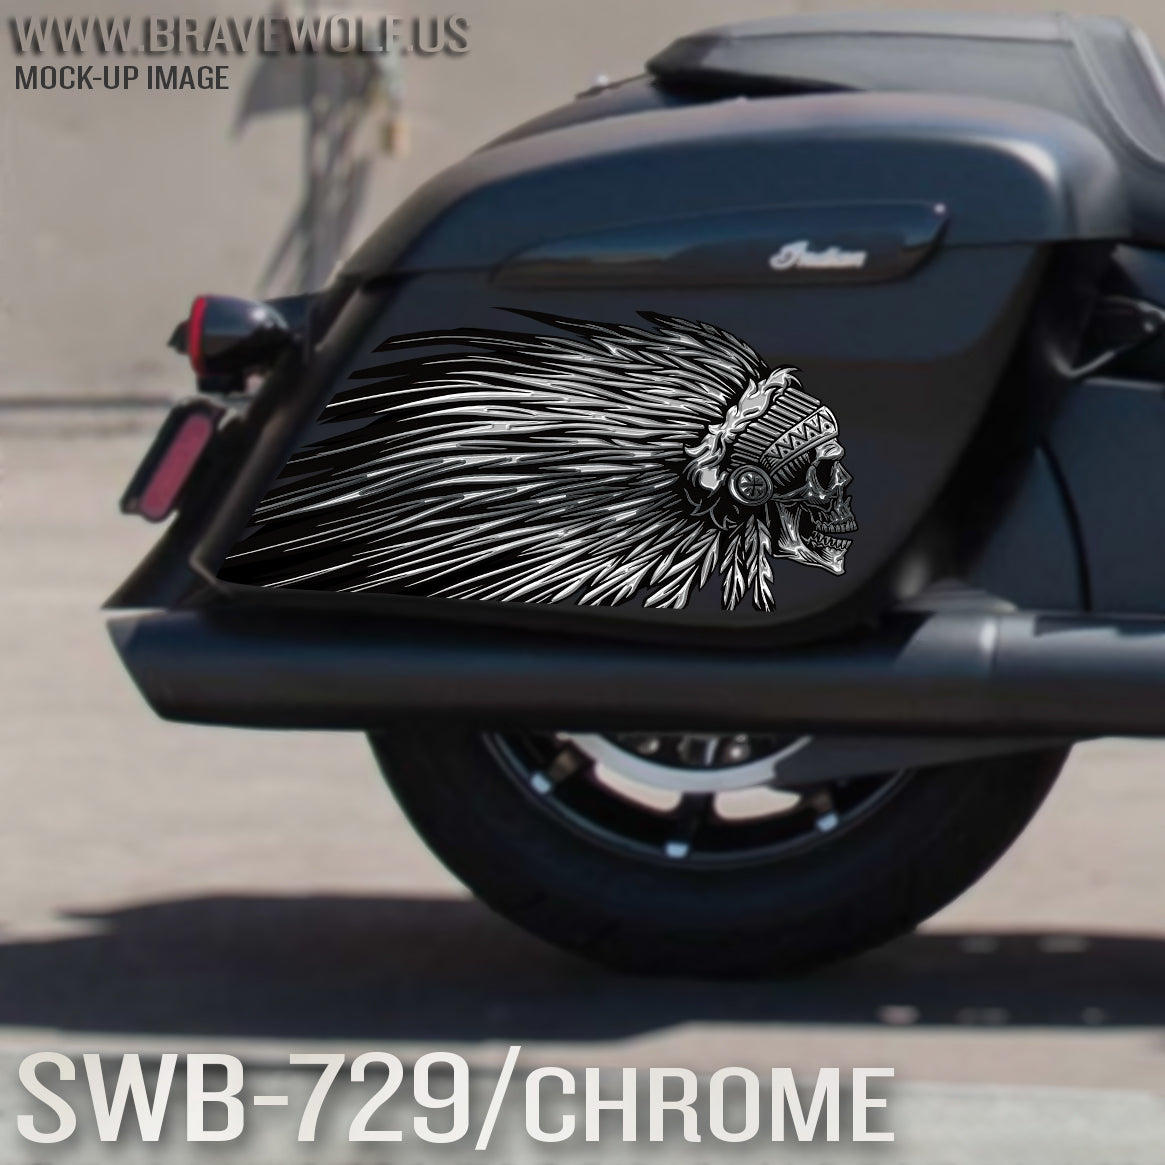
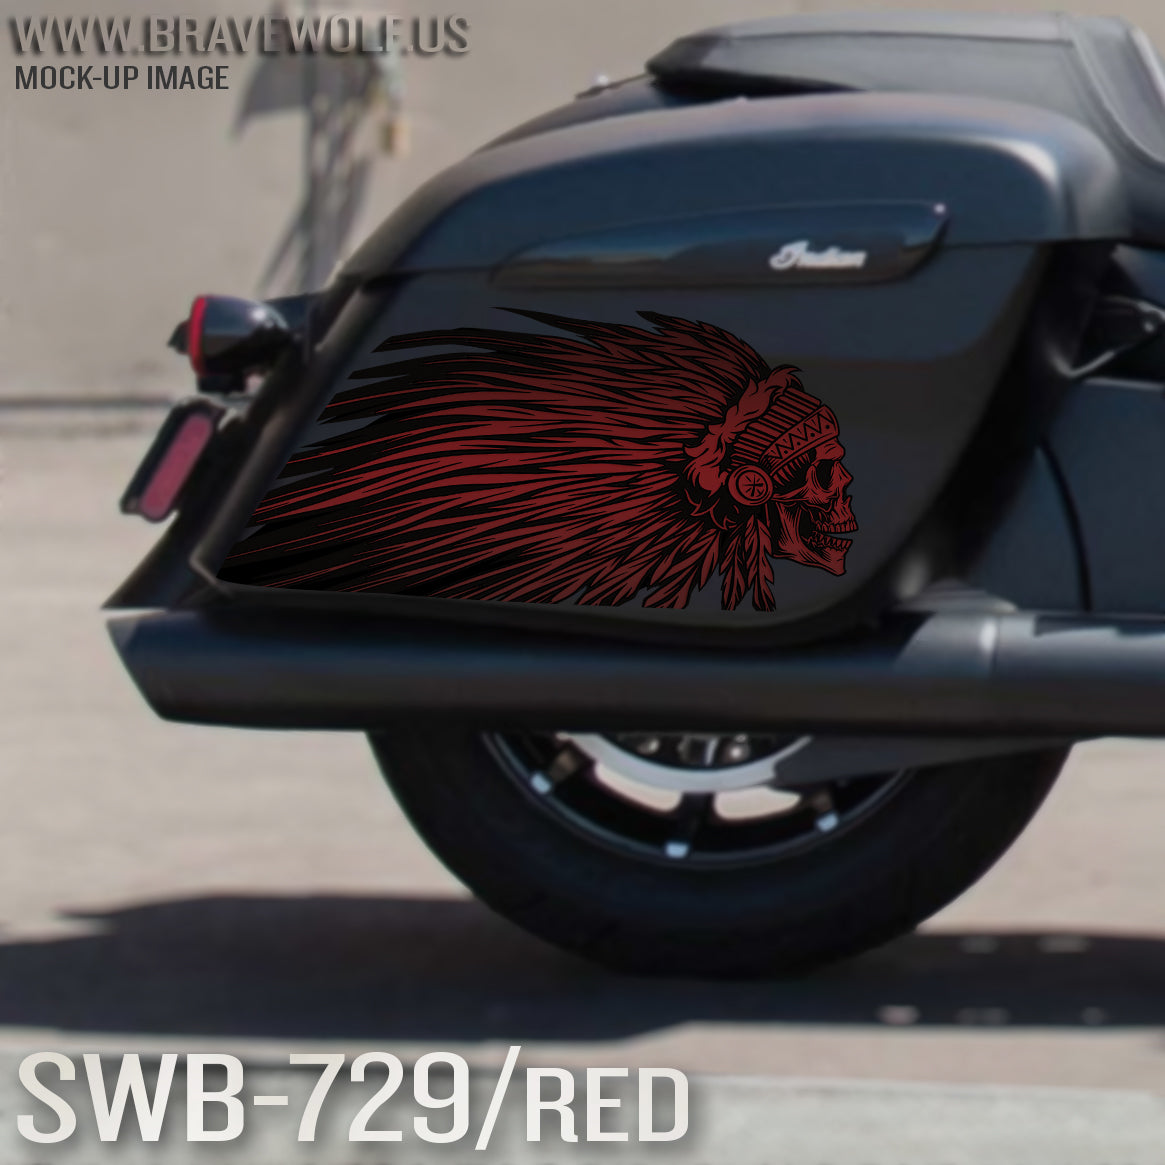
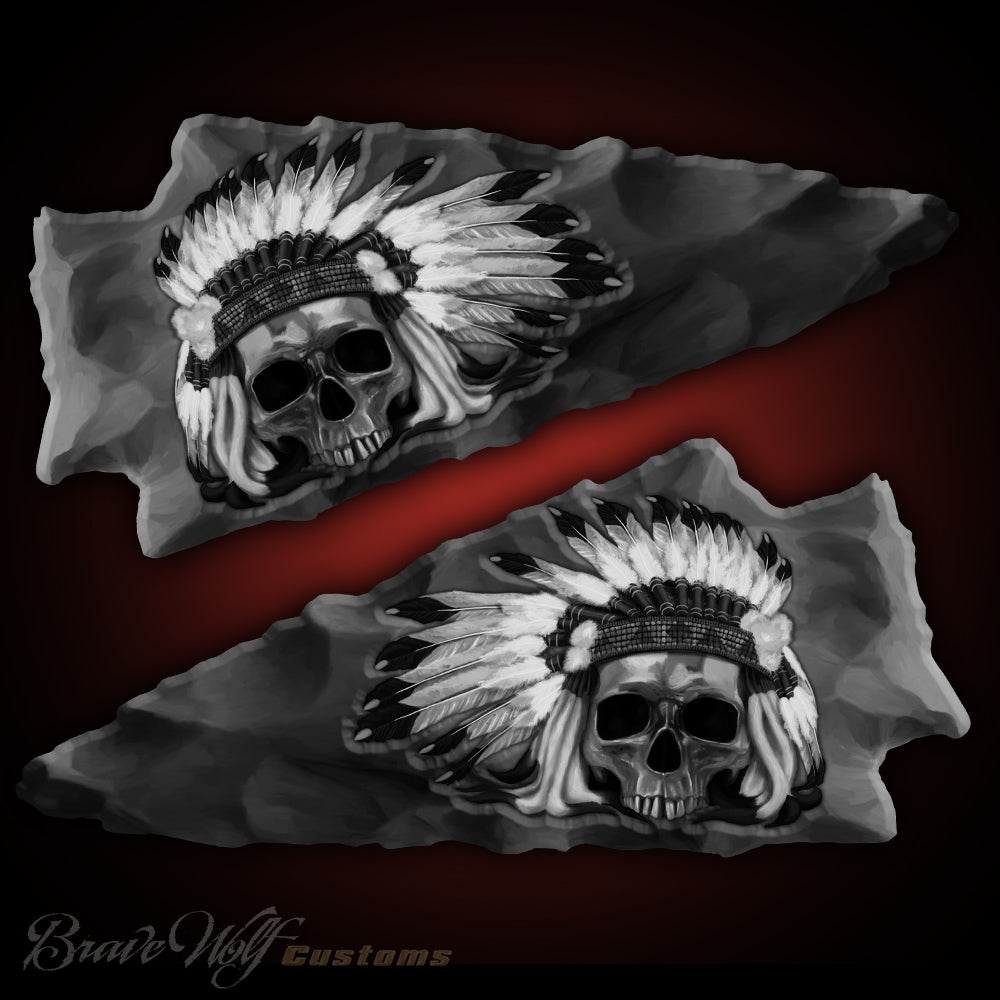
Indian Saddlebag Decals-SWB729-Blacklift
Regular price $180.00
Shipping calculated at checkout.
Stock Notice: (may take approximately 2-3 weeks before shipping if not in stock at the time of your order)
Our saddlebag decals are made from premium weatherproof hi-tack vinyl with a long lifespan that will keep them looking new for years. They are available in two finishes, heavy-duty 12 mil laminated Gloss (looks like it's painted on), or a heavy-duty sandy matte textured premium finish.
|
Fitment Guide: Fits both styles of Indian OEM saddlebags (rounded and squared). Also fits the Challenger & Pursuit when the plastic bag guard is removed. |

Installation:
Installing our decals is easy to do yourself at home. We recommend removing all of the excess decal material (the background image) before installing the decals. This will allow you to dispose of all the small cut-out pieces so that the pieces do not get trapped underneath your decal when installing it on the bike. Once you have all of the small pieces and background removed, you can use the "wet method" to install the decals to your saddlebags. The wet method involves using a spray bottle of water with a couple drops of dish soap in the mixture and spraying the surface of your saddlebags to wet the entire surface. Then carefully remove the backing from your decal and use the spray bottle to wet the adhesive side of the decal. Now you can gently place the decal on your saddlebag. Because the surfaces are wet, you can pull the decal up to reposition it until you get it where you want it. Once it's in place, use a squeegee or other object such as a credit card wrapped in a microfiber towel to squeeze the water out from behind the decal. You can also use your hands to do this. You should take care not to use a hard/abrasive object that can scratch the decals or your bike's paint. The high-tack adhesive will begin to set/adhere to the bike as soon as the liquid is push out from behind the decal. Use caution to ensure the towel or object you are using does not catch any edges of the decal and pull it off your bike. If you take your time and be gentle during installation, it should be an easy process. A hair dryer can be used to speed up the drying process if needed.
Feel free to visit our How-To page on the website to watch a "wet method" installation video TAB Performance made while installing our Zombie decals.


MesoSkull Warbonnet 2023 - Universal Tank Decal-BW
Regular price $100.00
Shipping calculated at checkout.
Stock Notice: (may take approximately 2-3 weeks before shipping if not in stock at the time of your order)
“MesoSkull Warbonnet 2023" Universal Tank Decals for all Brands and Models of Motorcycles

These decals were designed to cover the original headdress on Indian Motorcycles but can be used by any brand or model of bike.
If you have an Indian Scout, we recommend purchasing our Scout version which is slightly smaller in order fit on the tank side without extending over the border.
Size: Will be posted soon
These decals are designed for all brands/models of motorcycles. Check the measurements to ensure a proper fit on your bike before ordering. If your tank already has a graphic, we can’t guarantee these decals will cover it completely. To verify fit and coverage, print out the template below, cut it out and tape it to your tank. (Print out template will be added soon)
How To Install: <-Visit our How To page for videos
Weatherproof HD Gloss finish vinyl decals are self adhesive. We recommend using the wet method to install these decals: A spray bottle with water and dish soap can be used to wet the surface and the back of the decal, allowing you to slide the decal into place. Once you have it aligned properly, use your thumbs to push the moisture out from behind the decal, working from the center outwards to the edges and it will adhere to your bike. Using the wet method allows the decal surface to evenly distribute over the curved surface. A hair dryer to apply heat will make the process easier since the vinyl becomes more soft and flexible when warm.


Saddlebag Decals-SWB729-Chrome
Regular price $180.00
Shipping calculated at checkout.
Stock Notice - Special Order (may take approximately 2-3 weeks before shipping if not in stock at time of order)
Our saddlebag decals are made from premium weatherproof hi-tack vinyl with a long lifespan that will keep them looking new for years. They are available in two finishes, heavy-duty 12 mil laminated Gloss (looks like it's painted on), or a heavy-duty sandy matte textured premium finish.
|
Fitment Guide: Fits both styles of Indian OEM saddlebags (rounded and squared). Also fits the Challenger & Pursuit when the plastic bag guard is removed. |
Installation:
Installing our decals is easy to do yourself at home. We recommend removing all of the excess decal material (the background image) before installing the decals. This will allow you to dispose of all the small cut-out pieces so that the pieces do not get trapped underneath your decal when installing it on the bike. Once you have all of the small pieces and background removed, you can use the "wet method" to install the decals to your saddlebags. The wet method involves using a spray bottle of water with a couple drops of dish soap in the mixture and spraying the surface of your saddlebags to wet the entire surface. Then carefully remove the backing from your decal and use the spray bottle to wet the adhesive side of the decal. Now you can gently place the decal on your saddlebag. Because the surfaces are wet, you can pull the decal up to reposition it until you get it where you want it. Once it's in place, use a squeegee or other object such as a credit card wrapped in a microfiber towel to squeeze the water out from behind the decal. You can also use your hands to do this. You should take care not to use a hard/abrasive object that can scratch the decals or your bike's paint. The high-tack adhesive will begin to set/adhere to the bike as soon as the liquid is push out from behind the decal. Use caution to ensure the towel or object you are using does not catch any edges of the decal and pull it off your bike. If you take your time and be gentle during installation, it should be an easy process. A hair dryer can be used to speed up the drying process if needed.
Feel free to visit our How-To page on the website to watch a "wet method" installation video.


Saddlebag Decals-SWB729-Red
Regular price $180.00
Shipping calculated at checkout.
Stock Notice: (may take approximately 2-3 weeks before shipping if not in stock at the time of your order)
Our saddlebag decals are made from premium weatherproof hi-tack vinyl with a long lifespan that will keep them looking new for years. They are available in two finishes, heavy-duty 12 mil laminated Gloss (looks like it's painted on), or a heavy-duty sandy matte textured premium finish.
|
Fitment Guide: Fits both styles of Indian OEM saddlebags (rounded and squared). Also fits the Challenger & Pursuit when the plastic bag guard is removed. |
Installation:
Installing our decals is easy to do yourself at home. We recommend removing all of the excess decal material (the background image) before installing the decals. This will allow you to dispose of all the small cut-out pieces so that the pieces do not get trapped underneath your decal when installing it on the bike. Once you have all of the small pieces and background removed, you can use the "wet method" to install the decals to your saddlebags. The wet method involves using a spray bottle of water with a couple drops of dish soap in the mixture and spraying the surface of your saddlebags to wet the entire surface. Then carefully remove the backing from your decal and use the spray bottle to wet the adhesive side of the decal. Now you can gently place the decal on your saddlebag. Because the surfaces are wet, you can pull the decal up to reposition it until you get it where you want it. Once it's in place, use a squeegee or other object such as a credit card wrapped in a microfiber towel to squeeze the water out from behind the decal. You can also use your hands to do this. You should take care not to use a hard/abrasive object that can scratch the decals or your bike's paint. The high-tack adhesive will begin to set/adhere to the bike as soon as the liquid is push out from behind the decal. Use caution to ensure the towel or object you are using does not catch any edges of the decal and pull it off your bike. If you take your time and be gentle during installation, it should be an easy process. A hair dryer can be used to speed up the drying process if needed.
Feel free to visit our How-To page on the website to watch a "wet method" installation video TAB Performance made while installing our Zombie decals.


Indian Saddlebag Decals-SWB729-WhiteSmoke
Regular price $180.00
Shipping calculated at checkout.
Stock Notice: (may take approximately 2-3 weeks before shipping if not in stock at the time of your order)
Our saddlebag decals are made from premium weatherproof hi-tack vinyl with a long lifespan that will keep them looking new for years. They are available in two finishes, heavy-duty 12 mil laminated Gloss (looks like it's painted on), or a heavy-duty sandy matte textured premium finish.
|
Fitment Guide: Fits both styles of Indian OEM saddlebags (rounded and squared). Also fits the Challenger & Pursuit when the plastic bag guard is removed. |
Installation:
Installing our decals is easy to do yourself at home. We recommend removing all of the excess decal material (the background image) before installing the decals. This will allow you to dispose of all the small cut-out pieces so that the pieces do not get trapped underneath your decal when installing it on the bike. Once you have all of the small pieces and background removed, you can use the "wet method" to install the decals to your saddlebags. The wet method involves using a spray bottle of water with a couple drops of dish soap in the mixture and spraying the surface of your saddlebags to wet the entire surface. Then carefully remove the backing from your decal and use the spray bottle to wet the adhesive side of the decal. Now you can gently place the decal on your saddlebag. Because the surfaces are wet, you can pull the decal up to reposition it until you get it where you want it. Once it's in place, use a squeegee or other object such as a credit card wrapped in a microfiber towel to squeeze the water out from behind the decal. You can also use your hands to do this. You should take care not to use a hard/abrasive object that can scratch the decals or your bike's paint. The high-tack adhesive will begin to set/adhere to the bike as soon as the liquid is push out from behind the decal. Use caution to ensure the towel or object you are using does not catch any edges of the decal and pull it off your bike. If you take your time and be gentle during installation, it should be an easy process. A hair dryer can be used to speed up the drying process if needed.
Feel free to visit our How-To page on the website to watch a "wet method" installation video TAB Performance made while installing our Zombie decals.


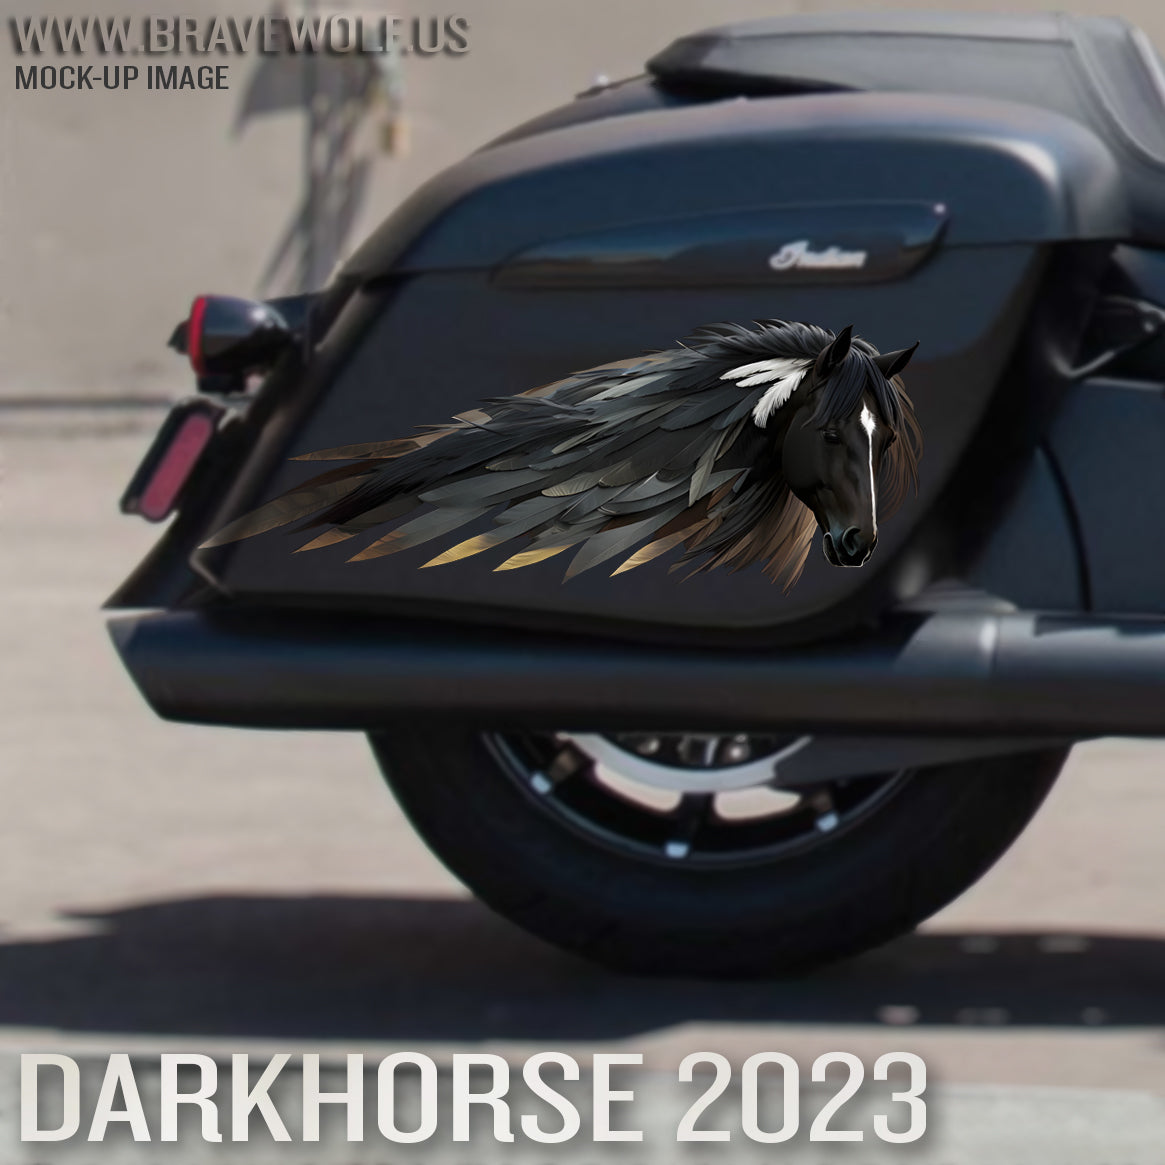

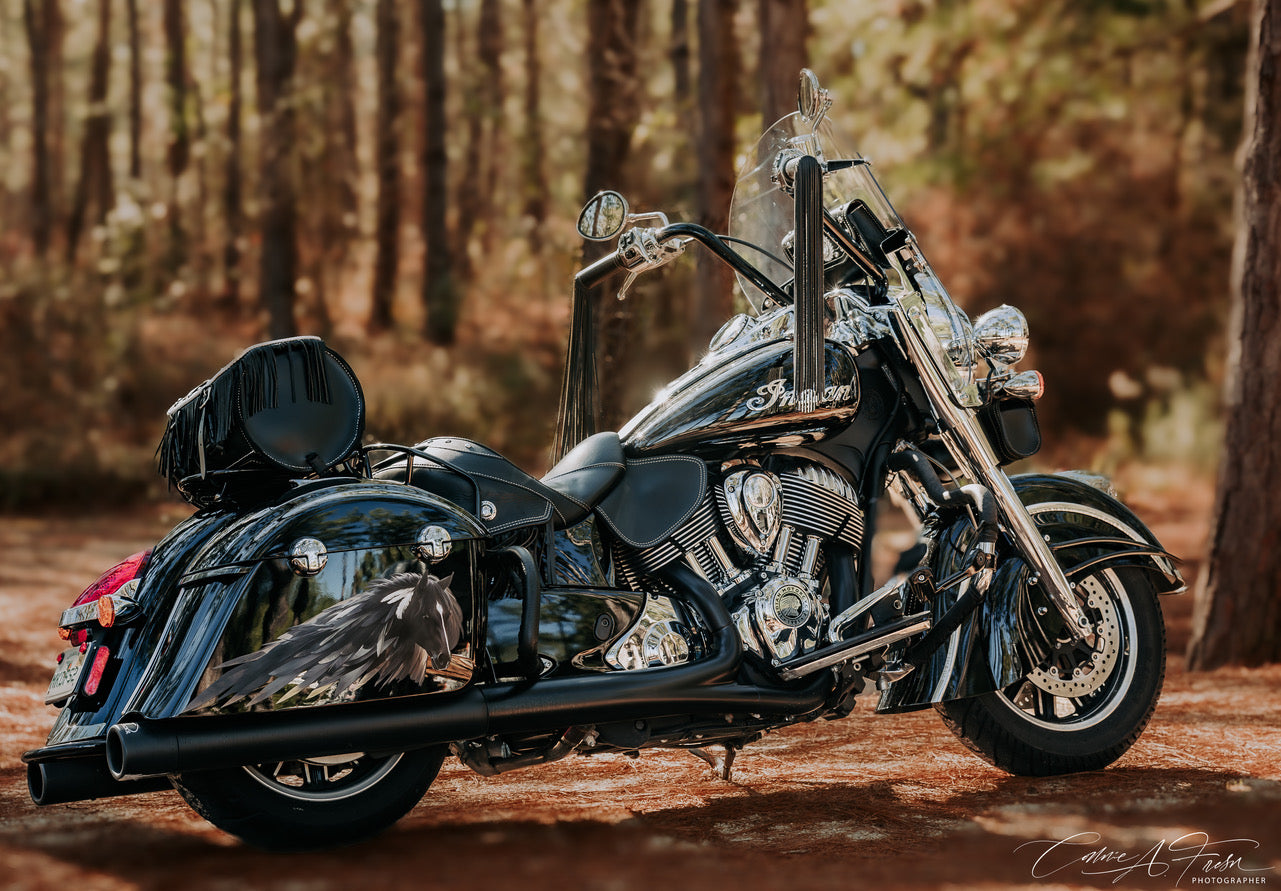
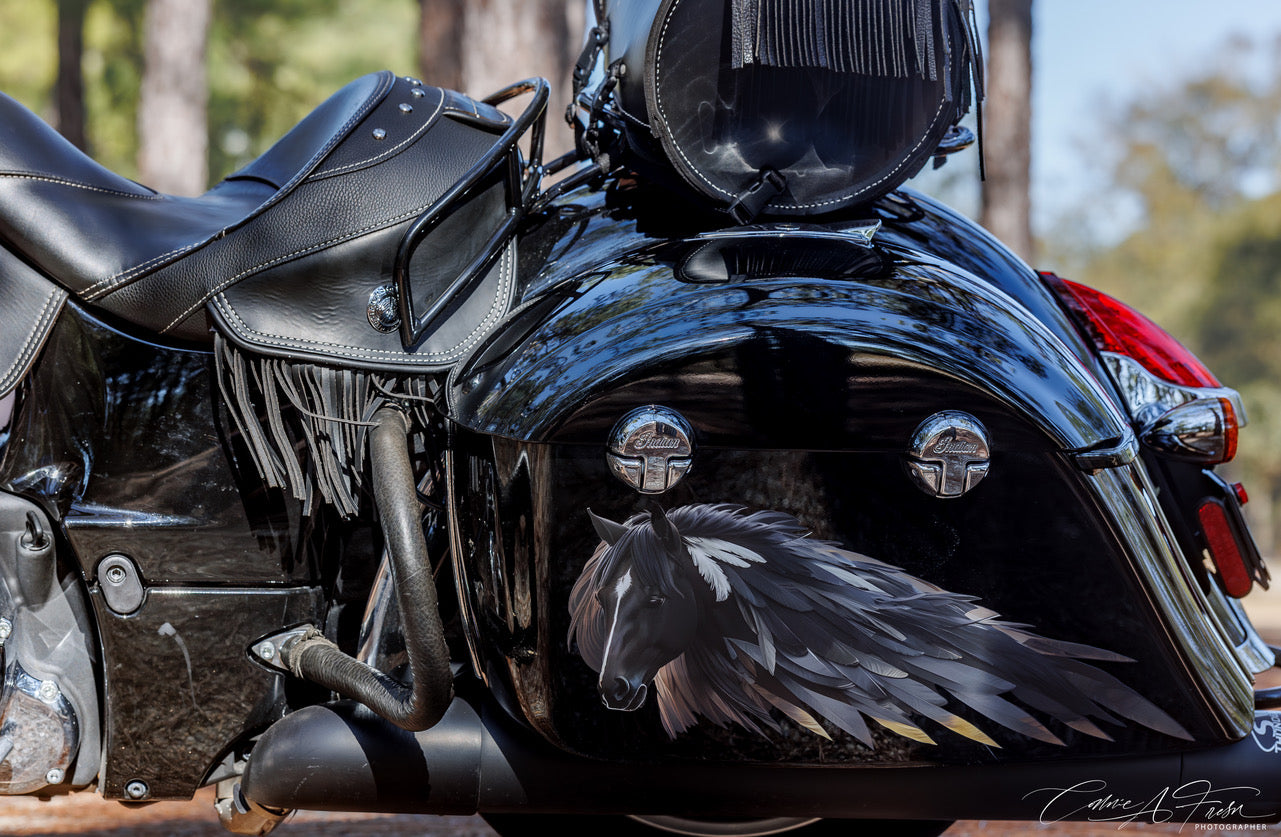
Dark Horse 2023 (color) Saddlebag Decal Set for Indian Motorcycles
Regular price $160.00
Shipping calculated at checkout.
Stock Notice: (may take approximately 2-3 weeks before shipping if not in stock at time of order)
Our saddlebag decals are made from premium weatherproof hi-tack vinyl with a long lifespan that will keep them looking new for years. They are available in two finishes, heavy-duty 12 mil laminated Gloss (looks like it's painted on), or a heavy-duty sandy matte textured premium finish.
|
Fitment Guide: Fits both styles of Indian OEM saddlebags (rounded and squared). Also fits the Challenger & Pursuit when the plastic bag guard is removed. |
Installation:
Installing our decals is easy to do yourself at home. We recommend removing all of the excess decal material (the background image) before installing the decals. This will allow you to dispose of all the small cut-out pieces so that the pieces do not get trapped underneath your decal when installing it on the bike. Once you have all of the small pieces and background removed, you can use the "wet method" to install the decals to your saddlebags. The wet method involves using a spray bottle of water with a couple drops of dish soap in the mixture and spraying the surface of your saddlebags to wet the entire surface. Then carefully remove the backing from your decal and use the spray bottle to wet the adhesive side of the decal. Now you can gently place the decal on your saddlebag. Because the surfaces are wet, you can pull the decal up to reposition it until you get it where you want it. Once it's in place, use a squeegee or other object such as a credit card wrapped in a microfiber towel to squeeze the water out from behind the decal. You can also use your hands to do this. You should take care not to use a hard/abrasive object that can scratch the decals or your bike's paint. The high-tack adhesive will begin to set/adhere to the bike as soon as the liquid is push out from behind the decal. Use caution to ensure the towel or object you are using does not catch any edges of the decal and pull it off your bike. If you take your time and be gentle during installation, it should be an easy process. A hair dryer can be used to speed up the drying process if needed.
Feel free to visit our How-To page on the website to watch a "wet method" installation video.


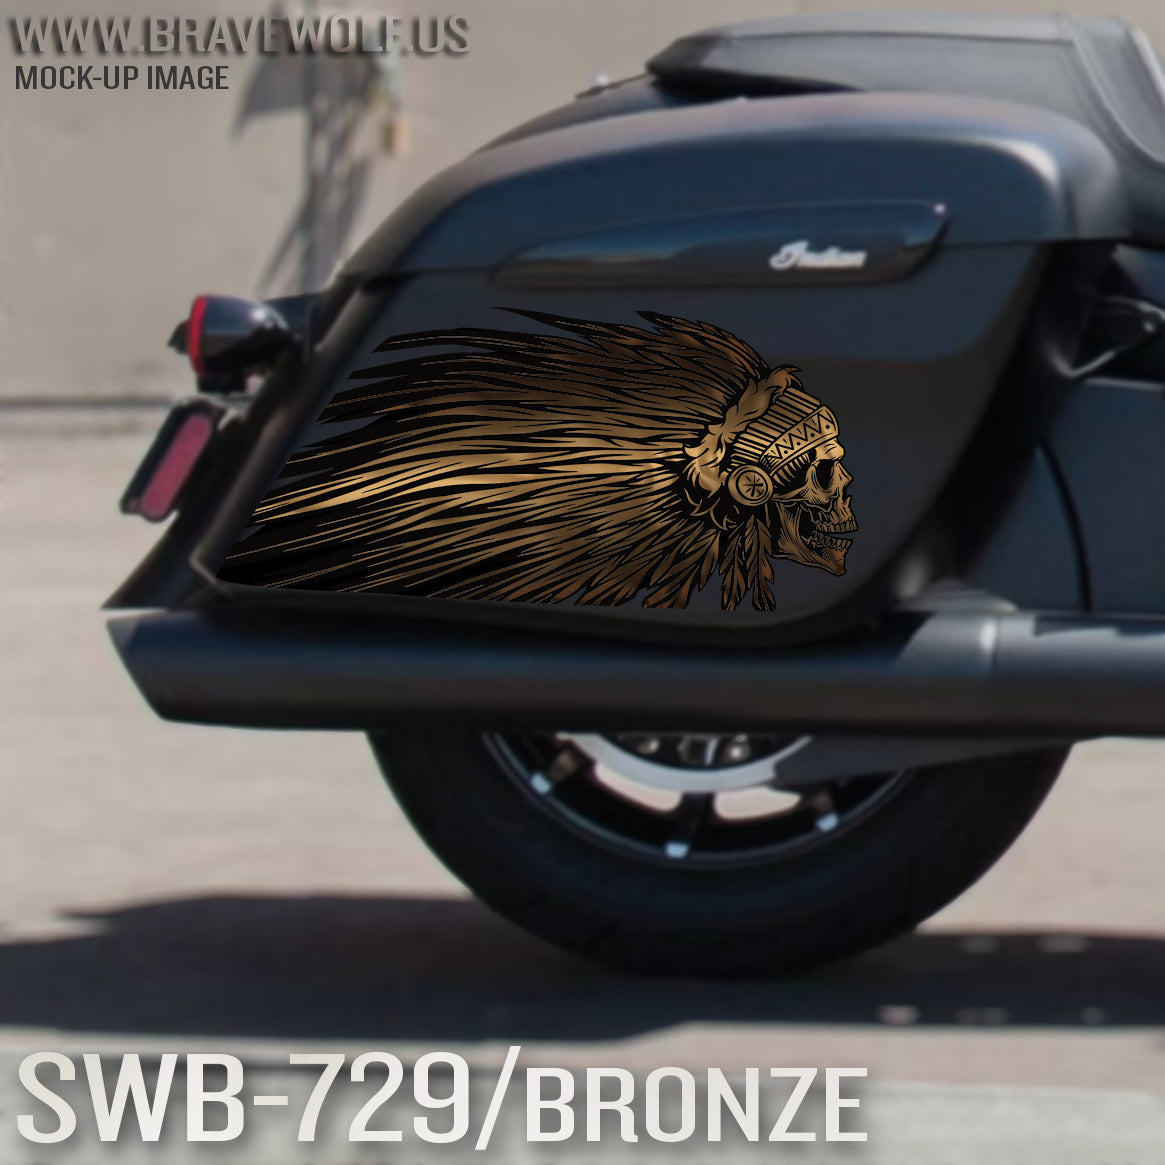
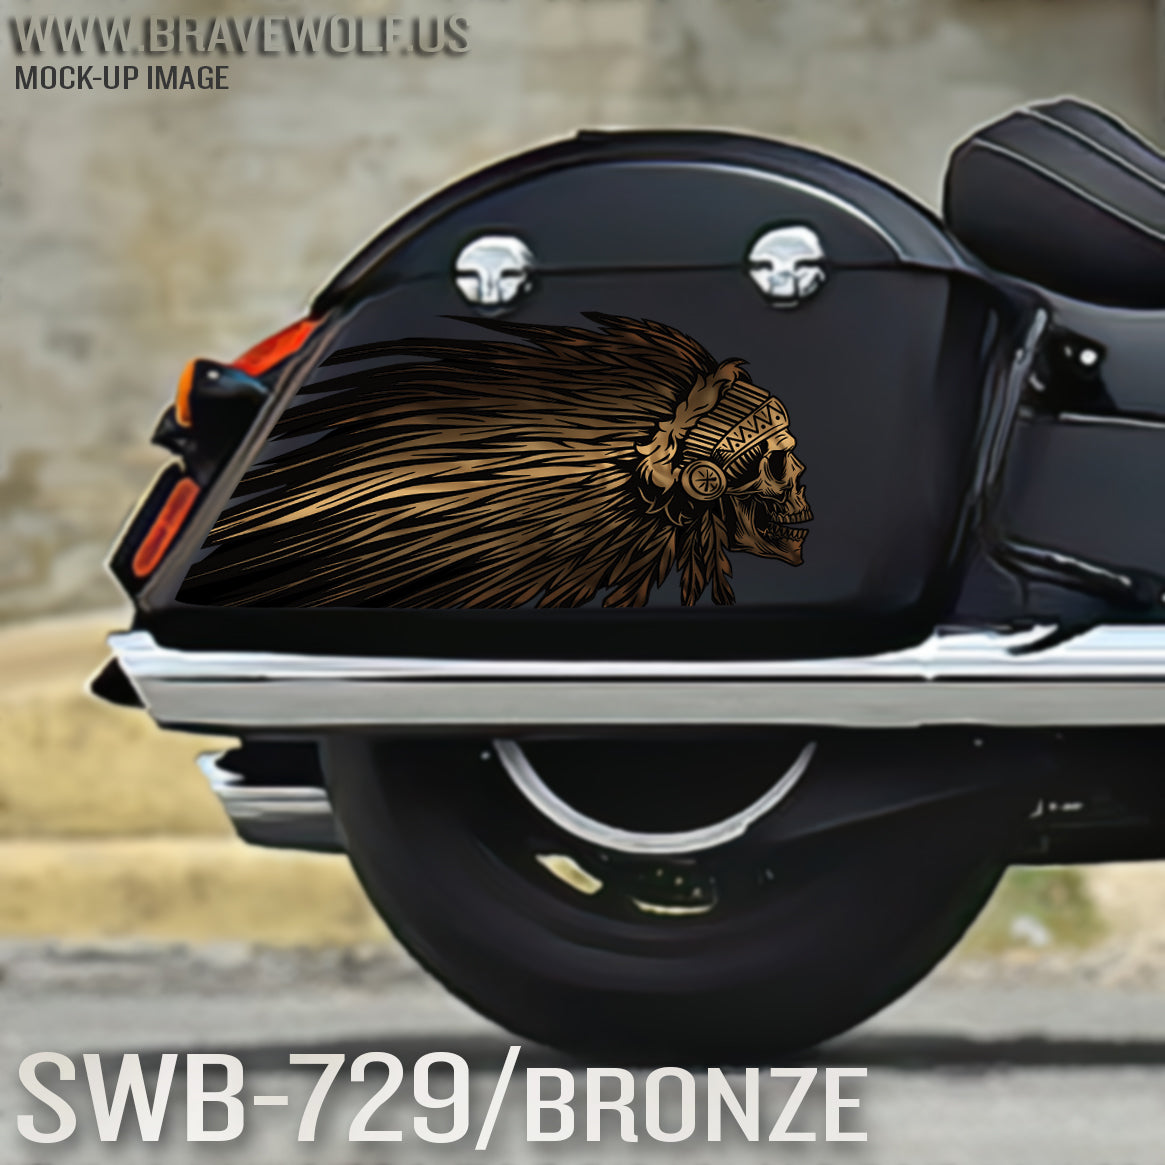
Indian Saddlebag Decals-SWB729-Bronze
Regular price $180.00
Shipping calculated at checkout.
Stock Notice: (may take approximately 2-3 weeks before shipping if not in stock at the time of your order)
Our saddlebag decals are made from premium weatherproof hi-tack vinyl with a long lifespan that will keep them looking new for years. They are available in two finishes, heavy-duty 12 mil laminated Gloss (looks like it's painted on), or a heavy-duty sandy matte textured premium finish.
|
Fitment Guide: Fits both styles of Indian OEM saddlebags (rounded and squared). Also fits the Challenger & Pursuit when the plastic bag guard is removed. |
Installation:
Installing our decals is easy to do yourself at home. We recommend removing all of the excess decal material (the background image) before installing the decals. This will allow you to dispose of all the small cut-out pieces so that the pieces do not get trapped underneath your decal when installing it on the bike. Once you have all of the small pieces and background removed, you can use the "wet method" to install the decals to your saddlebags. The wet method involves using a spray bottle of water with a couple drops of dish soap in the mixture and spraying the surface of your saddlebags to wet the entire surface. Then carefully remove the backing from your decal and use the spray bottle to wet the adhesive side of the decal. Now you can gently place the decal on your saddlebag. Because the surfaces are wet, you can pull the decal up to reposition it until you get it where you want it. Once it's in place, use a squeegee or other object such as a credit card wrapped in a microfiber towel to squeeze the water out from behind the decal. You can also use your hands to do this. You should take care not to use a hard/abrasive object that can scratch the decals or your bike's paint. The high-tack adhesive will begin to set/adhere to the bike as soon as the liquid is push out from behind the decal. Use caution to ensure the towel or object you are using does not catch any edges of the decal and pull it off your bike. If you take your time and be gentle during installation, it should be an easy process. A hair dryer can be used to speed up the drying process if needed.
Feel free to visit our How-To page on the website to watch a "wet method" installation video TAB Performance made while installing our Zombie decals.


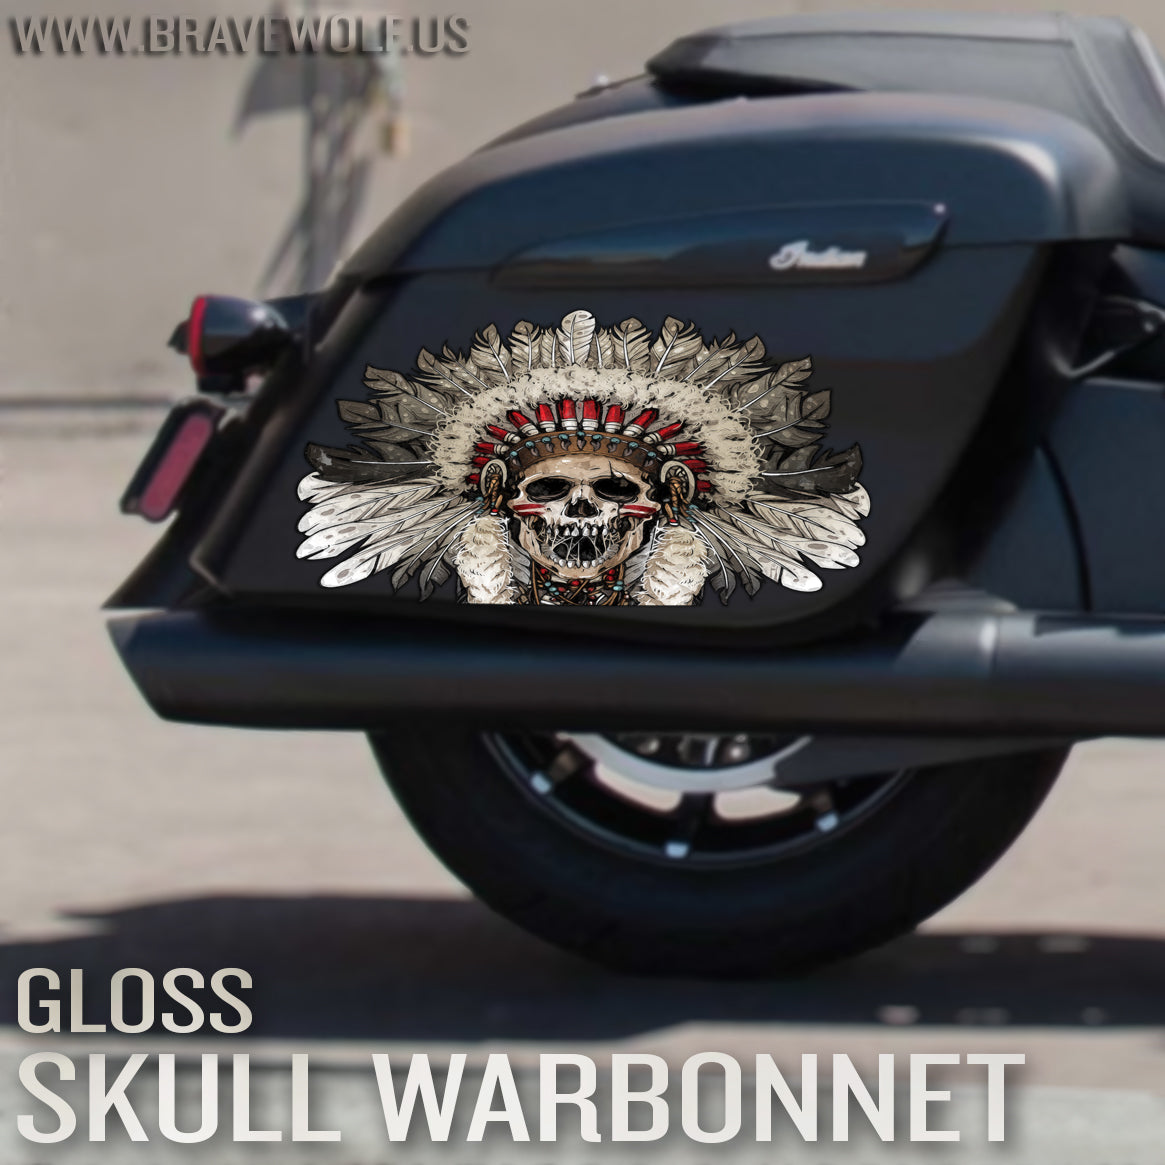
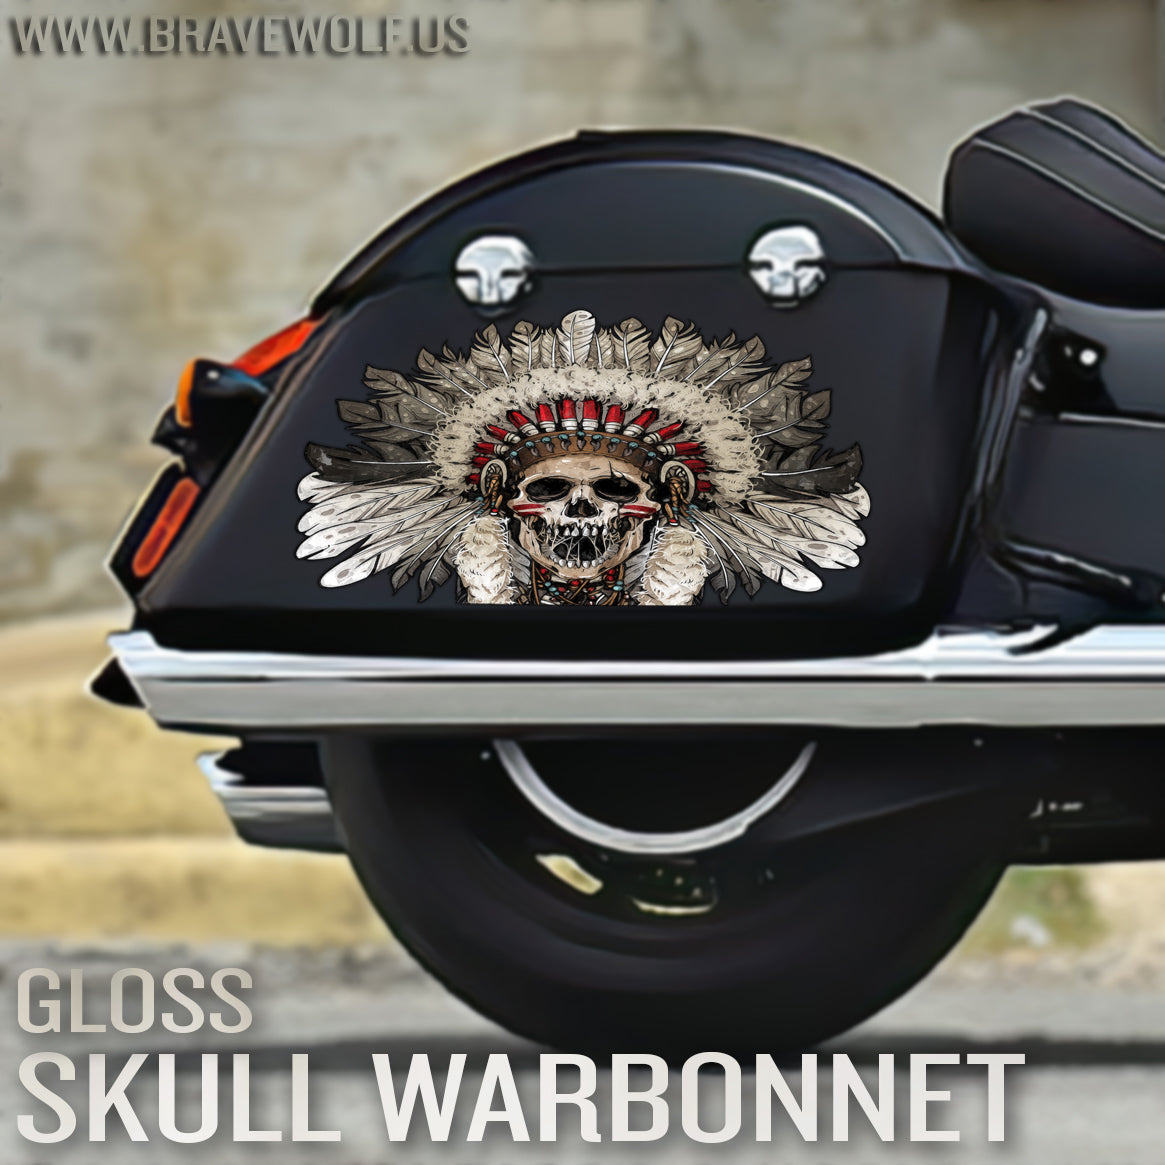

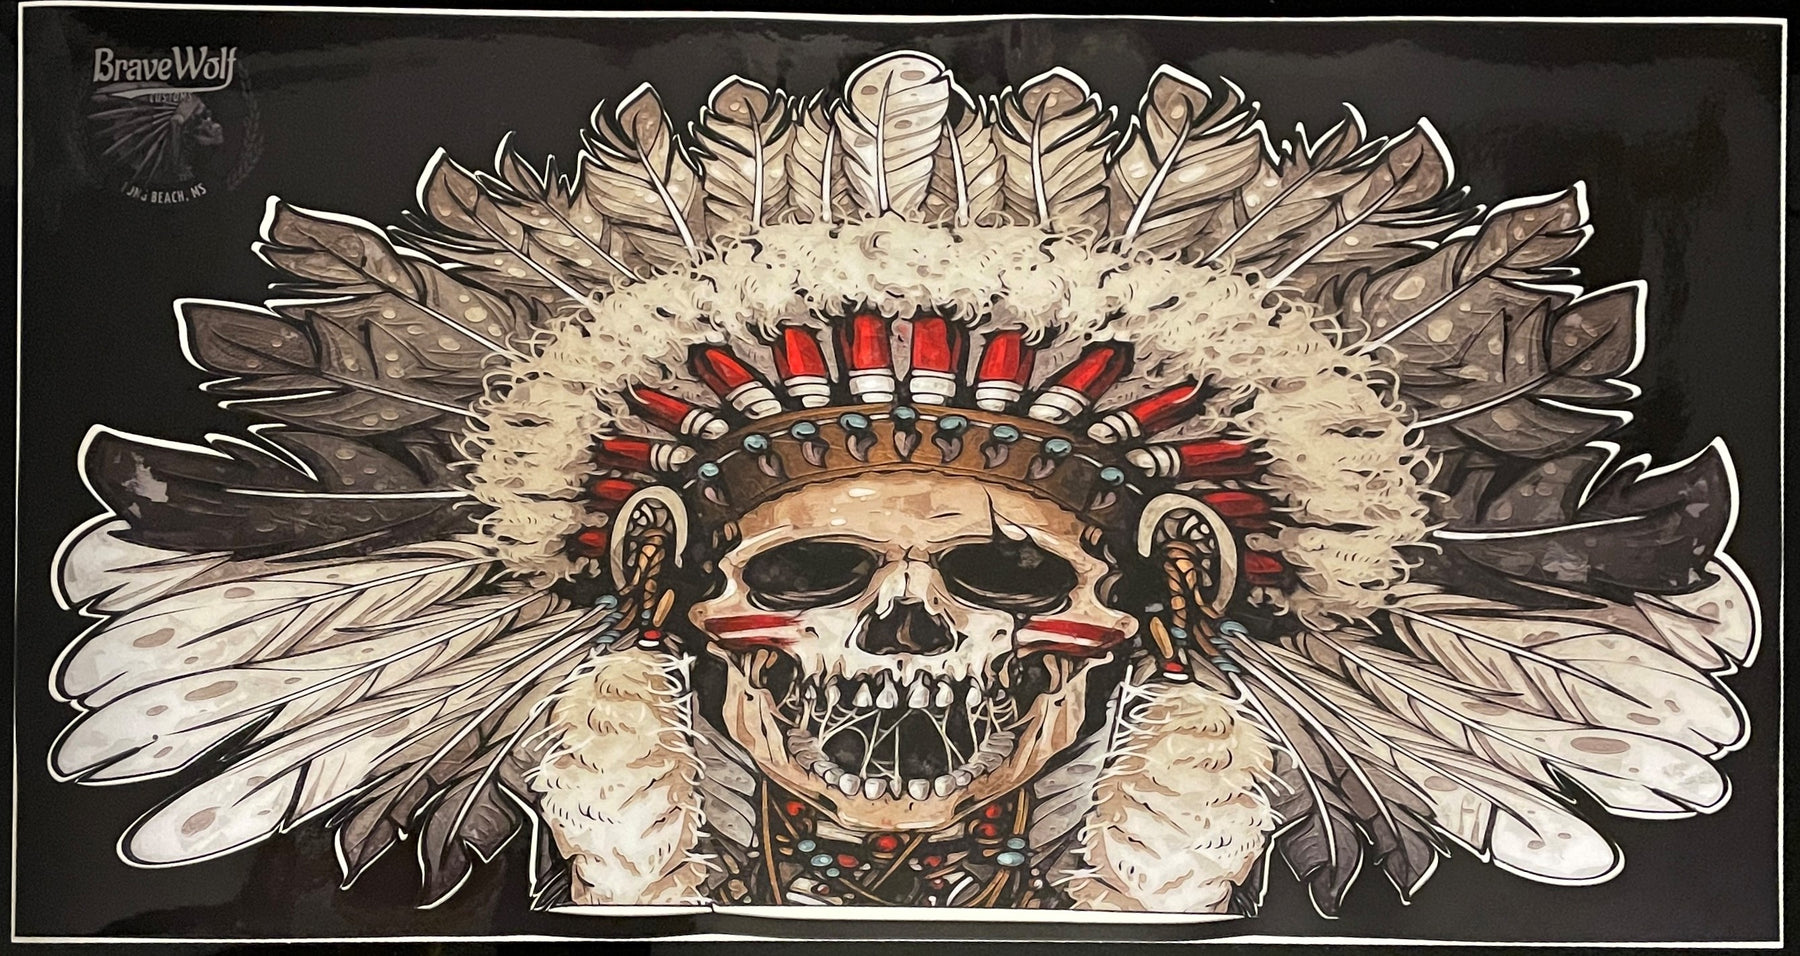

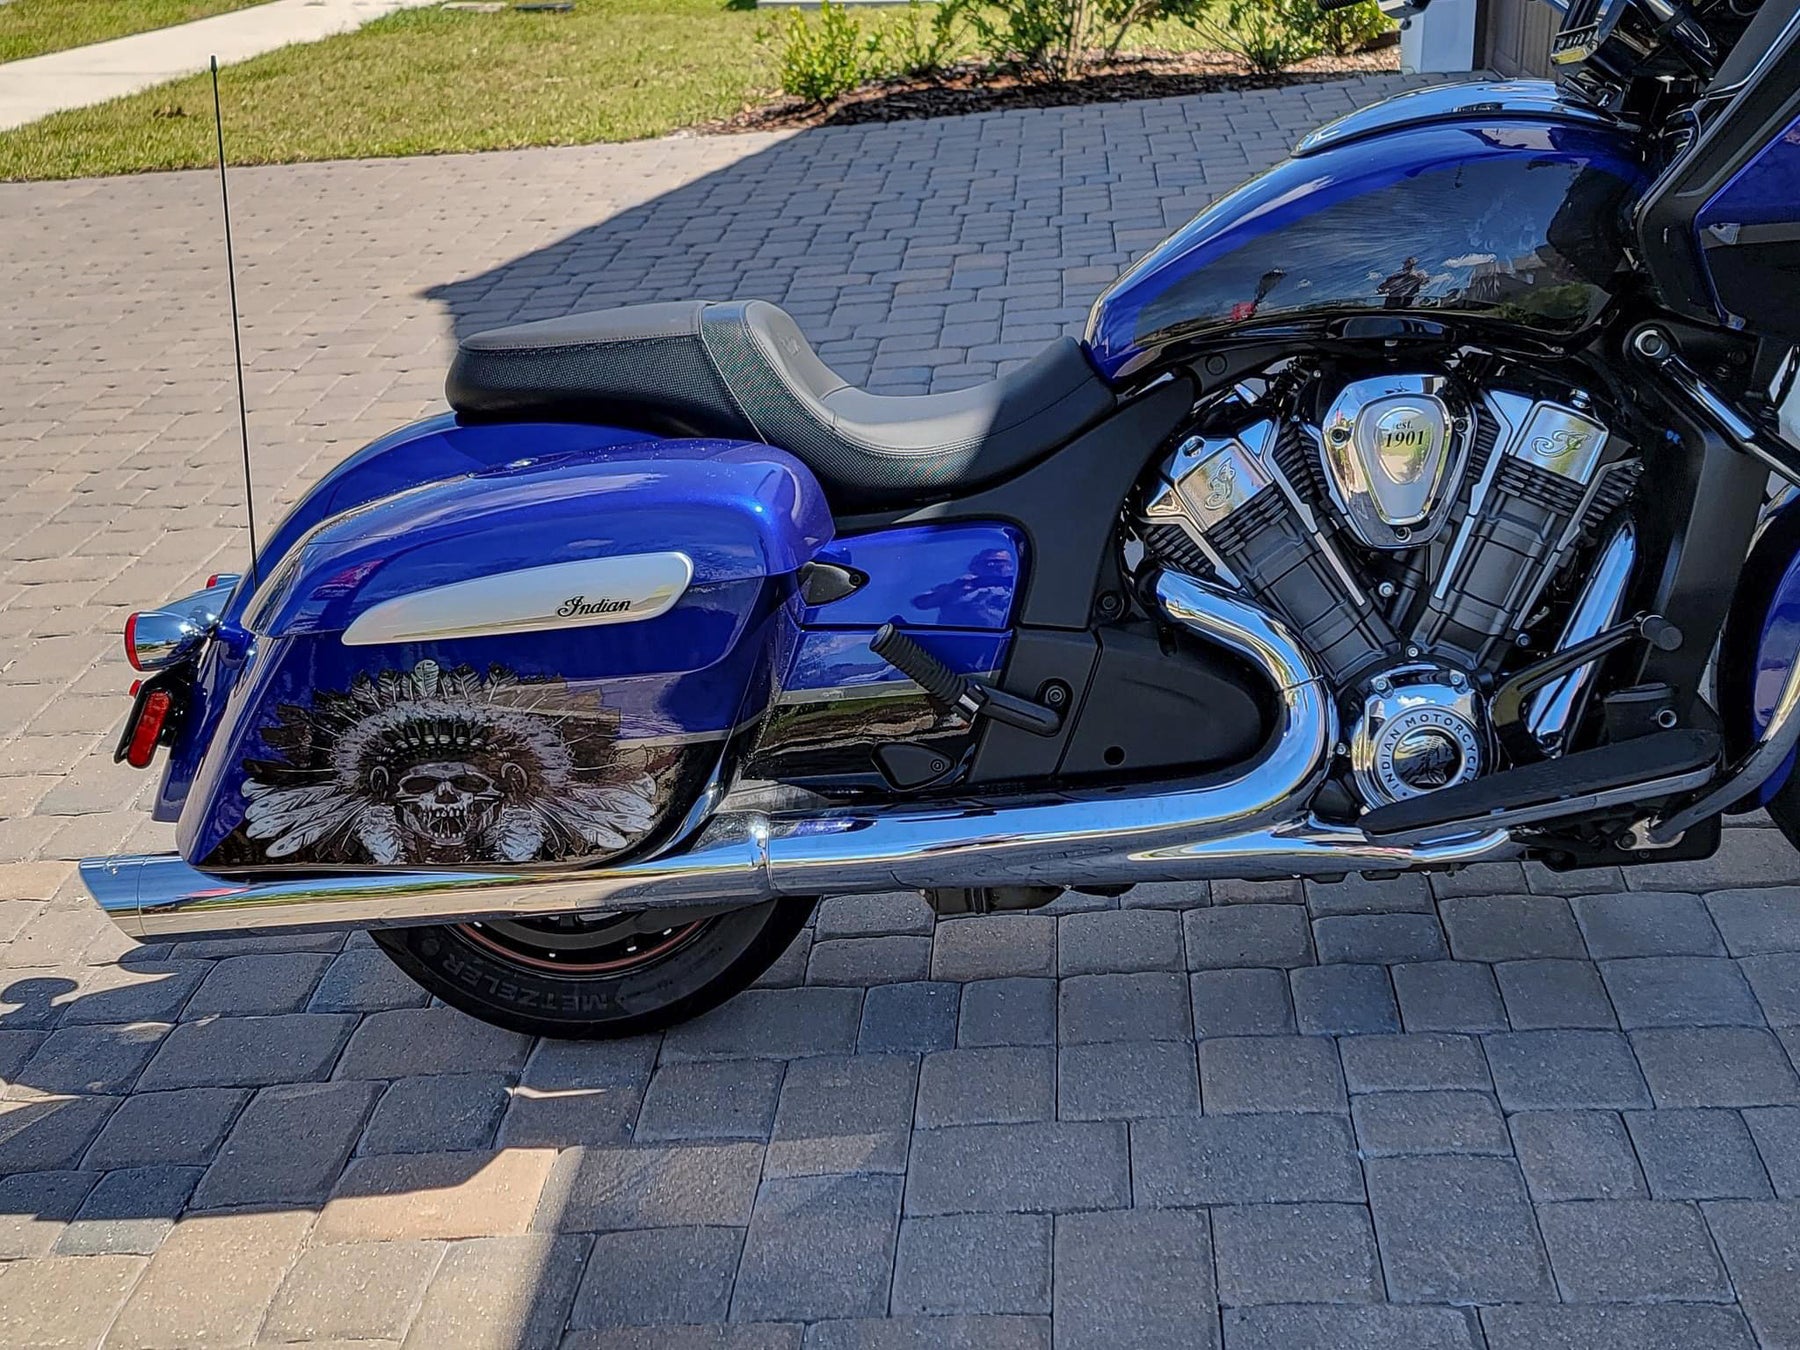
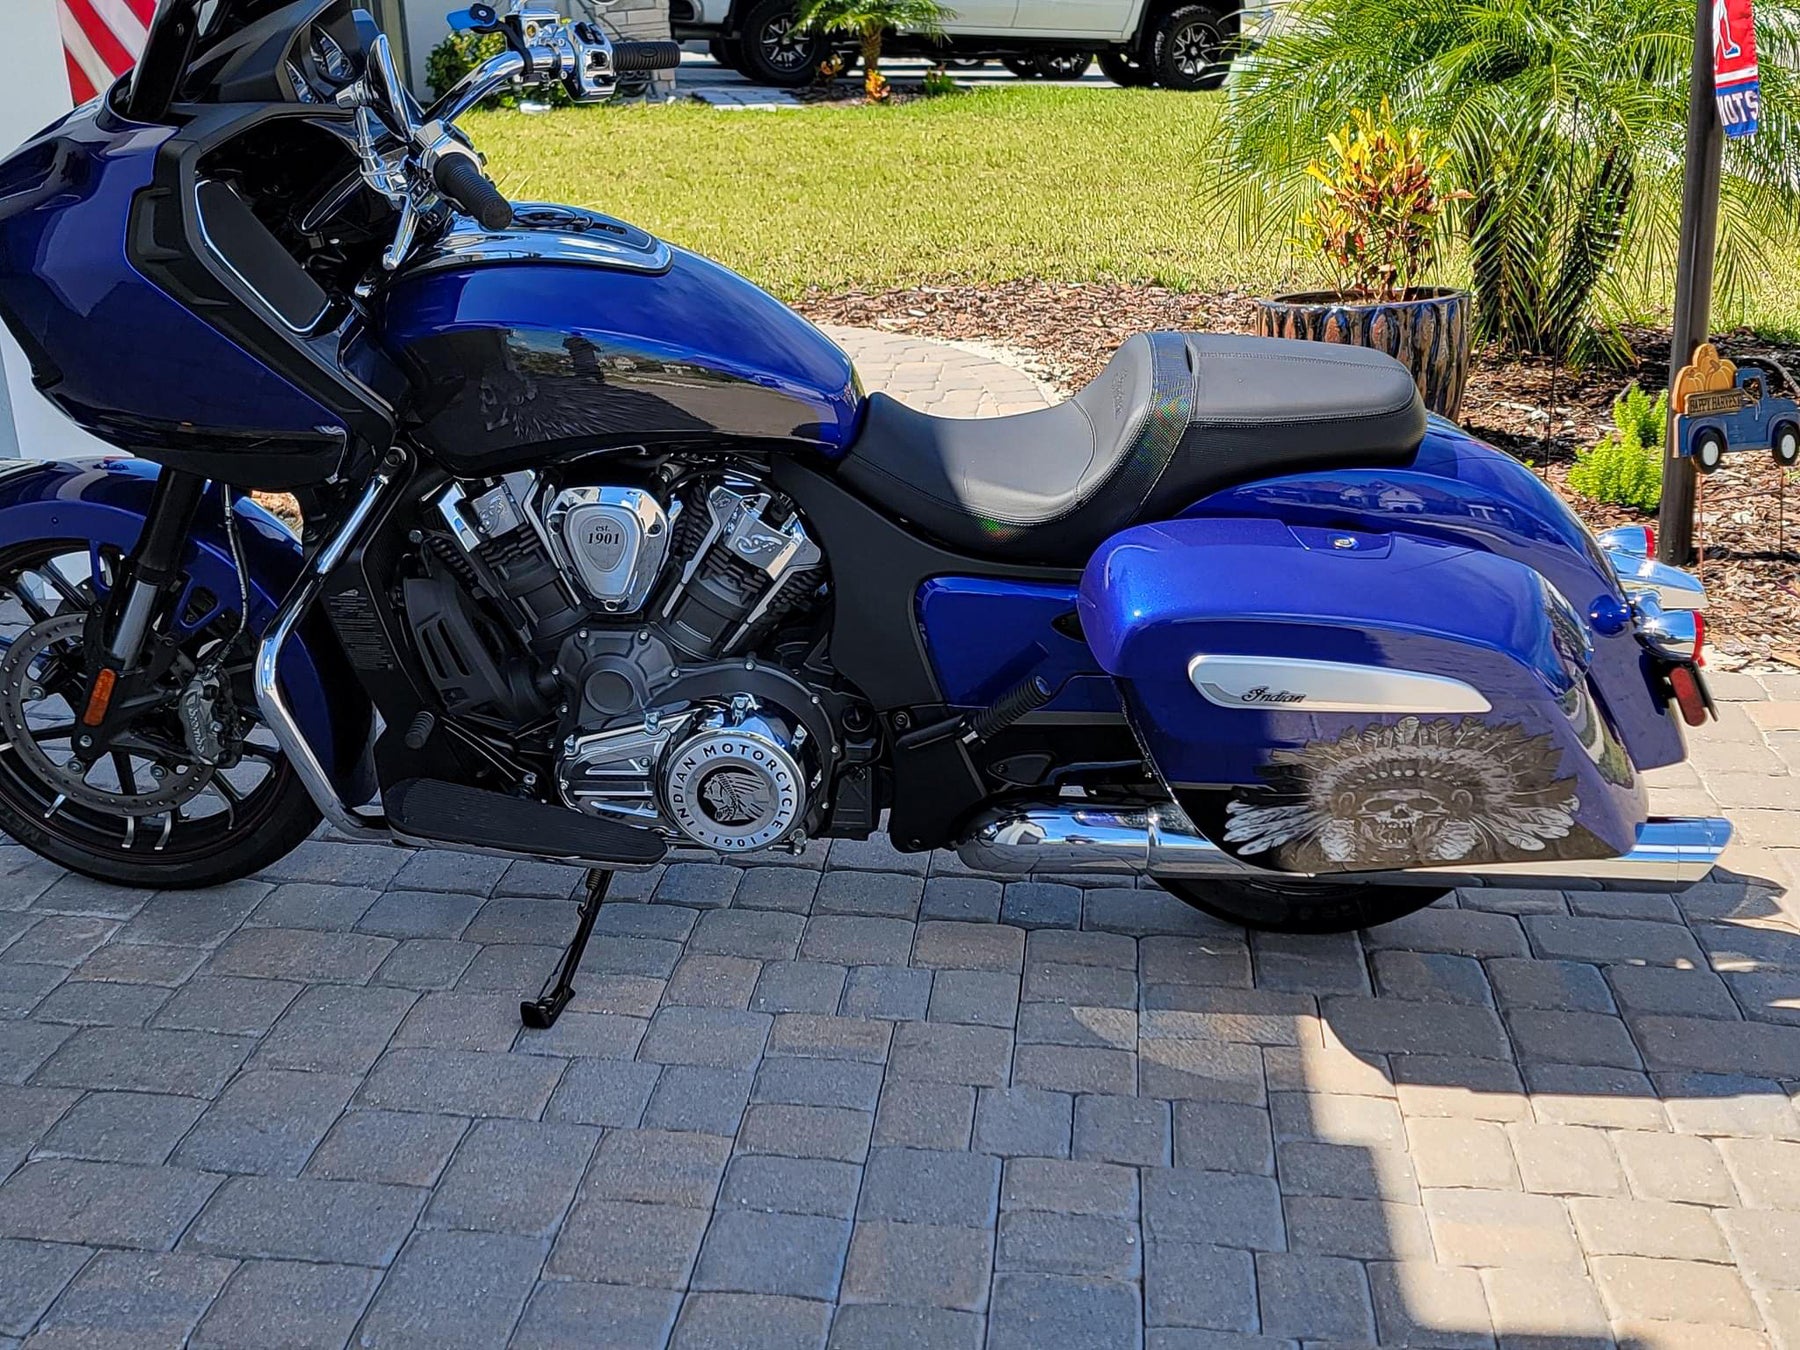
Indian Saddlebag Decals - Skull Warbonnet - Color
Regular price $150.00
Shipping calculated at checkout.
Stock Notice: (may take approximately 2-3 weeks before shipping if not in stock at the time of your order)
Our saddlebag decals are made from premium weatherproof hi-tack vinyl with a long lifespan that will keep them looking new for years. They are available in two finishes, heavy-duty 12 mil laminated Gloss (looks like it's painted on), or a heavy-duty sandy matte textured premium finish.
|
Fitment Guide: Fits both styles of Indian OEM saddlebags (rounded and squared). Also fits the Challenger when the plastic bag guard is removed. |
Installation:
Installing our decals is easy to do yourself at home. We recommend removing all of the excess decal material (the background image) before installing the decals. This will allow you to dispose of all the small cut-out pieces so that the pieces do not get trapped underneath your decal when installing it on the bike. Once you have all of the small pieces and background removed, you can use the "wet method" to install the decals to your saddlebags. The wet method involves using a spray bottle of water with a couple drops of dish soap in the mixture and spraying the surface of your saddlebags to wet the entire surface. Then carefully remove the backing from your decal and use the spray bottle to wet the adhesive side of the decal. Now you can gently place the decal on your saddlebag. Because the surfaces are wet, you can pull the decal up to reposition it until you get it where you want it. Once it's in place, use a squeegee or other object such as a credit card wrapped in a microfiber towel to squeeze the water out from behind the decal. You can also use your hands to do this. You should take care not to use a hard/abrasive object that can scratch the decals or your bike's paint. The high-tack adhesive will begin to set/adhere to the bike as soon as the liquid is push out from behind the decal. Use caution to ensure the towel or object you are using does not catch any edges of the decal and pull it off your bike. If you take your time and be gentle during installation, it should be an easy process. A hair dryer can be used to speed up the drying process if needed.
Feel free to visit our How-To page on the website to watch a "wet method" installation video TAB Performance made while installing our Zombie decals.


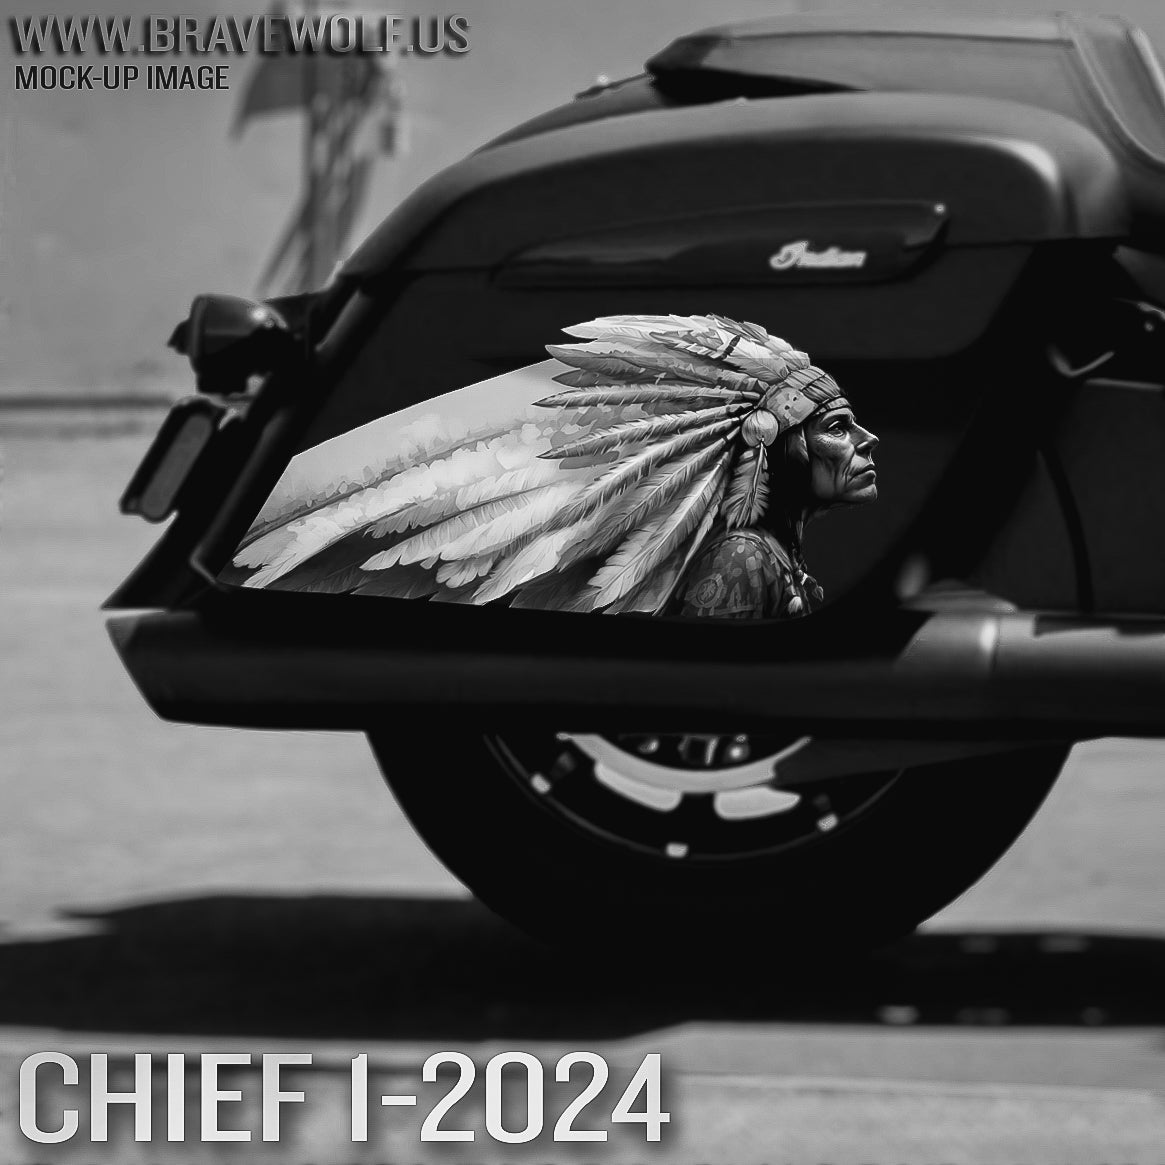
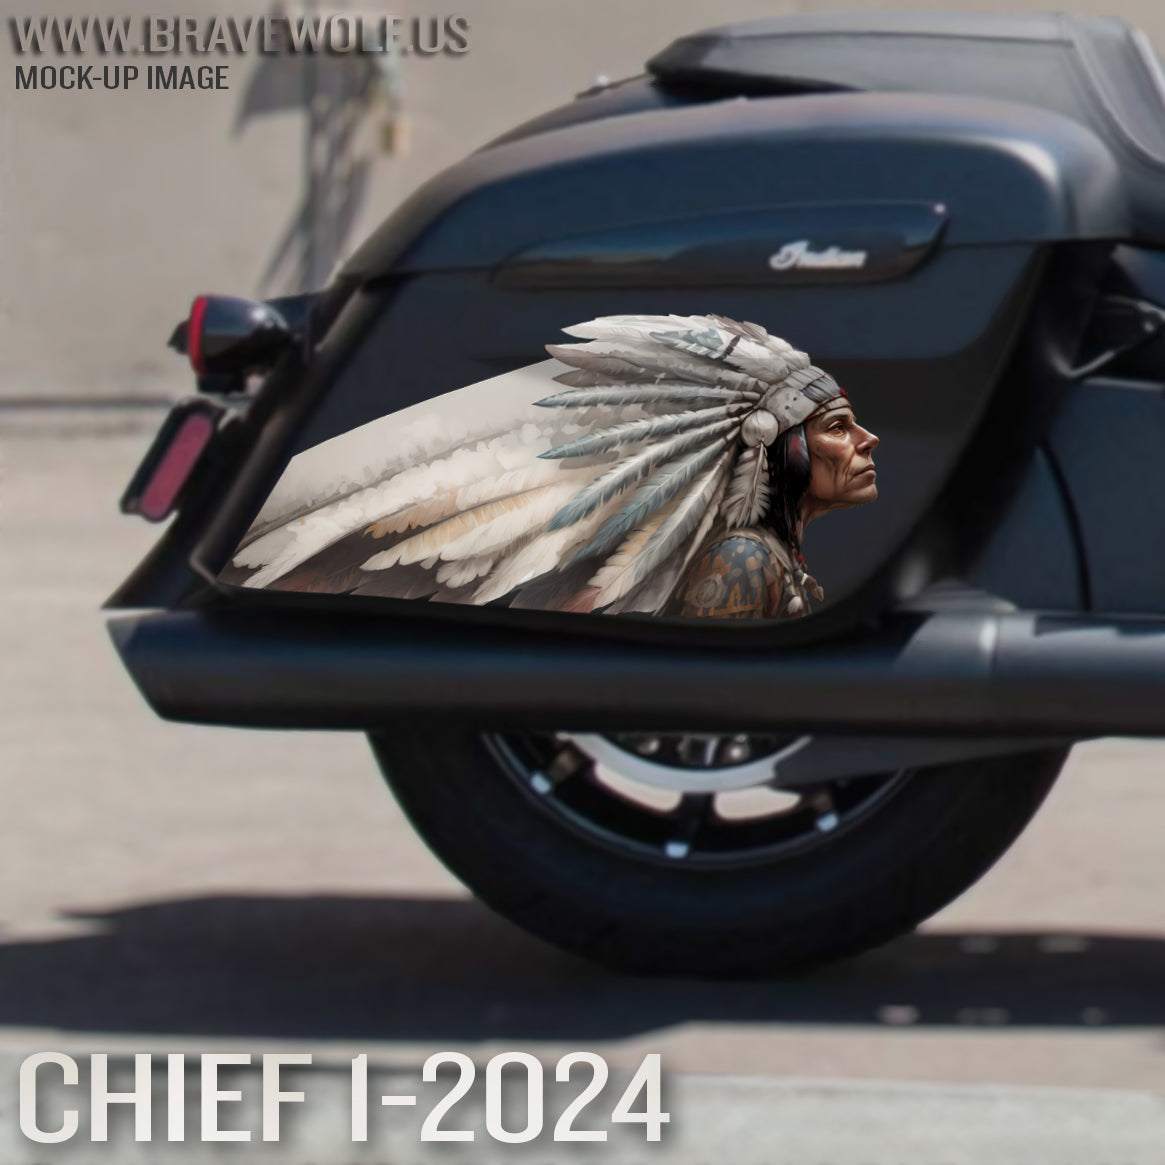
Chief 1-2024 (B&W) Saddlebag Decal Set for Indian Motorcycles
Regular price $160.00
Shipping calculated at checkout.
Stock Notice: Special Order (may take approximately 2-3 weeks before shipping if not in stock at time of order)
Our saddlebag decals are made from premium weatherproof hi-tack vinyl with a long lifespan that will keep them looking new for years. They are available in two finishes, heavy-duty 12 mil laminated Gloss (looks like it's painted on), or a heavy-duty sandy matte textured premium finish.
|
Fitment Guide: Fits both styles of Indian OEM saddlebags (rounded and squared). Also fits the Challenger & Pursuit when the plastic bag guard is removed. |
Installation:
Installing our decals is easy to do yourself at home. We recommend removing all of the excess decal material (the background image) before installing the decals. This will allow you to dispose of all the small cut-out pieces so that the pieces do not get trapped underneath your decal when installing it on the bike. Once you have all of the small pieces and background removed, you can use the "wet method" to install the decals to your saddlebags. The wet method involves using a spray bottle of water with a couple drops of dish soap in the mixture and spraying the surface of your saddlebags to wet the entire surface. Then carefully remove the backing from your decal and use the spray bottle to wet the adhesive side of the decal. Now you can gently place the decal on your saddlebag. Because the surfaces are wet, you can pull the decal up to reposition it until you get it where you want it. Once it's in place, use a squeegee or other object such as a credit card wrapped in a microfiber towel to squeeze the water out from behind the decal. You can also use your hands to do this. You should take care not to use a hard/abrasive object that can scratch the decals or your bike's paint. The high-tack adhesive will begin to set/adhere to the bike as soon as the liquid is push out from behind the decal. Use caution to ensure the towel or object you are using does not catch any edges of the decal and pull it off your bike. If you take your time and be gentle during installation, it should be an easy process. A hair dryer can be used to speed up the drying process if needed.
Feel free to visit our How-To page on the website to watch a "wet method" installation video.


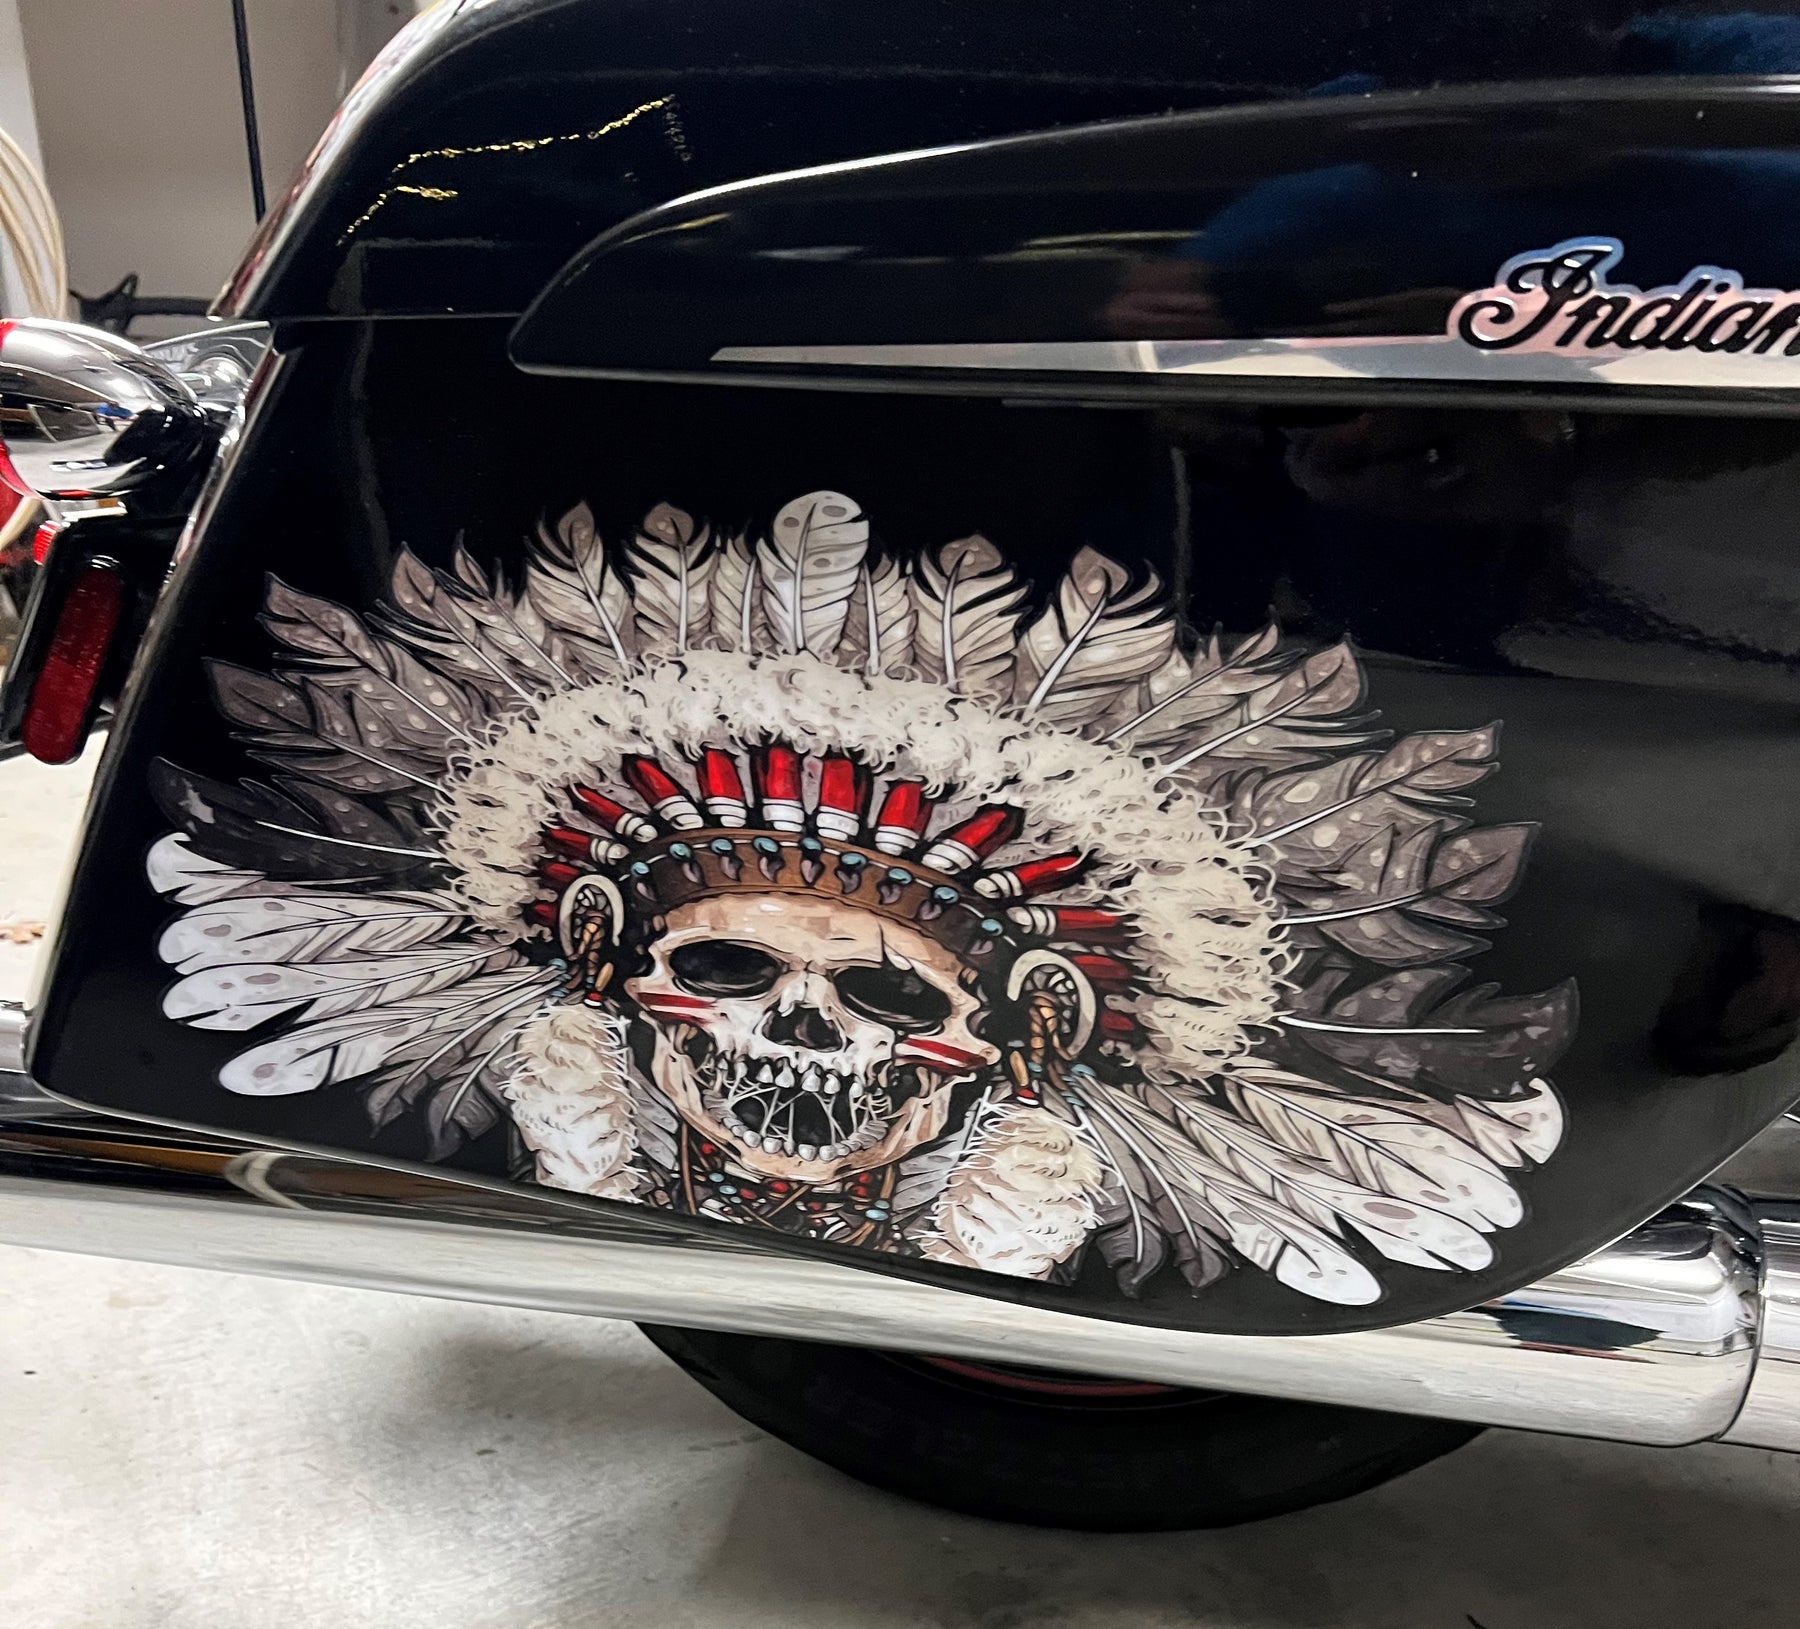
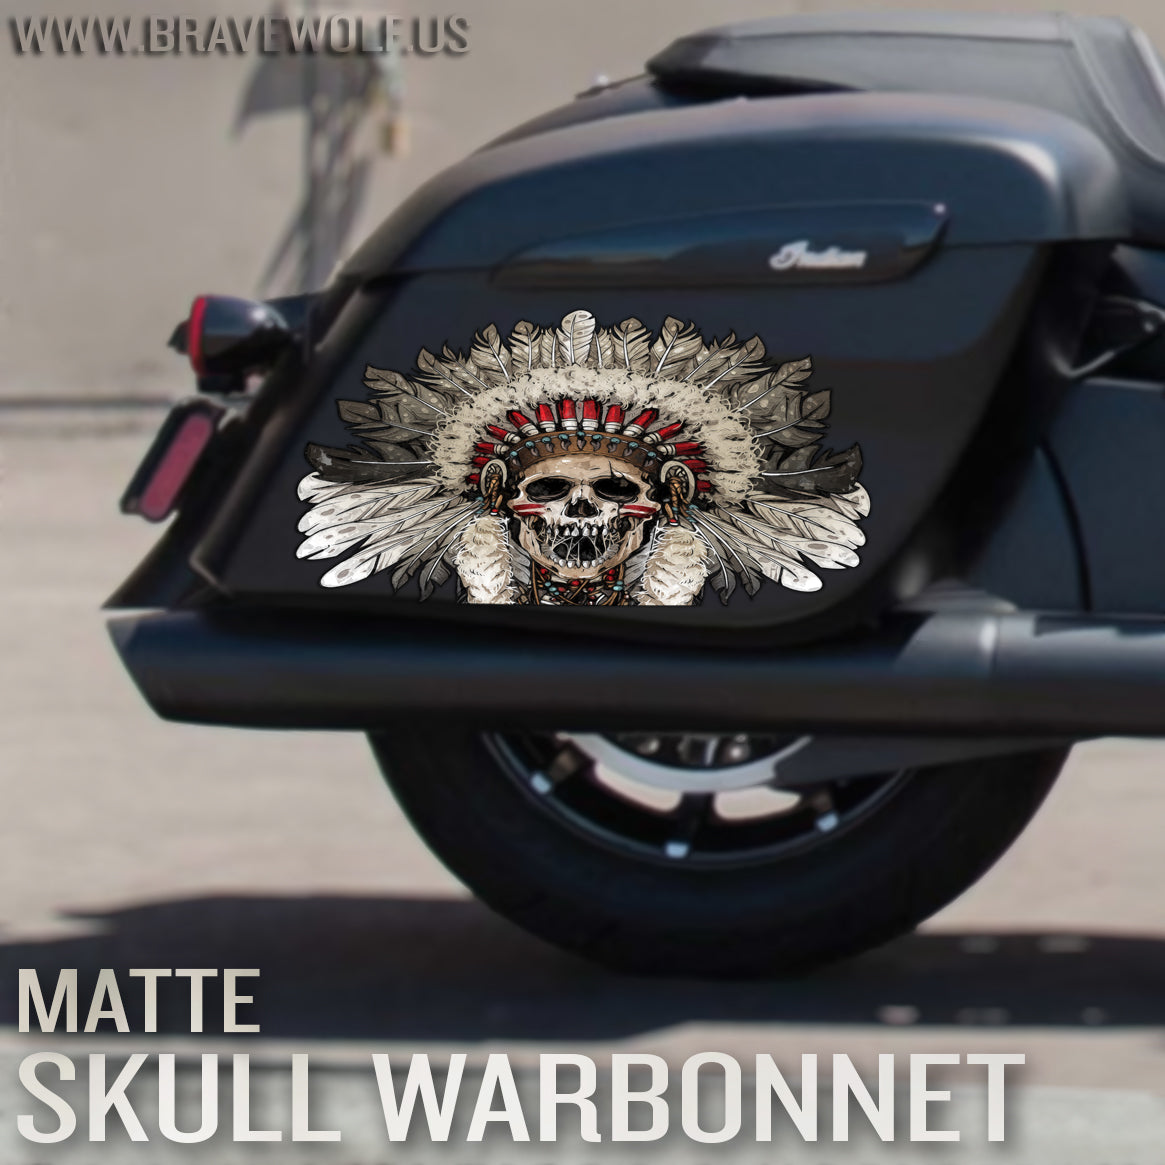
Indian Saddlebag Decals - Skull Warbonnet - B&W
Regular price $150.00
Shipping calculated at checkout.
Stock Notice: (may take approximately 2-3 weeks before shipping if not in stock at the time of your order)
Our saddlebag decals are made from premium weatherproof hi-tack vinyl with a long lifespan that will keep them looking new for years. They are available in two finishes, heavy-duty 12 mil laminated Gloss (looks like it's painted on), or a heavy-duty sandy matte textured premium finish.
|
Fitment Guide: Fits both styles of Indian OEM saddlebags (rounded and squared). Also fits the Challenger when the plastic bag guard is removed. |
Installation:
Installing our decals is easy to do yourself at home. We recommend removing all of the excess decal material (the background image) before installing the decals. This will allow you to dispose of all the small cut-out pieces so that the pieces do not get trapped underneath your decal when installing it on the bike. Once you have all of the small pieces and background removed, you can use the "wet method" to install the decals to your saddlebags. The wet method involves using a spray bottle of water with a couple drops of dish soap in the mixture and spraying the surface of your saddlebags to wet the entire surface. Then carefully remove the backing from your decal and use the spray bottle to wet the adhesive side of the decal. Now you can gently place the decal on your saddlebag. Because the surfaces are wet, you can pull the decal up to reposition it until you get it where you want it. Once it's in place, use a squeegee or other object such as a credit card wrapped in a microfiber towel to squeeze the water out from behind the decal. You can also use your hands to do this. You should take care not to use a hard/abrasive object that can scratch the decals or your bike's paint. The high-tack adhesive will begin to set/adhere to the bike as soon as the liquid is push out from behind the decal. Use caution to ensure the towel or object you are using does not catch any edges of the decal and pull it off your bike. If you take your time and be gentle during installation, it should be an easy process. A hair dryer can be used to speed up the drying process if needed.
Feel free to visit our How-To page on the website to watch a "wet method" installation video TAB Performance made while installing our Zombie decals.

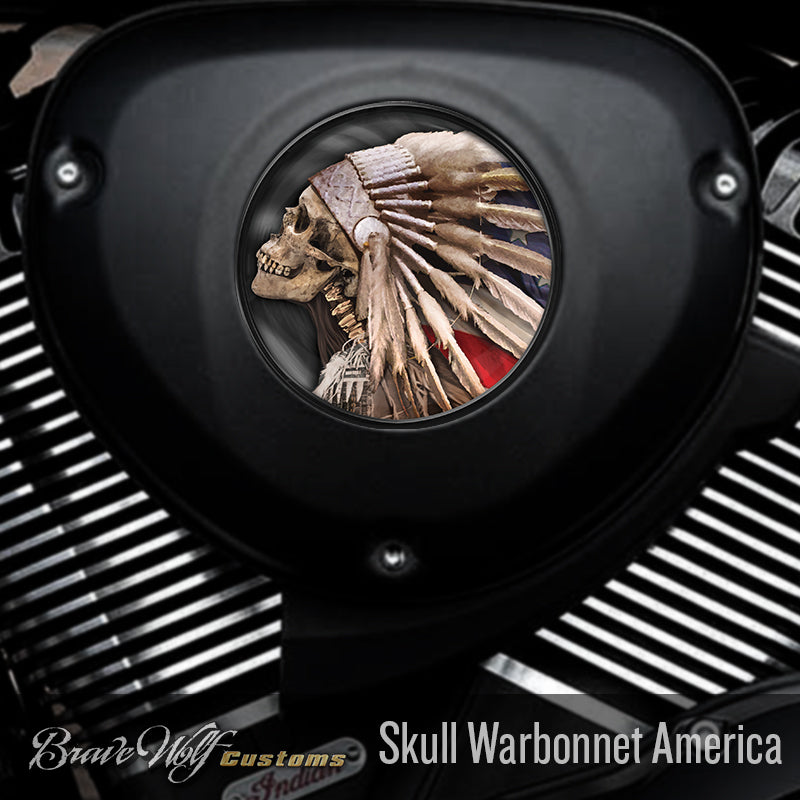
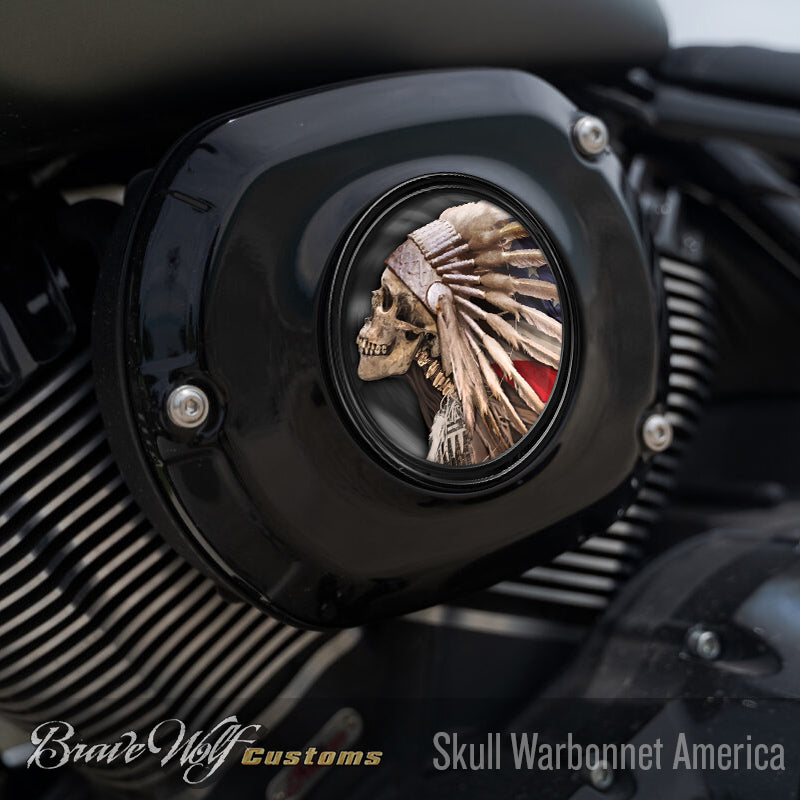
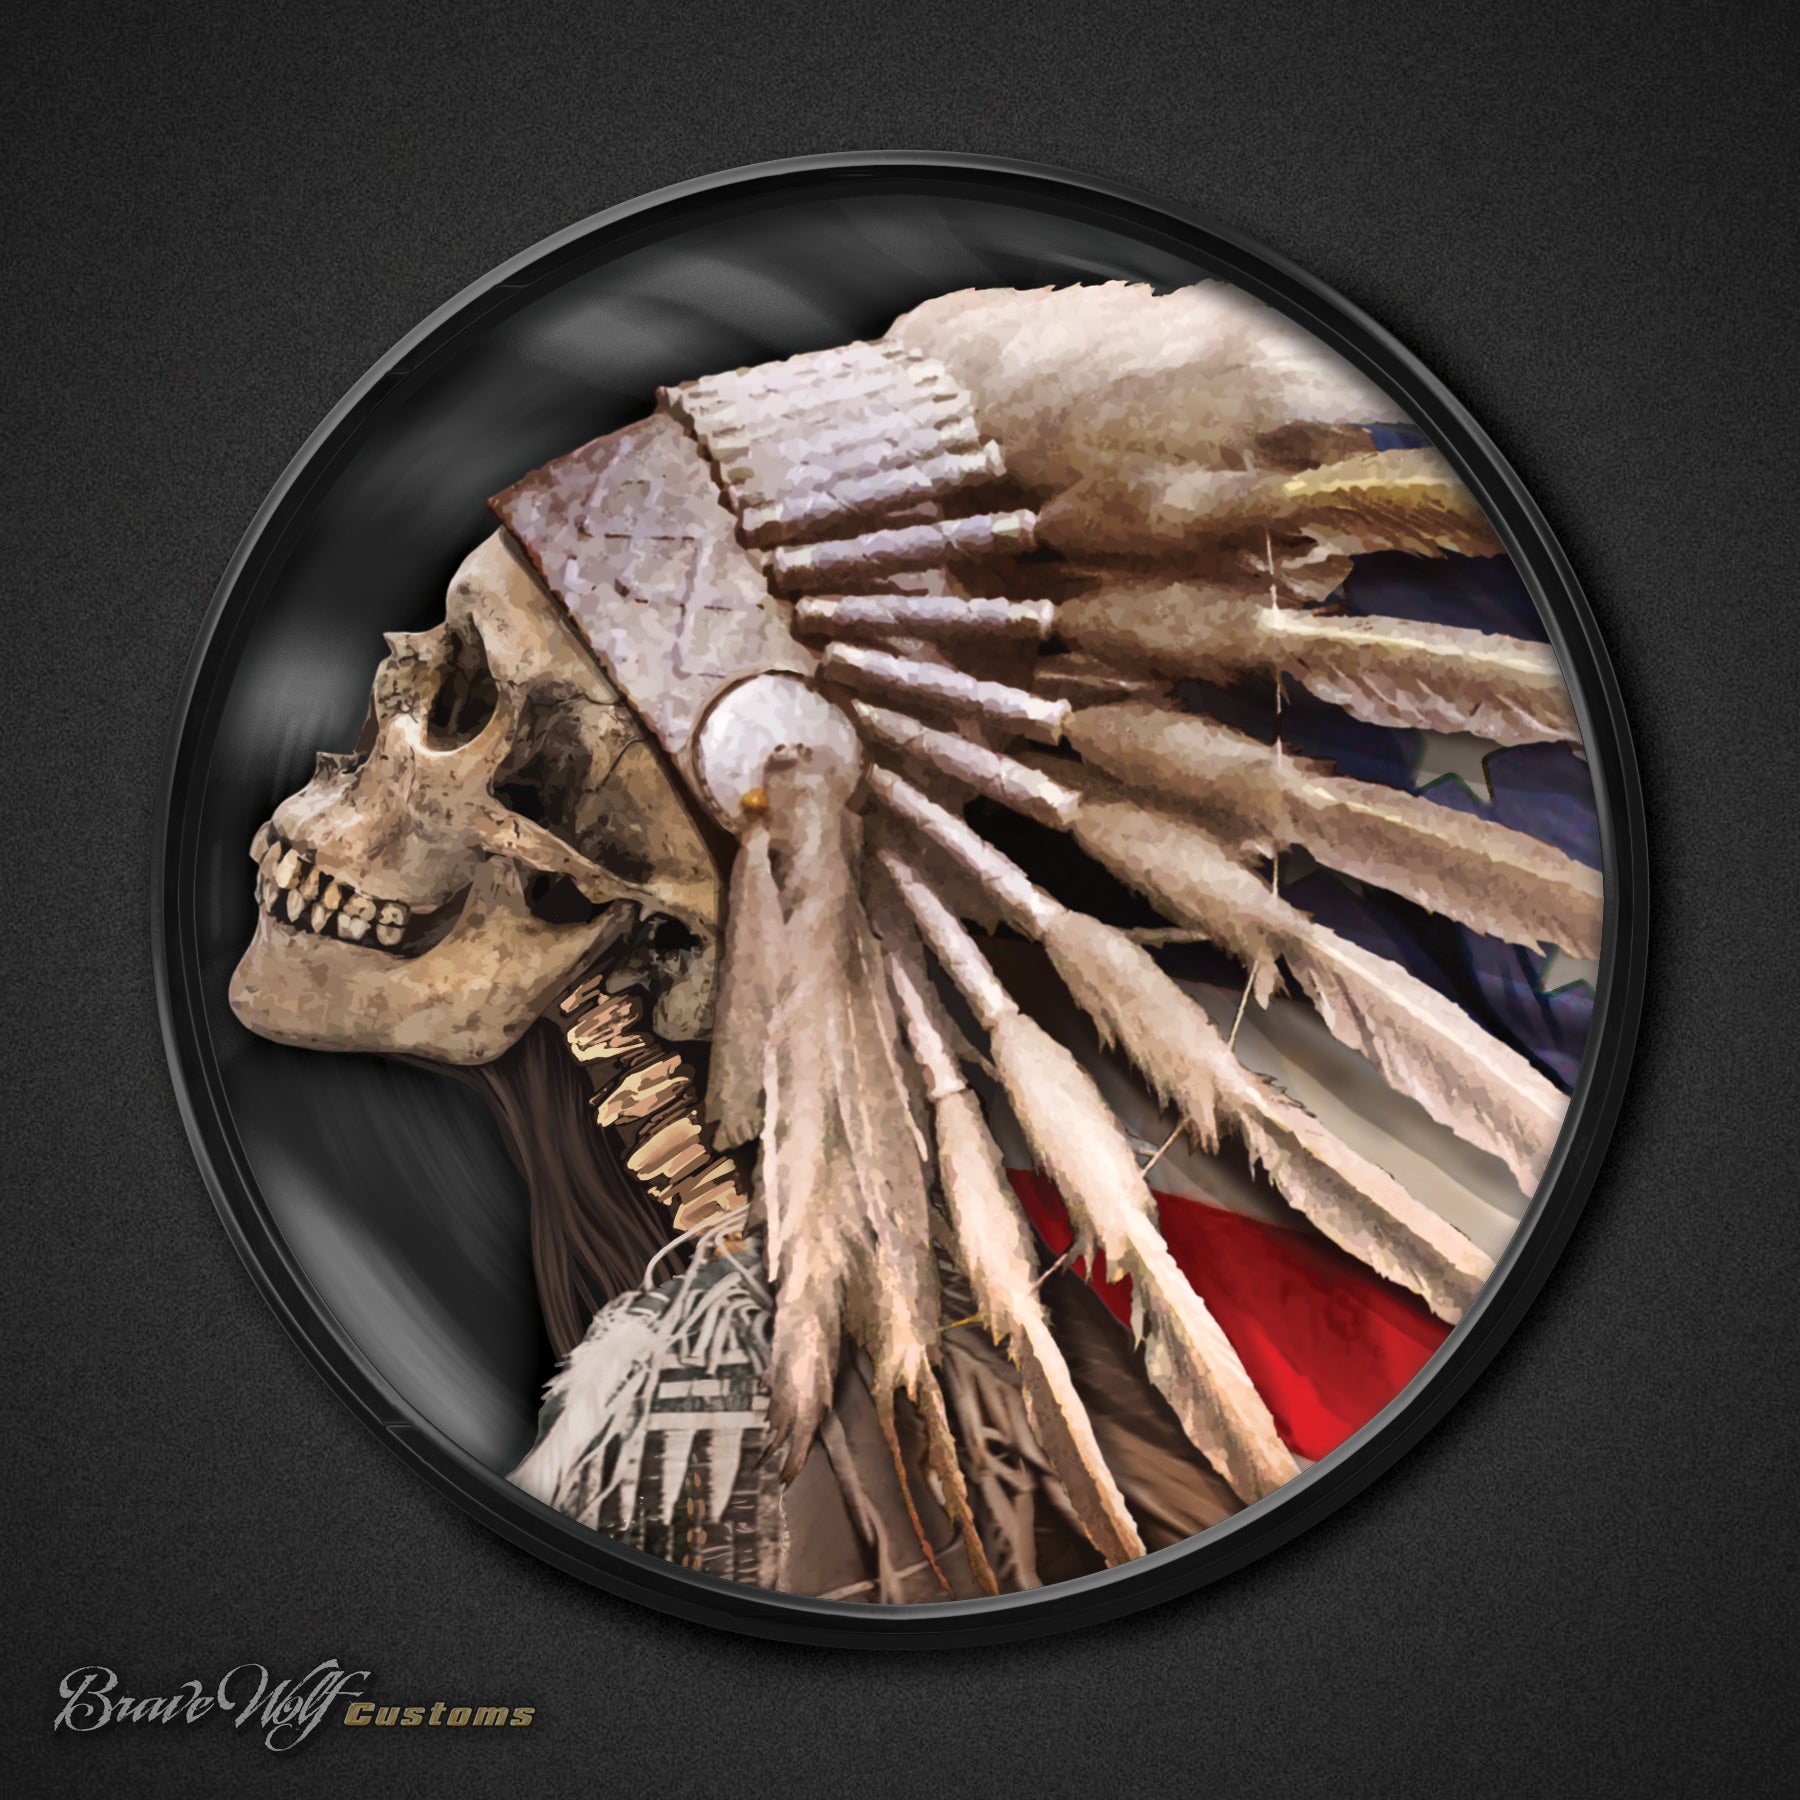
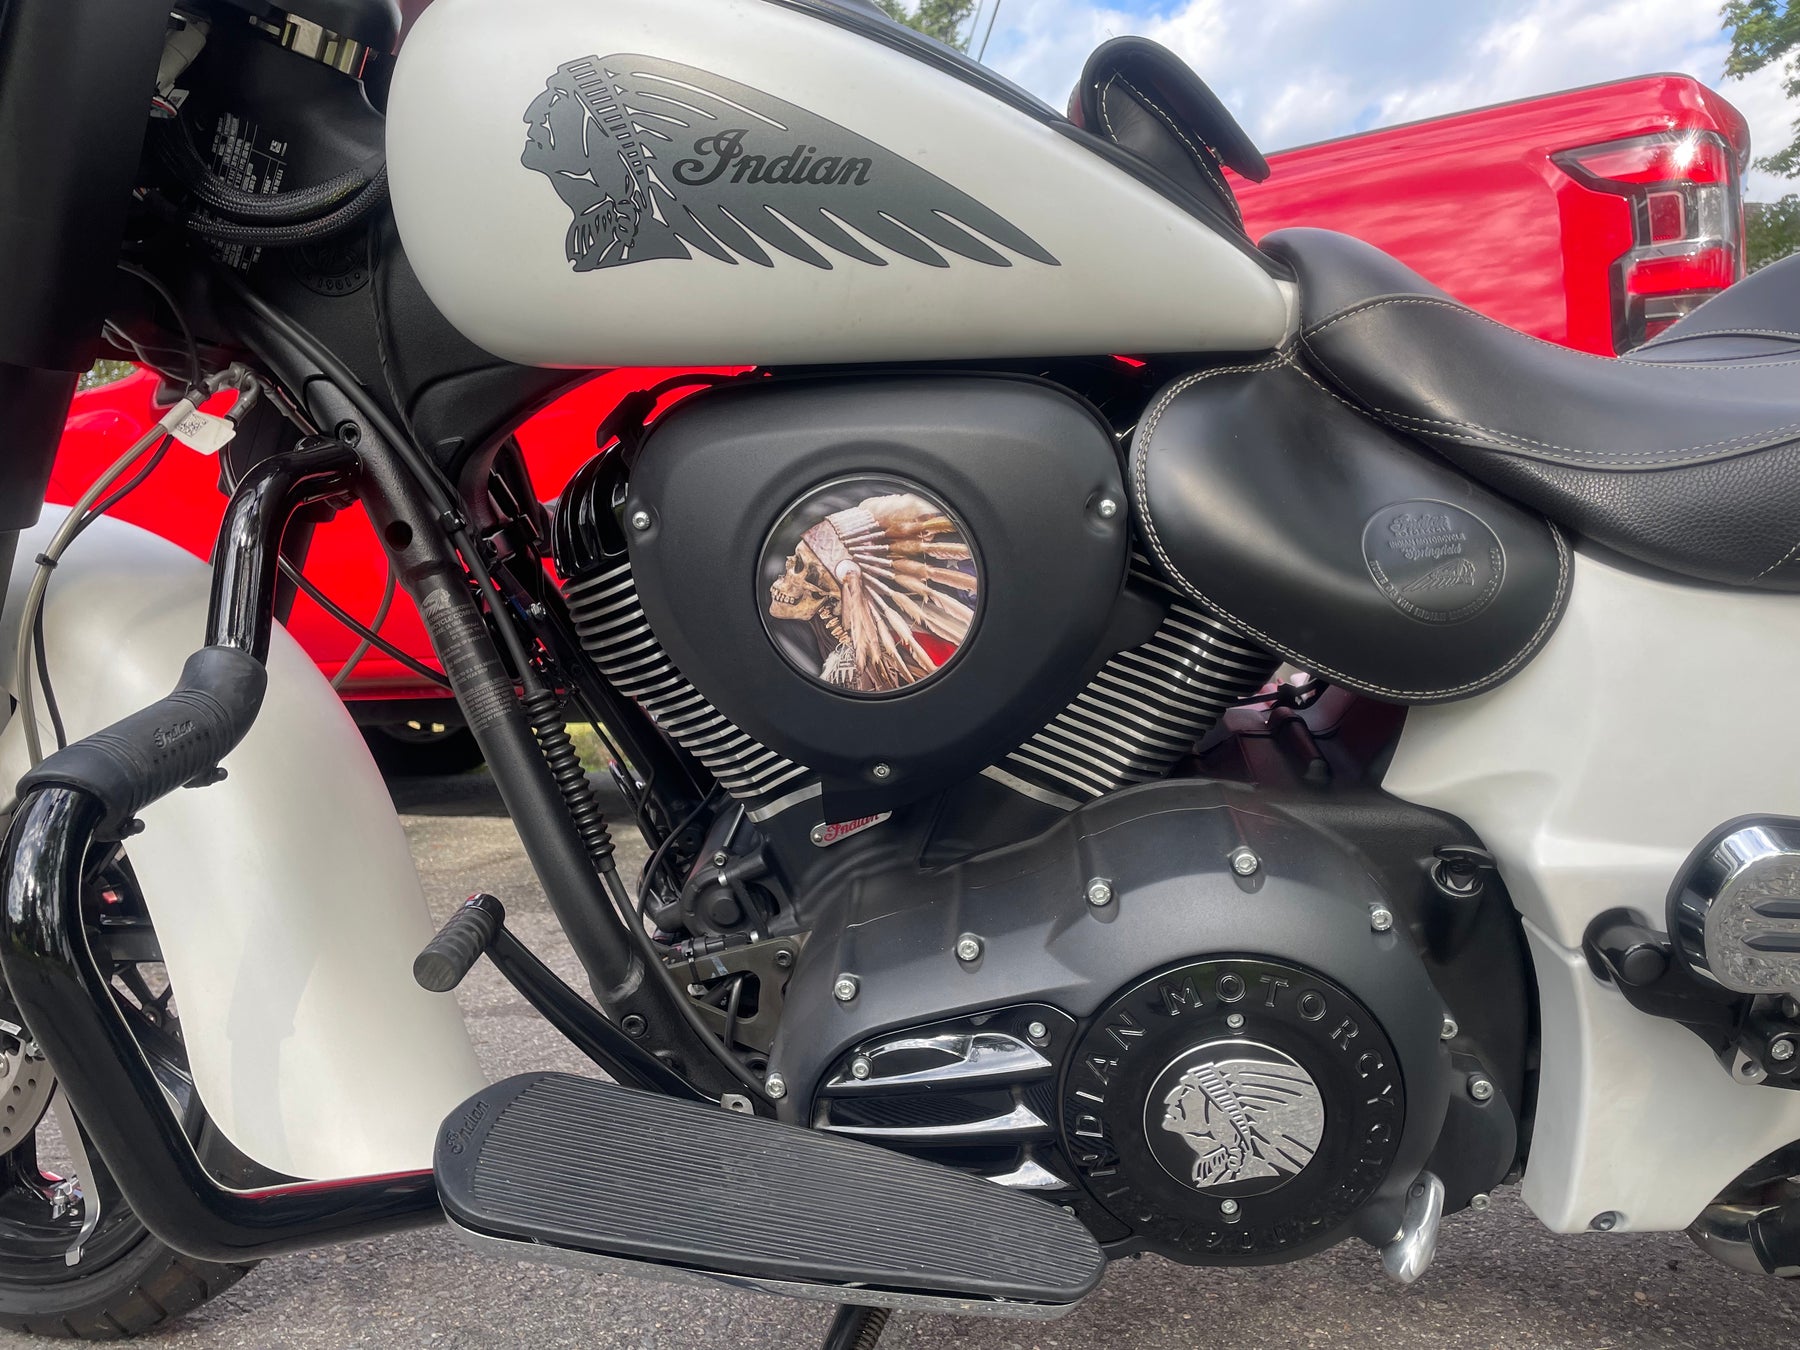
SKULL WARBONNET 120 - 5 Inch Decal
Regular price $20.00
Shipping calculated at checkout.
Special Order Item (may not always be in stock and could take approximately two weeks before shipping)
“SWB-120” 5 inch Decal
These decal inserts have a 5 inch diameter which makes them a perfect fit for the Thunderstroke engine airbox (for models with a round emblem). Check out the photos, and if your bike has the same style airbox, these are a match!
Size: 5 inch diameter circle
Weatherproof laminated decals are self adhesive. We recommend using the wet method to install these decals: A spray bottle with water and dish soap can be used to wet the surface and the back of the decal, allowing you to slide the decal into place. Once you have it aligned properly, use your thumbs to push the moisture out from behind the decal, working from the center outwards to the edges and it will adhere to your bike. Using the wet method allows the decal surface to evenly distribute over the curved surface. A hair dryer to apply heat will make the process easier since the vinyl becomes more soft and flexible when warm.
EXAMPLE PLACEMENT


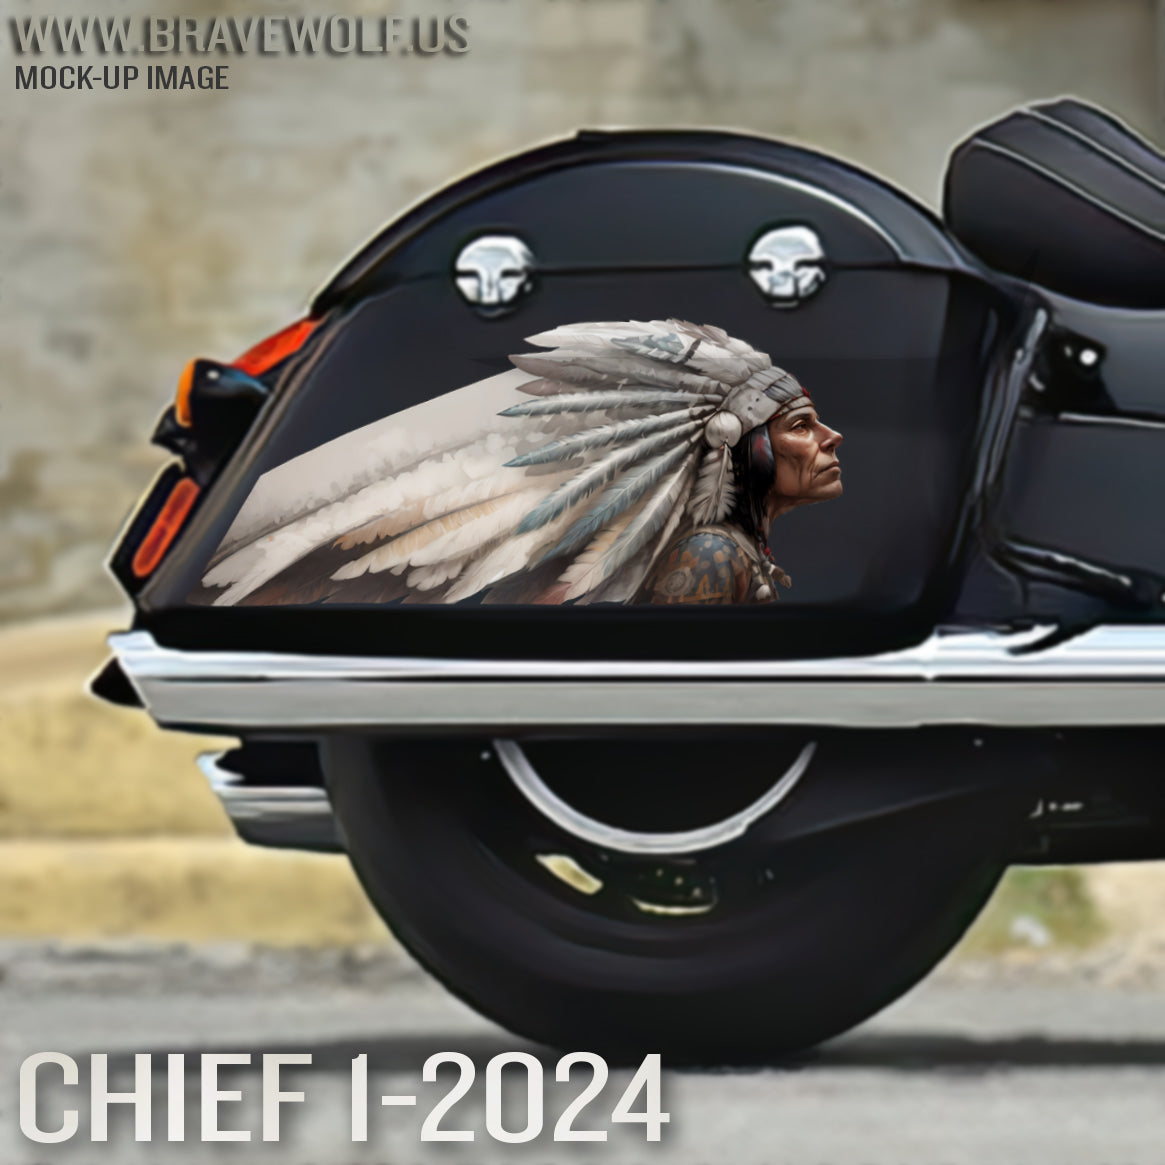
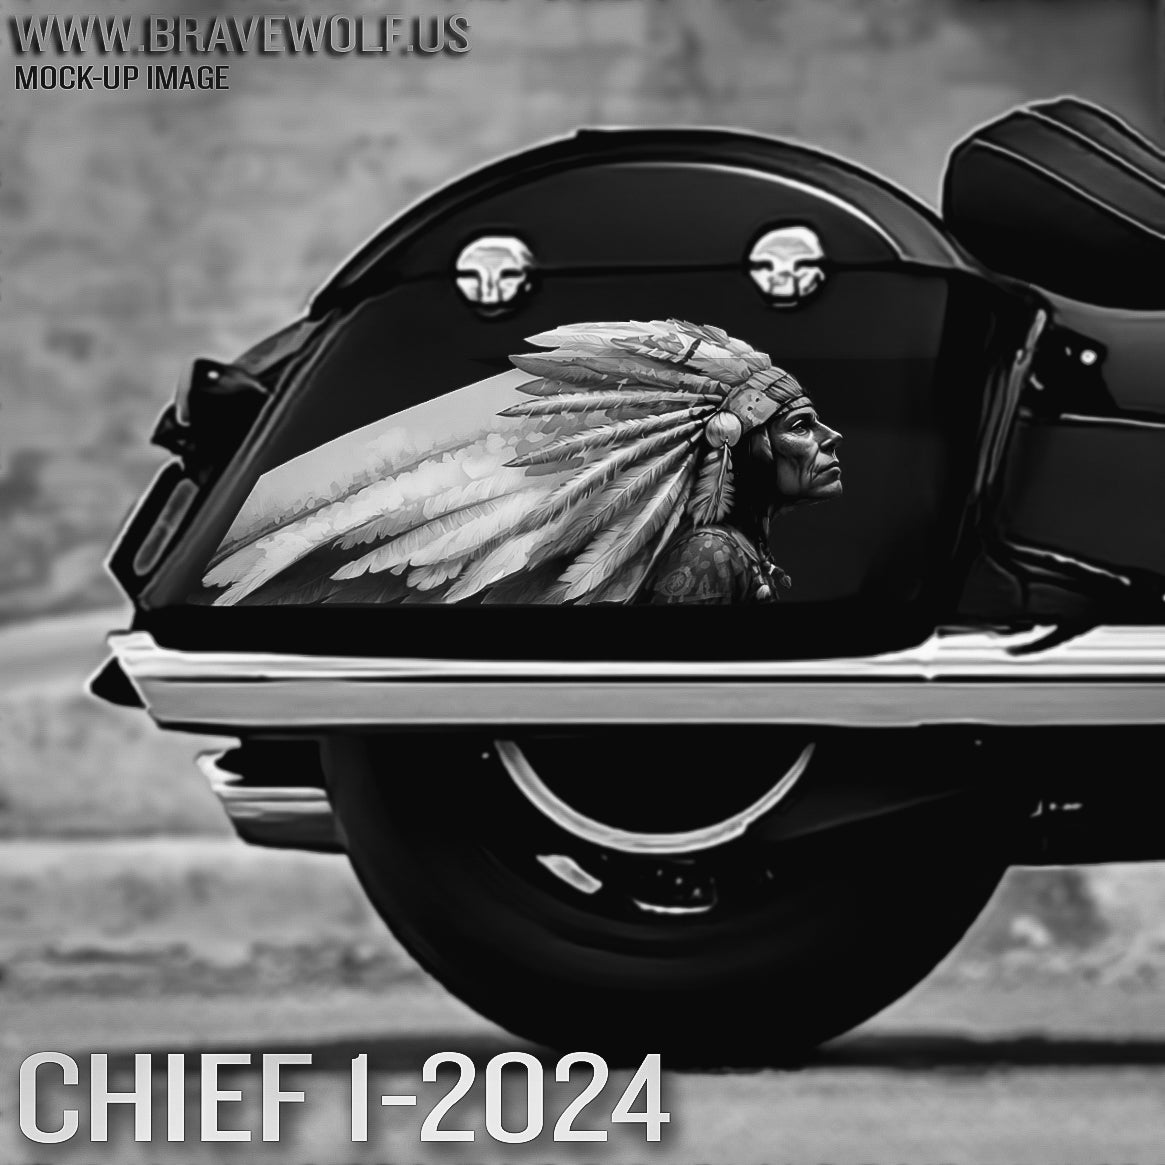
Chief 1-2024 (Color) Saddlebag Decal Set for Indian Motorcycles
Regular price $160.00
Shipping calculated at checkout.
Stock Notice - Special Order (may take approximately 2-3 weeks before shipping if not in stock at time of order)
Our saddlebag decals are made from premium weatherproof hi-tack vinyl with a long lifespan that will keep them looking new for years. They are available in two finishes, heavy-duty 12 mil laminated Gloss (looks like it's painted on), or a heavy-duty sandy matte textured premium finish.
|
Fitment Guide: Fits both styles of Indian OEM saddlebags (rounded and squared). Also fits the Challenger & Pursuit when the plastic bag guard is removed. |
Installation:
Installing our decals is easy to do yourself at home. We recommend removing all of the excess decal material (the background image) before installing the decals. This will allow you to dispose of all the small cut-out pieces so that the pieces do not get trapped underneath your decal when installing it on the bike. Once you have all of the small pieces and background removed, you can use the "wet method" to install the decals to your saddlebags. The wet method involves using a spray bottle of water with a couple drops of dish soap in the mixture and spraying the surface of your saddlebags to wet the entire surface. Then carefully remove the backing from your decal and use the spray bottle to wet the adhesive side of the decal. Now you can gently place the decal on your saddlebag. Because the surfaces are wet, you can pull the decal up to reposition it until you get it where you want it. Once it's in place, use a squeegee or other object such as a credit card wrapped in a microfiber towel to squeeze the water out from behind the decal. You can also use your hands to do this. You should take care not to use a hard/abrasive object that can scratch the decals or your bike's paint. The high-tack adhesive will begin to set/adhere to the bike as soon as the liquid is push out from behind the decal. Use caution to ensure the towel or object you are using does not catch any edges of the decal and pull it off your bike. If you take your time and be gentle during installation, it should be an easy process. A hair dryer can be used to speed up the drying process if needed.
Feel free to visit our How-To page on the website to watch a "wet method" installation video.


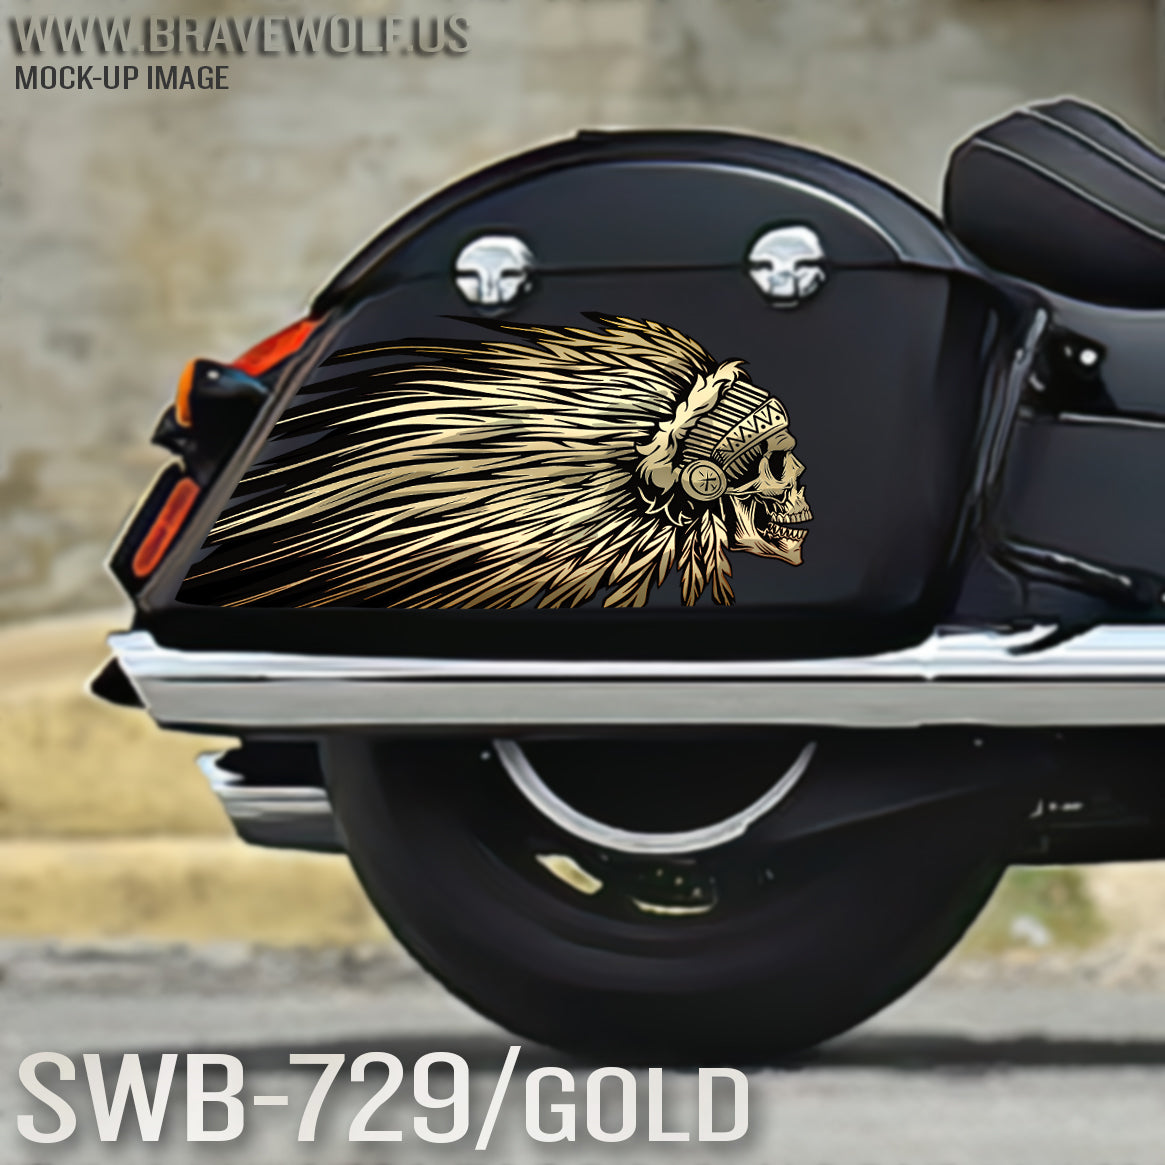
Indian Saddlebag Decals-SWB729-Gold
Regular price $180.00
Shipping calculated at checkout.
Stock Notice - Special Order (may take approximately 2-3 weeks before shipping if not in stock at time of order)
Our saddlebag decals are made from premium weatherproof hi-tack vinyl with a long lifespan that will keep them looking new for years. They are available in two finishes, heavy-duty 12 mil laminated Gloss (looks like it's painted on), or a heavy-duty sandy matte textured premium finish.
|
Fitment Guide: Fits both styles of Indian OEM saddlebags (rounded and squared). Also fits the Challenger & Pursuit when the plastic bag guard is removed. |
Installation:
Installing our decals is easy to do yourself at home. We recommend removing all of the excess decal material (the background image) before installing the decals. This will allow you to dispose of all the small cut-out pieces so that the pieces do not get trapped underneath your decal when installing it on the bike. Once you have all of the small pieces and background removed, you can use the "wet method" to install the decals to your saddlebags. The wet method involves using a spray bottle of water with a couple drops of dish soap in the mixture and spraying the surface of your saddlebags to wet the entire surface. Then carefully remove the backing from your decal and use the spray bottle to wet the adhesive side of the decal. Now you can gently place the decal on your saddlebag. Because the surfaces are wet, you can pull the decal up to reposition it until you get it where you want it. Once it's in place, use a squeegee or other object such as a credit card wrapped in a microfiber towel to squeeze the water out from behind the decal. You can also use your hands to do this. You should take care not to use a hard/abrasive object that can scratch the decals or your bike's paint. The high-tack adhesive will begin to set/adhere to the bike as soon as the liquid is push out from behind the decal. Use caution to ensure the towel or object you are using does not catch any edges of the decal and pull it off your bike. If you take your time and be gentle during installation, it should be an easy process. A hair dryer can be used to speed up the drying process if needed.
Feel free to visit our How-To page on the website to watch a "wet method" installation video TAB Performance made while installing our Zombie decals.

SKULL WARBONNET 122 - 5 Inch Decal
Regular price $20.00
Shipping calculated at checkout.
Special Order Item (may not always be in stock and could take approximately two weeks before shipping)
“SWB-122” 5 inch Decal
These decal inserts have a 5 inch diameter which makes them a perfect fit for the Thunderstroke engine airbox (for models with a round emblem). Check out the photos, and if your bike has the same style airbox, these are a match!
Size: 5 inch diameter circle
Weatherproof laminated decals are self adhesive. We recommend using the wet method to install these decals: A spray bottle with water and dish soap can be used to wet the surface and the back of the decal, allowing you to slide the decal into place. Once you have it aligned properly, use your thumbs to push the moisture out from behind the decal, working from the center outwards to the edges and it will adhere to your bike. Using the wet method allows the decal surface to evenly distribute over the curved surface. A hair dryer to apply heat will make the process easier since the vinyl becomes more soft and flexible when warm.
EXAMPLE PLACEMENT


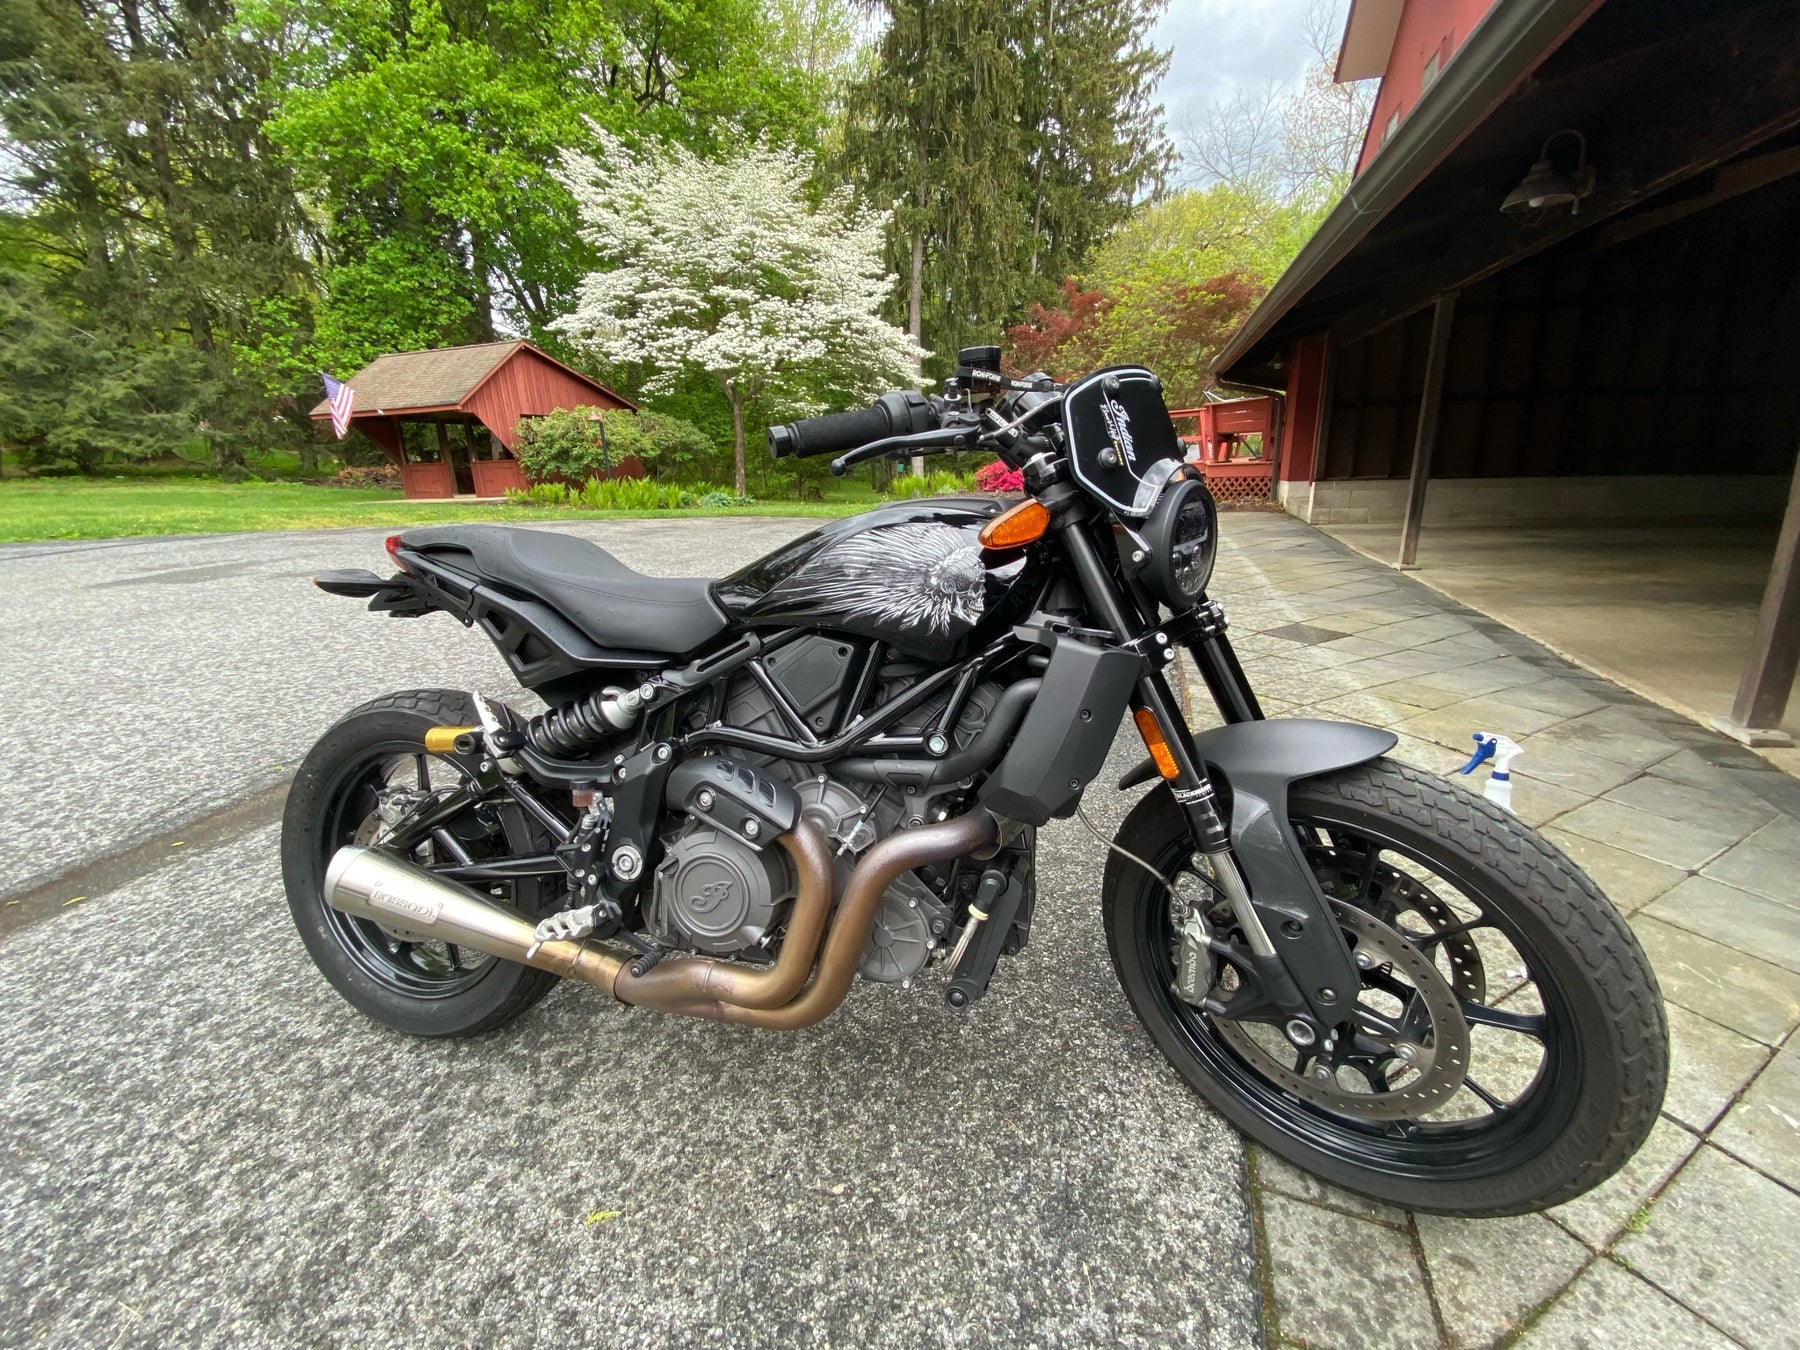
NEW Skull Warbonnet - Thunderstroke Models B&W
Regular price $100.00
Shipping calculated at checkout.
New Item - Special Order (may take up to two weeks before shipping)
“NEW Skull Warbonnet for Thunderstroke Models(Black and White Version)”
Size: Large decal that covers Original logos on the tank.
15.35 in x 6.86 in

Weatherproof laminated decals are self adhesive. We recommend using the wet method to install larger decals: A spray bottle with water and dish soap can be used to wet the tank and the back of the decal, allowing you to slide the decal into place. Once you have it aligned properly, use a squeegee or some non-abrasive tool (even your fingers) to push the moisture out from behind the decal and it will adhere to your tank.

SKULL WARBONNET 117 - 5 Inch Decal
Regular price $20.00
Shipping calculated at checkout.
Special Order Item (may not always be in stock and could take approximately two weeks before shipping)
“SWB-117” 5 inch Decal
These decal inserts have a 5 inch diameter which makes them a perfect fit for the Thunderstroke engine airbox (for models with a round emblem). Check out the photos, and if your bike has the same style airbox, these are a match!
Size: 5 inch diameter circle
Weatherproof laminated decals are self adhesive. We recommend using the wet method to install these decals: A spray bottle with water and dish soap can be used to wet the surface and the back of the decal, allowing you to slide the decal into place. Once you have it aligned properly, use your thumbs to push the moisture out from behind the decal, working from the center outwards to the edges and it will adhere to your bike. Using the wet method allows the decal surface to evenly distribute over the curved surface. A hair dryer to apply heat will make the process easier since the vinyl becomes more soft and flexible when warm.
EXAMPLE PLACEMENT

SKULL WARBONNET 2030 - 5 Inch Decal
Regular price $20.00
Shipping calculated at checkout.
Special Order Item (may not always be in stock and could take approximately two weeks before shipping)
“SWB-2030” 5 inch Decal
These decal inserts have a 5 inch diameter which makes them a perfect fit for the Thunderstroke engine airbox (for models with a round emblem). Check out the photos, and if your bike has the same style airbox, these are a match!
Size: 5 inch diameter circle
Weatherproof laminated decals are self adhesive. We recommend using the wet method to install these decals: A spray bottle with water and dish soap can be used to wet the surface and the back of the decal, allowing you to slide the decal into place. Once you have it aligned properly, use your thumbs to push the moisture out from behind the decal, working from the center outwards to the edges and it will adhere to your bike. Using the wet method allows the decal surface to evenly distribute over the curved surface. A hair dryer to apply heat will make the process easier since the vinyl becomes more soft and flexible when warm.
EXAMPLE PLACEMENT


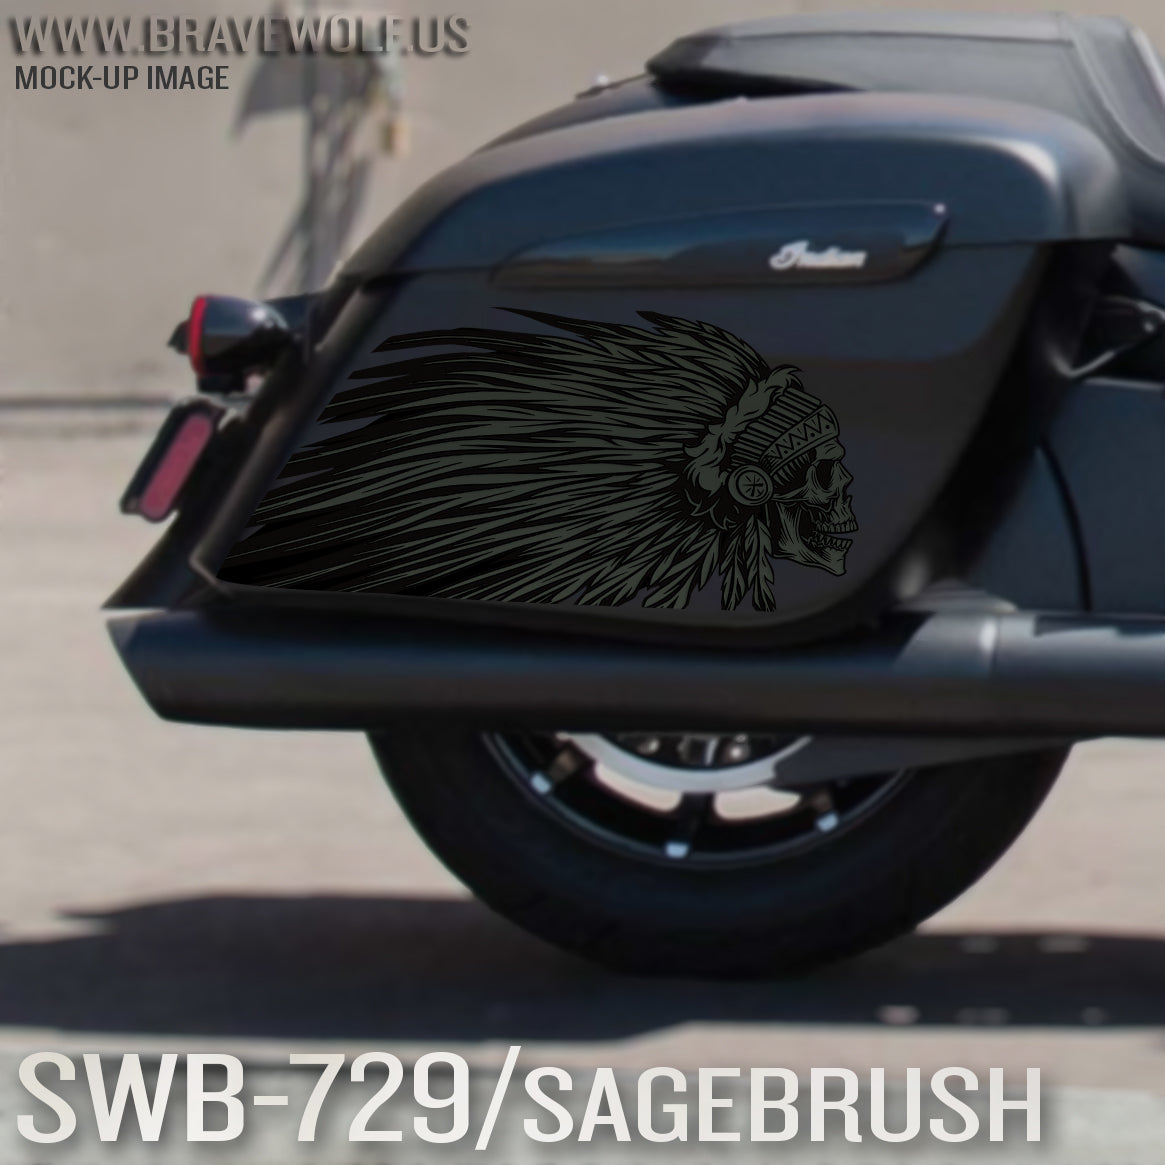
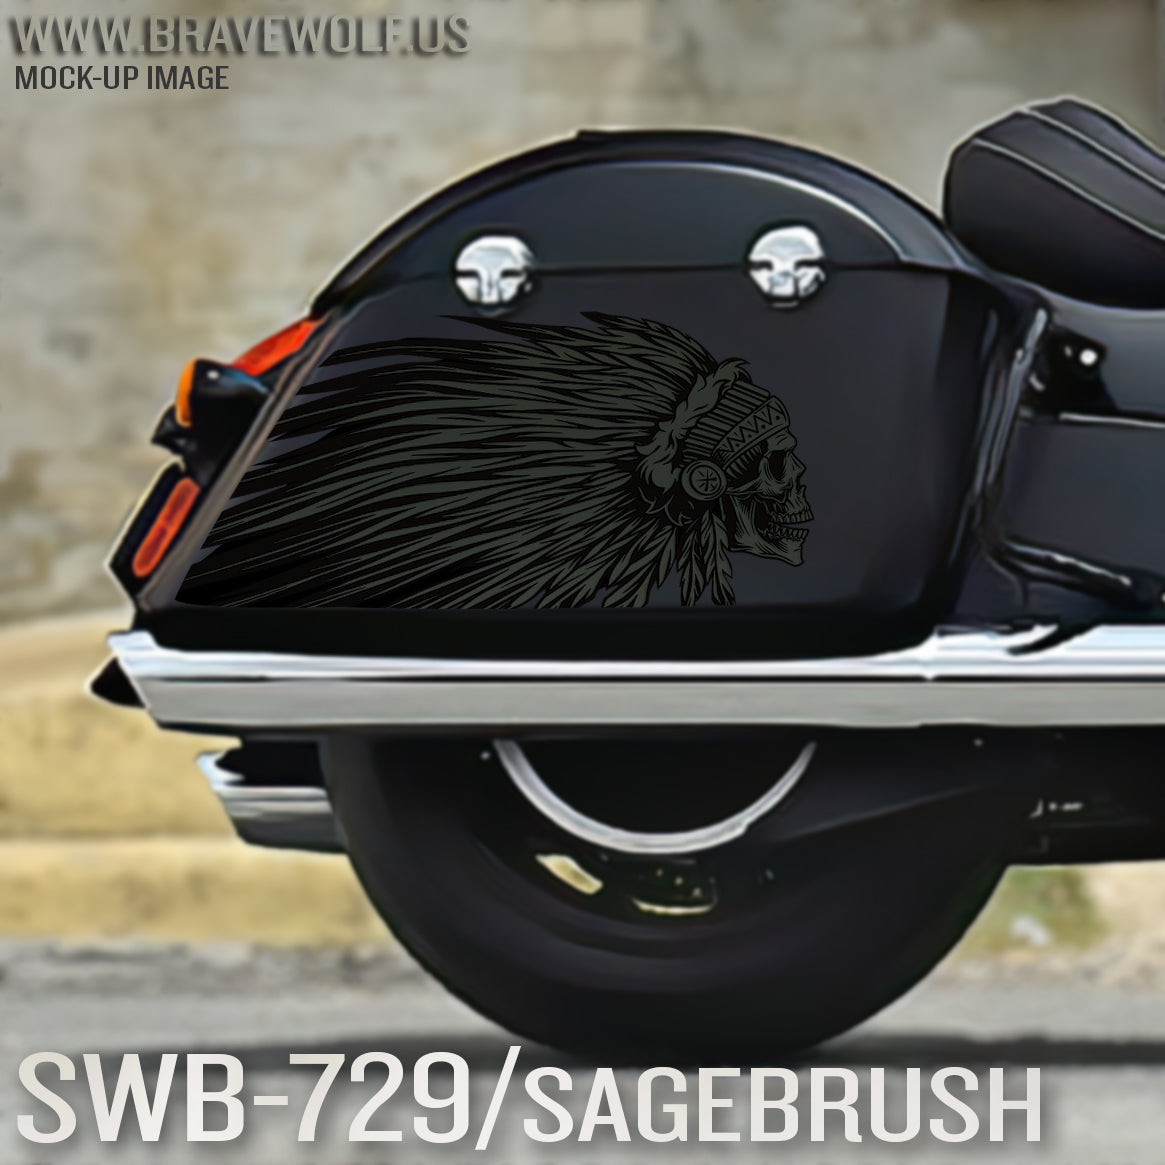
Saddlebag Decals-SWB729-Sagebrush
Regular price $180.00
Shipping calculated at checkout.
Stock Notice: (may take approximately 2-3 weeks before shipping if not in stock at the time of your order)
Our saddlebag decals are made from premium weatherproof hi-tack vinyl with a long lifespan that will keep them looking new for years. They are available in two finishes, heavy-duty 12 mil laminated Gloss (looks like it's painted on), or a heavy-duty sandy matte textured premium finish.
|
Fitment Guide: Fits both styles of Indian OEM saddlebags (rounded and squared). Also fits the Challenger & Pursuit when the plastic bag guard is removed. |
Installation:
Installing our decals is easy to do yourself at home. We recommend removing all of the excess decal material (the background image) before installing the decals. This will allow you to dispose of all the small cut-out pieces so that the pieces do not get trapped underneath your decal when installing it on the bike. Once you have all of the small pieces and background removed, you can use the "wet method" to install the decals to your saddlebags. The wet method involves using a spray bottle of water with a couple drops of dish soap in the mixture and spraying the surface of your saddlebags to wet the entire surface. Then carefully remove the backing from your decal and use the spray bottle to wet the adhesive side of the decal. Now you can gently place the decal on your saddlebag. Because the surfaces are wet, you can pull the decal up to reposition it until you get it where you want it. Once it's in place, use a squeegee or other object such as a credit card wrapped in a microfiber towel to squeeze the water out from behind the decal. You can also use your hands to do this. You should take care not to use a hard/abrasive object that can scratch the decals or your bike's paint. The high-tack adhesive will begin to set/adhere to the bike as soon as the liquid is push out from behind the decal. Use caution to ensure the towel or object you are using does not catch any edges of the decal and pull it off your bike. If you take your time and be gentle during installation, it should be an easy process. A hair dryer can be used to speed up the drying process if needed.
Feel free to visit our How-To page on the website to watch a "wet method" installation video TAB Performance made while installing our Zombie decals.


SKULL WARBONNET 108 - 5 Inch Decal
Regular price $20.00
Shipping calculated at checkout.
Special Order Item (may not always be in stock and could take approximately two weeks before shipping)
“SWB-108” 5 inch Decal
These decal inserts have a 5 inch diameter which makes them a perfect fit for the Thunderstroke engine airbox (for models with a round emblem). Check out the photos, and if your bike has the same style airbox, these are a match!
Size: 5 inch diameter circle
Weatherproof laminated decals are self adhesive. We recommend using the wet method to install these decals: A spray bottle with water and dish soap can be used to wet the surface and the back of the decal, allowing you to slide the decal into place. Once you have it aligned properly, use your thumbs to push the moisture out from behind the decal, working from the center outwards to the edges and it will adhere to your bike. Using the wet method allows the decal surface to evenly distribute over the curved surface. A hair dryer to apply heat will make the process easier since the vinyl becomes more soft and flexible when warm.
EXAMPLE PLACEMENT