
Brave Wolf Customs has a wide assortment of aftermarket products for your Indian Powerplus Roadmaster and Powerplus Chieftain. Because these models are built on the same platform as the Indian Challenger and Pursuit, aftermarket options are expanded. Check out our selection of decals, accents, radiator covers, highway bars, bag lights and more.
21 products
21 products


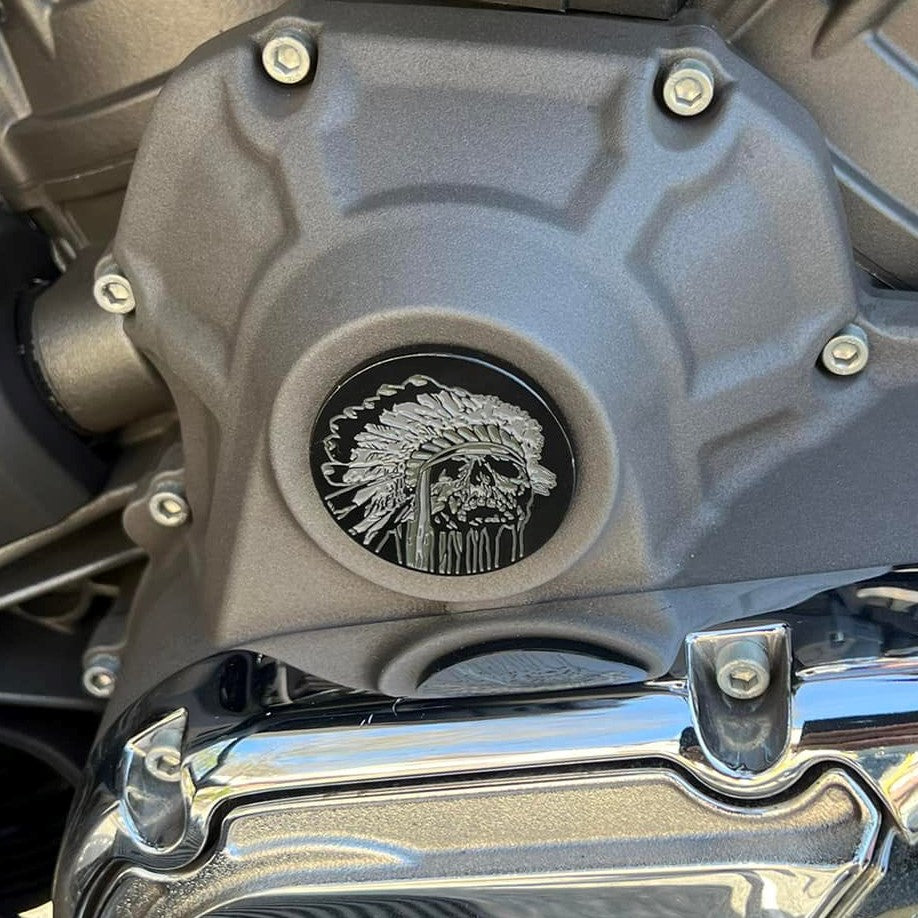
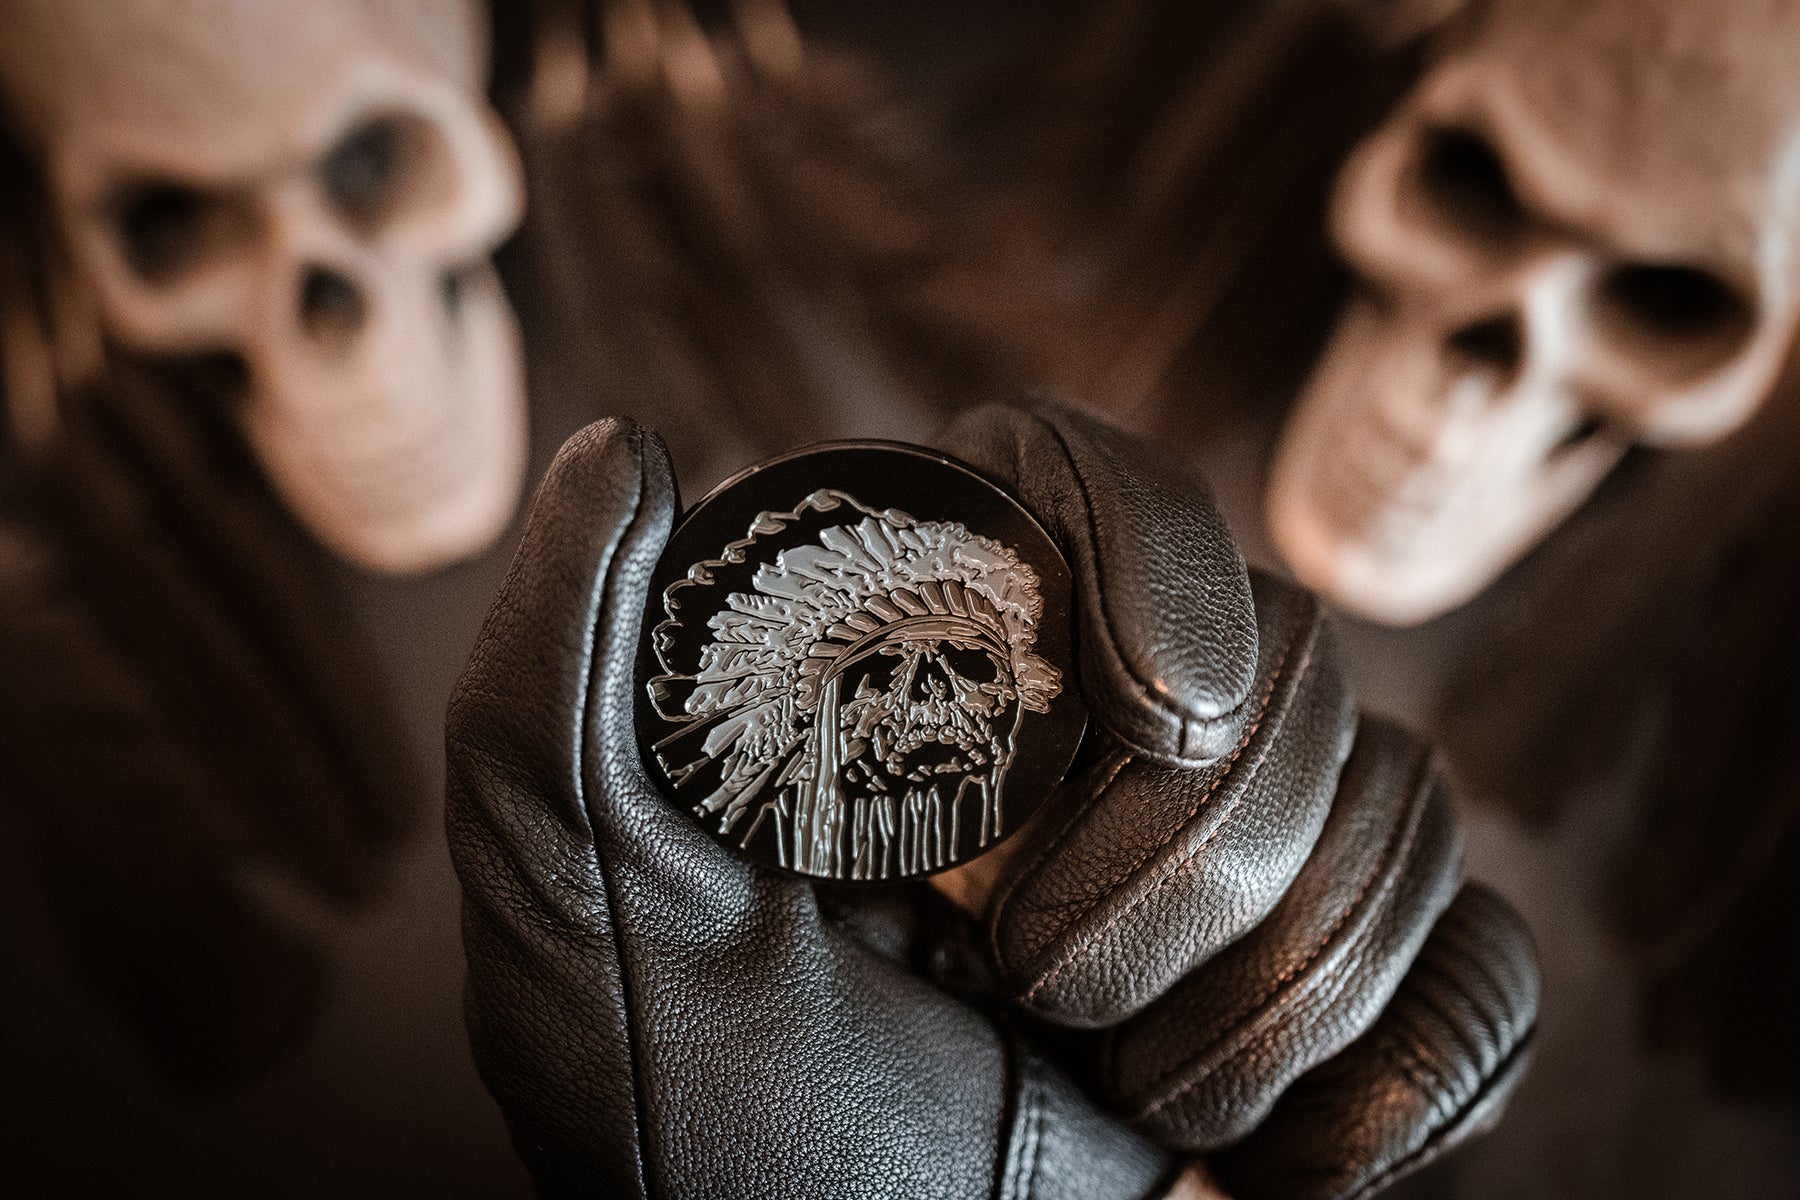
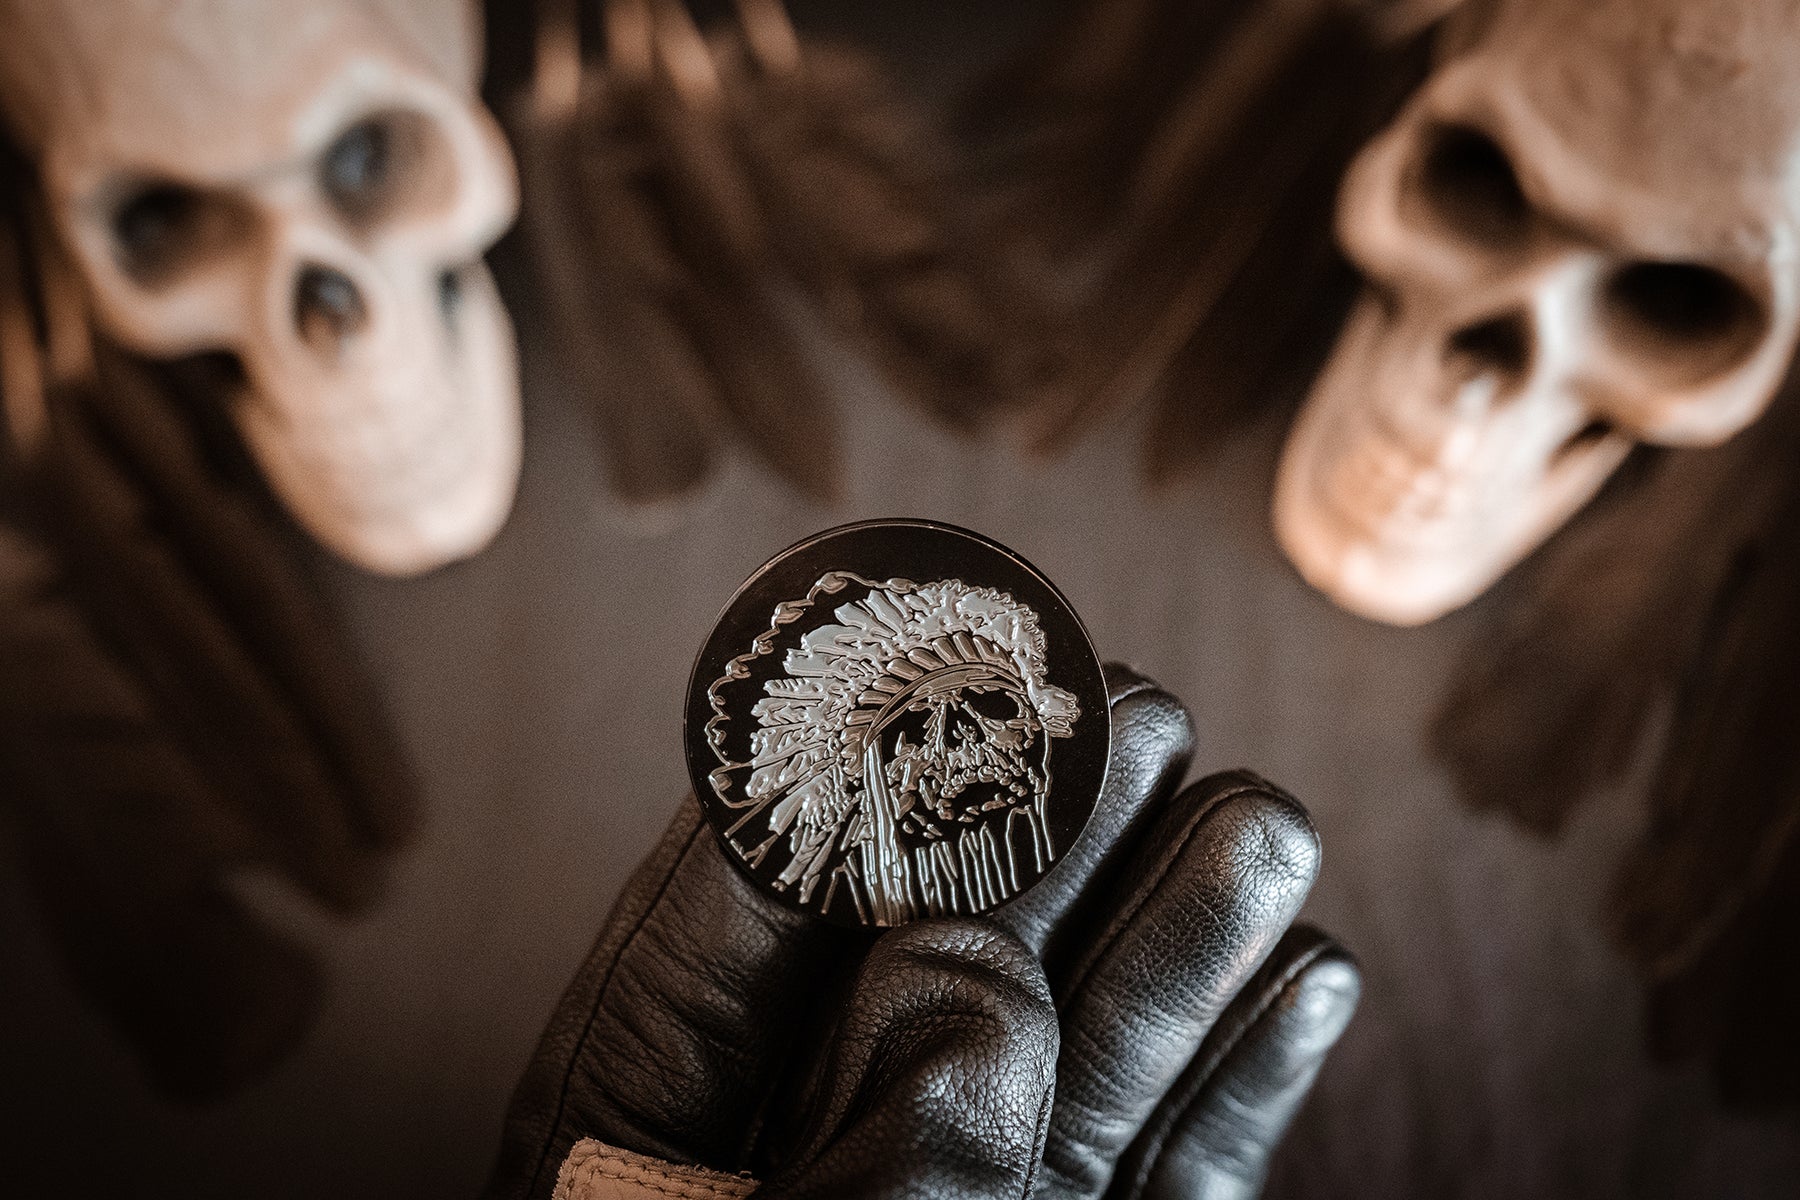
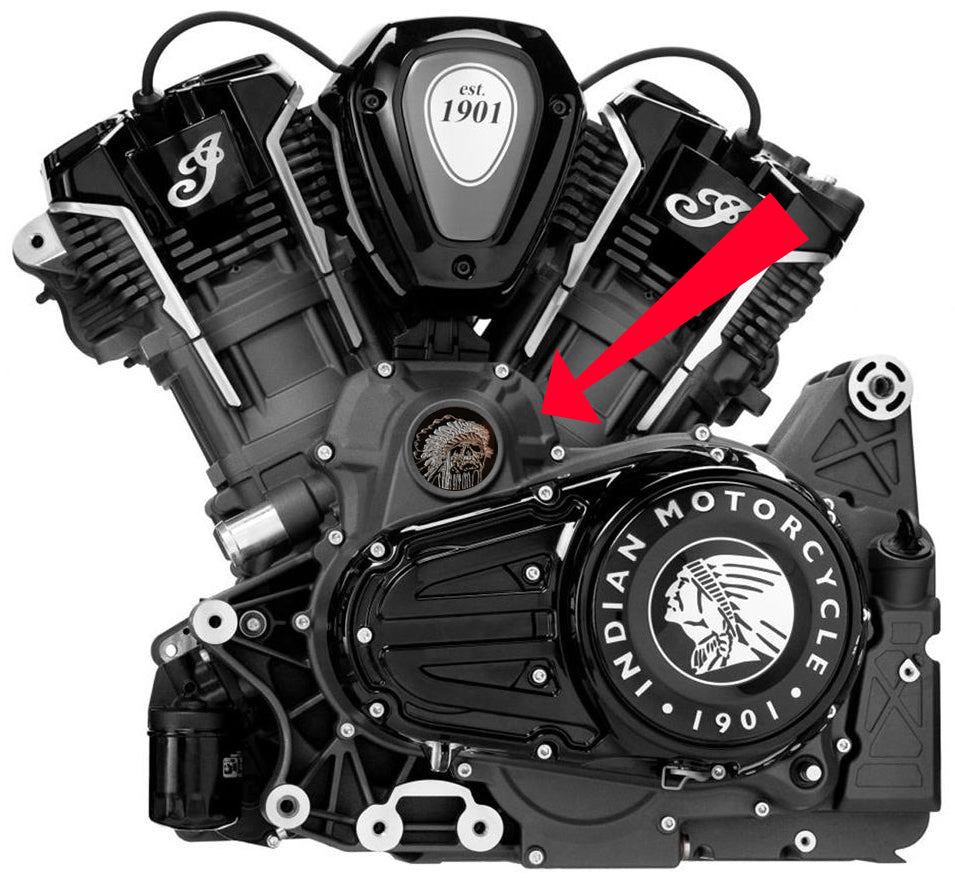
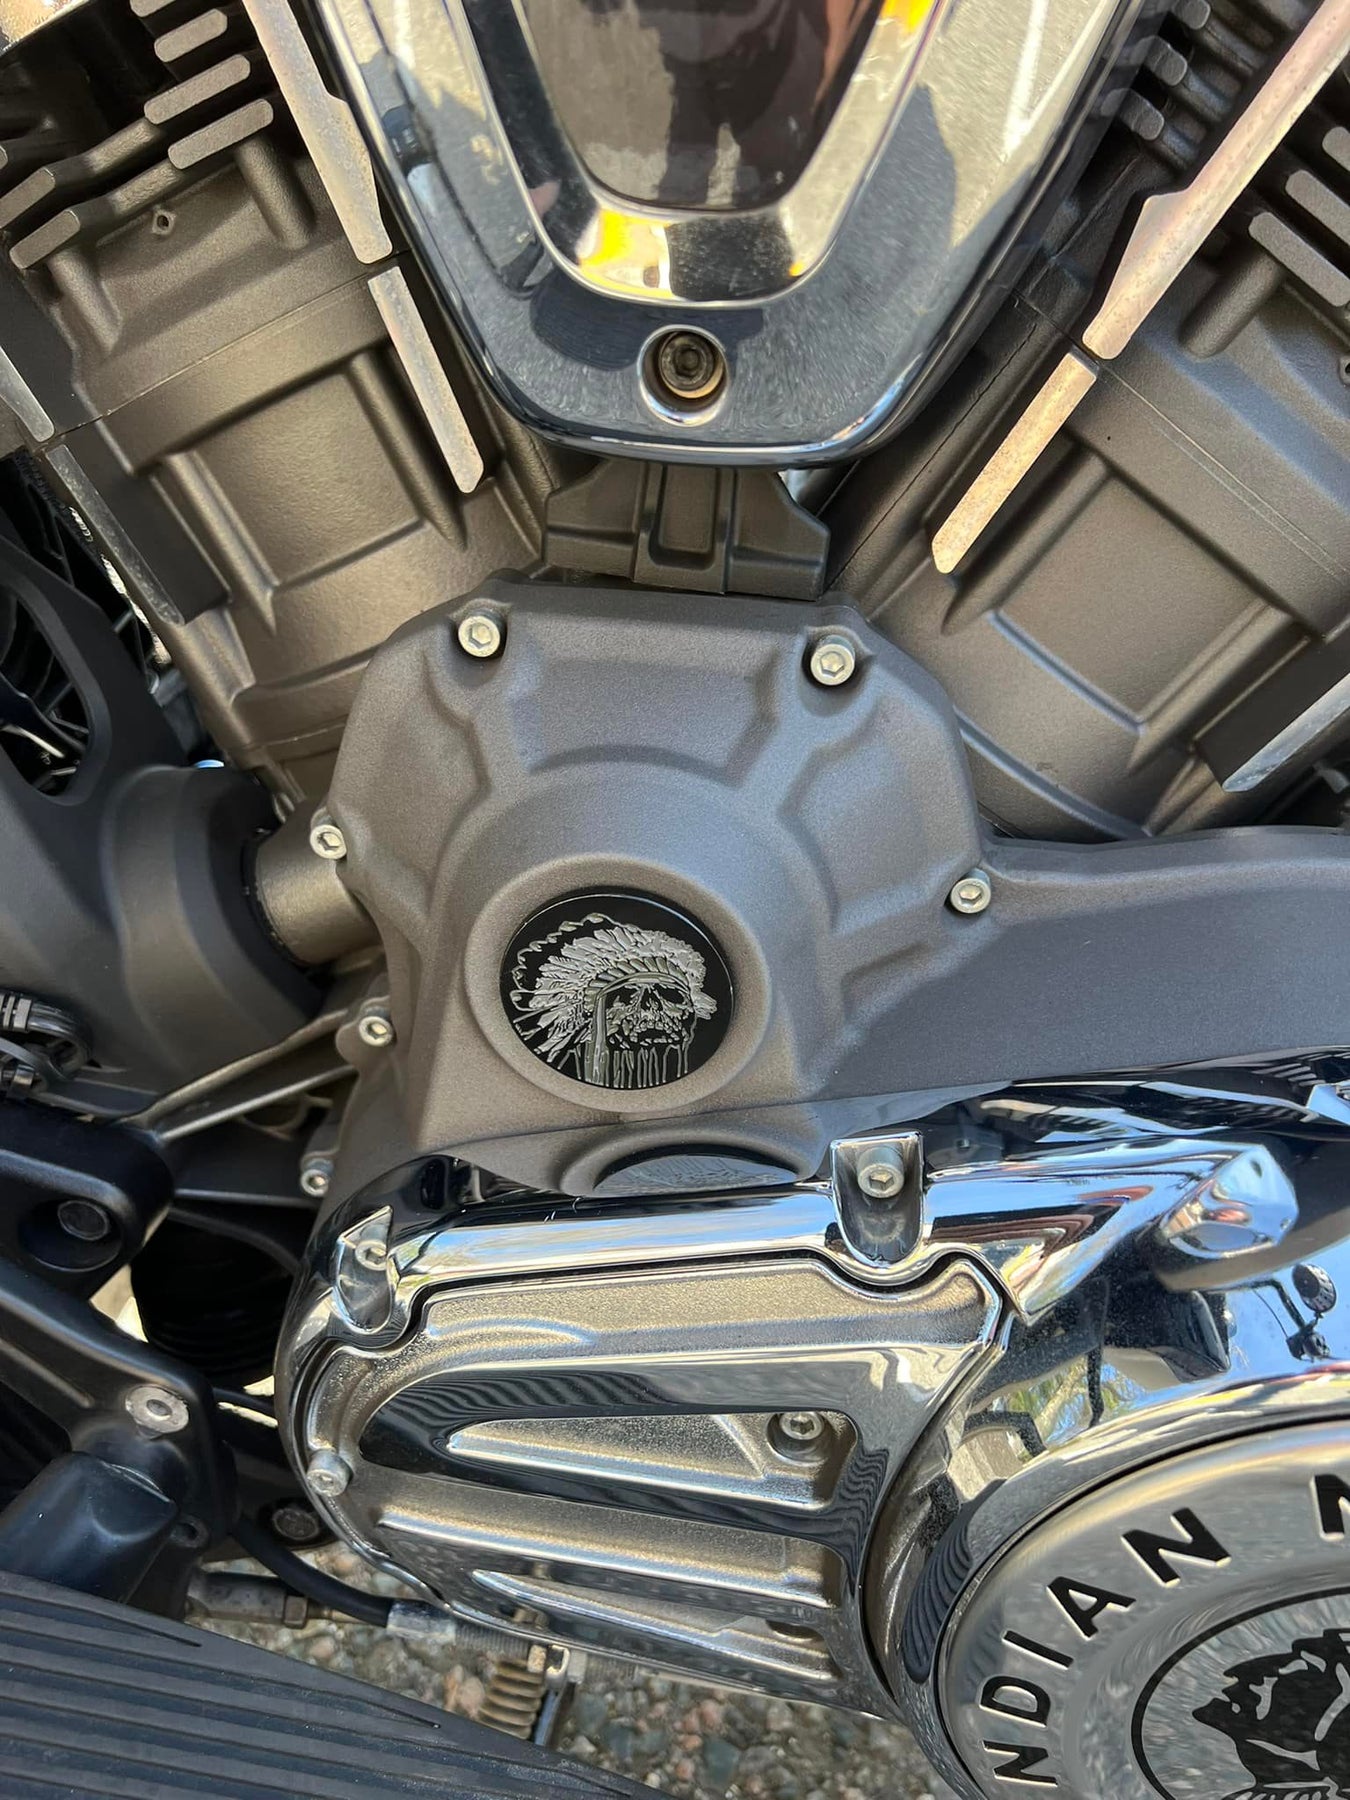
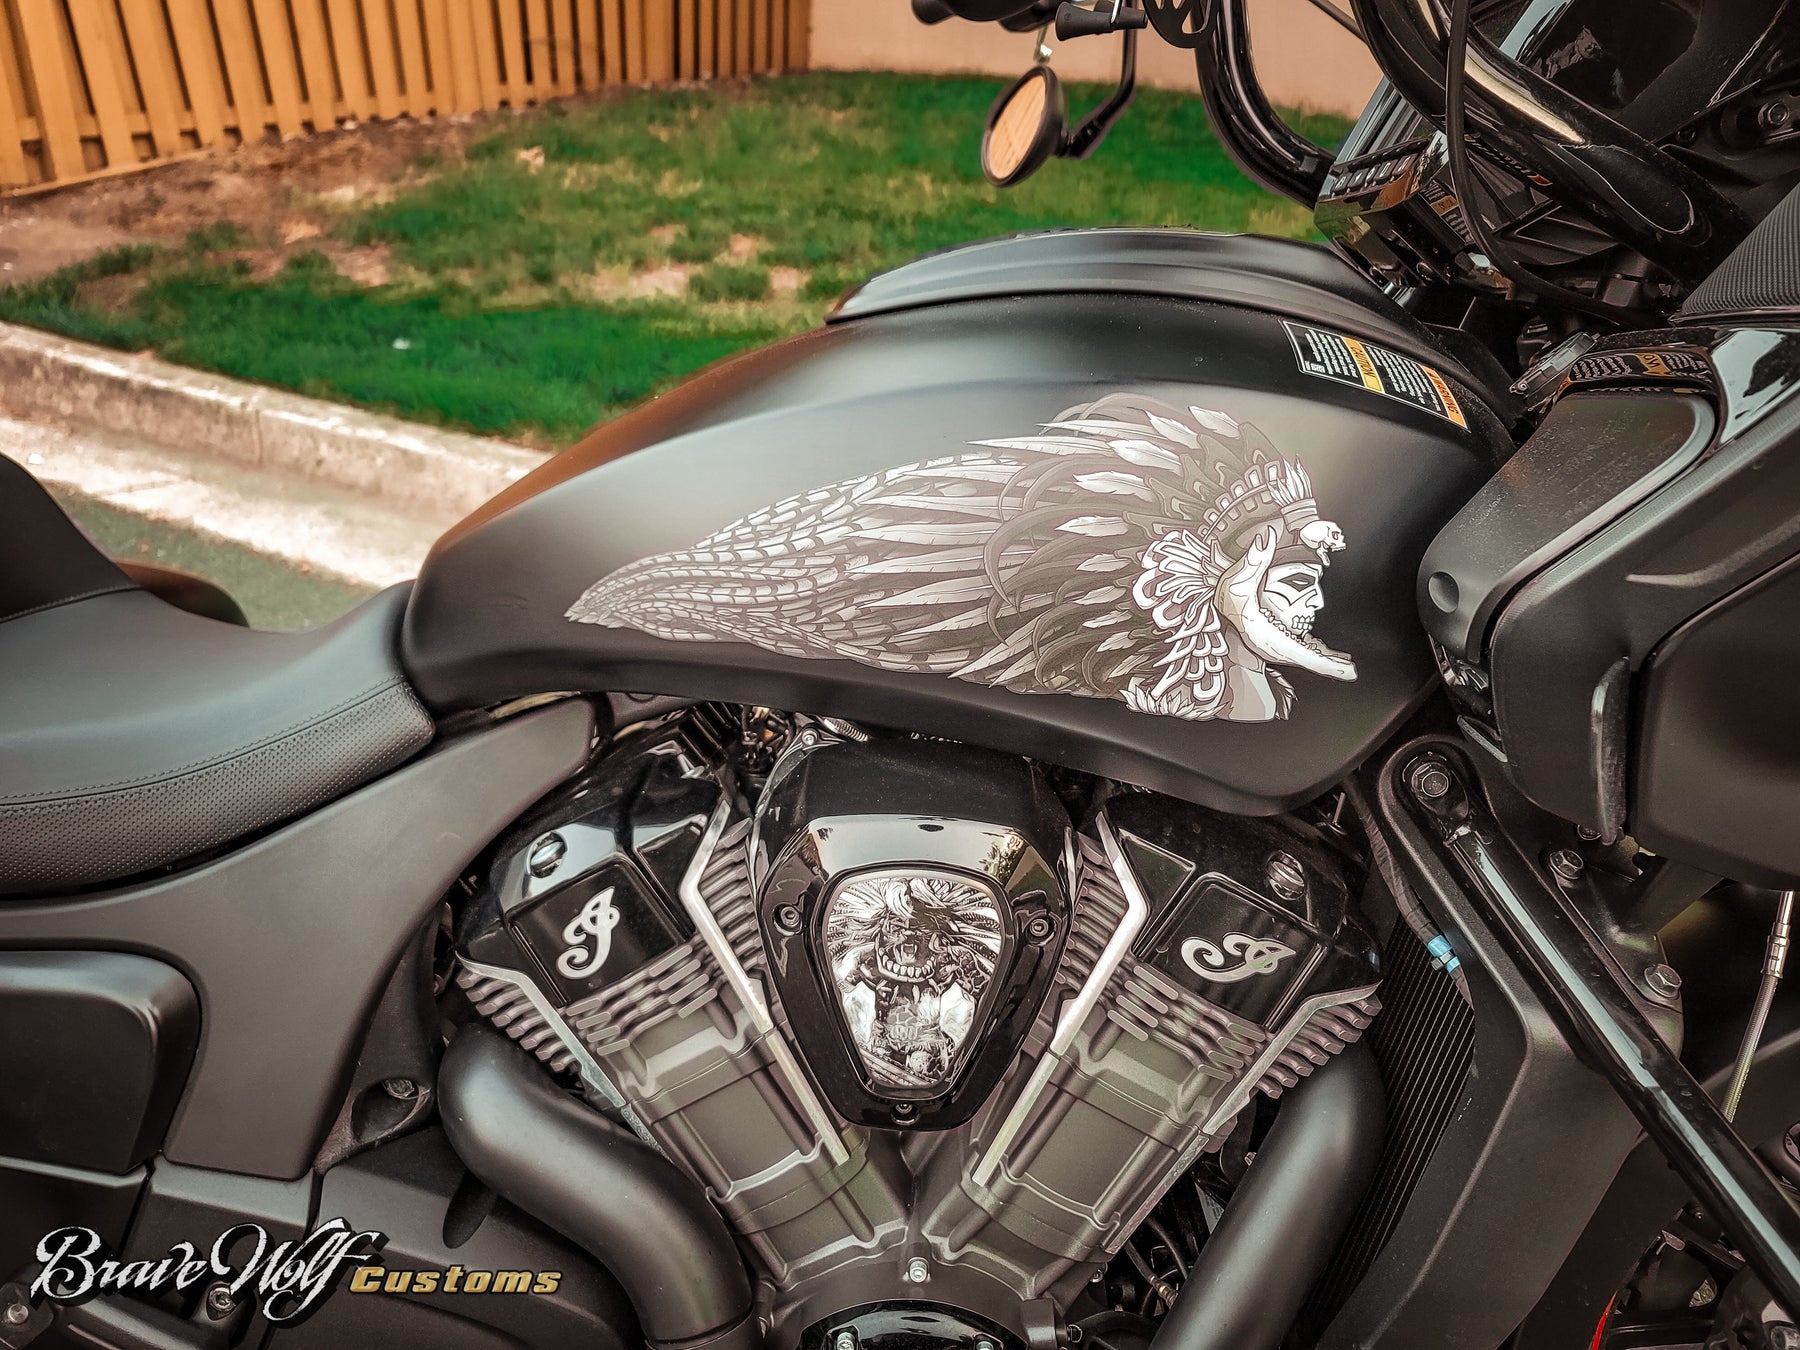
Skull Warbonnet 2" Emblem Coin
Regular price $8.00 Sale price $6.50 Save $1.50
Shipping calculated at checkout.
These embossed black-painted metal coin emblems are detailed with soft enamel to maintain ridges and detail. 2 inches in diameter, they're a perfect fit for the small circular inset on the left side of the Powerplus engine. If you don't ride a Powerplus model, you can install these anywhere you like. We recommend using 3M double-sided emblem tape or an adhesive that remains flexible such as Lexel or e6000 to install.

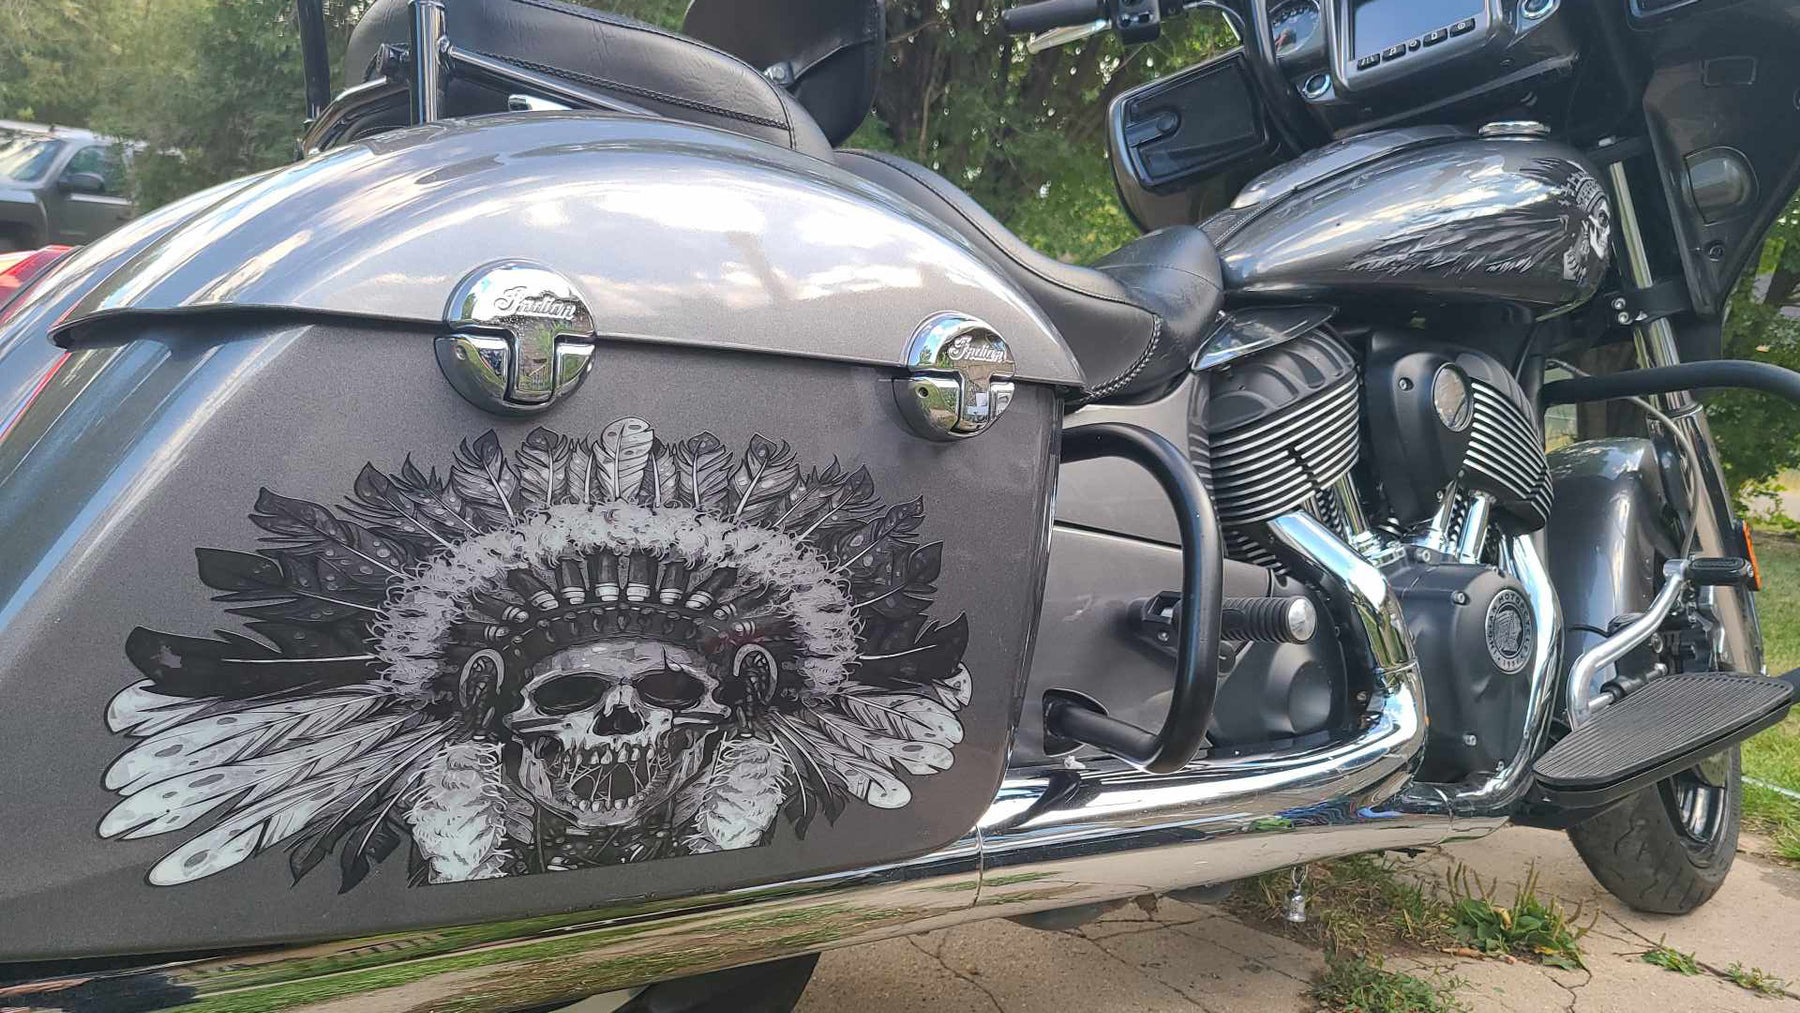
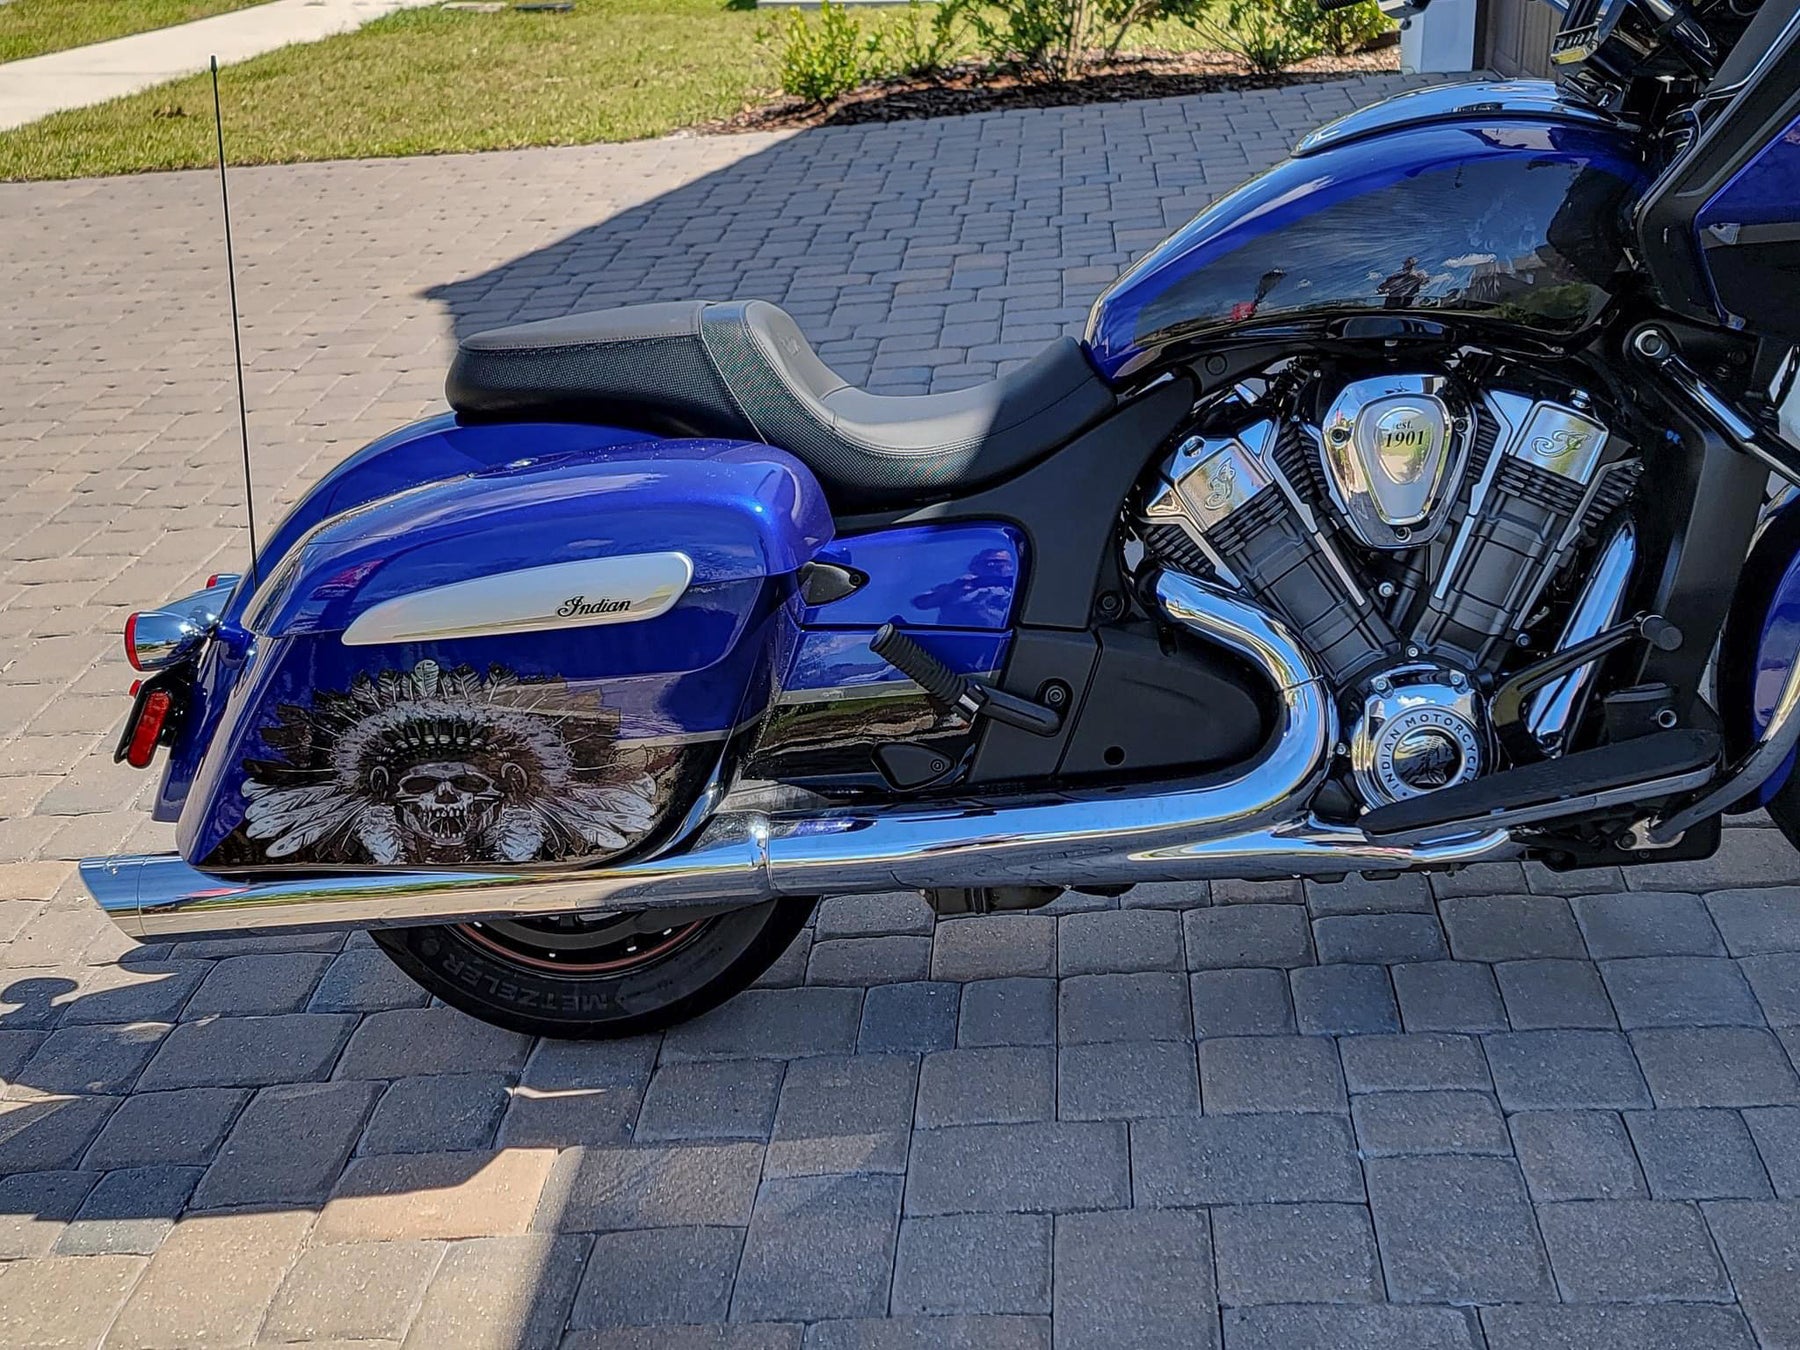
Photo courtesy of Anthony Masone


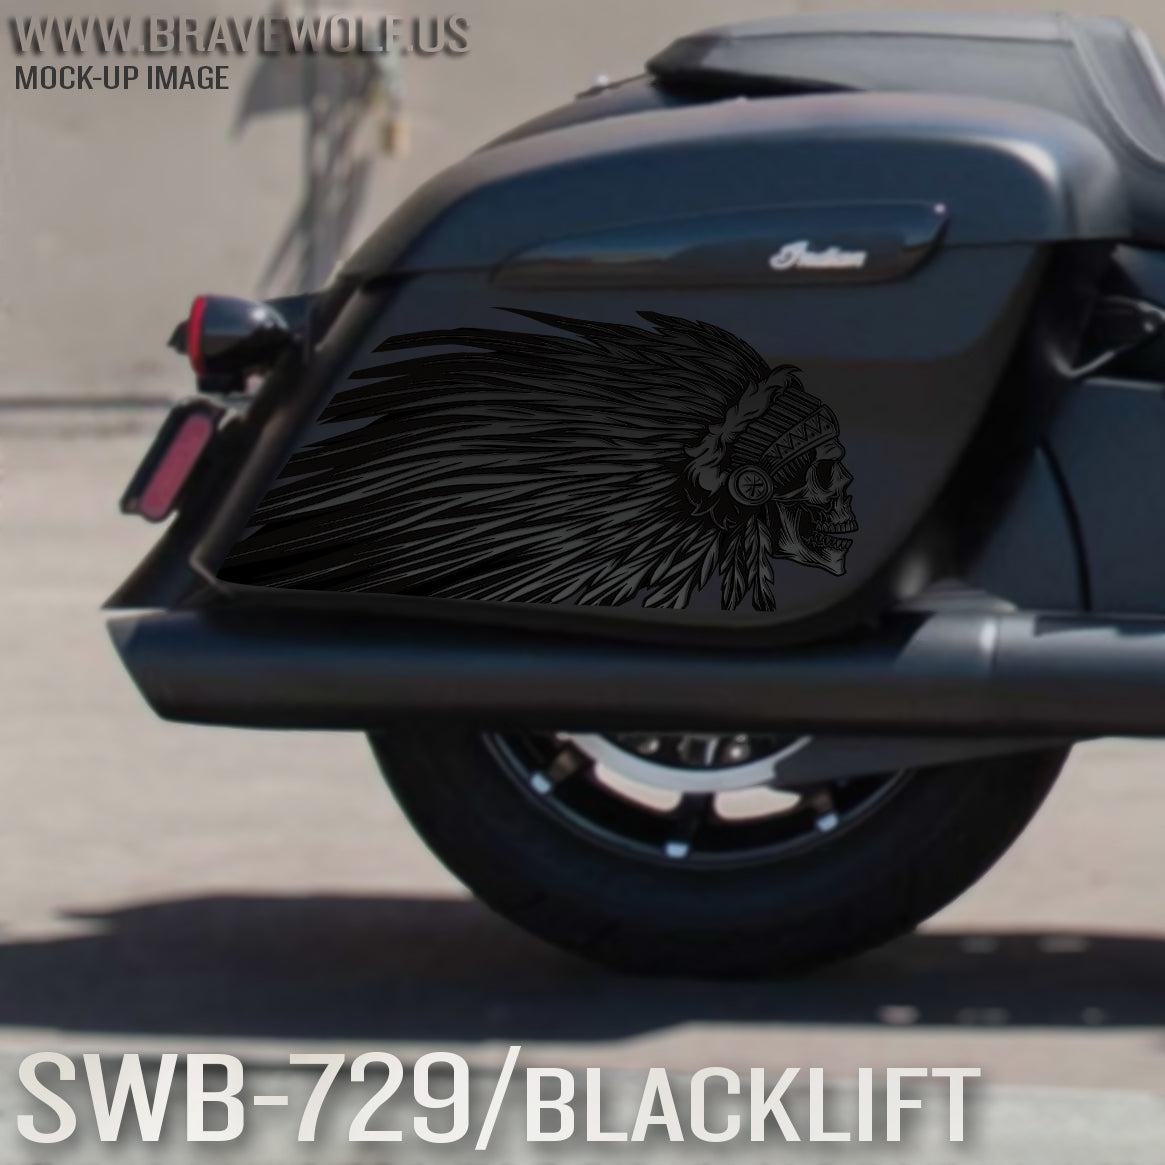
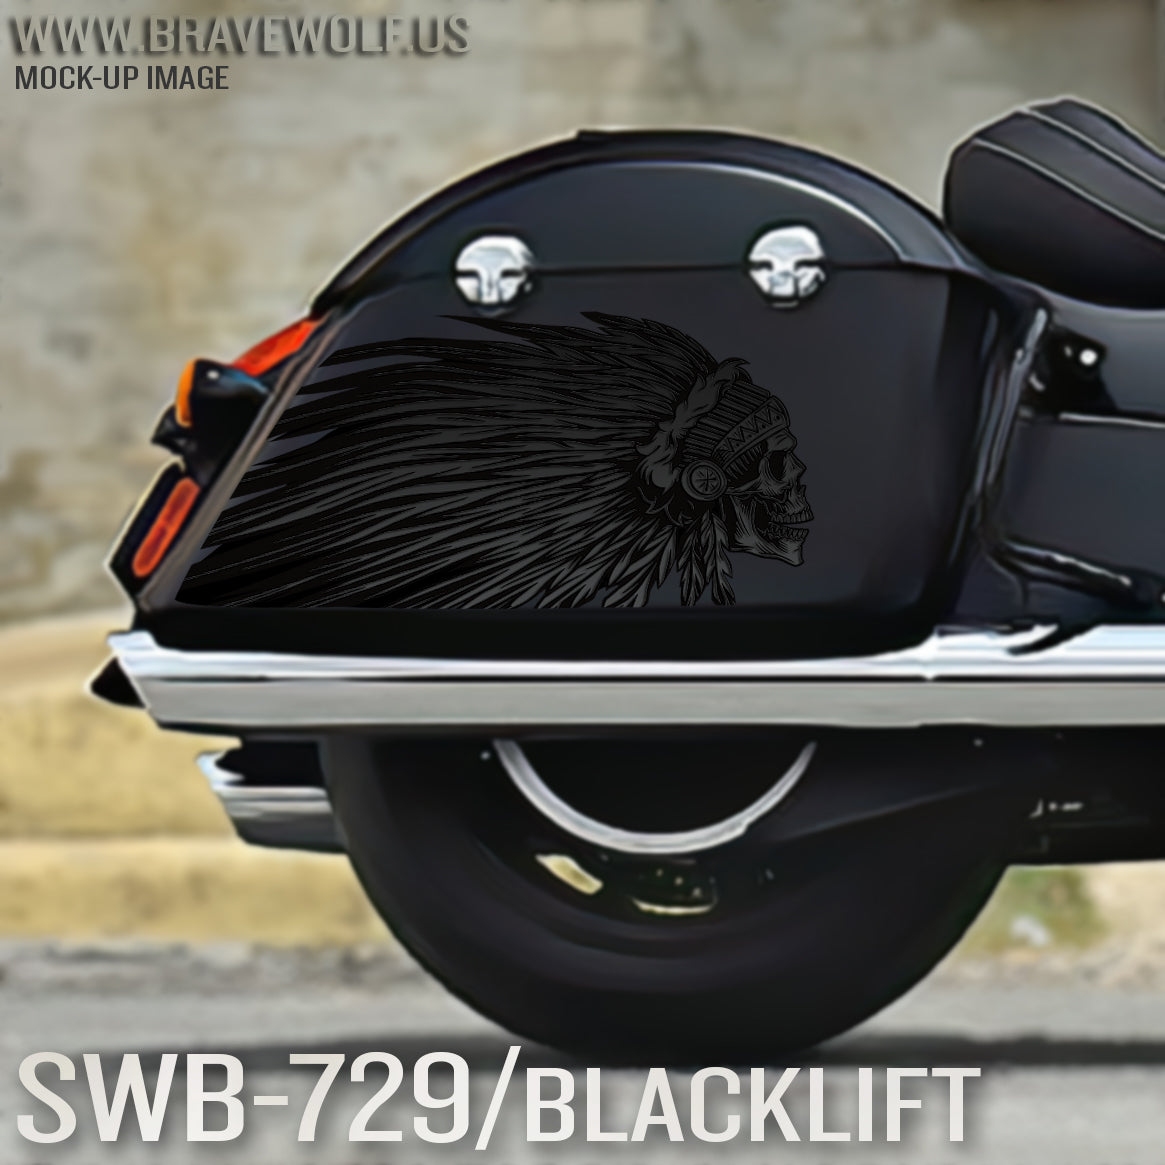
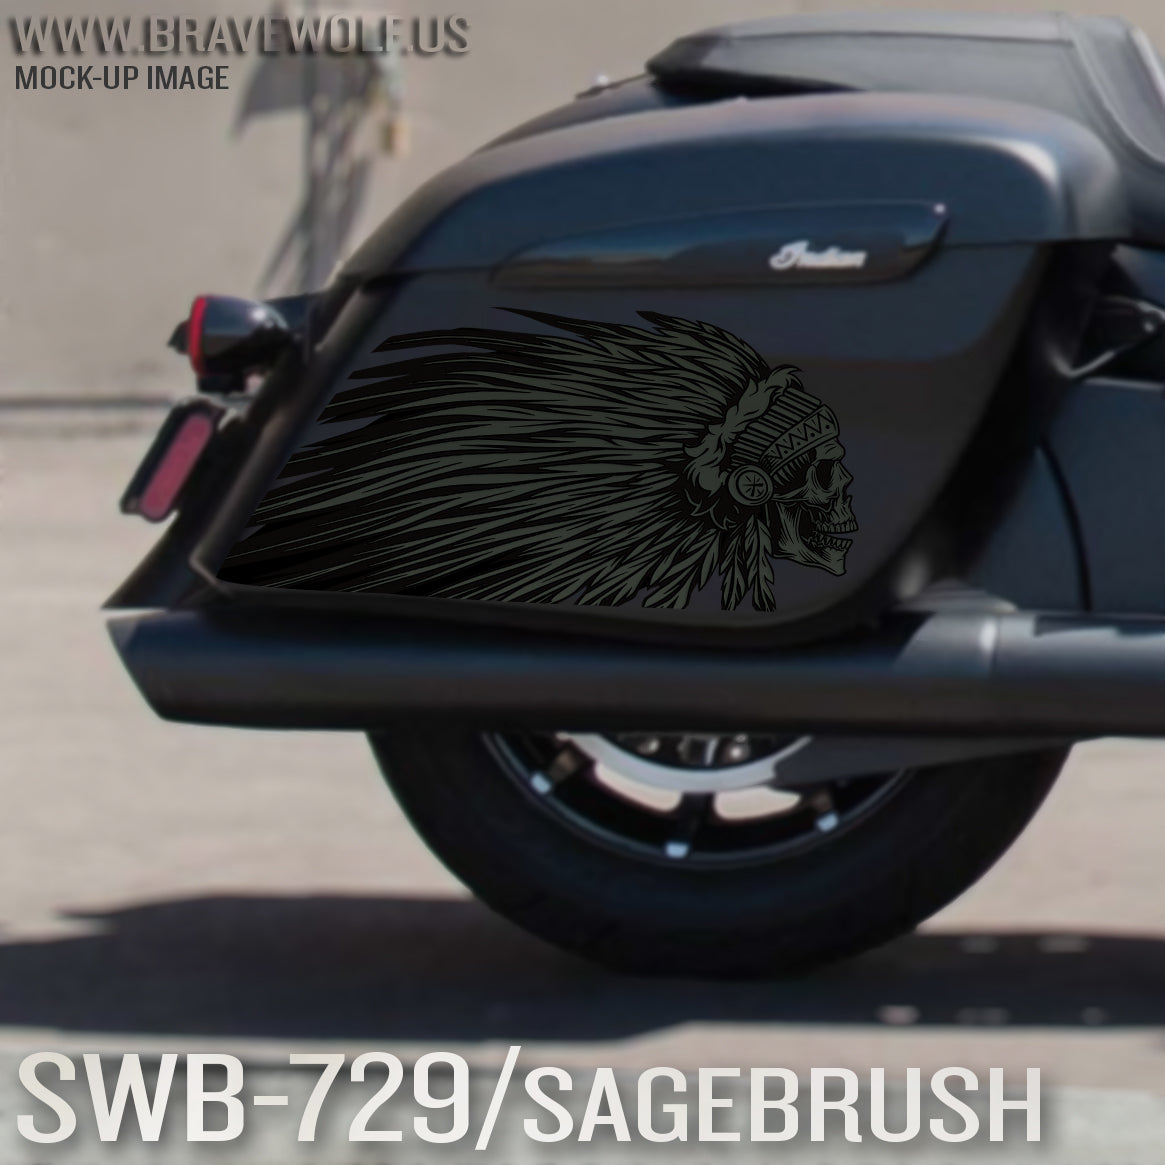
Indian Saddlebag Decals-SWB729-Blacklift
Regular price $180.00
Shipping calculated at checkout.
Stock Notice: (may take approximately 2-3 weeks before shipping if not in stock at the time of your order)
Our saddlebag decals are made from premium weatherproof hi-tack vinyl with a long lifespan that will keep them looking new for years. They are available in two finishes, heavy-duty 12 mil laminated Gloss (looks like it's painted on), or a heavy-duty sandy matte textured premium finish.
|
Fitment Guide: Fits both styles of Indian OEM saddlebags (rounded and squared). Also fits the Challenger & Pursuit when the plastic bag guard is removed. |

Installation:
Installing our decals is easy to do yourself at home. We recommend removing all of the excess decal material (the background image) before installing the decals. This will allow you to dispose of all the small cut-out pieces so that the pieces do not get trapped underneath your decal when installing it on the bike. Once you have all of the small pieces and background removed, you can use the "wet method" to install the decals to your saddlebags. The wet method involves using a spray bottle of water with a couple drops of dish soap in the mixture and spraying the surface of your saddlebags to wet the entire surface. Then carefully remove the backing from your decal and use the spray bottle to wet the adhesive side of the decal. Now you can gently place the decal on your saddlebag. Because the surfaces are wet, you can pull the decal up to reposition it until you get it where you want it. Once it's in place, use a squeegee or other object such as a credit card wrapped in a microfiber towel to squeeze the water out from behind the decal. You can also use your hands to do this. You should take care not to use a hard/abrasive object that can scratch the decals or your bike's paint. The high-tack adhesive will begin to set/adhere to the bike as soon as the liquid is push out from behind the decal. Use caution to ensure the towel or object you are using does not catch any edges of the decal and pull it off your bike. If you take your time and be gentle during installation, it should be an easy process. A hair dryer can be used to speed up the drying process if needed.
Feel free to visit our How-To page on the website to watch a "wet method" installation video TAB Performance made while installing our Zombie decals.


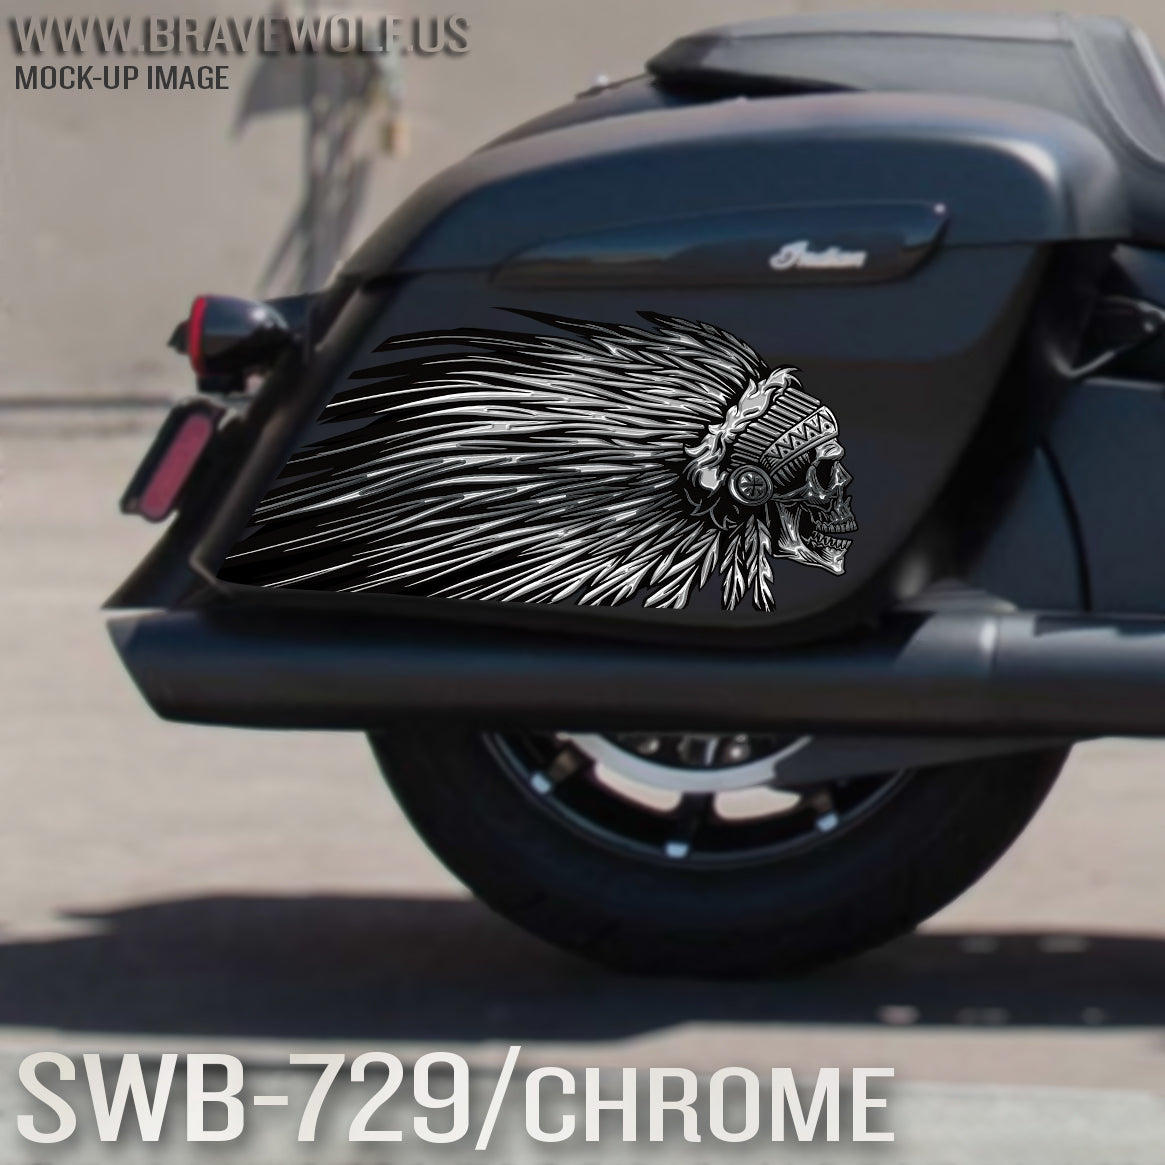


Saddlebag Decals-SWB729-Chrome
Regular price $180.00
Shipping calculated at checkout.
Stock Notice - Special Order (may take approximately 2-3 weeks before shipping if not in stock at time of order)
Our saddlebag decals are made from premium weatherproof hi-tack vinyl with a long lifespan that will keep them looking new for years. They are available in two finishes, heavy-duty 12 mil laminated Gloss (looks like it's painted on), or a heavy-duty sandy matte textured premium finish.
|
Fitment Guide: Fits both styles of Indian OEM saddlebags (rounded and squared). Also fits the Challenger & Pursuit when the plastic bag guard is removed. |
Installation:
Installing our decals is easy to do yourself at home. We recommend removing all of the excess decal material (the background image) before installing the decals. This will allow you to dispose of all the small cut-out pieces so that the pieces do not get trapped underneath your decal when installing it on the bike. Once you have all of the small pieces and background removed, you can use the "wet method" to install the decals to your saddlebags. The wet method involves using a spray bottle of water with a couple drops of dish soap in the mixture and spraying the surface of your saddlebags to wet the entire surface. Then carefully remove the backing from your decal and use the spray bottle to wet the adhesive side of the decal. Now you can gently place the decal on your saddlebag. Because the surfaces are wet, you can pull the decal up to reposition it until you get it where you want it. Once it's in place, use a squeegee or other object such as a credit card wrapped in a microfiber towel to squeeze the water out from behind the decal. You can also use your hands to do this. You should take care not to use a hard/abrasive object that can scratch the decals or your bike's paint. The high-tack adhesive will begin to set/adhere to the bike as soon as the liquid is push out from behind the decal. Use caution to ensure the towel or object you are using does not catch any edges of the decal and pull it off your bike. If you take your time and be gentle during installation, it should be an easy process. A hair dryer can be used to speed up the drying process if needed.
Feel free to visit our How-To page on the website to watch a "wet method" installation video.


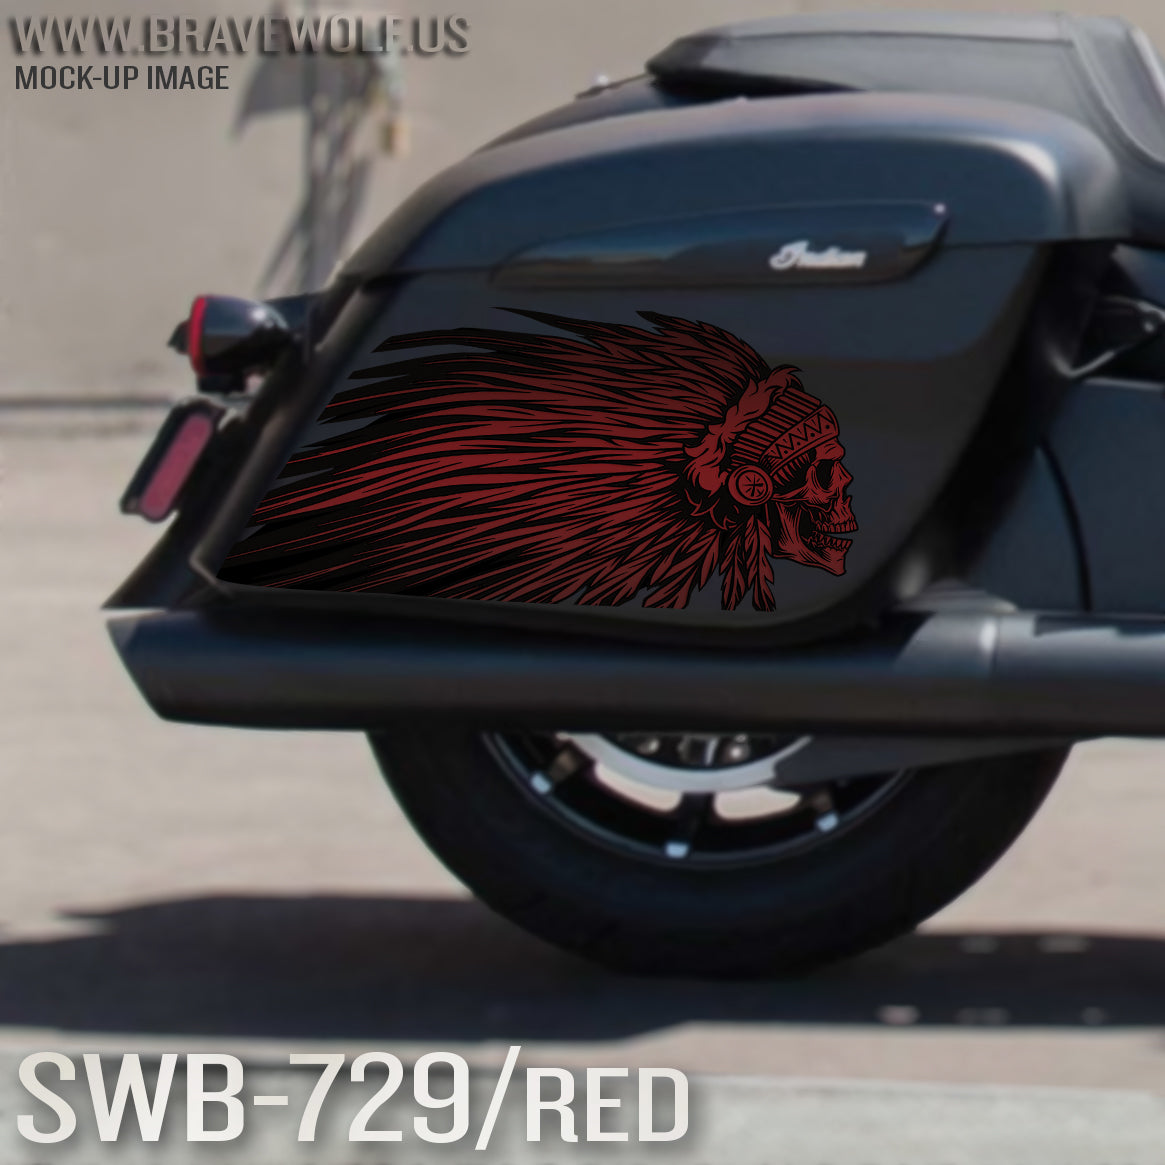

Saddlebag Decals-SWB729-Red
Regular price $180.00
Shipping calculated at checkout.
Stock Notice: (may take approximately 2-3 weeks before shipping if not in stock at the time of your order)
Our saddlebag decals are made from premium weatherproof hi-tack vinyl with a long lifespan that will keep them looking new for years. They are available in two finishes, heavy-duty 12 mil laminated Gloss (looks like it's painted on), or a heavy-duty sandy matte textured premium finish.
|
Fitment Guide: Fits both styles of Indian OEM saddlebags (rounded and squared). Also fits the Challenger & Pursuit when the plastic bag guard is removed. |
Installation:
Installing our decals is easy to do yourself at home. We recommend removing all of the excess decal material (the background image) before installing the decals. This will allow you to dispose of all the small cut-out pieces so that the pieces do not get trapped underneath your decal when installing it on the bike. Once you have all of the small pieces and background removed, you can use the "wet method" to install the decals to your saddlebags. The wet method involves using a spray bottle of water with a couple drops of dish soap in the mixture and spraying the surface of your saddlebags to wet the entire surface. Then carefully remove the backing from your decal and use the spray bottle to wet the adhesive side of the decal. Now you can gently place the decal on your saddlebag. Because the surfaces are wet, you can pull the decal up to reposition it until you get it where you want it. Once it's in place, use a squeegee or other object such as a credit card wrapped in a microfiber towel to squeeze the water out from behind the decal. You can also use your hands to do this. You should take care not to use a hard/abrasive object that can scratch the decals or your bike's paint. The high-tack adhesive will begin to set/adhere to the bike as soon as the liquid is push out from behind the decal. Use caution to ensure the towel or object you are using does not catch any edges of the decal and pull it off your bike. If you take your time and be gentle during installation, it should be an easy process. A hair dryer can be used to speed up the drying process if needed.
Feel free to visit our How-To page on the website to watch a "wet method" installation video TAB Performance made while installing our Zombie decals.


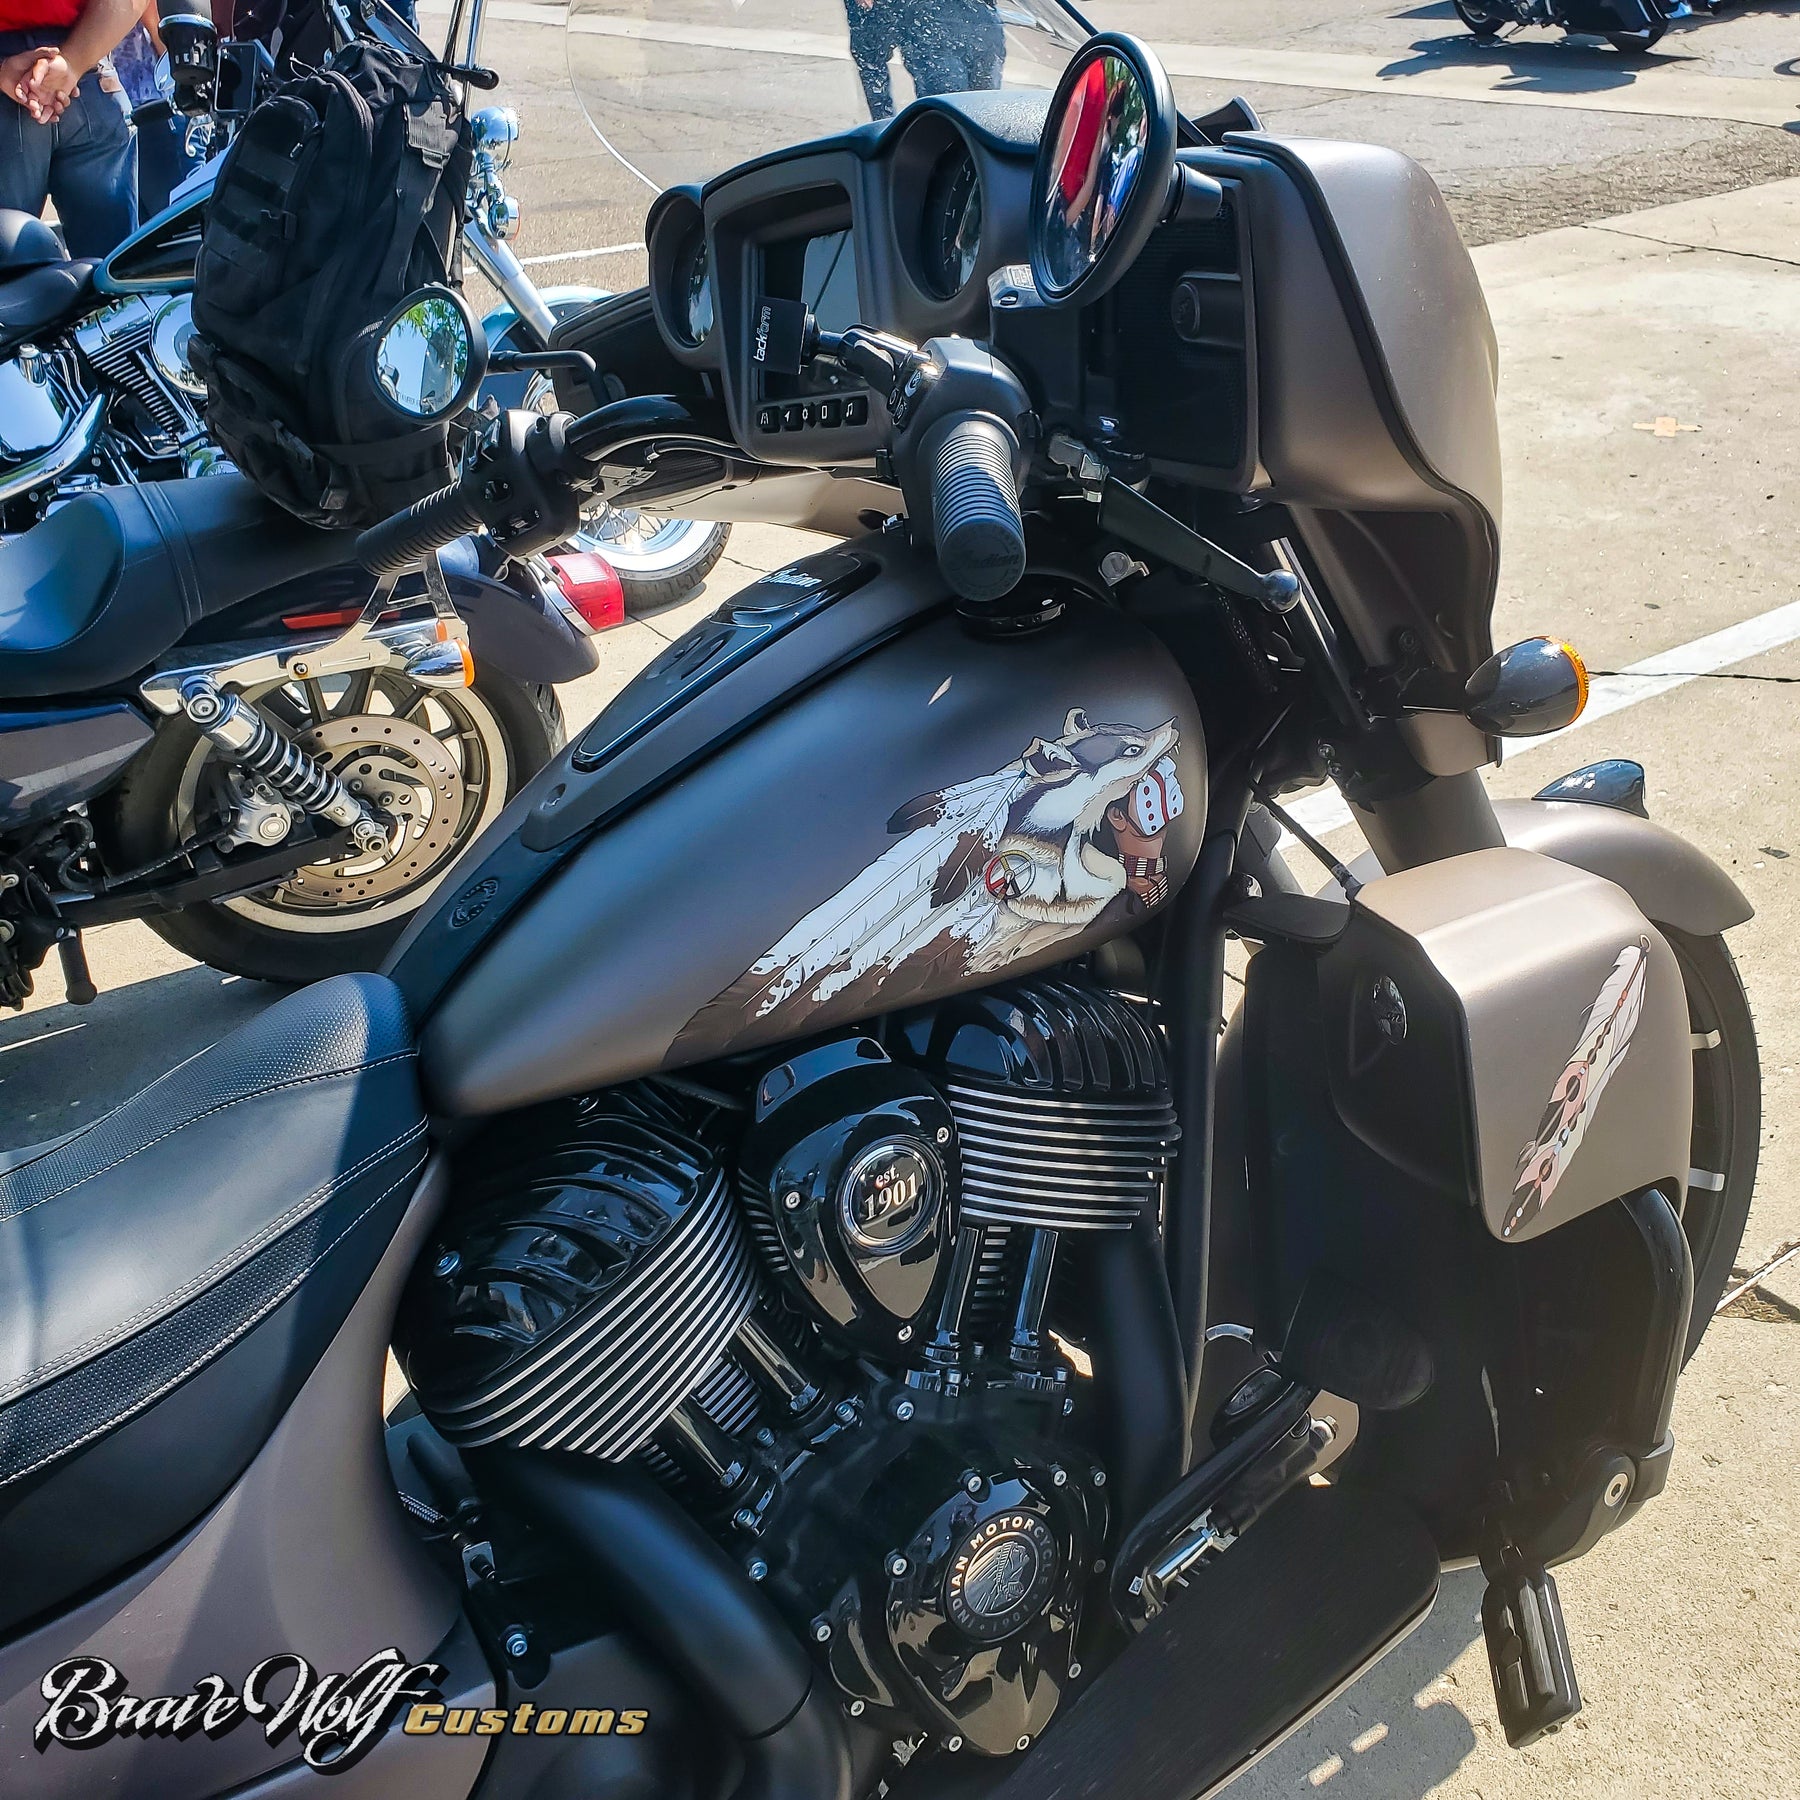
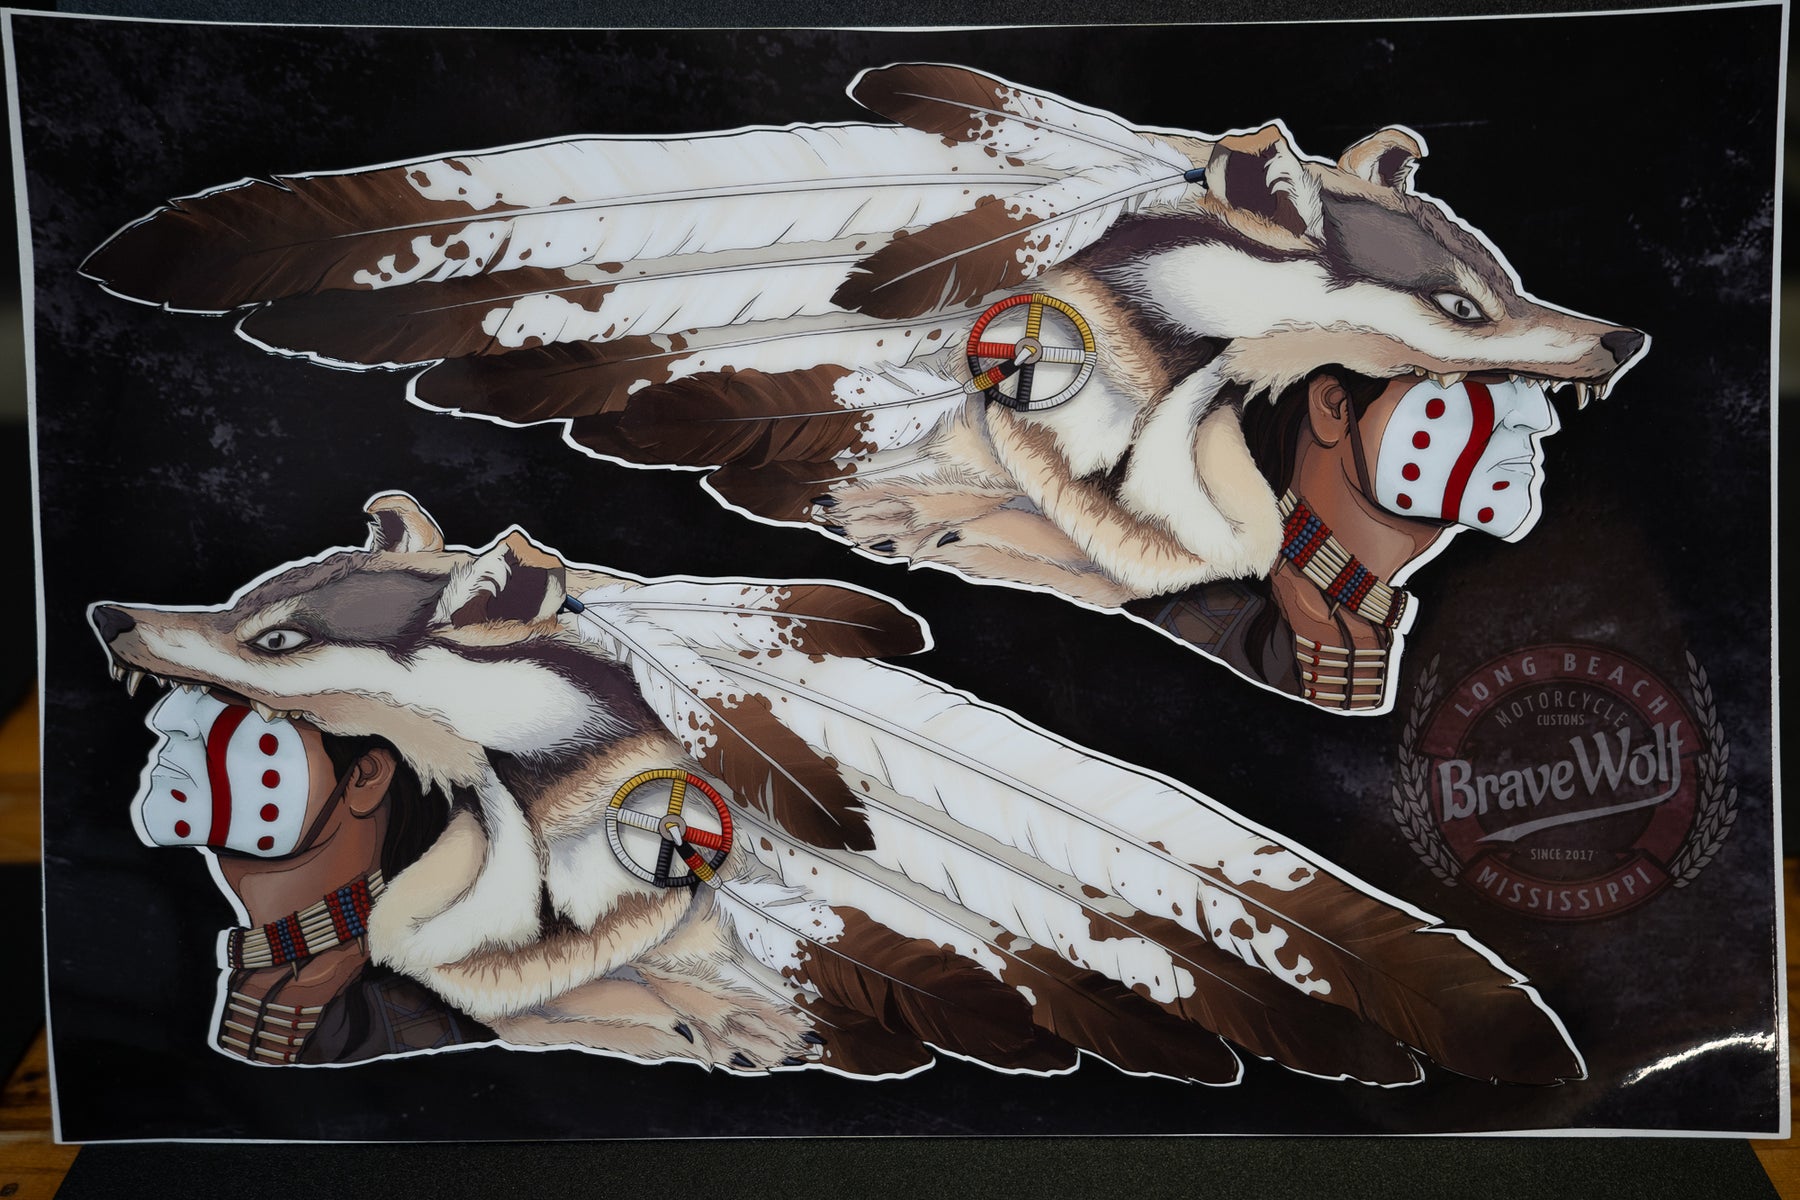
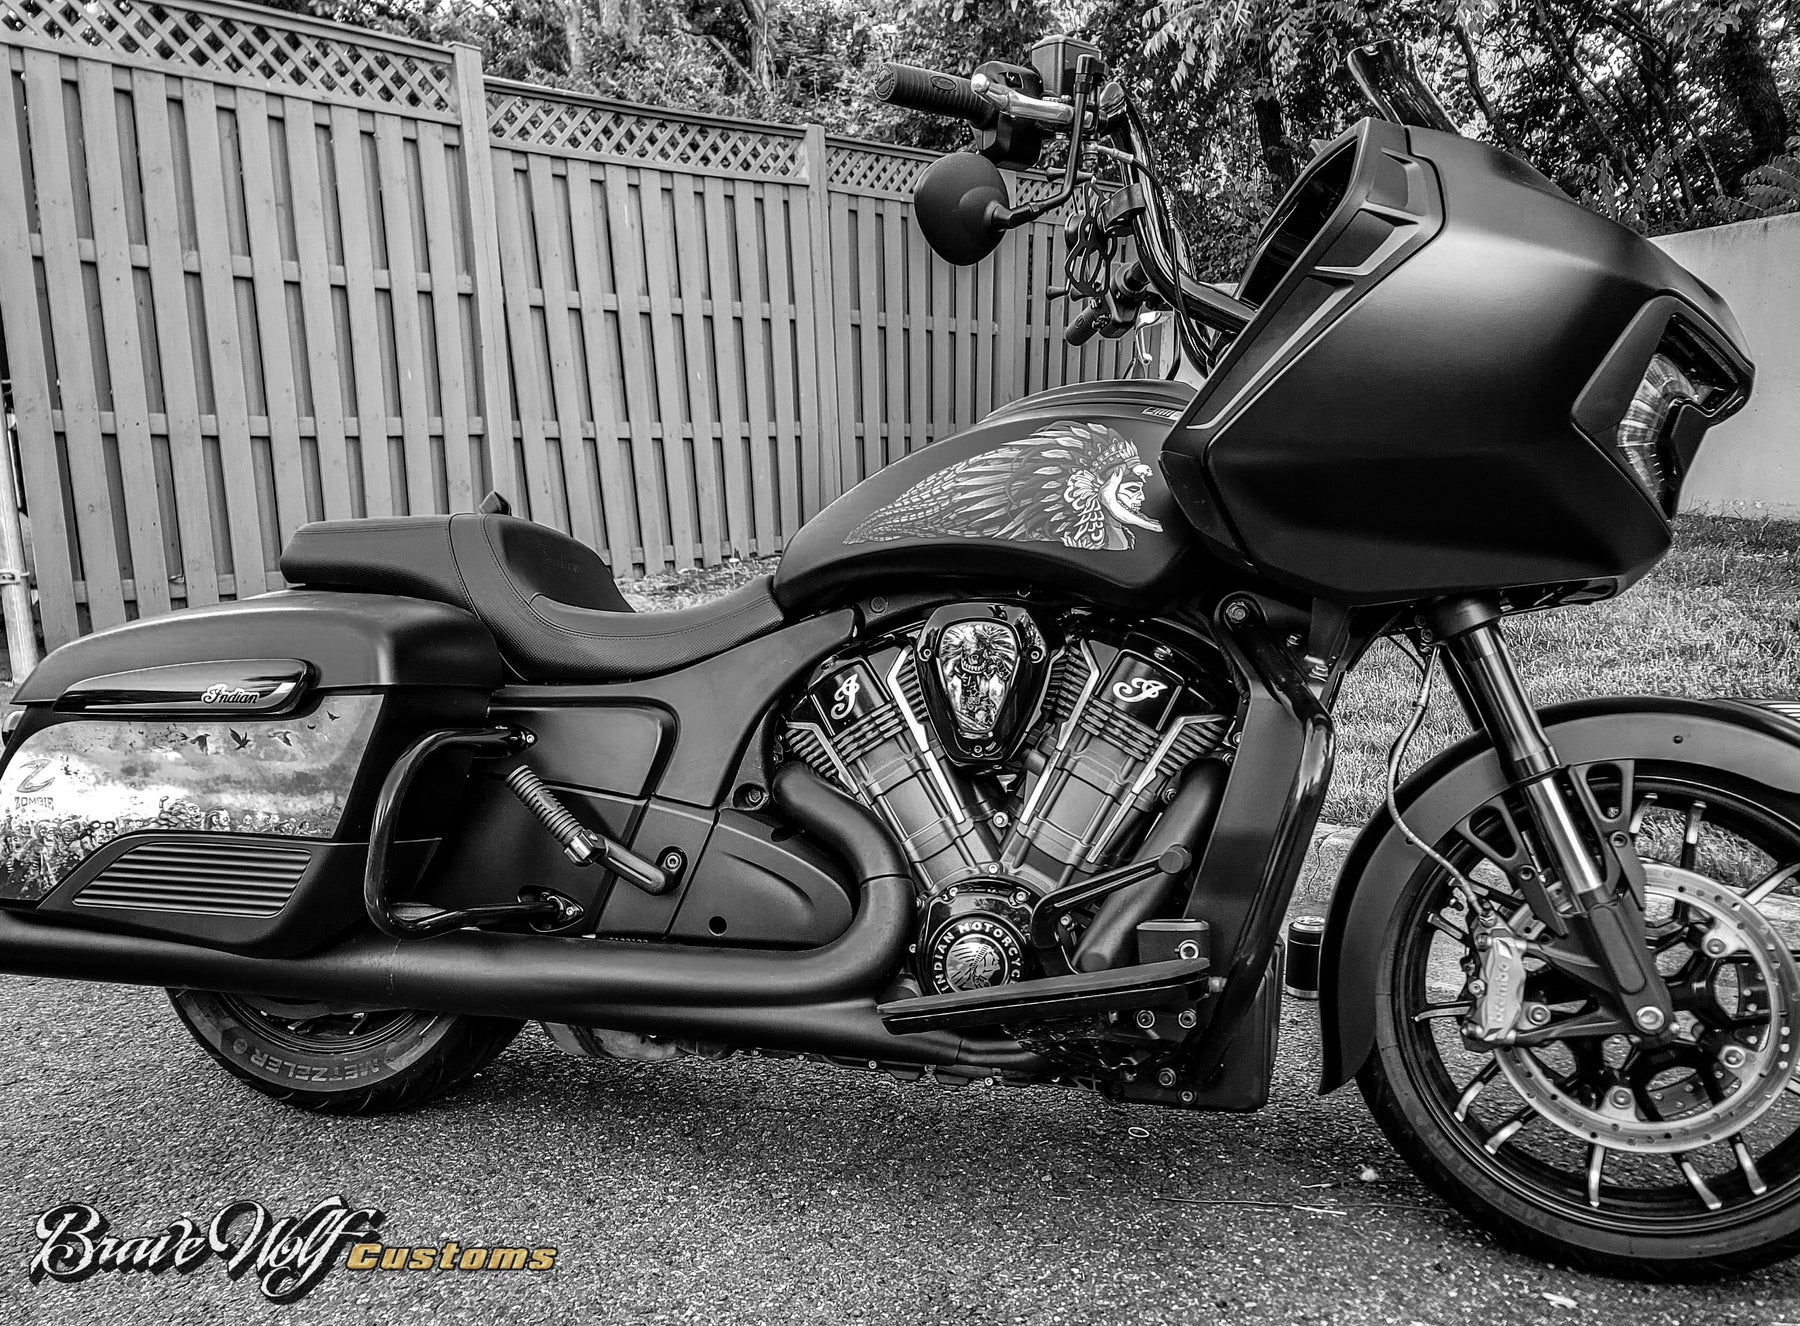
CLEARANCE - The Black Wolf-Universal Tank Decal
Regular price $100.00 Sale price $10.00 Save $90.00
Shipping calculated at checkout.
CLEARANCE SALE - We are clearing out our old stock of retired designs and other non-current products at an extremely reduced price!
Snatch them up now before they're gone forever!
Native American cultures appreciated all aspects of nature, and while animal mysticism was subject to tribal and individualistic interpretations, the wolf has been known to represent intelligence, teacher, organizer, hunter, and loyalty.
Size: 14.47 inches length by 5.9 inches tall (Indian Scout owners should purchase the Scout version of this art. It is a different product)


Photo courtesy of Kevin Peppers


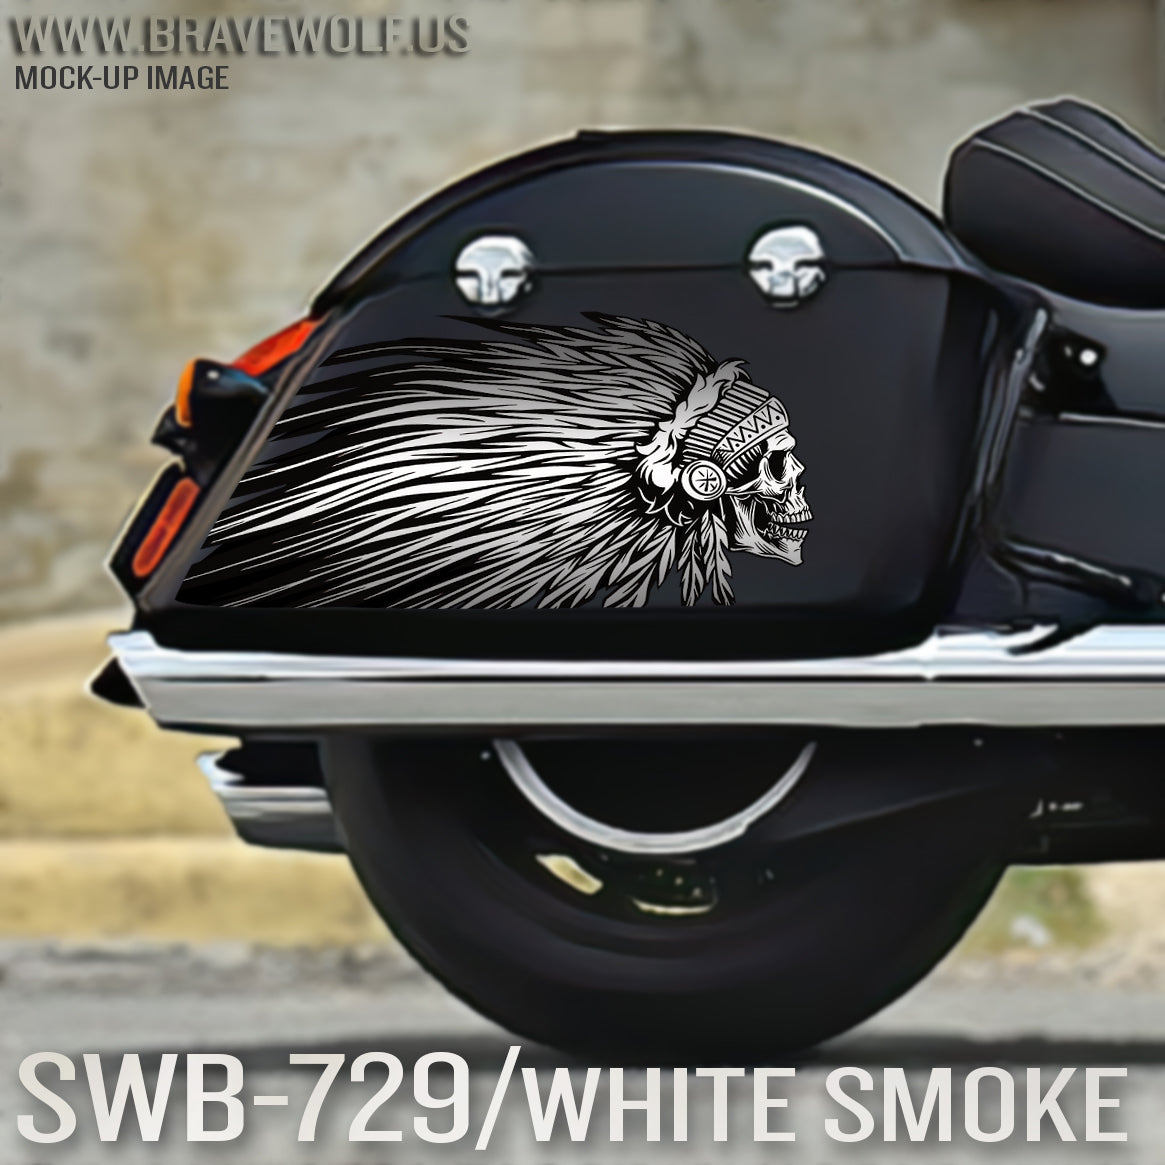
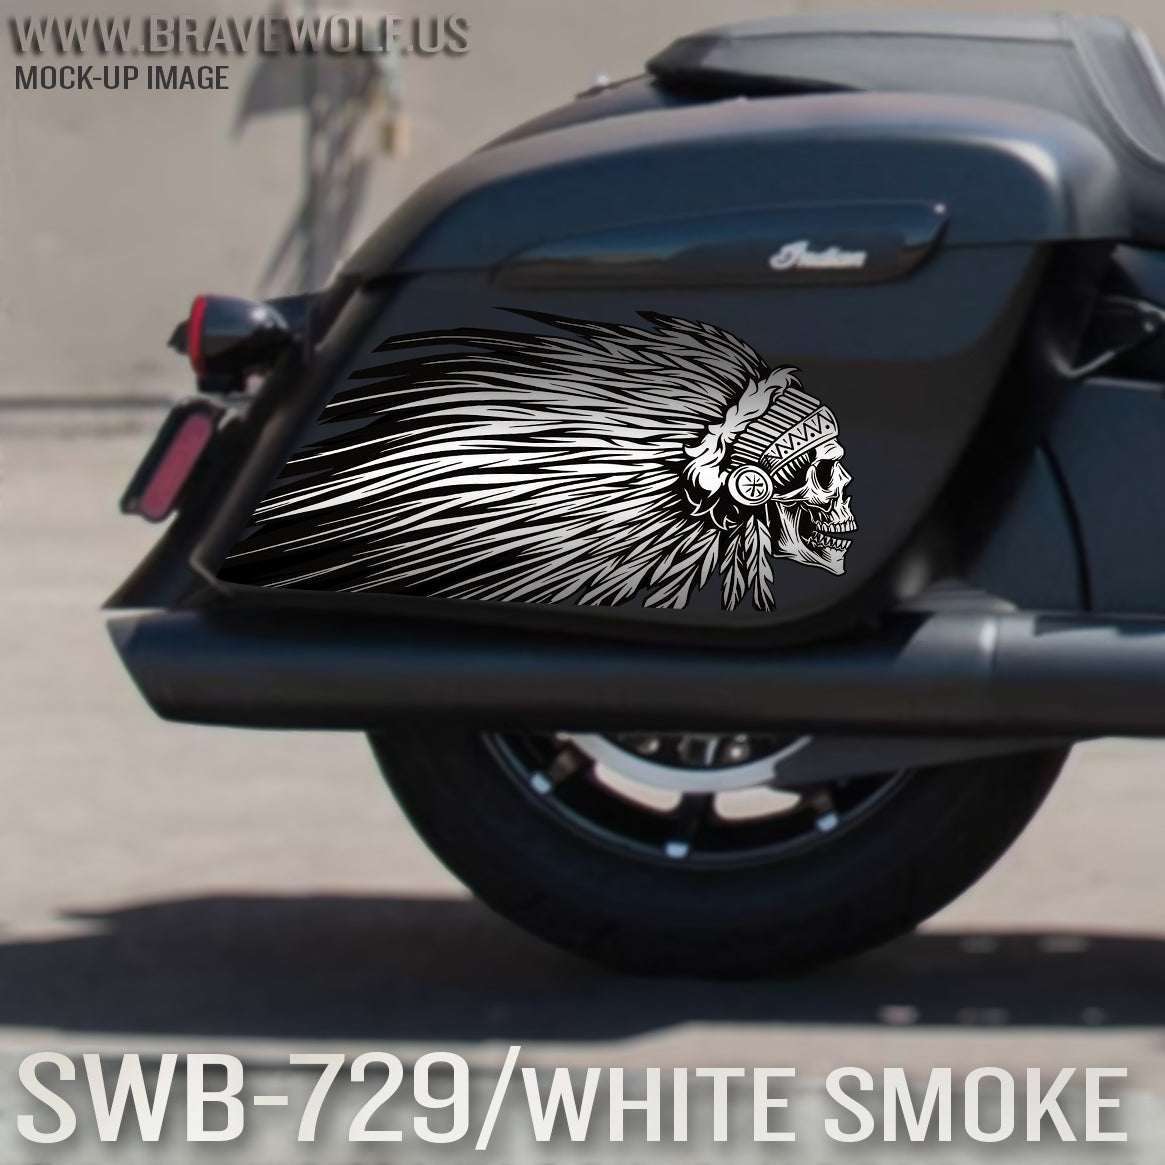
Indian Saddlebag Decals-SWB729-WhiteSmoke
Regular price $180.00
Shipping calculated at checkout.
Stock Notice: (may take approximately 2-3 weeks before shipping if not in stock at the time of your order)
Our saddlebag decals are made from premium weatherproof hi-tack vinyl with a long lifespan that will keep them looking new for years. They are available in two finishes, heavy-duty 12 mil laminated Gloss (looks like it's painted on), or a heavy-duty sandy matte textured premium finish.
|
Fitment Guide: Fits both styles of Indian OEM saddlebags (rounded and squared). Also fits the Challenger & Pursuit when the plastic bag guard is removed. |
Installation:
Installing our decals is easy to do yourself at home. We recommend removing all of the excess decal material (the background image) before installing the decals. This will allow you to dispose of all the small cut-out pieces so that the pieces do not get trapped underneath your decal when installing it on the bike. Once you have all of the small pieces and background removed, you can use the "wet method" to install the decals to your saddlebags. The wet method involves using a spray bottle of water with a couple drops of dish soap in the mixture and spraying the surface of your saddlebags to wet the entire surface. Then carefully remove the backing from your decal and use the spray bottle to wet the adhesive side of the decal. Now you can gently place the decal on your saddlebag. Because the surfaces are wet, you can pull the decal up to reposition it until you get it where you want it. Once it's in place, use a squeegee or other object such as a credit card wrapped in a microfiber towel to squeeze the water out from behind the decal. You can also use your hands to do this. You should take care not to use a hard/abrasive object that can scratch the decals or your bike's paint. The high-tack adhesive will begin to set/adhere to the bike as soon as the liquid is push out from behind the decal. Use caution to ensure the towel or object you are using does not catch any edges of the decal and pull it off your bike. If you take your time and be gentle during installation, it should be an easy process. A hair dryer can be used to speed up the drying process if needed.
Feel free to visit our How-To page on the website to watch a "wet method" installation video TAB Performance made while installing our Zombie decals.


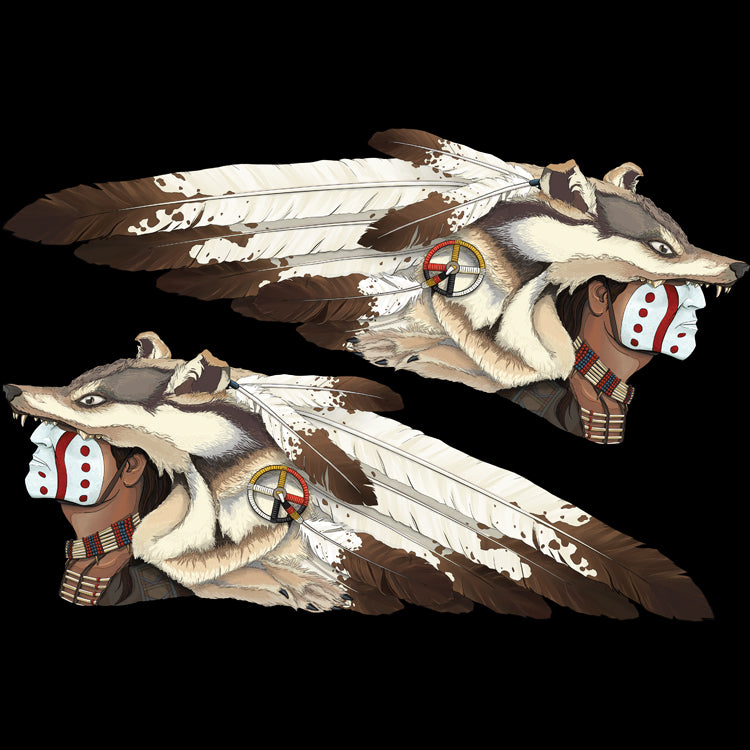

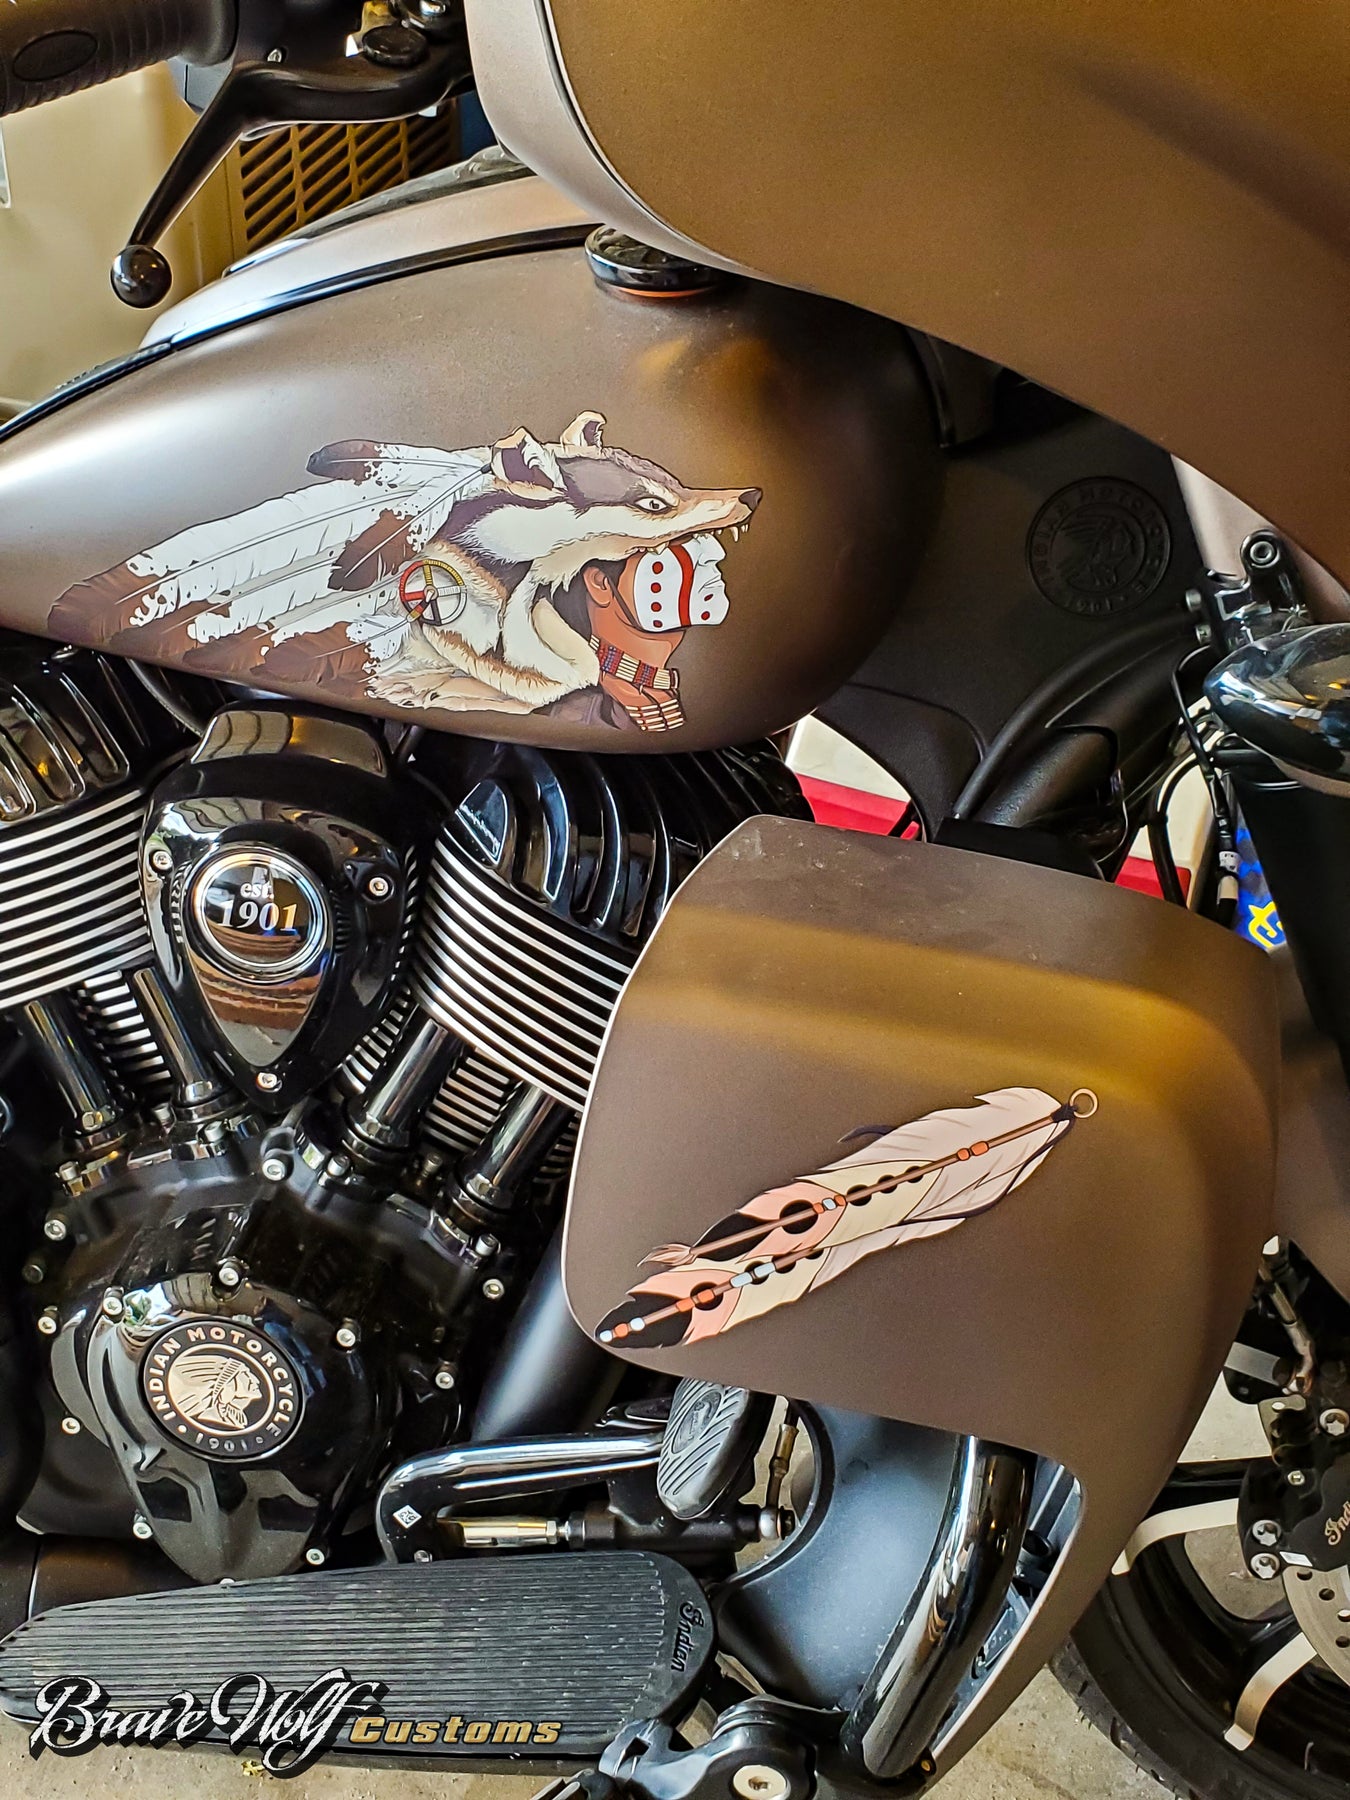
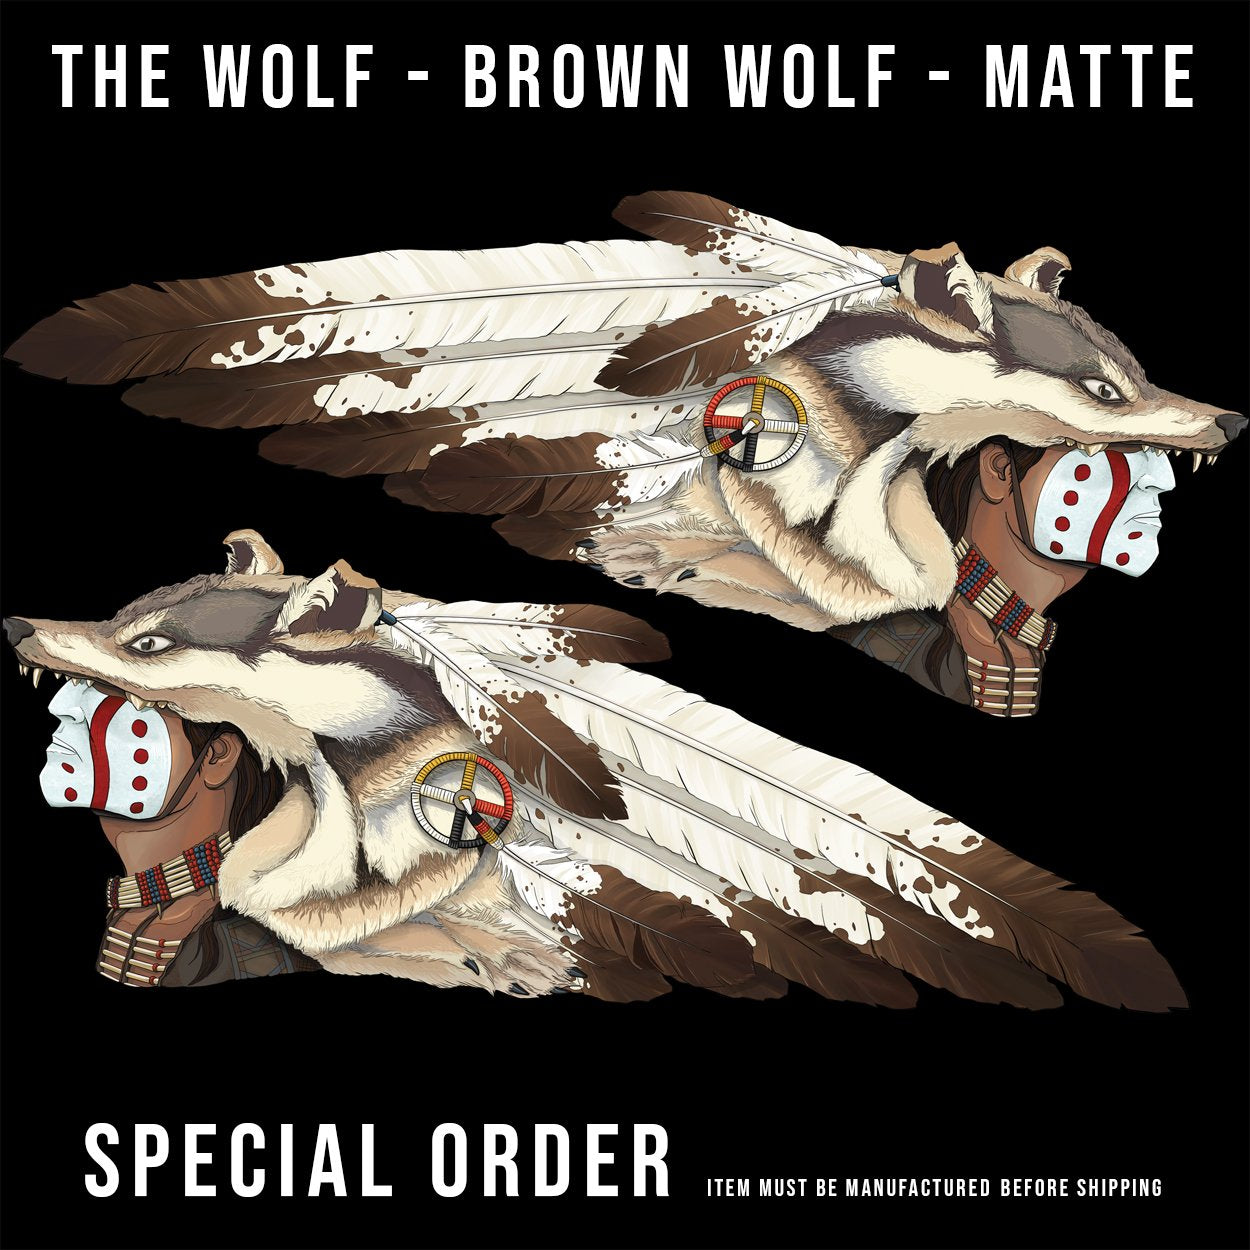
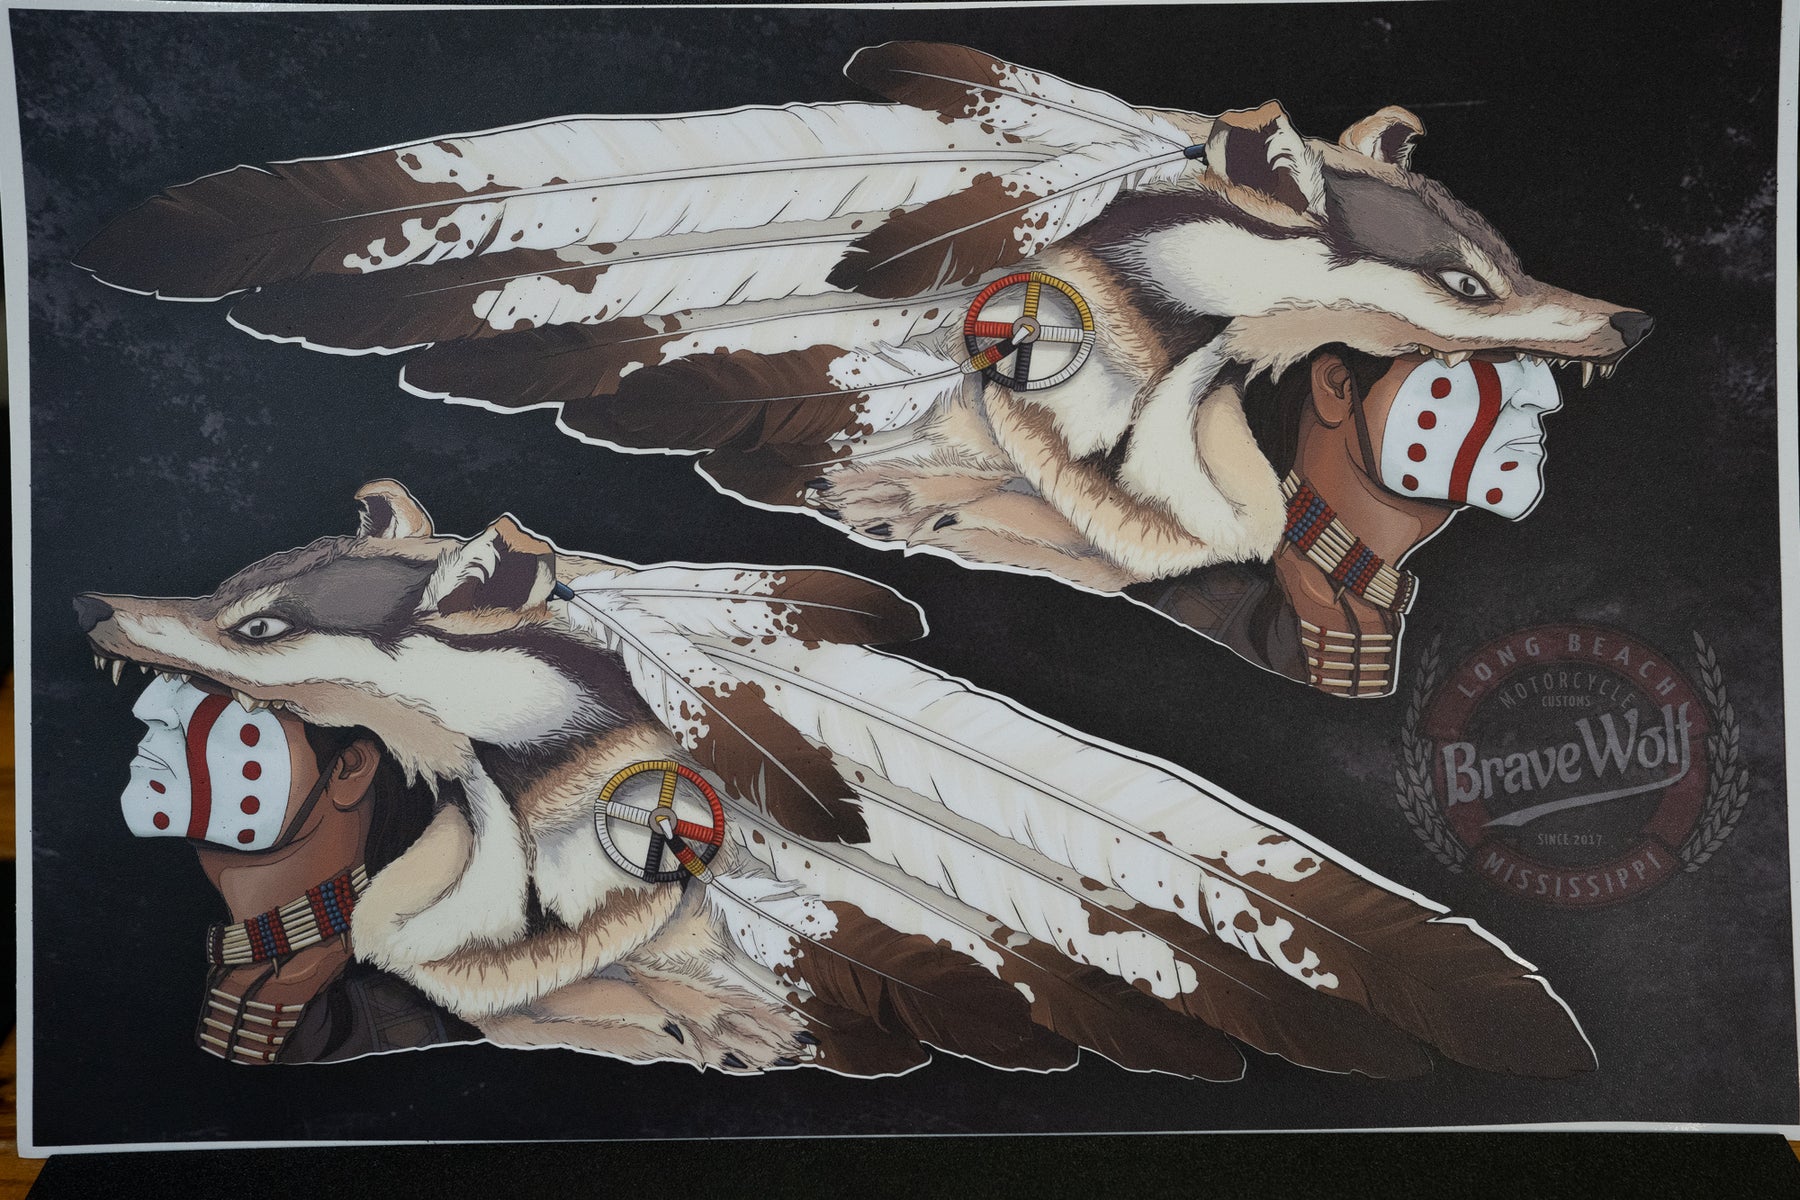
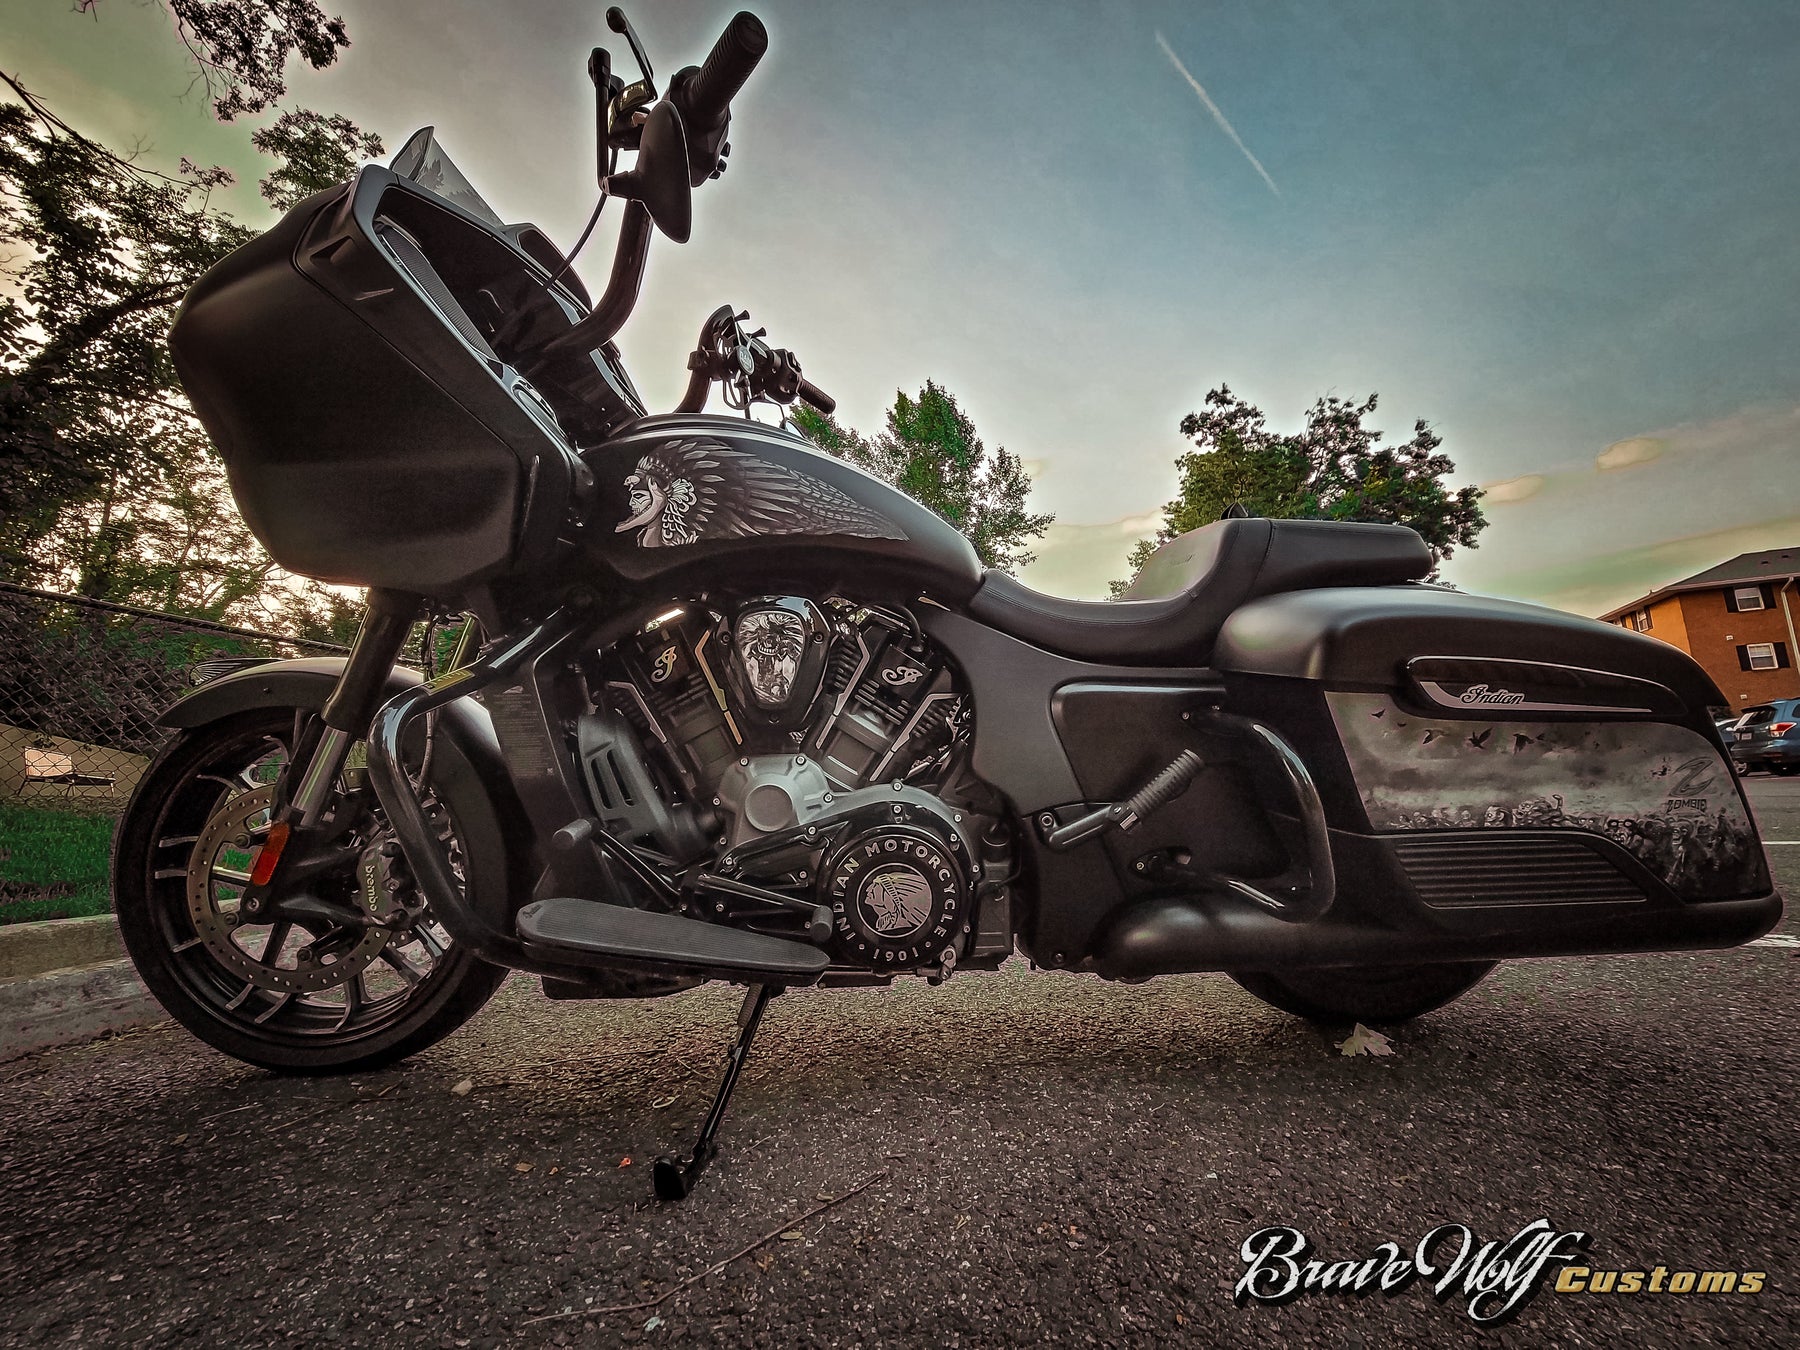
CLEARANCE-The Brown Wolf-Universal Tank Decals
Regular price $100.00 Sale price $10.00 Save $90.00
Shipping calculated at checkout.
CLEARANCE SALE - We are clearing out our old stock of retired designs and other non-current products at an extremely reduced price!
Limited quantity remaining before they're gone forever!
Native American cultures appreciated all aspects of nature, and while animal mysticism was subject to tribal and individualistic interpretations, the wolf has been known to represent intelligence, teacher, organizer, hunter, and loyalty.
Size: 14.47 inches length by 5.9 inches tall (Indian Scout owners should purchase the Scout version of this art. It is a different product)

Photo courtesy of Timothy Domeier


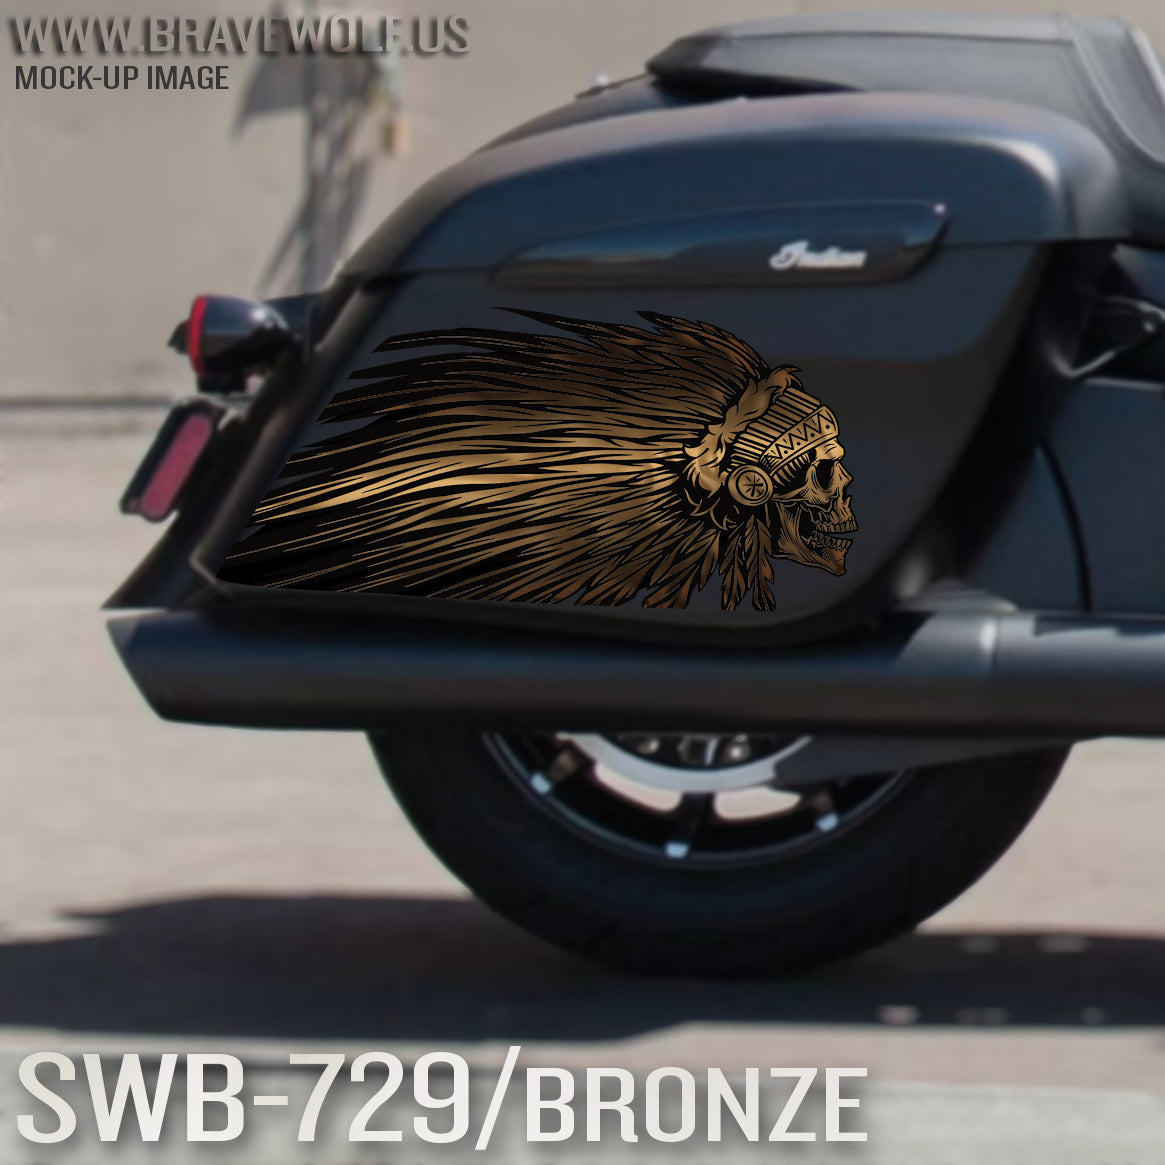
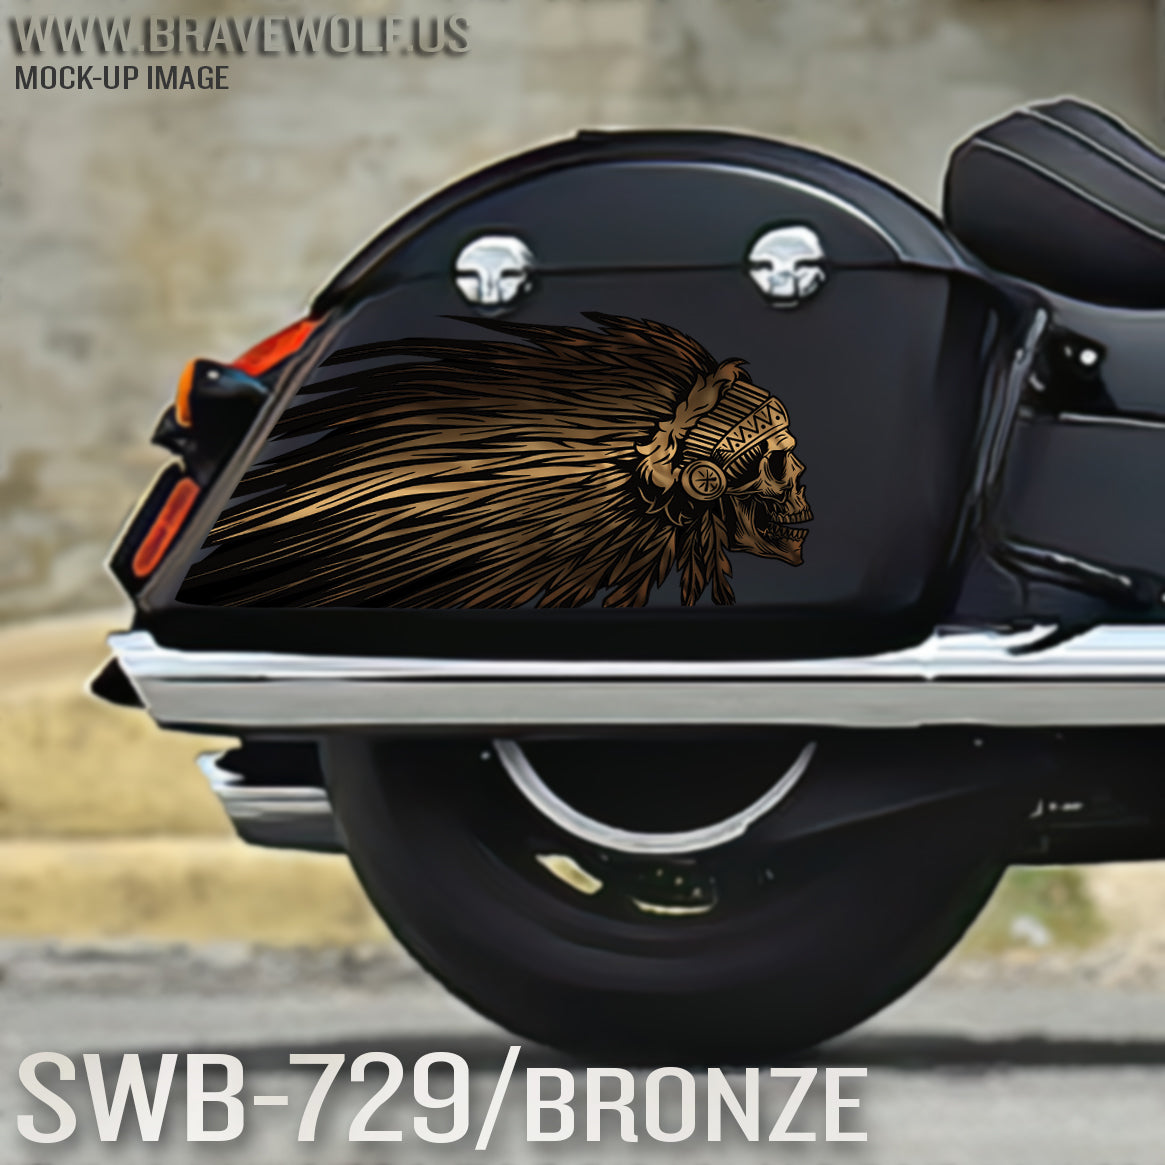
Indian Saddlebag Decals-SWB729-Bronze
Regular price $180.00
Shipping calculated at checkout.
Stock Notice: (may take approximately 2-3 weeks before shipping if not in stock at the time of your order)
Our saddlebag decals are made from premium weatherproof hi-tack vinyl with a long lifespan that will keep them looking new for years. They are available in two finishes, heavy-duty 12 mil laminated Gloss (looks like it's painted on), or a heavy-duty sandy matte textured premium finish.
|
Fitment Guide: Fits both styles of Indian OEM saddlebags (rounded and squared). Also fits the Challenger & Pursuit when the plastic bag guard is removed. |
Installation:
Installing our decals is easy to do yourself at home. We recommend removing all of the excess decal material (the background image) before installing the decals. This will allow you to dispose of all the small cut-out pieces so that the pieces do not get trapped underneath your decal when installing it on the bike. Once you have all of the small pieces and background removed, you can use the "wet method" to install the decals to your saddlebags. The wet method involves using a spray bottle of water with a couple drops of dish soap in the mixture and spraying the surface of your saddlebags to wet the entire surface. Then carefully remove the backing from your decal and use the spray bottle to wet the adhesive side of the decal. Now you can gently place the decal on your saddlebag. Because the surfaces are wet, you can pull the decal up to reposition it until you get it where you want it. Once it's in place, use a squeegee or other object such as a credit card wrapped in a microfiber towel to squeeze the water out from behind the decal. You can also use your hands to do this. You should take care not to use a hard/abrasive object that can scratch the decals or your bike's paint. The high-tack adhesive will begin to set/adhere to the bike as soon as the liquid is push out from behind the decal. Use caution to ensure the towel or object you are using does not catch any edges of the decal and pull it off your bike. If you take your time and be gentle during installation, it should be an easy process. A hair dryer can be used to speed up the drying process if needed.
Feel free to visit our How-To page on the website to watch a "wet method" installation video TAB Performance made while installing our Zombie decals.


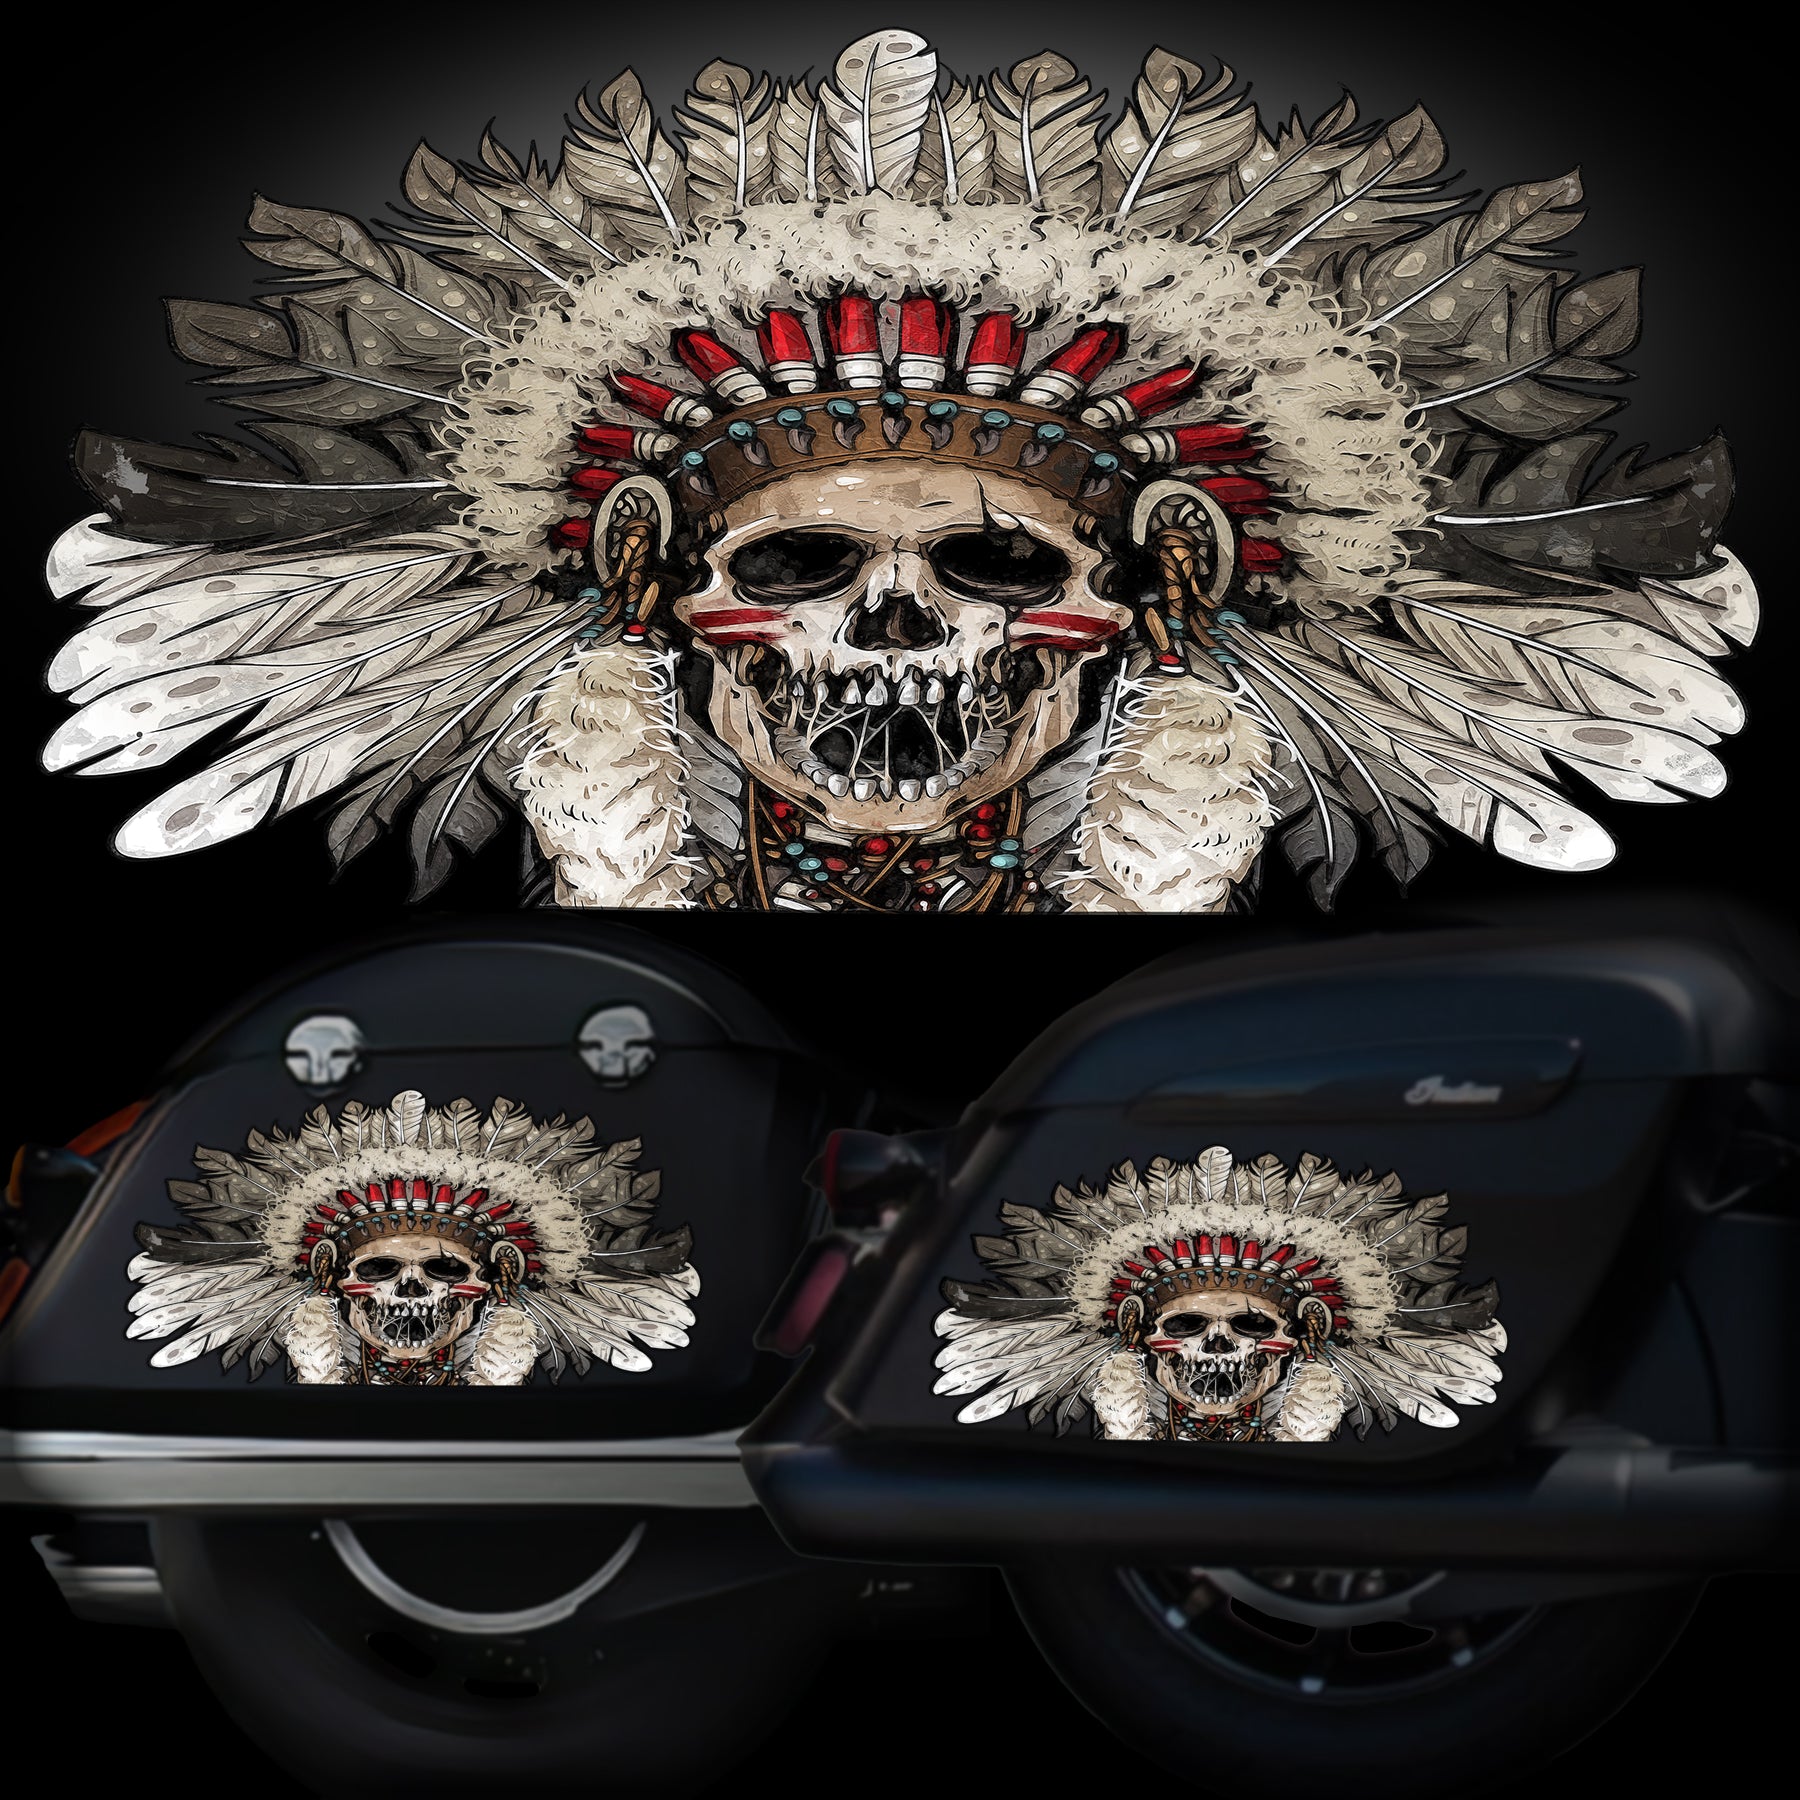
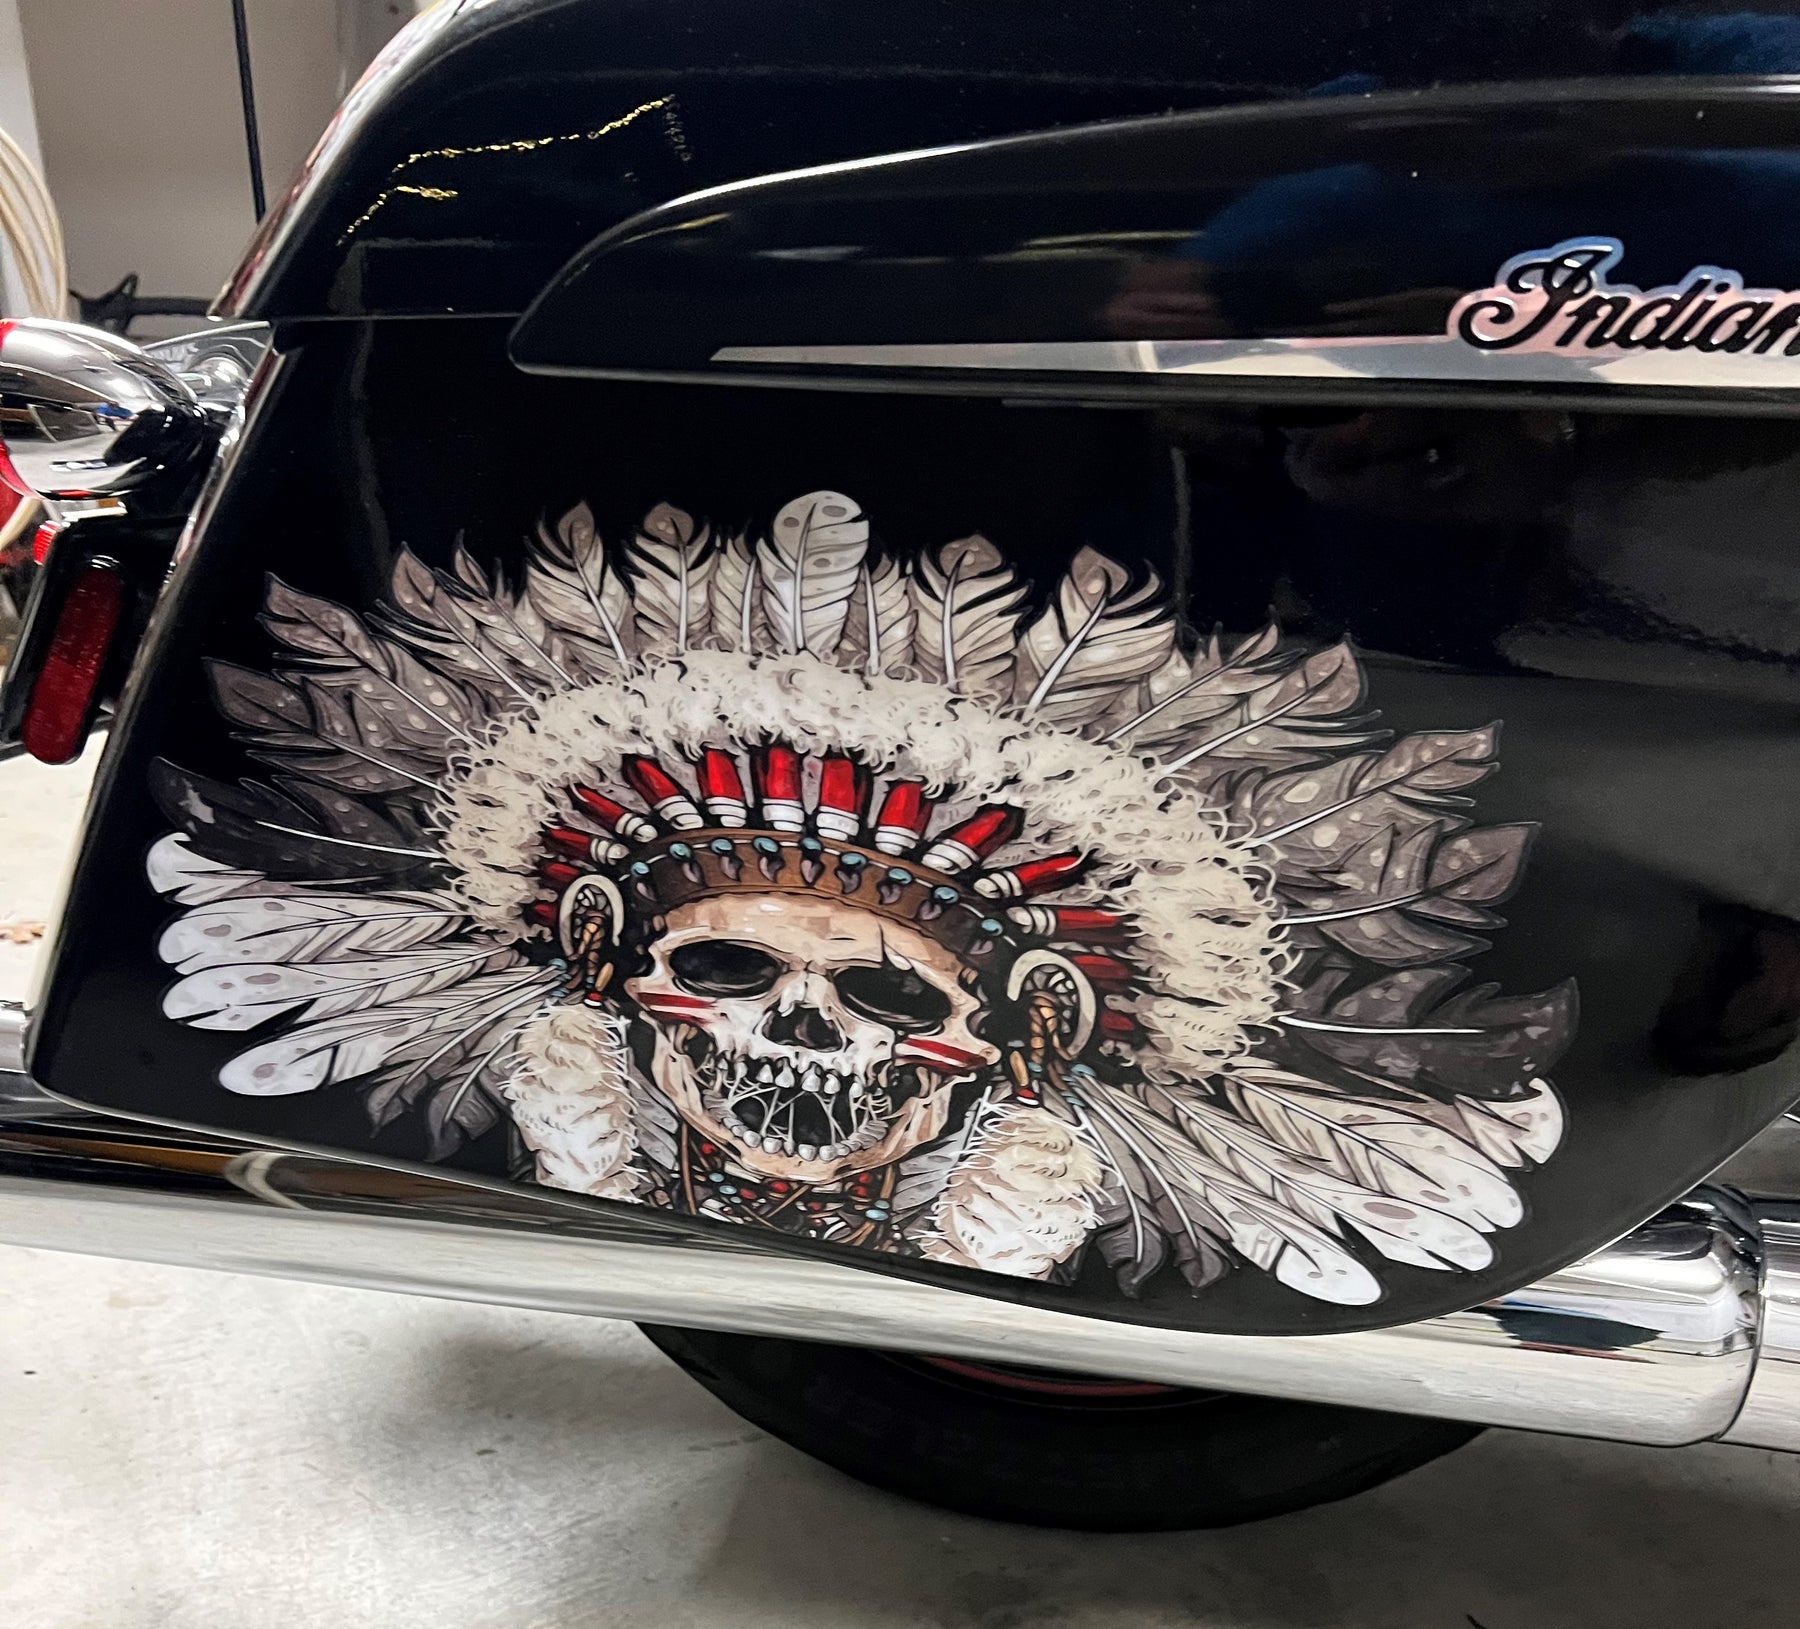
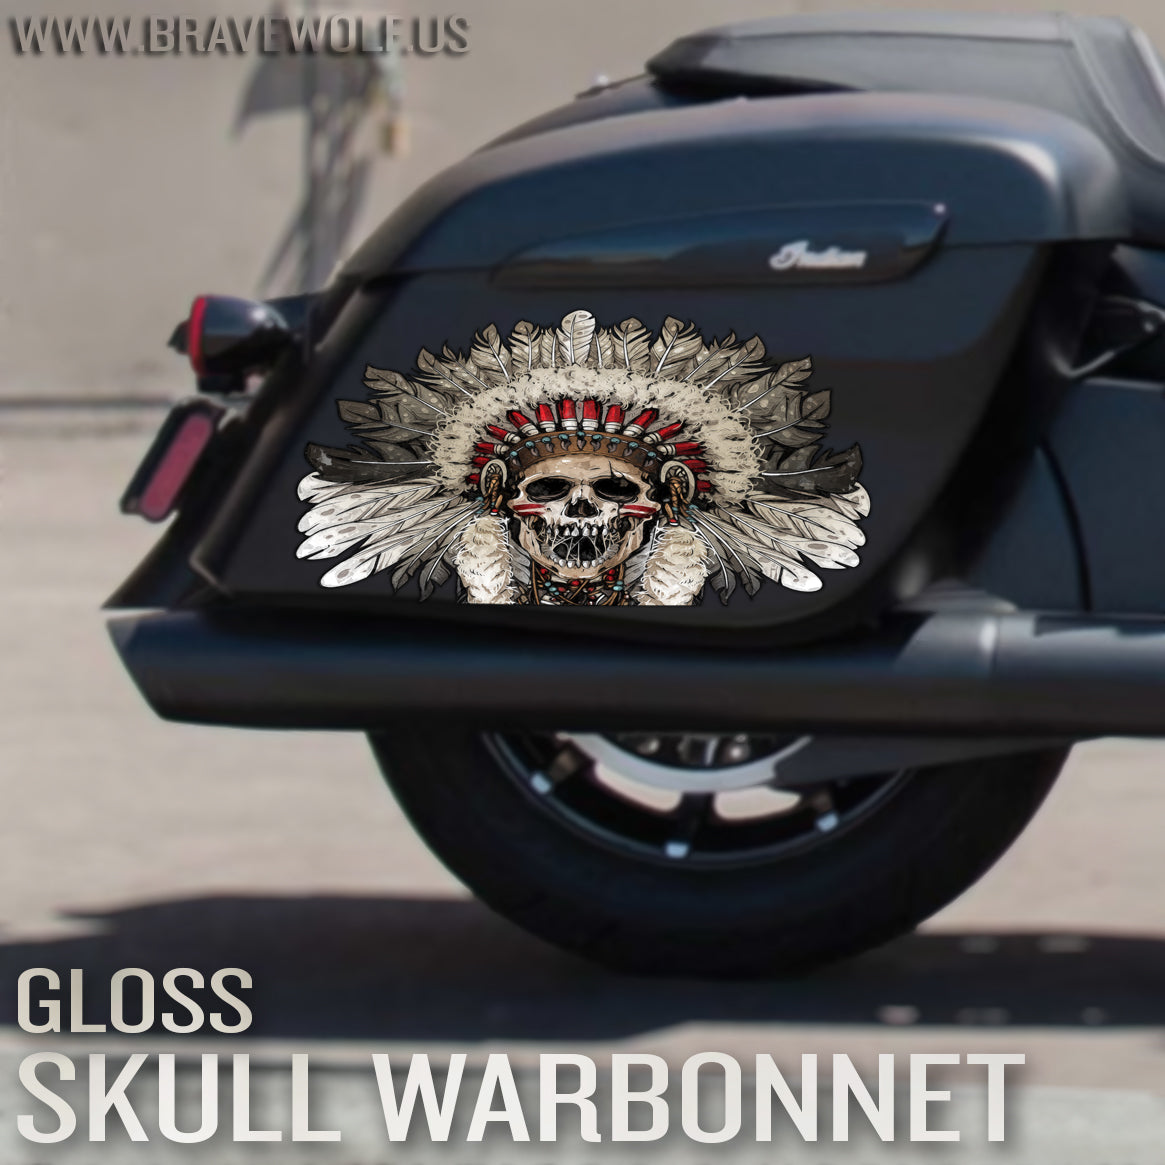
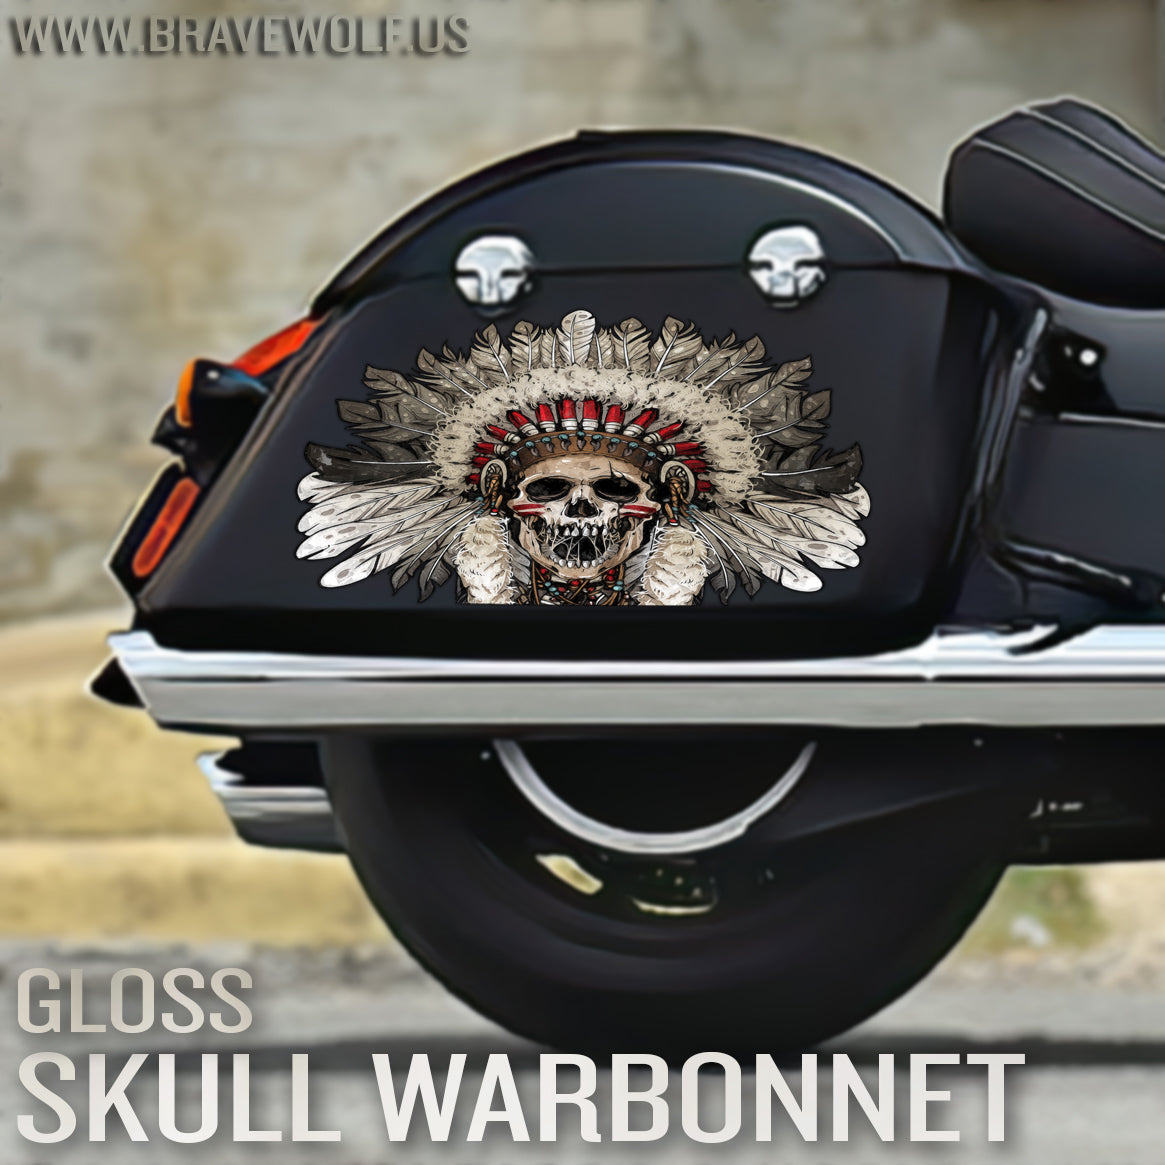
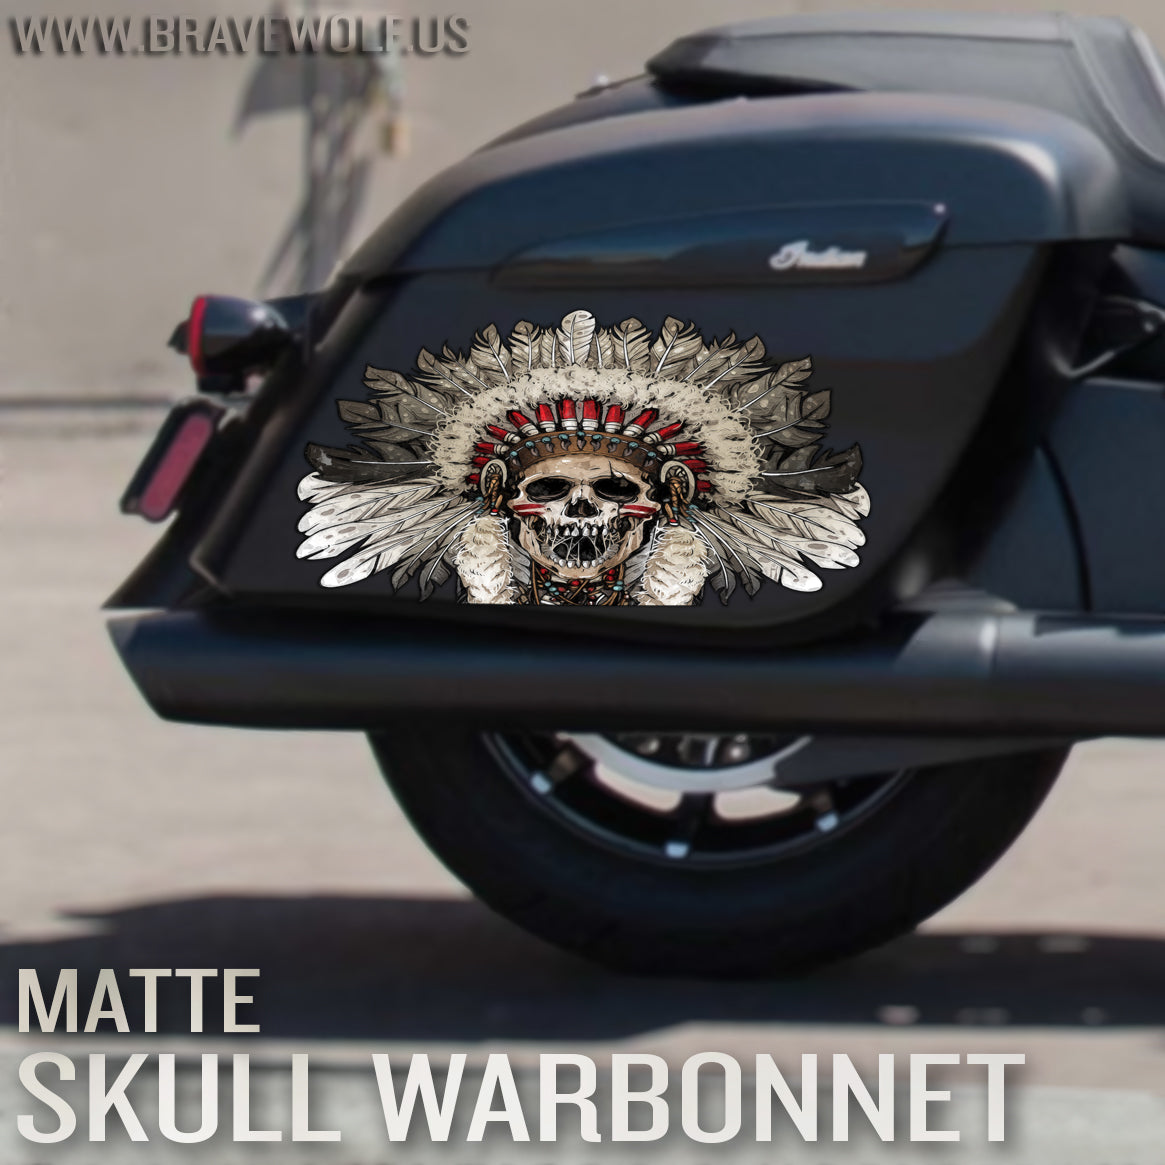

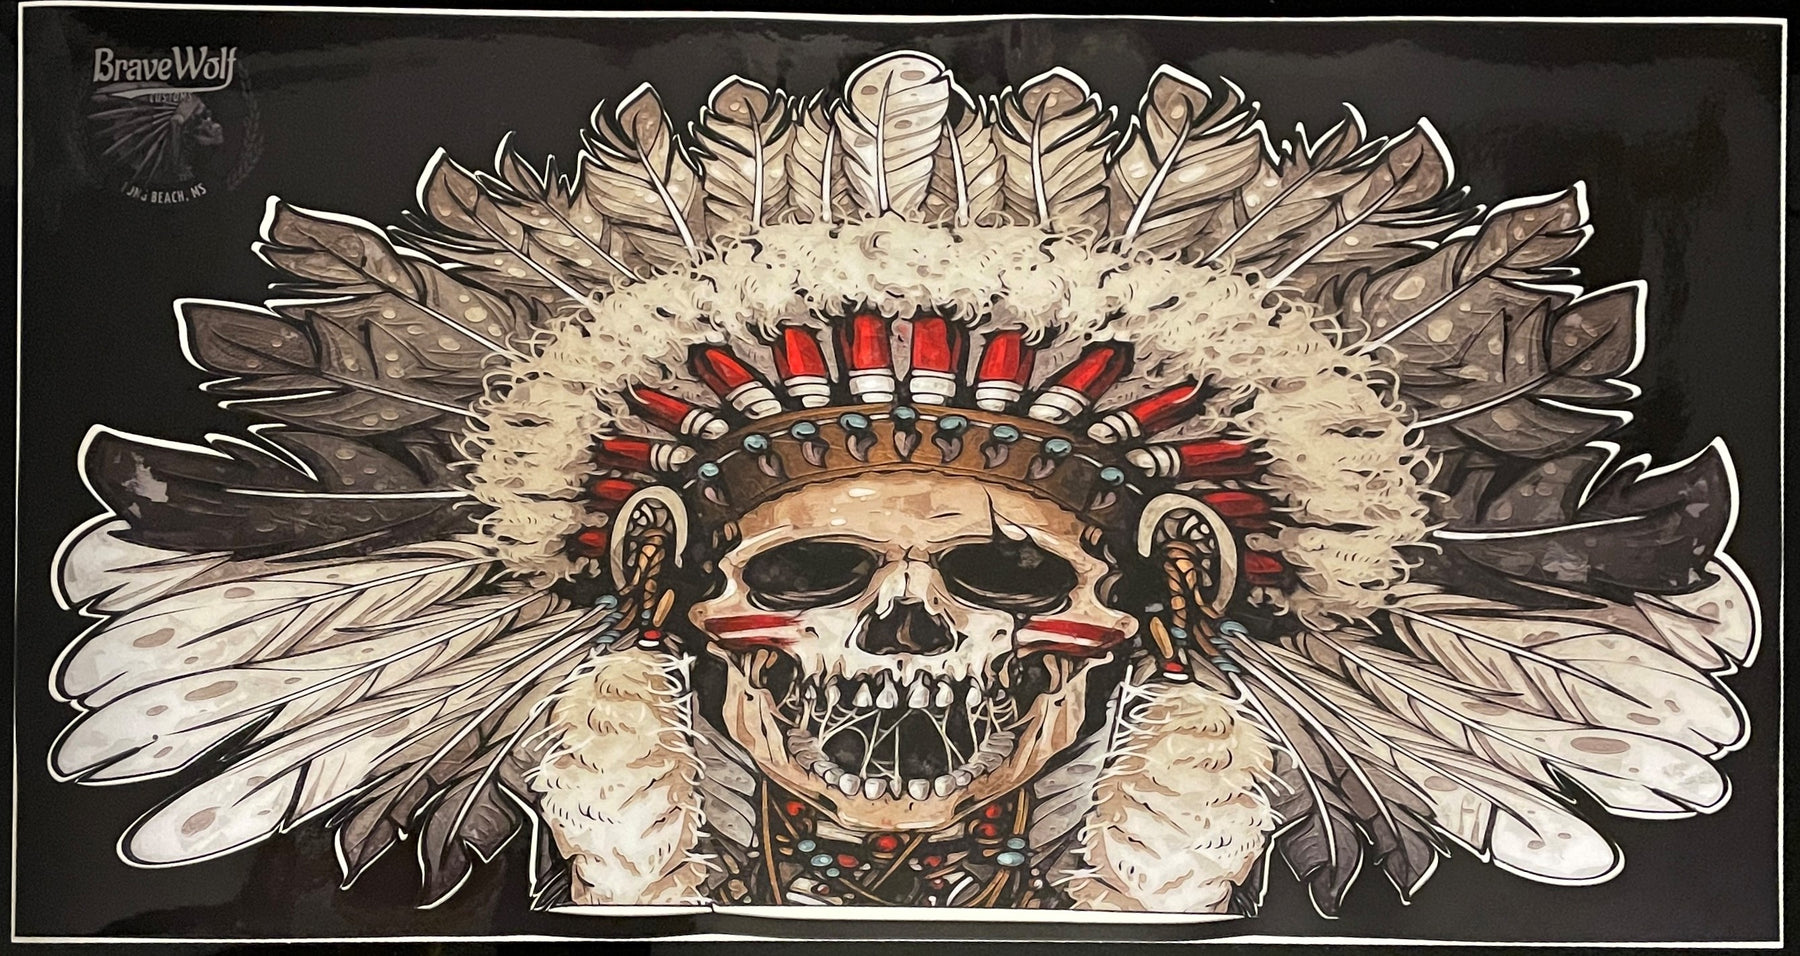

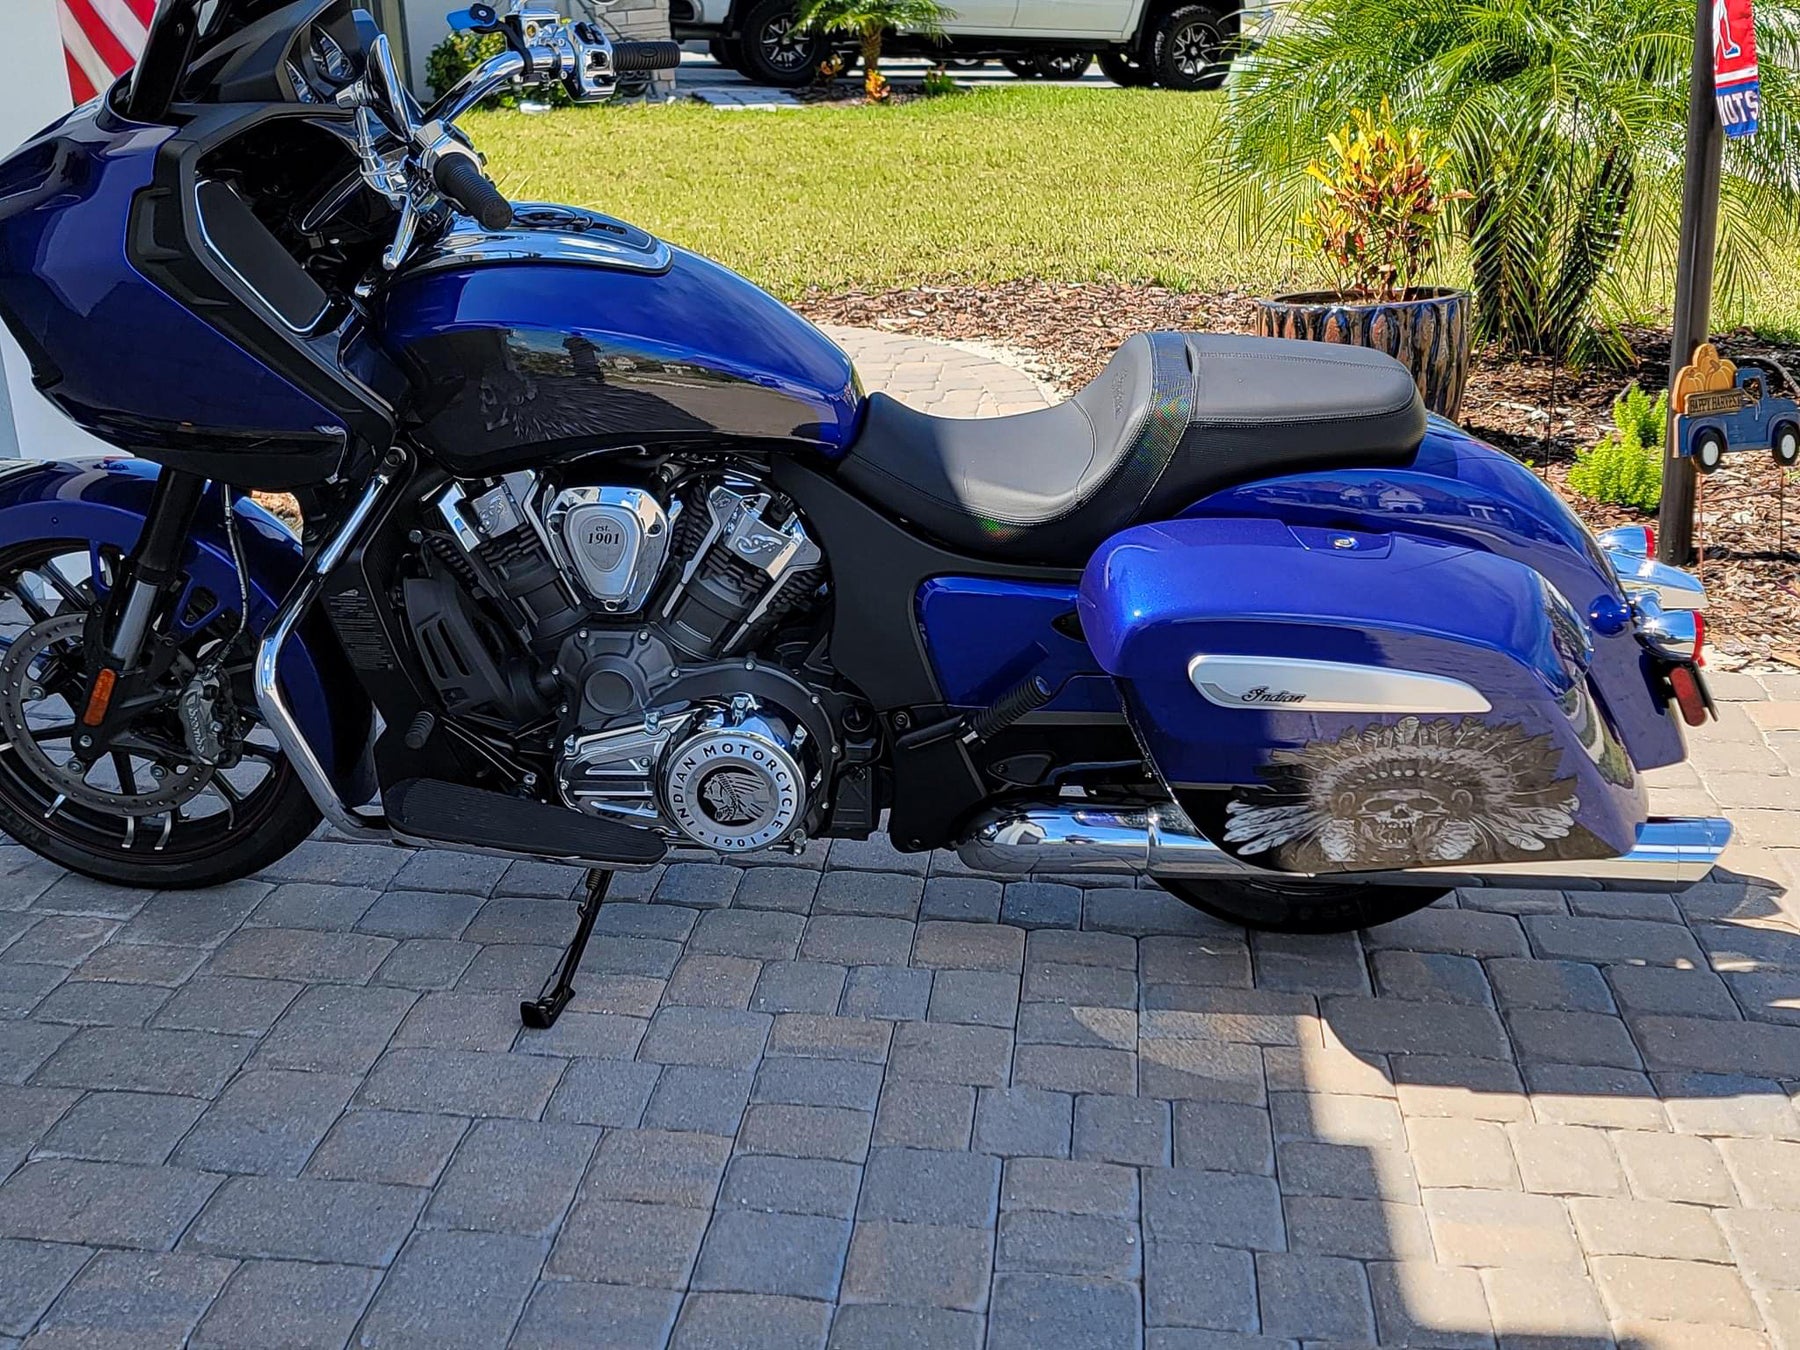
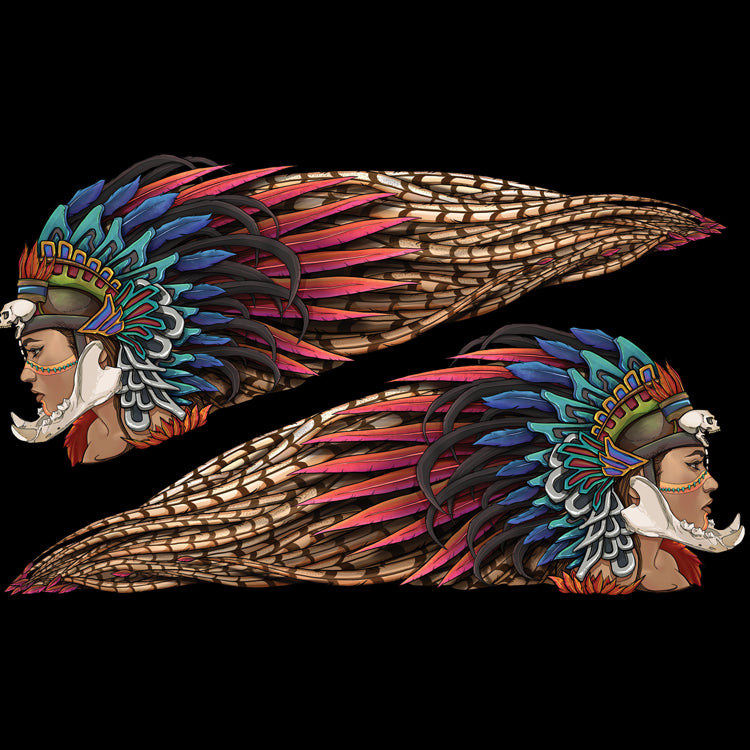
Indian Saddlebag Decals - Skull Warbonnet - Color
Regular price $150.00
Shipping calculated at checkout.
Stock Notice: (may take approximately 2-3 weeks before shipping if not in stock at the time of your order)
Our saddlebag decals are made from premium weatherproof hi-tack vinyl with a long lifespan that will keep them looking new for years. They are available in two finishes, heavy-duty 12 mil laminated Gloss (looks like it's painted on), or a heavy-duty sandy matte textured premium finish.
|
Fitment Guide: Fits both styles of Indian OEM saddlebags (rounded and squared). Also fits the Challenger when the plastic bag guard is removed. |
Installation:
Installing our decals is easy to do yourself at home. We recommend removing all of the excess decal material (the background image) before installing the decals. This will allow you to dispose of all the small cut-out pieces so that the pieces do not get trapped underneath your decal when installing it on the bike. Once you have all of the small pieces and background removed, you can use the "wet method" to install the decals to your saddlebags. The wet method involves using a spray bottle of water with a couple drops of dish soap in the mixture and spraying the surface of your saddlebags to wet the entire surface. Then carefully remove the backing from your decal and use the spray bottle to wet the adhesive side of the decal. Now you can gently place the decal on your saddlebag. Because the surfaces are wet, you can pull the decal up to reposition it until you get it where you want it. Once it's in place, use a squeegee or other object such as a credit card wrapped in a microfiber towel to squeeze the water out from behind the decal. You can also use your hands to do this. You should take care not to use a hard/abrasive object that can scratch the decals or your bike's paint. The high-tack adhesive will begin to set/adhere to the bike as soon as the liquid is push out from behind the decal. Use caution to ensure the towel or object you are using does not catch any edges of the decal and pull it off your bike. If you take your time and be gentle during installation, it should be an easy process. A hair dryer can be used to speed up the drying process if needed.
Feel free to visit our How-To page on the website to watch a "wet method" installation video TAB Performance made while installing our Zombie decals.


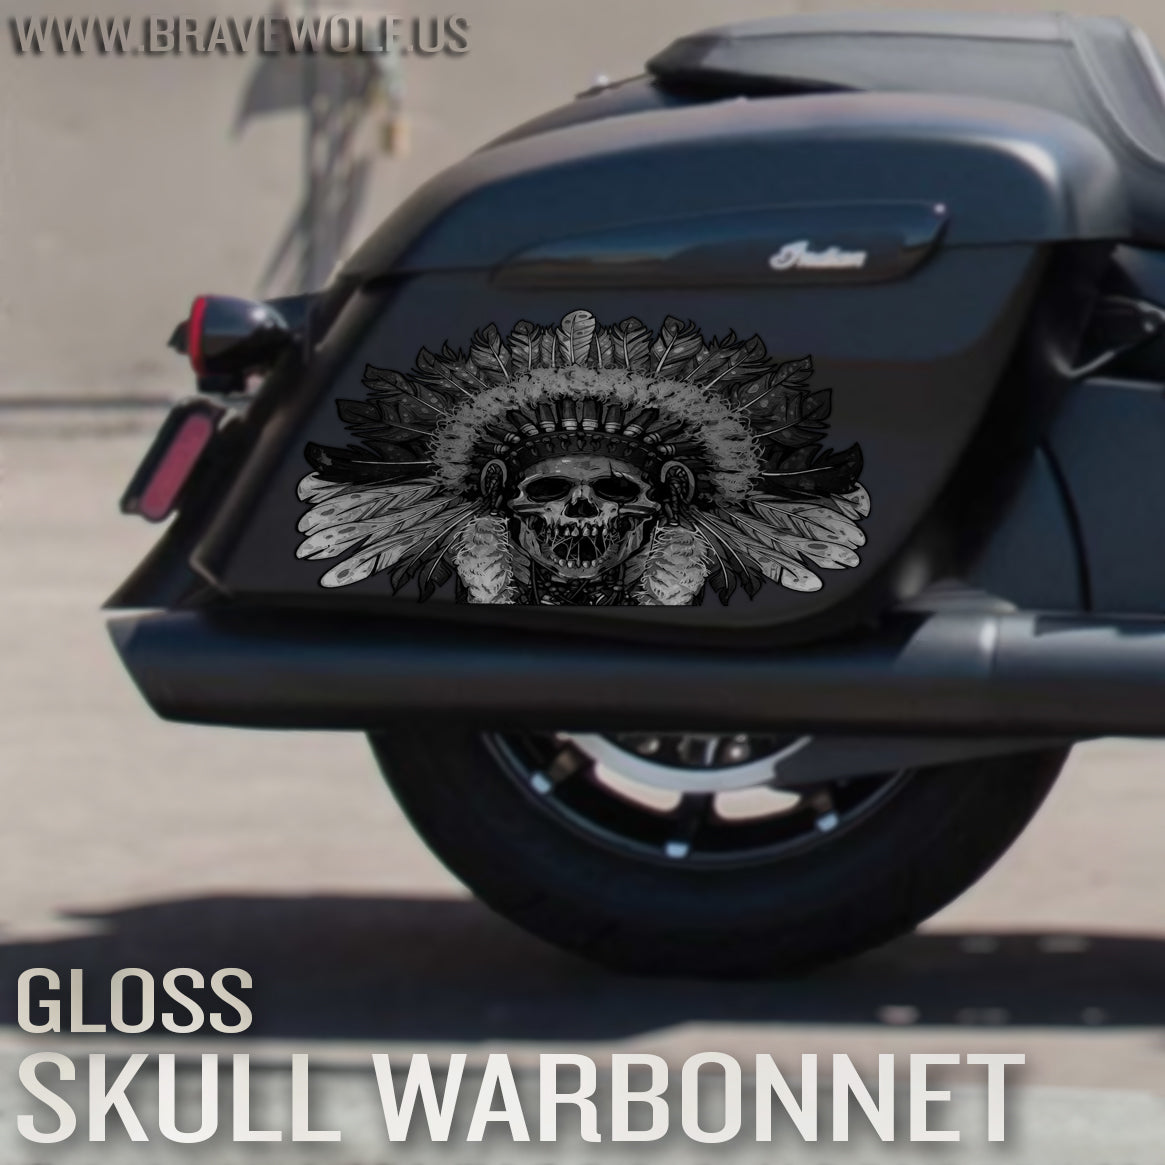
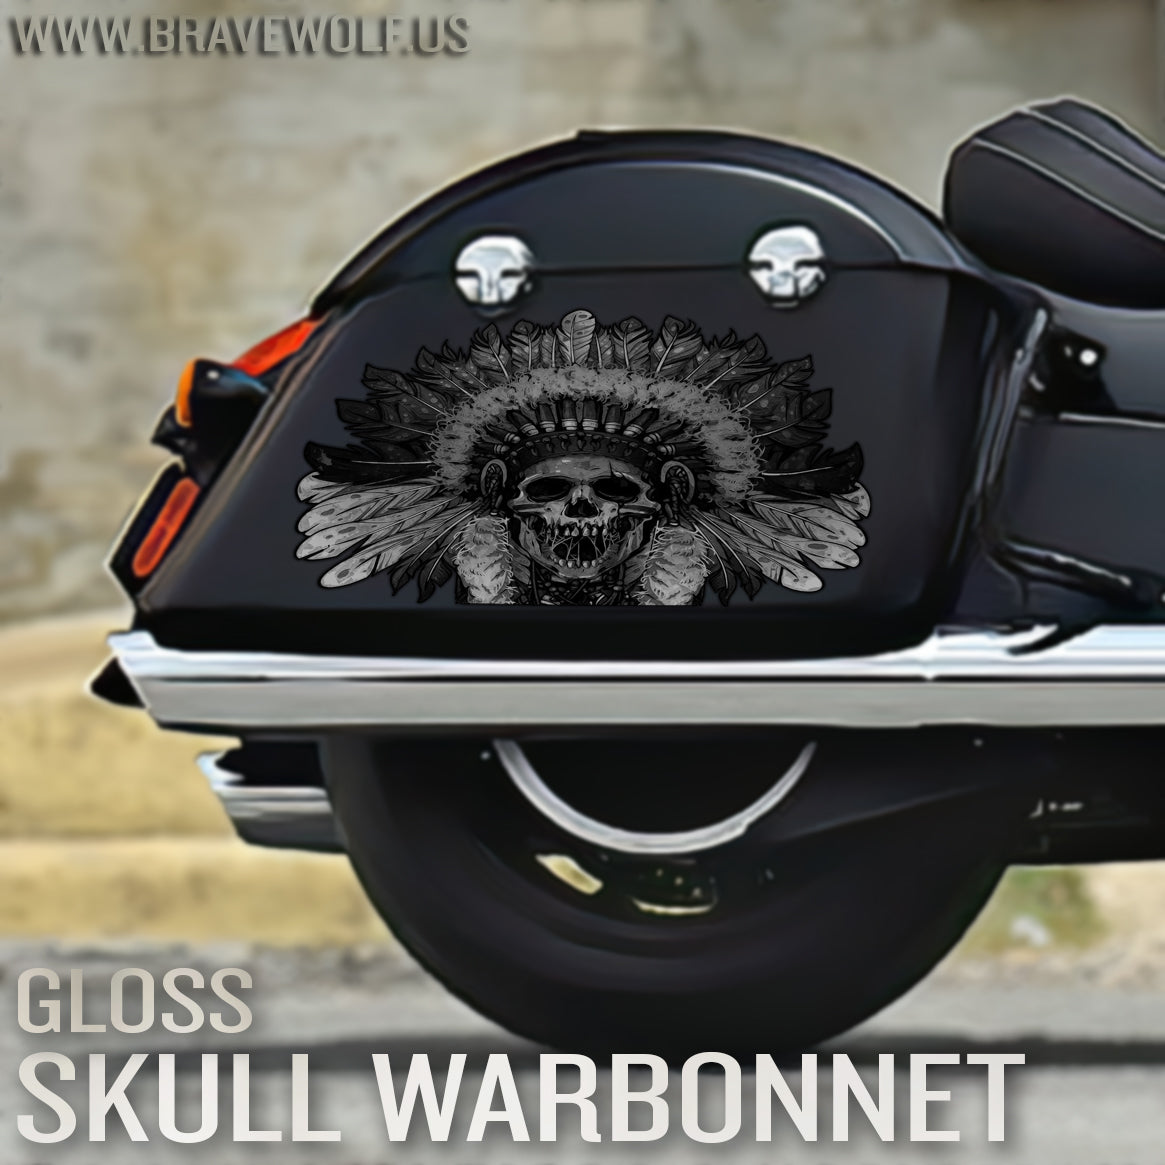


Indian Saddlebag Decals - Skull Warbonnet - B&W
Regular price $150.00
Shipping calculated at checkout.
Stock Notice: (may take approximately 2-3 weeks before shipping if not in stock at the time of your order)
Our saddlebag decals are made from premium weatherproof hi-tack vinyl with a long lifespan that will keep them looking new for years. They are available in two finishes, heavy-duty 12 mil laminated Gloss (looks like it's painted on), or a heavy-duty sandy matte textured premium finish.
|
Fitment Guide: Fits both styles of Indian OEM saddlebags (rounded and squared). Also fits the Challenger when the plastic bag guard is removed. |
Installation:
Installing our decals is easy to do yourself at home. We recommend removing all of the excess decal material (the background image) before installing the decals. This will allow you to dispose of all the small cut-out pieces so that the pieces do not get trapped underneath your decal when installing it on the bike. Once you have all of the small pieces and background removed, you can use the "wet method" to install the decals to your saddlebags. The wet method involves using a spray bottle of water with a couple drops of dish soap in the mixture and spraying the surface of your saddlebags to wet the entire surface. Then carefully remove the backing from your decal and use the spray bottle to wet the adhesive side of the decal. Now you can gently place the decal on your saddlebag. Because the surfaces are wet, you can pull the decal up to reposition it until you get it where you want it. Once it's in place, use a squeegee or other object such as a credit card wrapped in a microfiber towel to squeeze the water out from behind the decal. You can also use your hands to do this. You should take care not to use a hard/abrasive object that can scratch the decals or your bike's paint. The high-tack adhesive will begin to set/adhere to the bike as soon as the liquid is push out from behind the decal. Use caution to ensure the towel or object you are using does not catch any edges of the decal and pull it off your bike. If you take your time and be gentle during installation, it should be an easy process. A hair dryer can be used to speed up the drying process if needed.
Feel free to visit our How-To page on the website to watch a "wet method" installation video TAB Performance made while installing our Zombie decals.


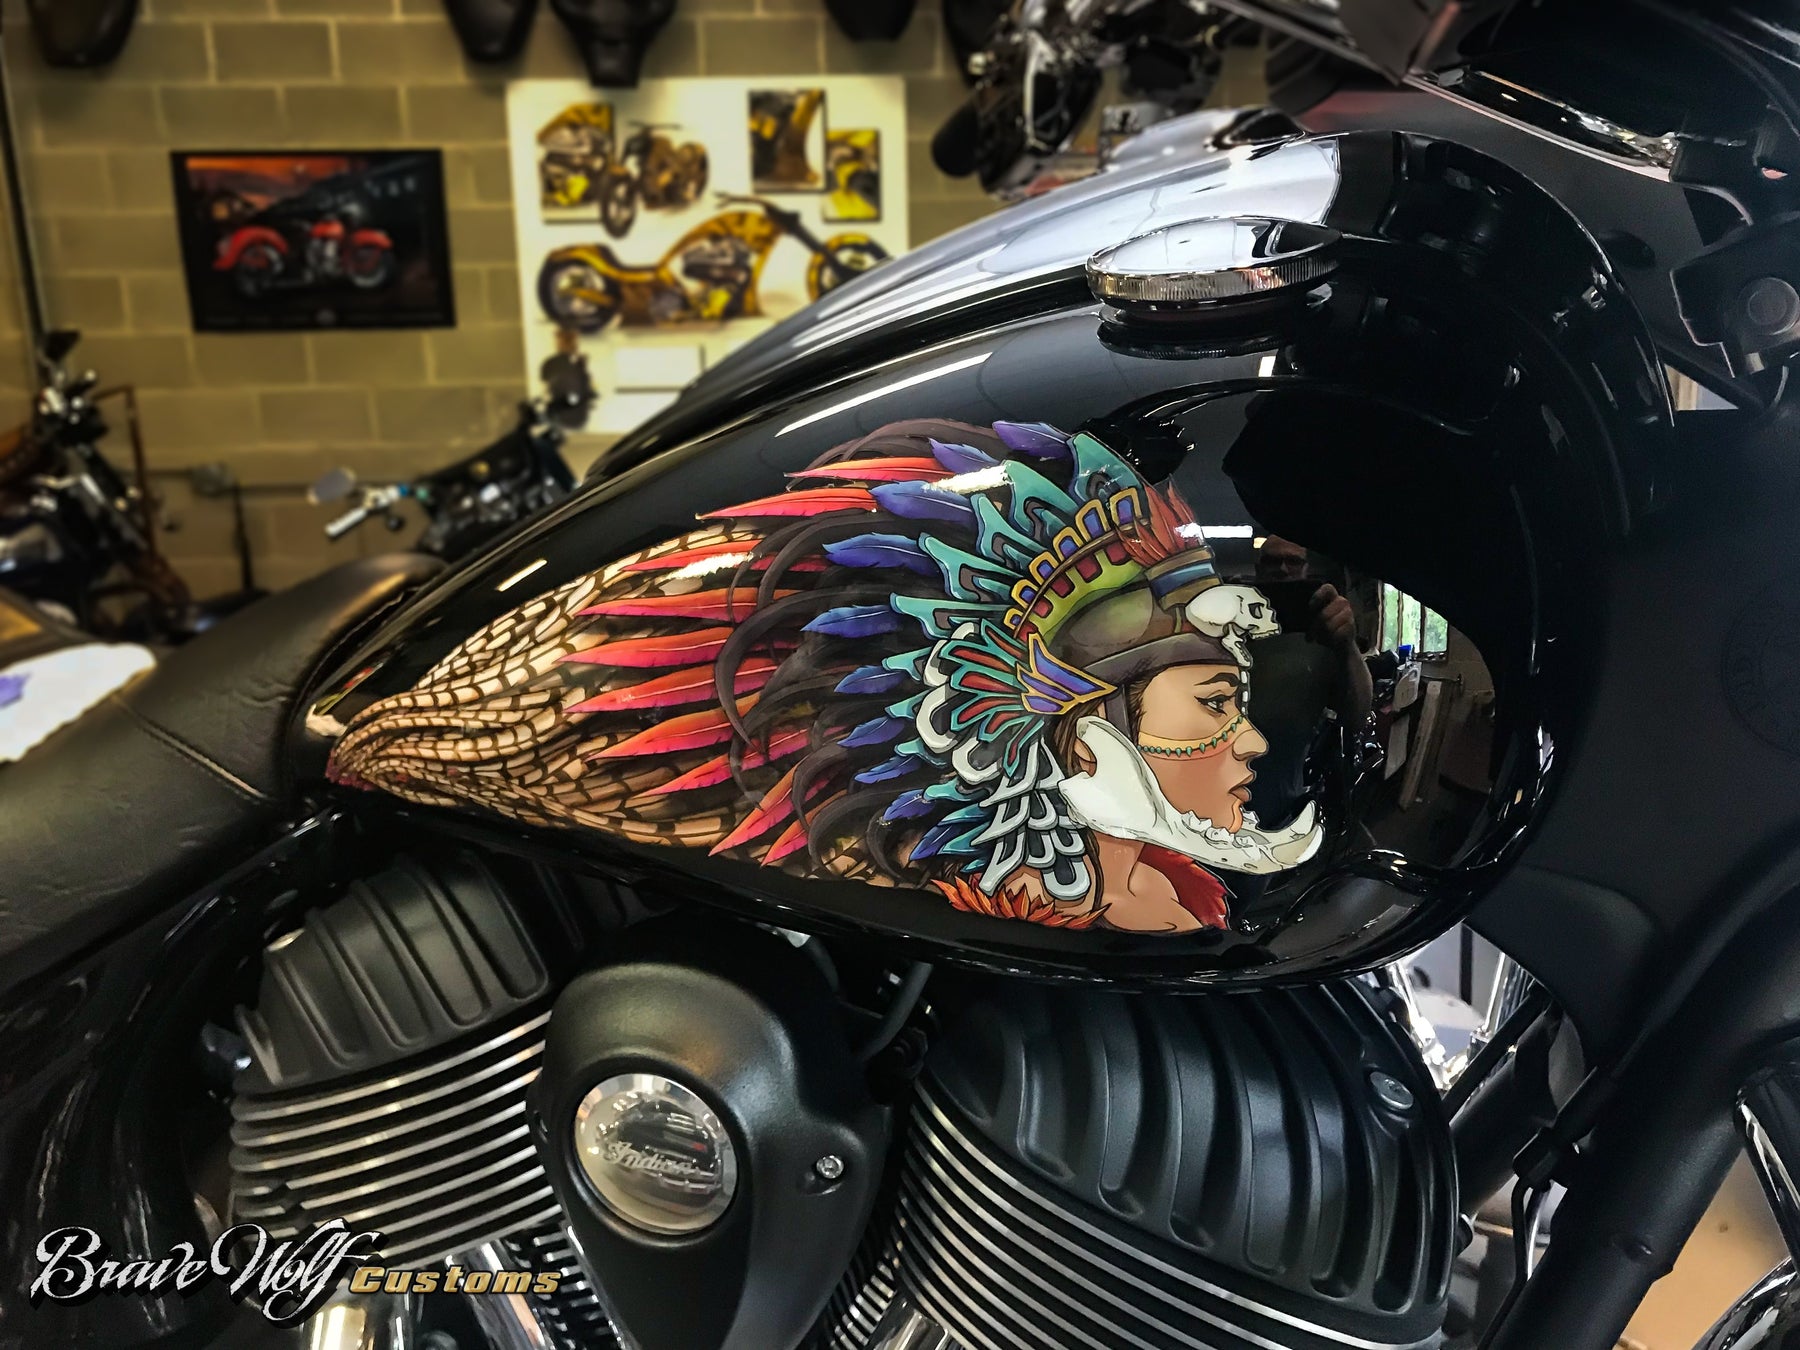
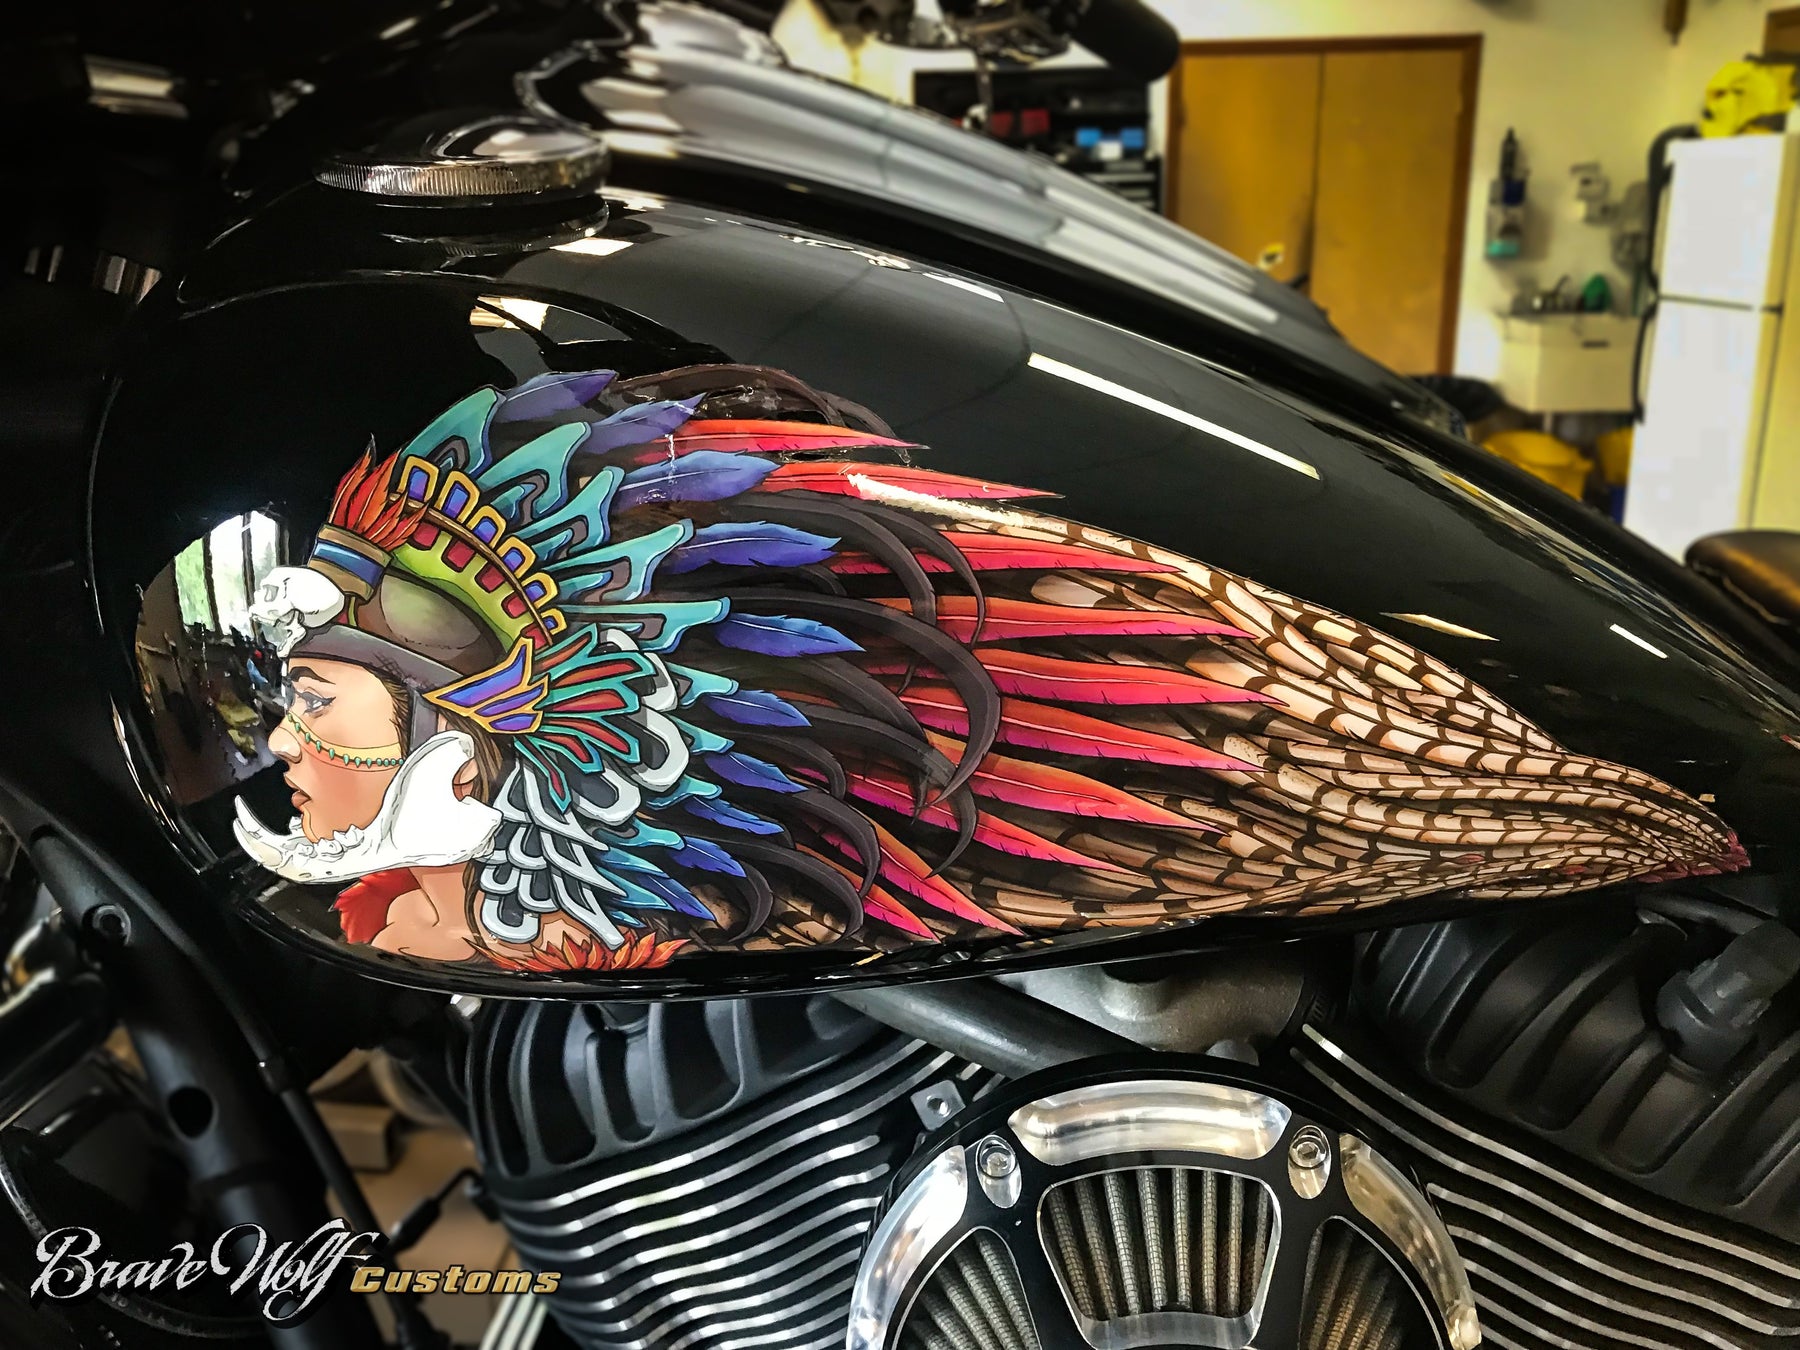
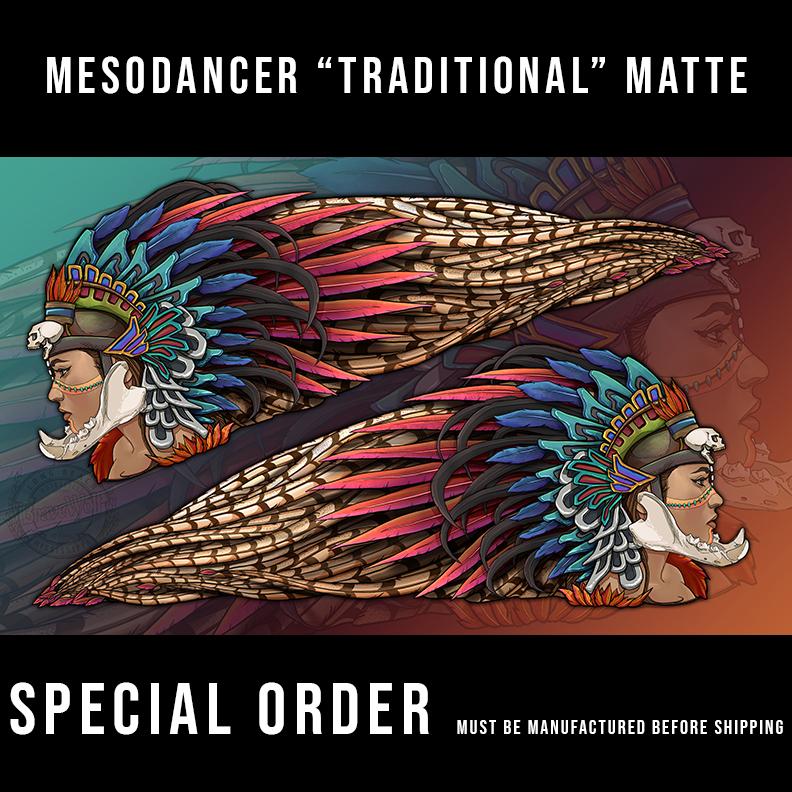

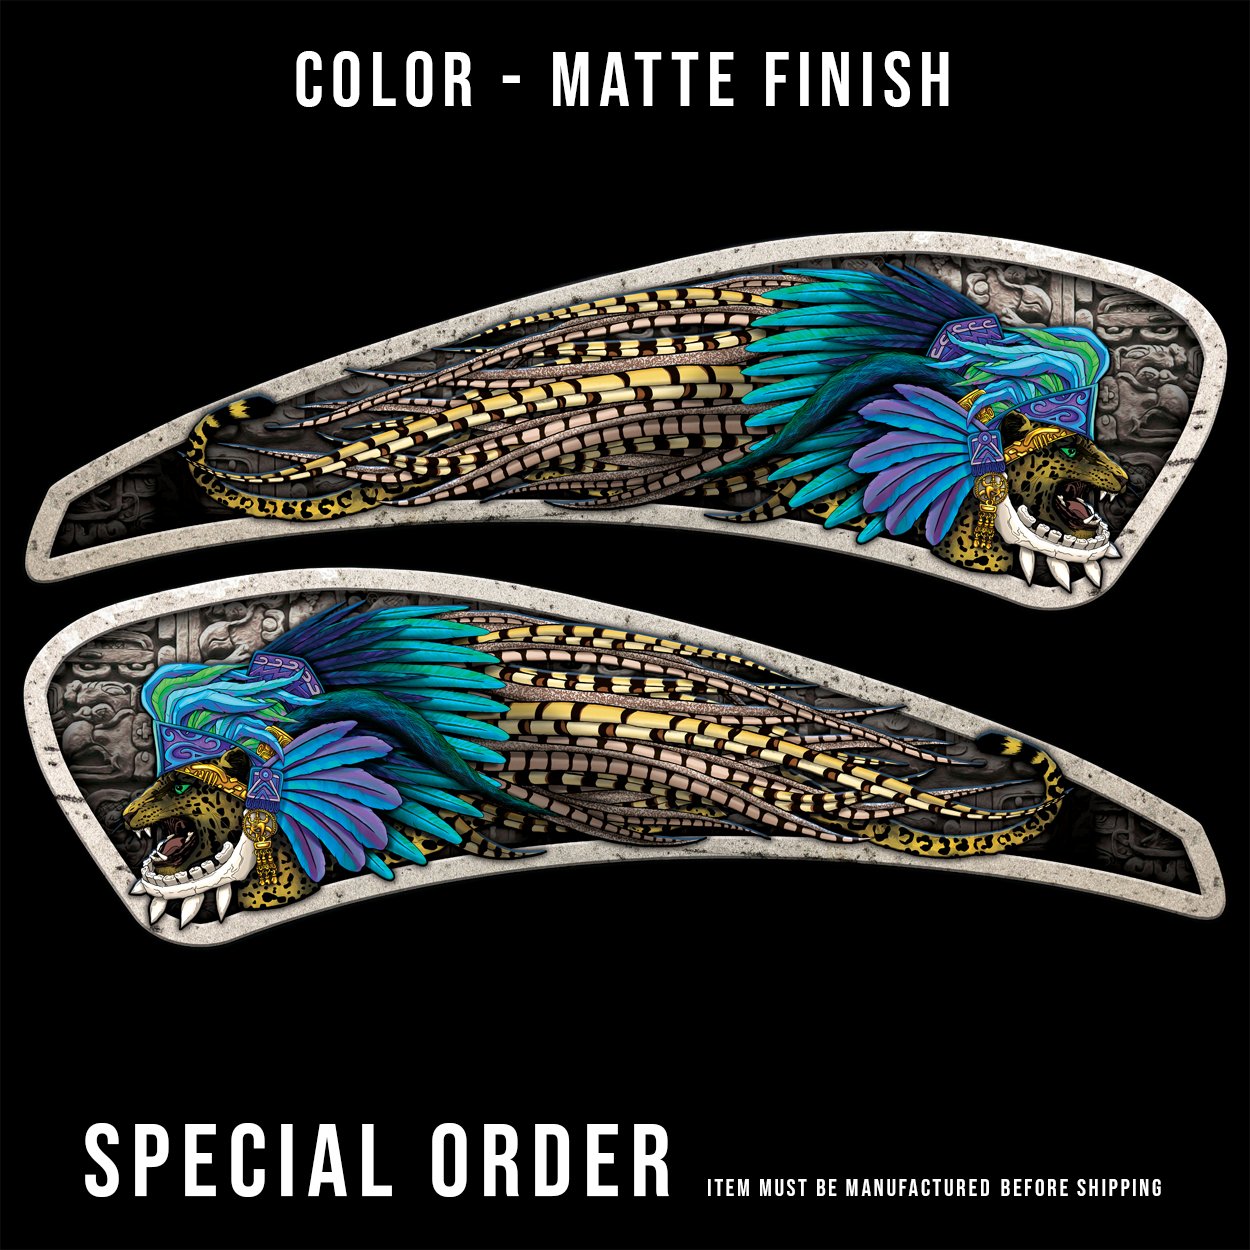
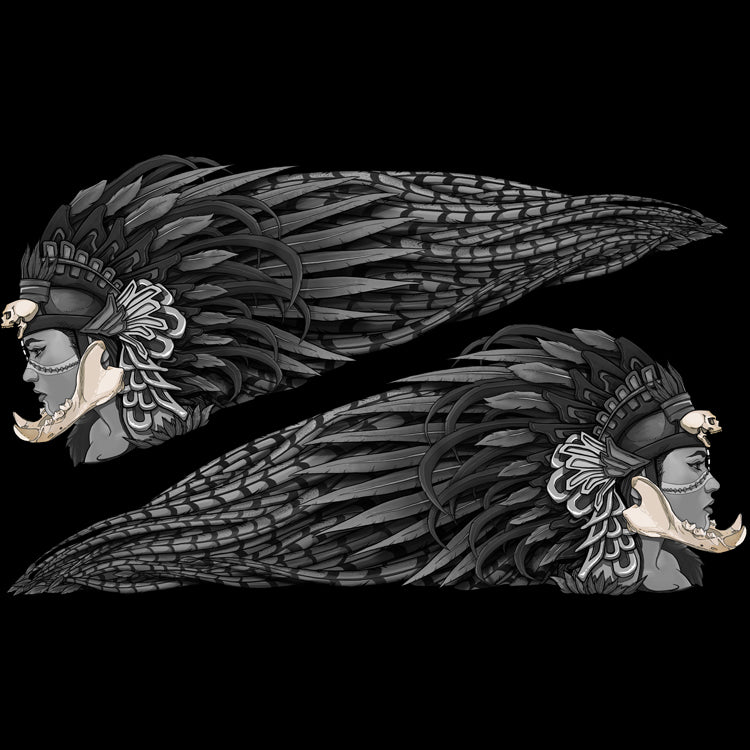
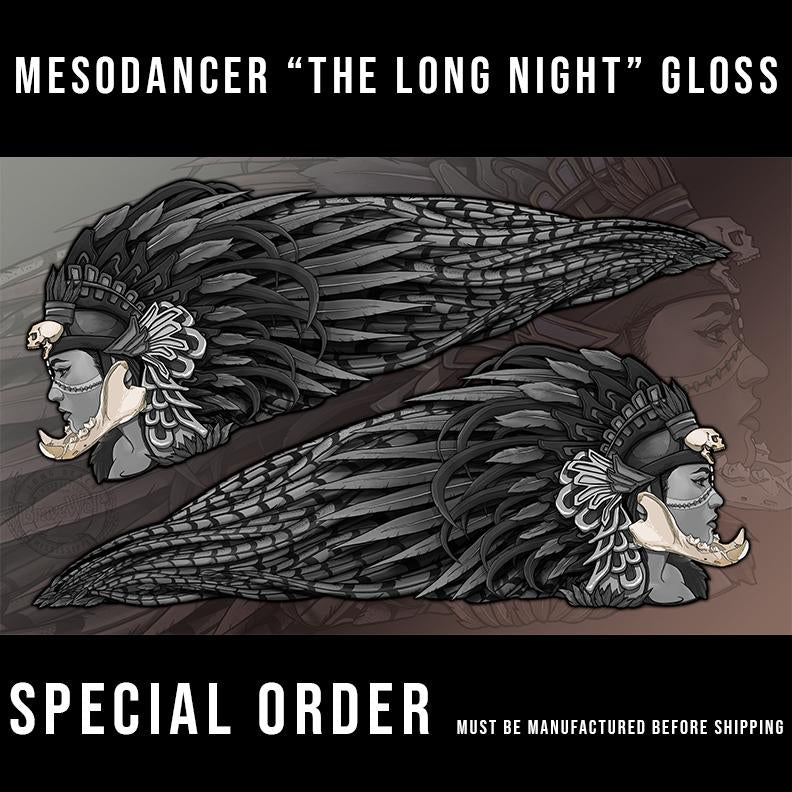
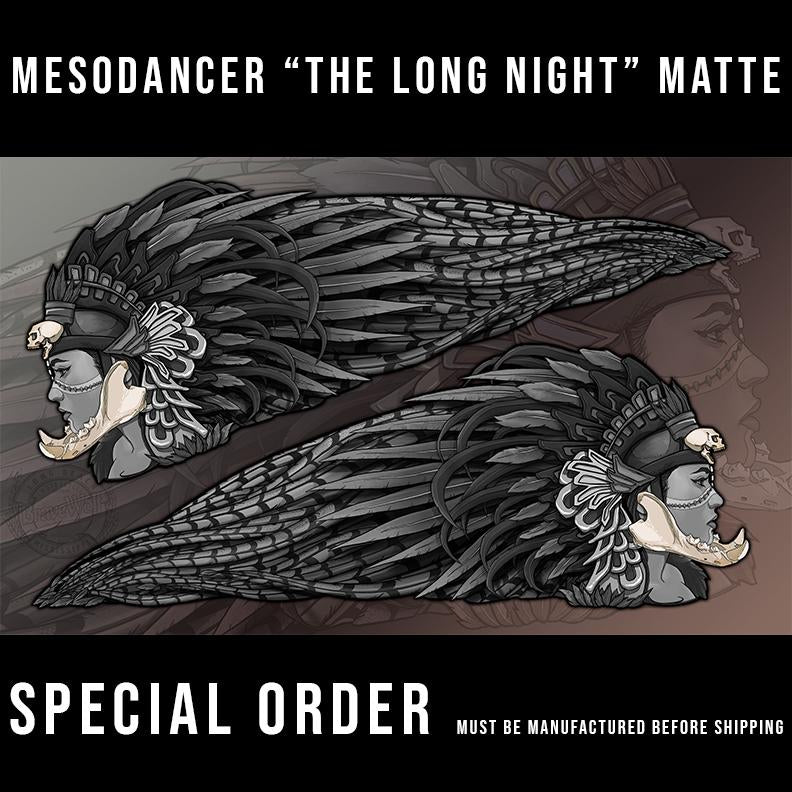
MesoDancer - Color
Regular price $100.00
Shipping calculated at checkout.
May take 2-3 weeks before shipping if not in stock at the time of your order
With a blend of Aztec, Mayan, and Inca, the MesoDancer represents Mesoamerican culture and tradition. A decorative feather headdress is trailed by plume of pheasant feathers for that authentic styling that's so recognizable in that part of the world.
Size: 16.15 inches length by 5.95 inches tall (Indian Scout owners should purchase the Scout version of this artwork. It is a different product.)
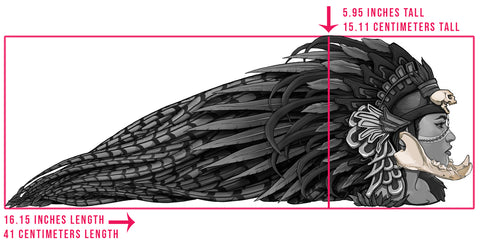

Photo courtesy of Mark Hartmann


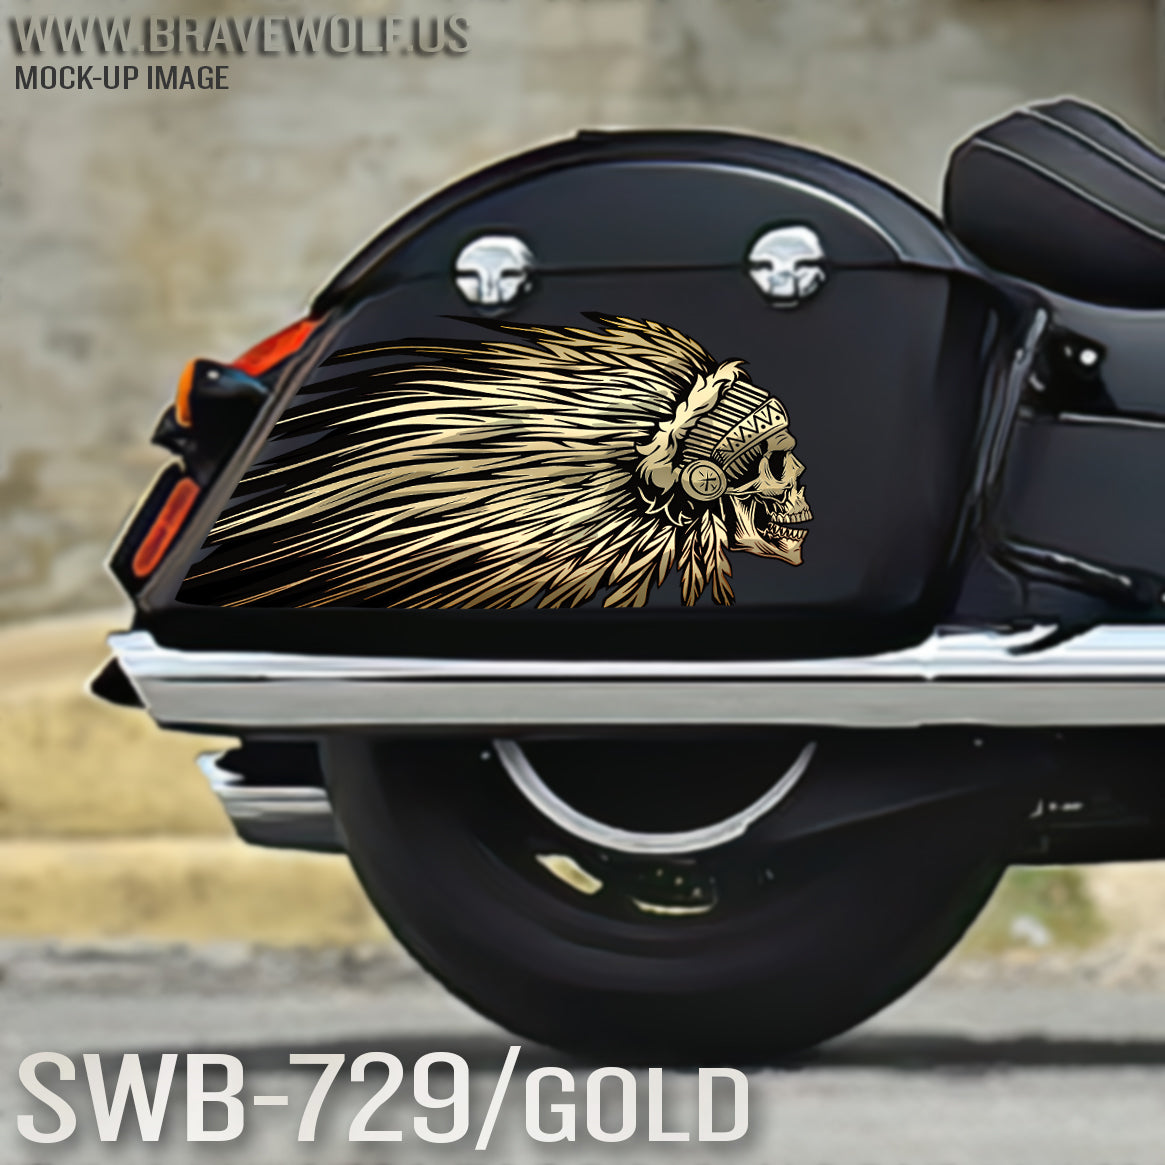
Indian Saddlebag Decals-SWB729-Gold
Regular price $180.00
Shipping calculated at checkout.
Stock Notice - Special Order (may take approximately 2-3 weeks before shipping if not in stock at time of order)
Our saddlebag decals are made from premium weatherproof hi-tack vinyl with a long lifespan that will keep them looking new for years. They are available in two finishes, heavy-duty 12 mil laminated Gloss (looks like it's painted on), or a heavy-duty sandy matte textured premium finish.
|
Fitment Guide: Fits both styles of Indian OEM saddlebags (rounded and squared). Also fits the Challenger & Pursuit when the plastic bag guard is removed. |
Installation:
Installing our decals is easy to do yourself at home. We recommend removing all of the excess decal material (the background image) before installing the decals. This will allow you to dispose of all the small cut-out pieces so that the pieces do not get trapped underneath your decal when installing it on the bike. Once you have all of the small pieces and background removed, you can use the "wet method" to install the decals to your saddlebags. The wet method involves using a spray bottle of water with a couple drops of dish soap in the mixture and spraying the surface of your saddlebags to wet the entire surface. Then carefully remove the backing from your decal and use the spray bottle to wet the adhesive side of the decal. Now you can gently place the decal on your saddlebag. Because the surfaces are wet, you can pull the decal up to reposition it until you get it where you want it. Once it's in place, use a squeegee or other object such as a credit card wrapped in a microfiber towel to squeeze the water out from behind the decal. You can also use your hands to do this. You should take care not to use a hard/abrasive object that can scratch the decals or your bike's paint. The high-tack adhesive will begin to set/adhere to the bike as soon as the liquid is push out from behind the decal. Use caution to ensure the towel or object you are using does not catch any edges of the decal and pull it off your bike. If you take your time and be gentle during installation, it should be an easy process. A hair dryer can be used to speed up the drying process if needed.
Feel free to visit our How-To page on the website to watch a "wet method" installation video TAB Performance made while installing our Zombie decals.


MesoDancer - Black & White
Regular price $100.00
Shipping calculated at checkout.
May take 2-3 weeks before shipping if not in stock at the time of your order
With a blend of Aztec, Mayan, and Inca, the MesoDancer represents Mesoamerican culture and tradition. A decorative feather headdress is trailed by plume of pheasant feathers for that authentic styling that's so recognizable in that part of the world.
Size: 16.15 inches length by 5.95 inches tall (Indian Scout owners should purchase the Scout version of this artwork. It is a different product.)


Dark Horse - Saddlebag - V1 - Rounded & Square Bags
Regular price $100.00
Shipping calculated at checkout.
LAST CHANCE - Order now while supplies last!
We are retiring many of our designs, making them limited in nature. We want this process to help make your bike unique. If you've been thinking about scoring a set of these custom decals, get them now before they're gone!
Give your motorcycle a custom look with these Dark Horse saddlebag decals! They are designed for both versions of Indian saddlebags, the common style, and the newer style. Although they were designed for the saddlebags, you can use these decals wherever you want. Just be sure to measure the size of where you want to apply them to ensure they will fit.
Size:
| Style | Inches | Centimeters |
|
Version 1 (Common Rounded style bags and New Square style bags) |
22.4999 in x 7.9098 in | 57.15 x 20 cm |
Material: A material originally made for motocross, these decals can really take a beating. They are not your everyday "sticker". These decals are printed on a hi-tack vinyl and laminated with a 12-mil glossy PVC laminate or with a sandy matte texture (your choice). It is weather proof, temperature and UV resistant, and will maintain its quality for years.
What is included: Matching set of left and right facing decals. Application suitable for Motorcycles, cars, trucks, windows, tables and more.
Installation: We recommend using the wet method to install decals of this size. Take a look at this video made by TAB Performance during their installation of our decals.


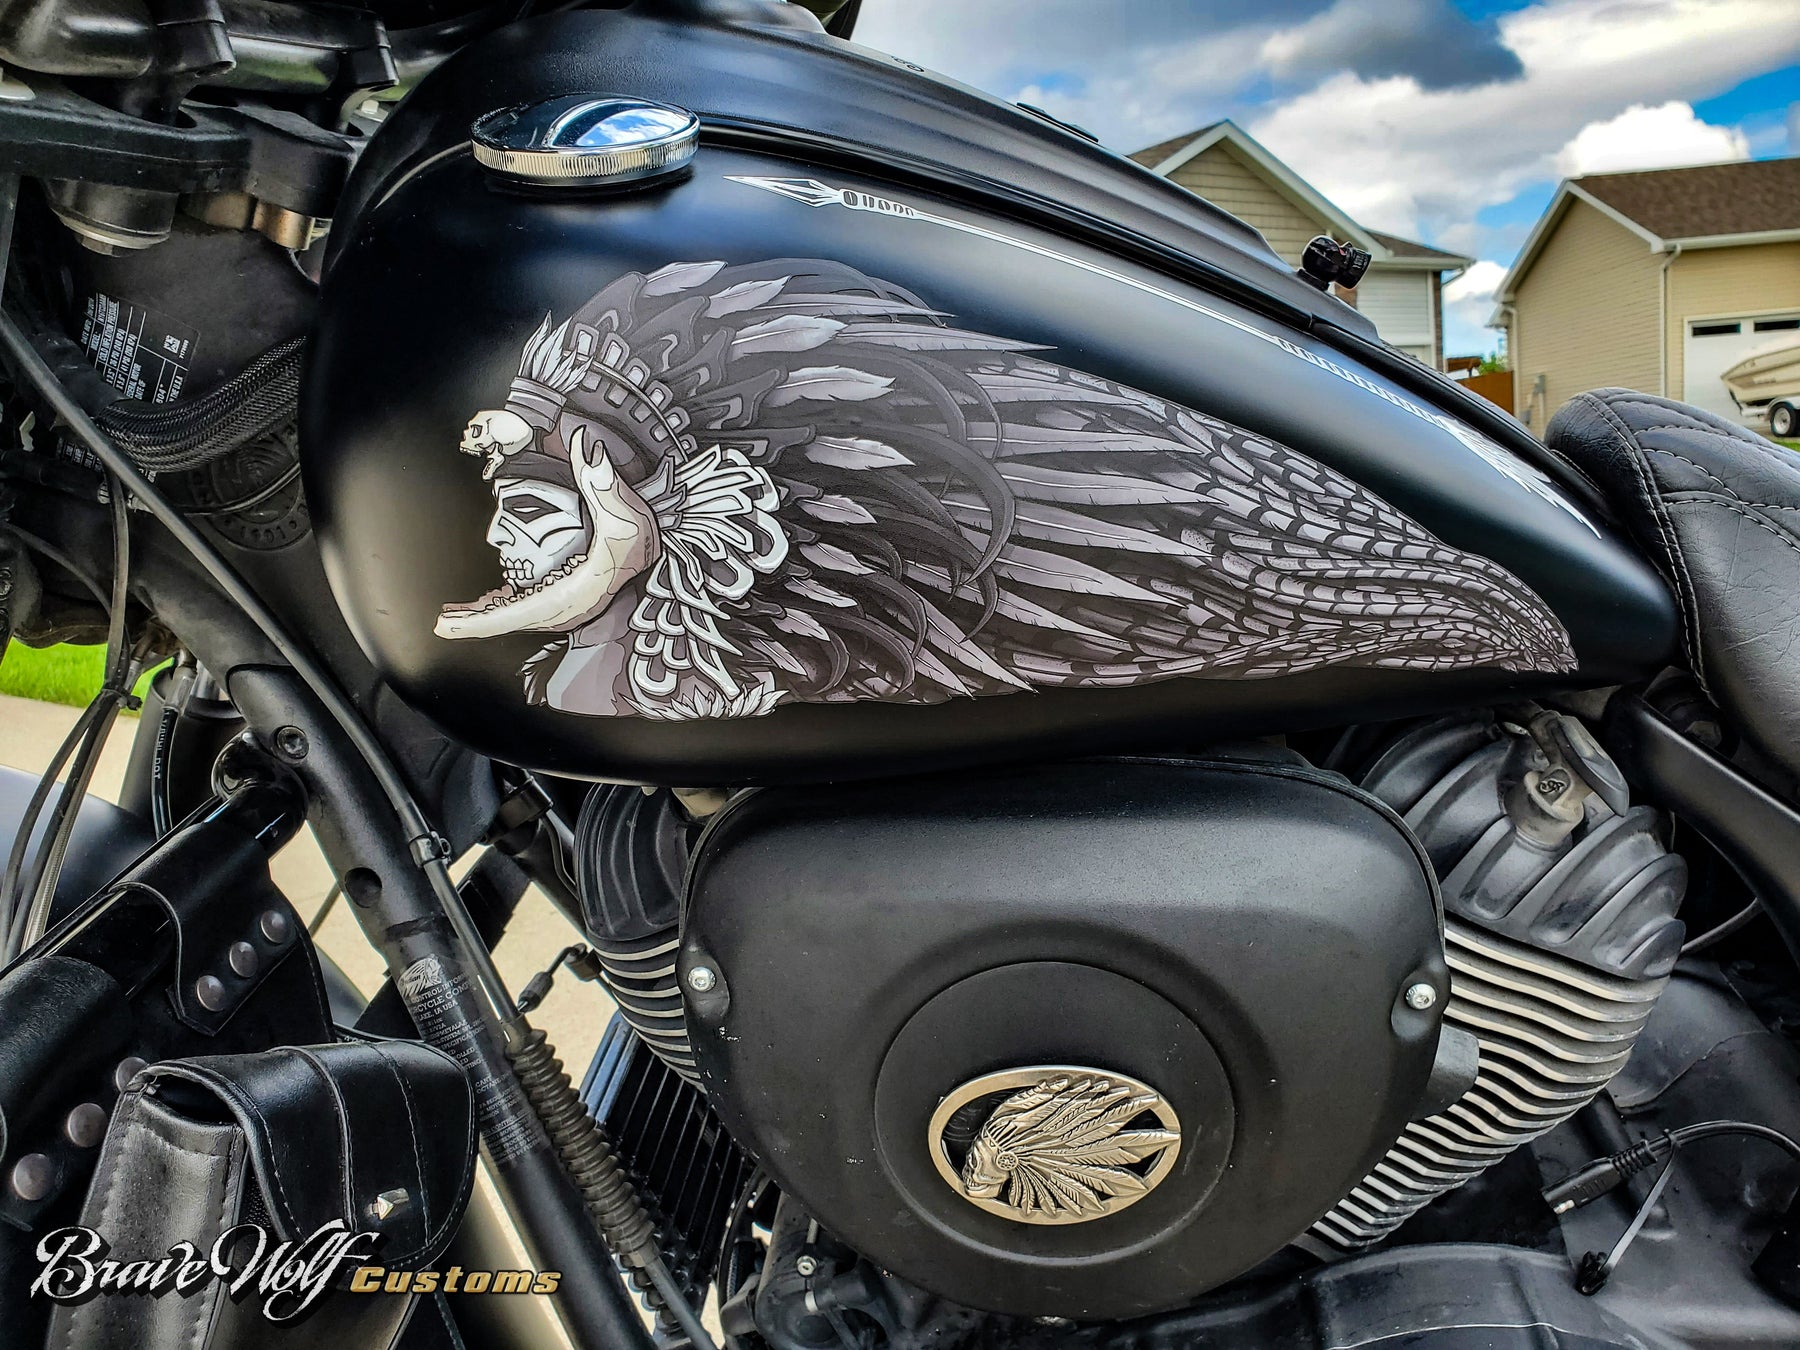
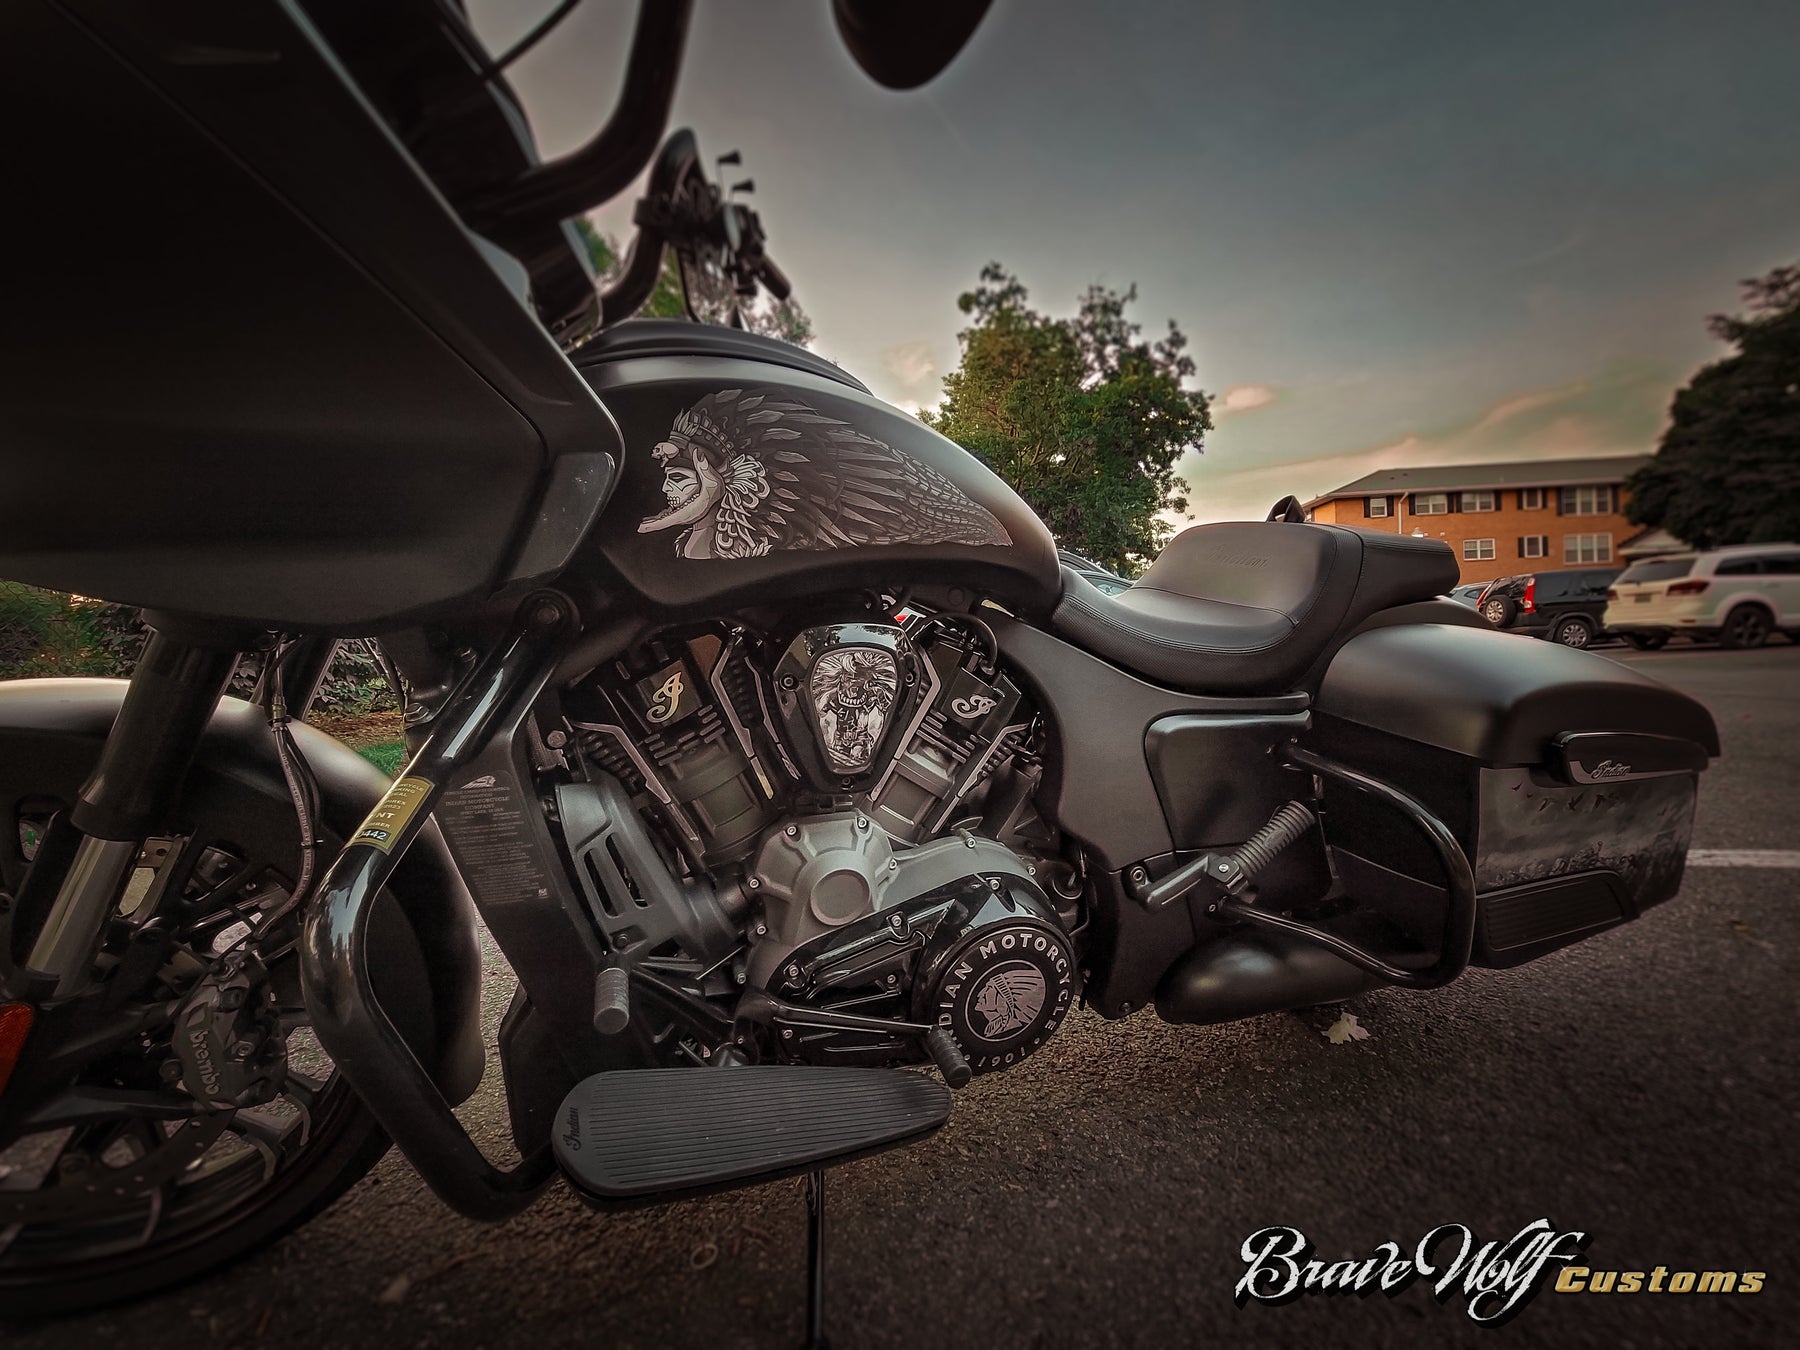
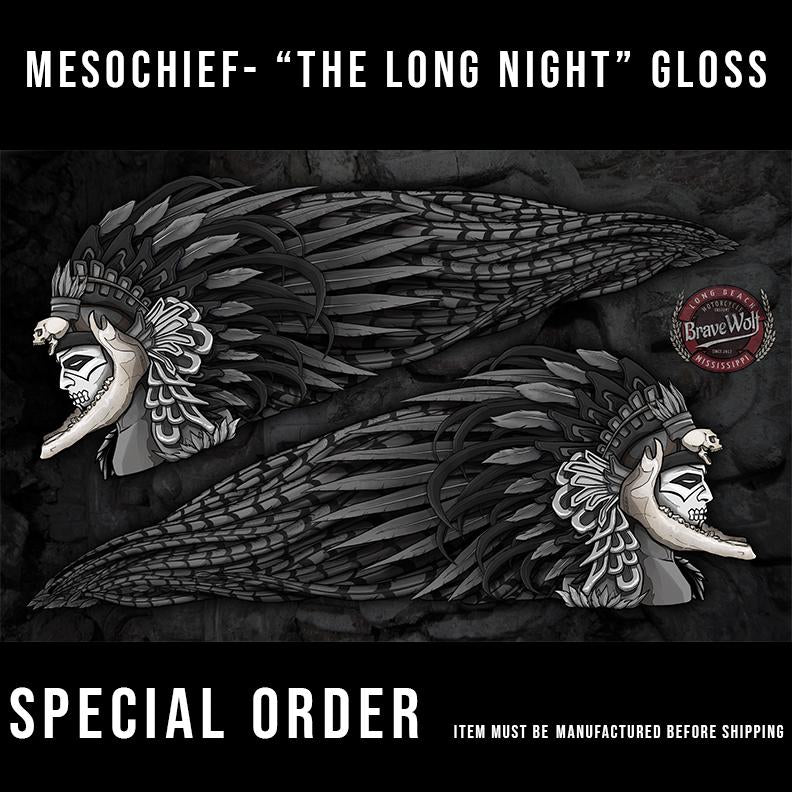

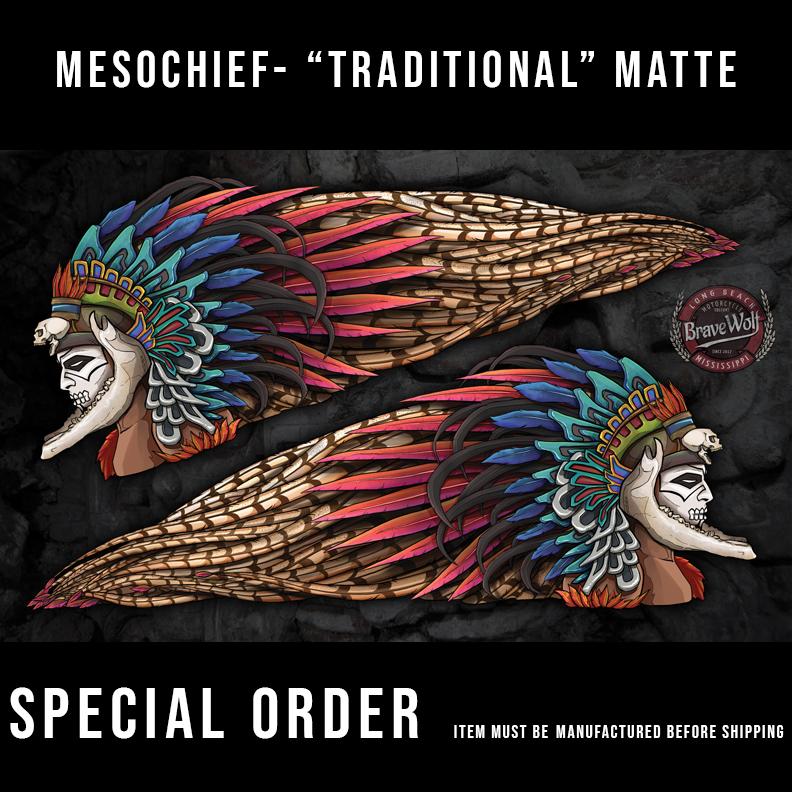
Mesochief - Black & White
Regular price $100.00
Shipping calculated at checkout.
May take 2-3 weeks before shipping if not in stock at the time of your order
With a blend of Aztec, Mayan, and Inca, the MesoChief represents Mesoamerican culture and tradition. A decorative feather headdress is trailed by plume of pheasant feathers for that authentic styling that's so recognizable in that part of the world.
Size: 16.15 inches length by 5.89 inches tall (Indian Scout owners should purchase the Scout version of this artwork. It is a different product)


Photo courtesy of Miguel Ramirez


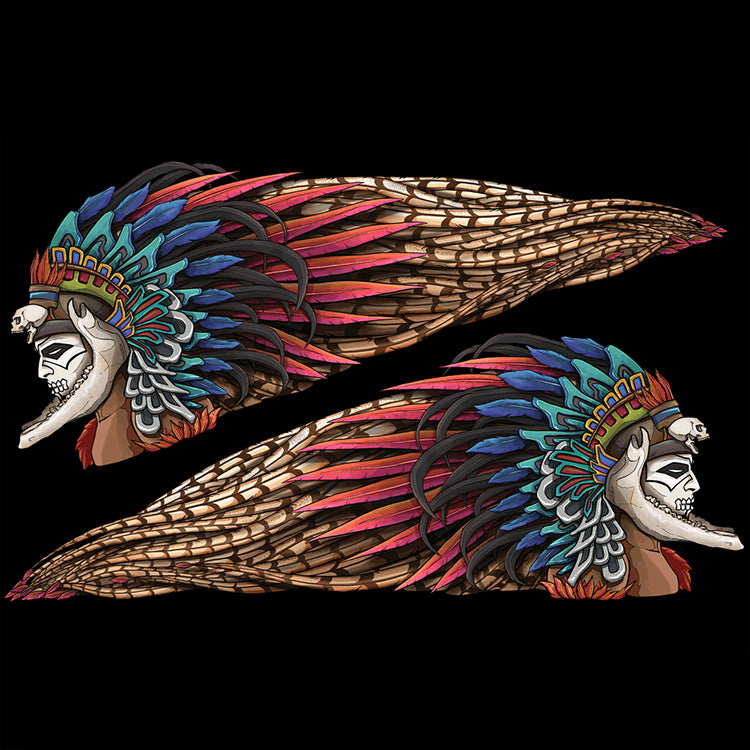
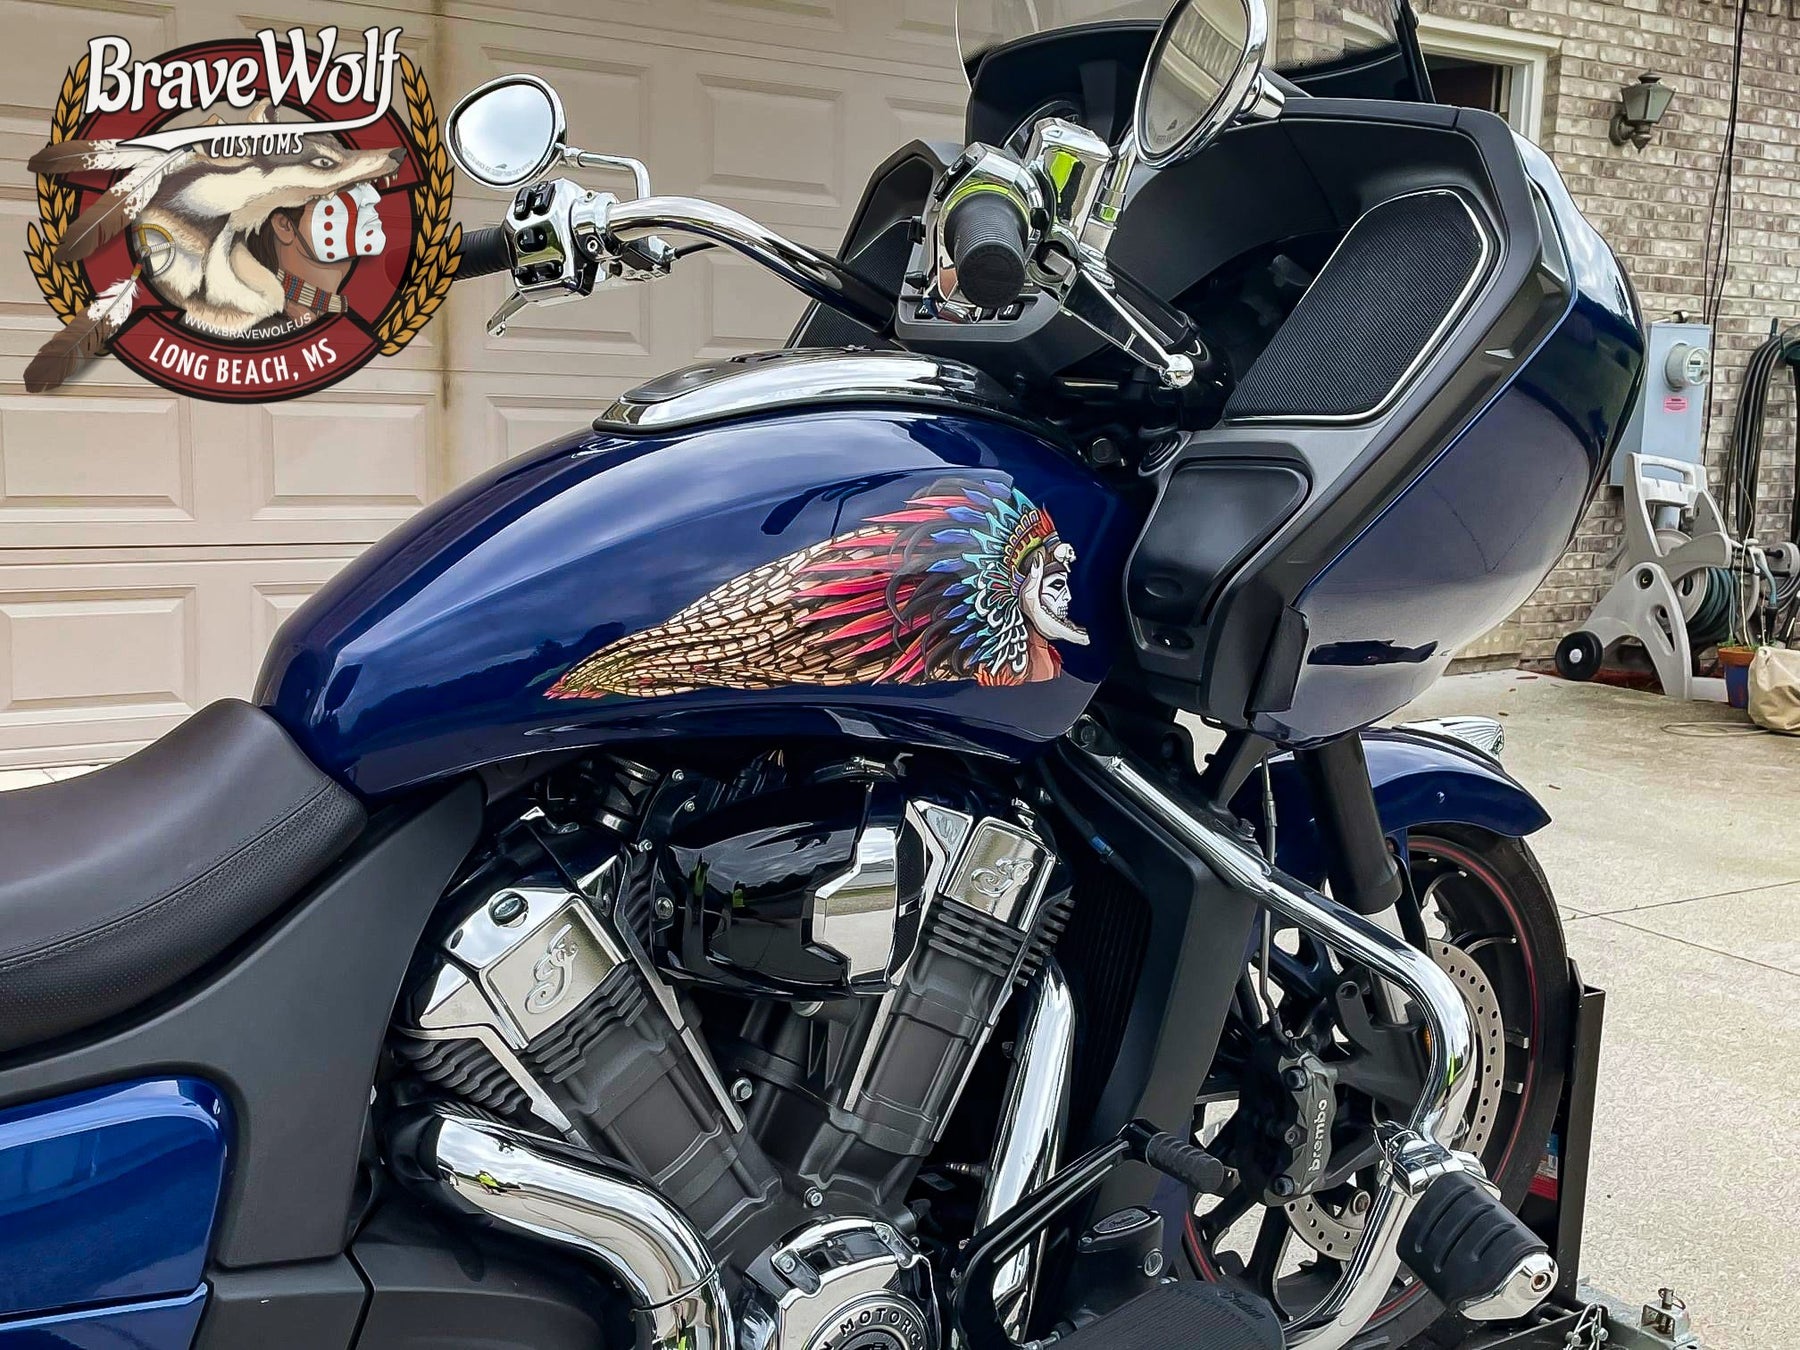
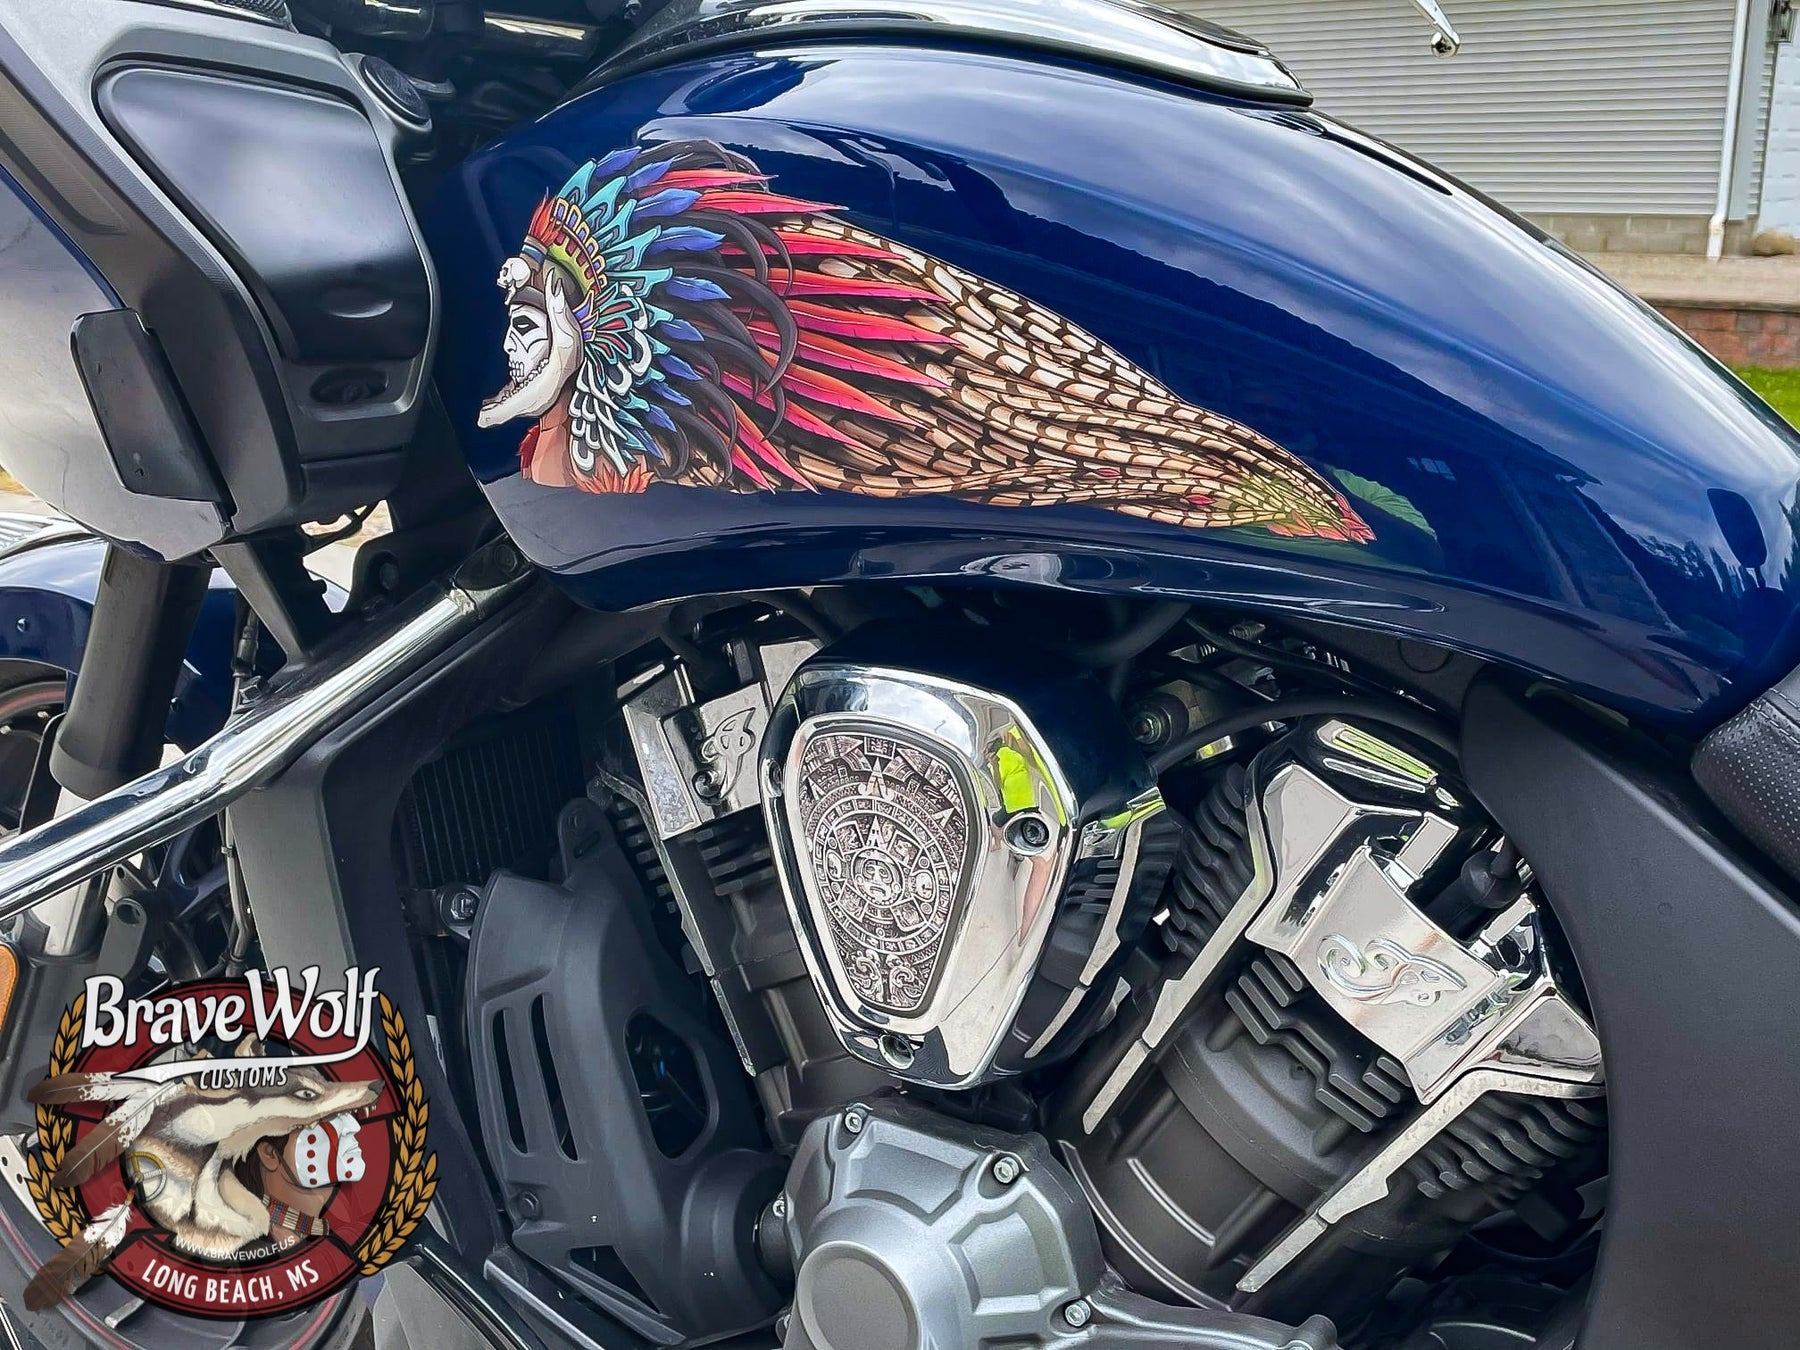

Mesochief - Color
Regular price $100.00 Sale price $80.00 Save $20.00
Shipping calculated at checkout.
May take 2-3 weeks before shipping if not in stock at the time of your order
With a blend of Aztec, Mayan, and Inca, the MesoChief represents Mesoamerican culture and tradition. A decorative feather headdress is trailed by plume of pheasant feathers for that authentic styling that's so recognizable in that part of the world.
Size: 16.15 inches length by 5.89 inches tall (Indian Scout owners should purchase the Scout version of this artwork. It is a different product)

Photo courtesy of Mike Fcrctwenty


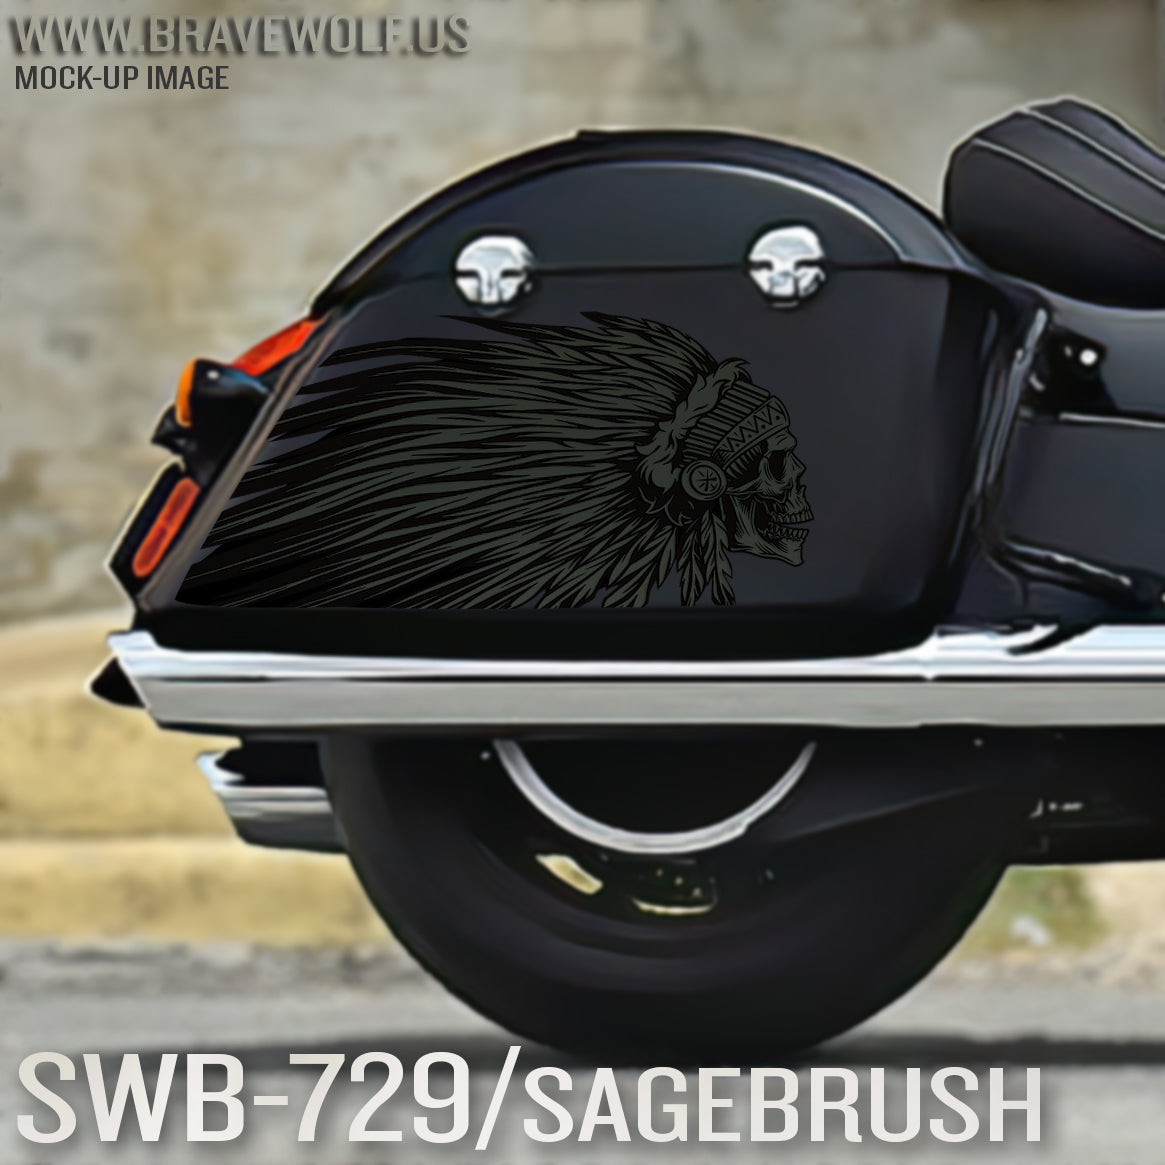
Saddlebag Decals-SWB729-Sagebrush
Regular price $180.00
Shipping calculated at checkout.
Stock Notice: (may take approximately 2-3 weeks before shipping if not in stock at the time of your order)
Our saddlebag decals are made from premium weatherproof hi-tack vinyl with a long lifespan that will keep them looking new for years. They are available in two finishes, heavy-duty 12 mil laminated Gloss (looks like it's painted on), or a heavy-duty sandy matte textured premium finish.
|
Fitment Guide: Fits both styles of Indian OEM saddlebags (rounded and squared). Also fits the Challenger & Pursuit when the plastic bag guard is removed. |
Installation:
Installing our decals is easy to do yourself at home. We recommend removing all of the excess decal material (the background image) before installing the decals. This will allow you to dispose of all the small cut-out pieces so that the pieces do not get trapped underneath your decal when installing it on the bike. Once you have all of the small pieces and background removed, you can use the "wet method" to install the decals to your saddlebags. The wet method involves using a spray bottle of water with a couple drops of dish soap in the mixture and spraying the surface of your saddlebags to wet the entire surface. Then carefully remove the backing from your decal and use the spray bottle to wet the adhesive side of the decal. Now you can gently place the decal on your saddlebag. Because the surfaces are wet, you can pull the decal up to reposition it until you get it where you want it. Once it's in place, use a squeegee or other object such as a credit card wrapped in a microfiber towel to squeeze the water out from behind the decal. You can also use your hands to do this. You should take care not to use a hard/abrasive object that can scratch the decals or your bike's paint. The high-tack adhesive will begin to set/adhere to the bike as soon as the liquid is push out from behind the decal. Use caution to ensure the towel or object you are using does not catch any edges of the decal and pull it off your bike. If you take your time and be gentle during installation, it should be an easy process. A hair dryer can be used to speed up the drying process if needed.
Feel free to visit our How-To page on the website to watch a "wet method" installation video TAB Performance made while installing our Zombie decals.


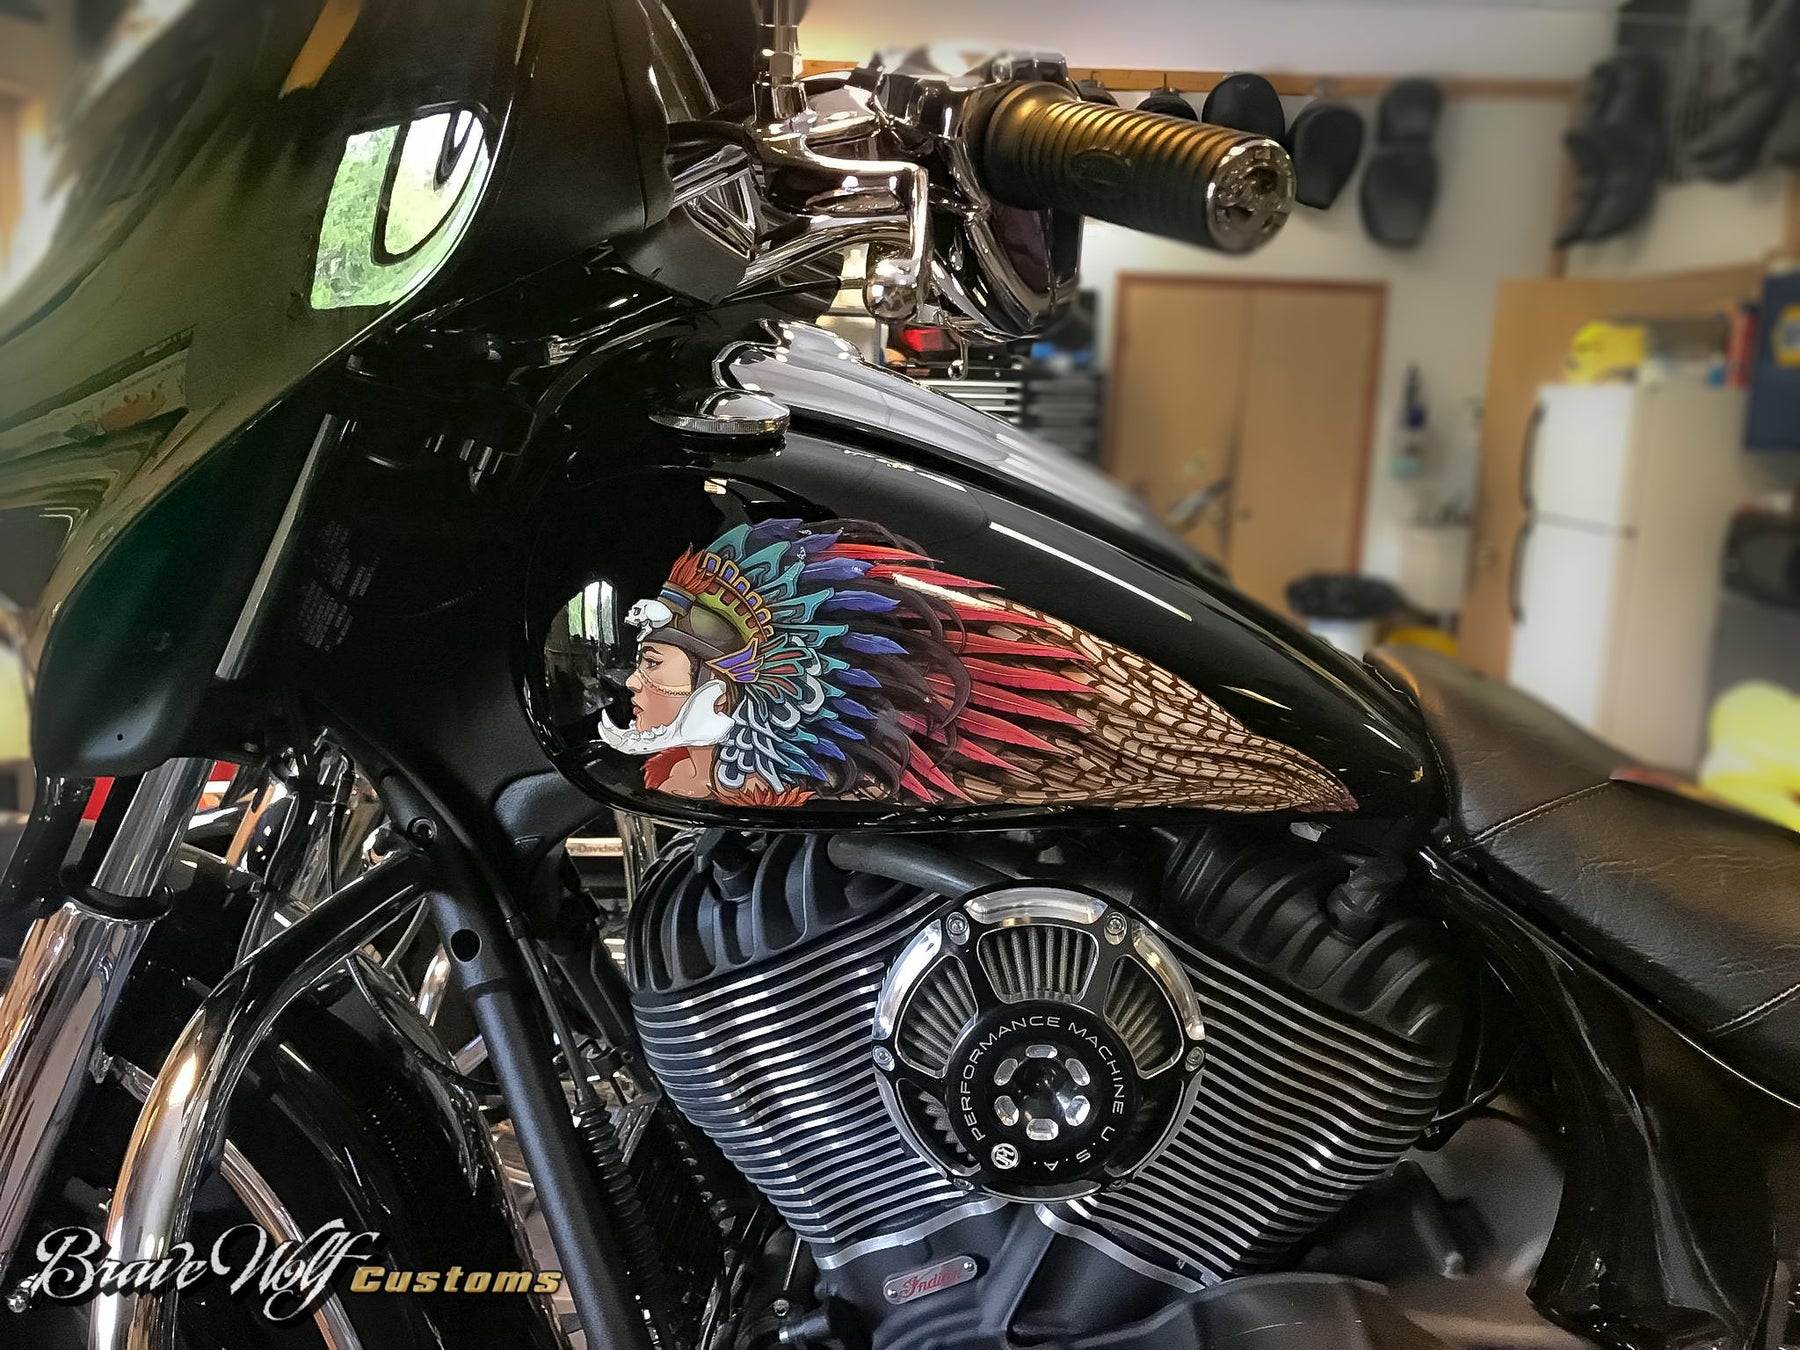
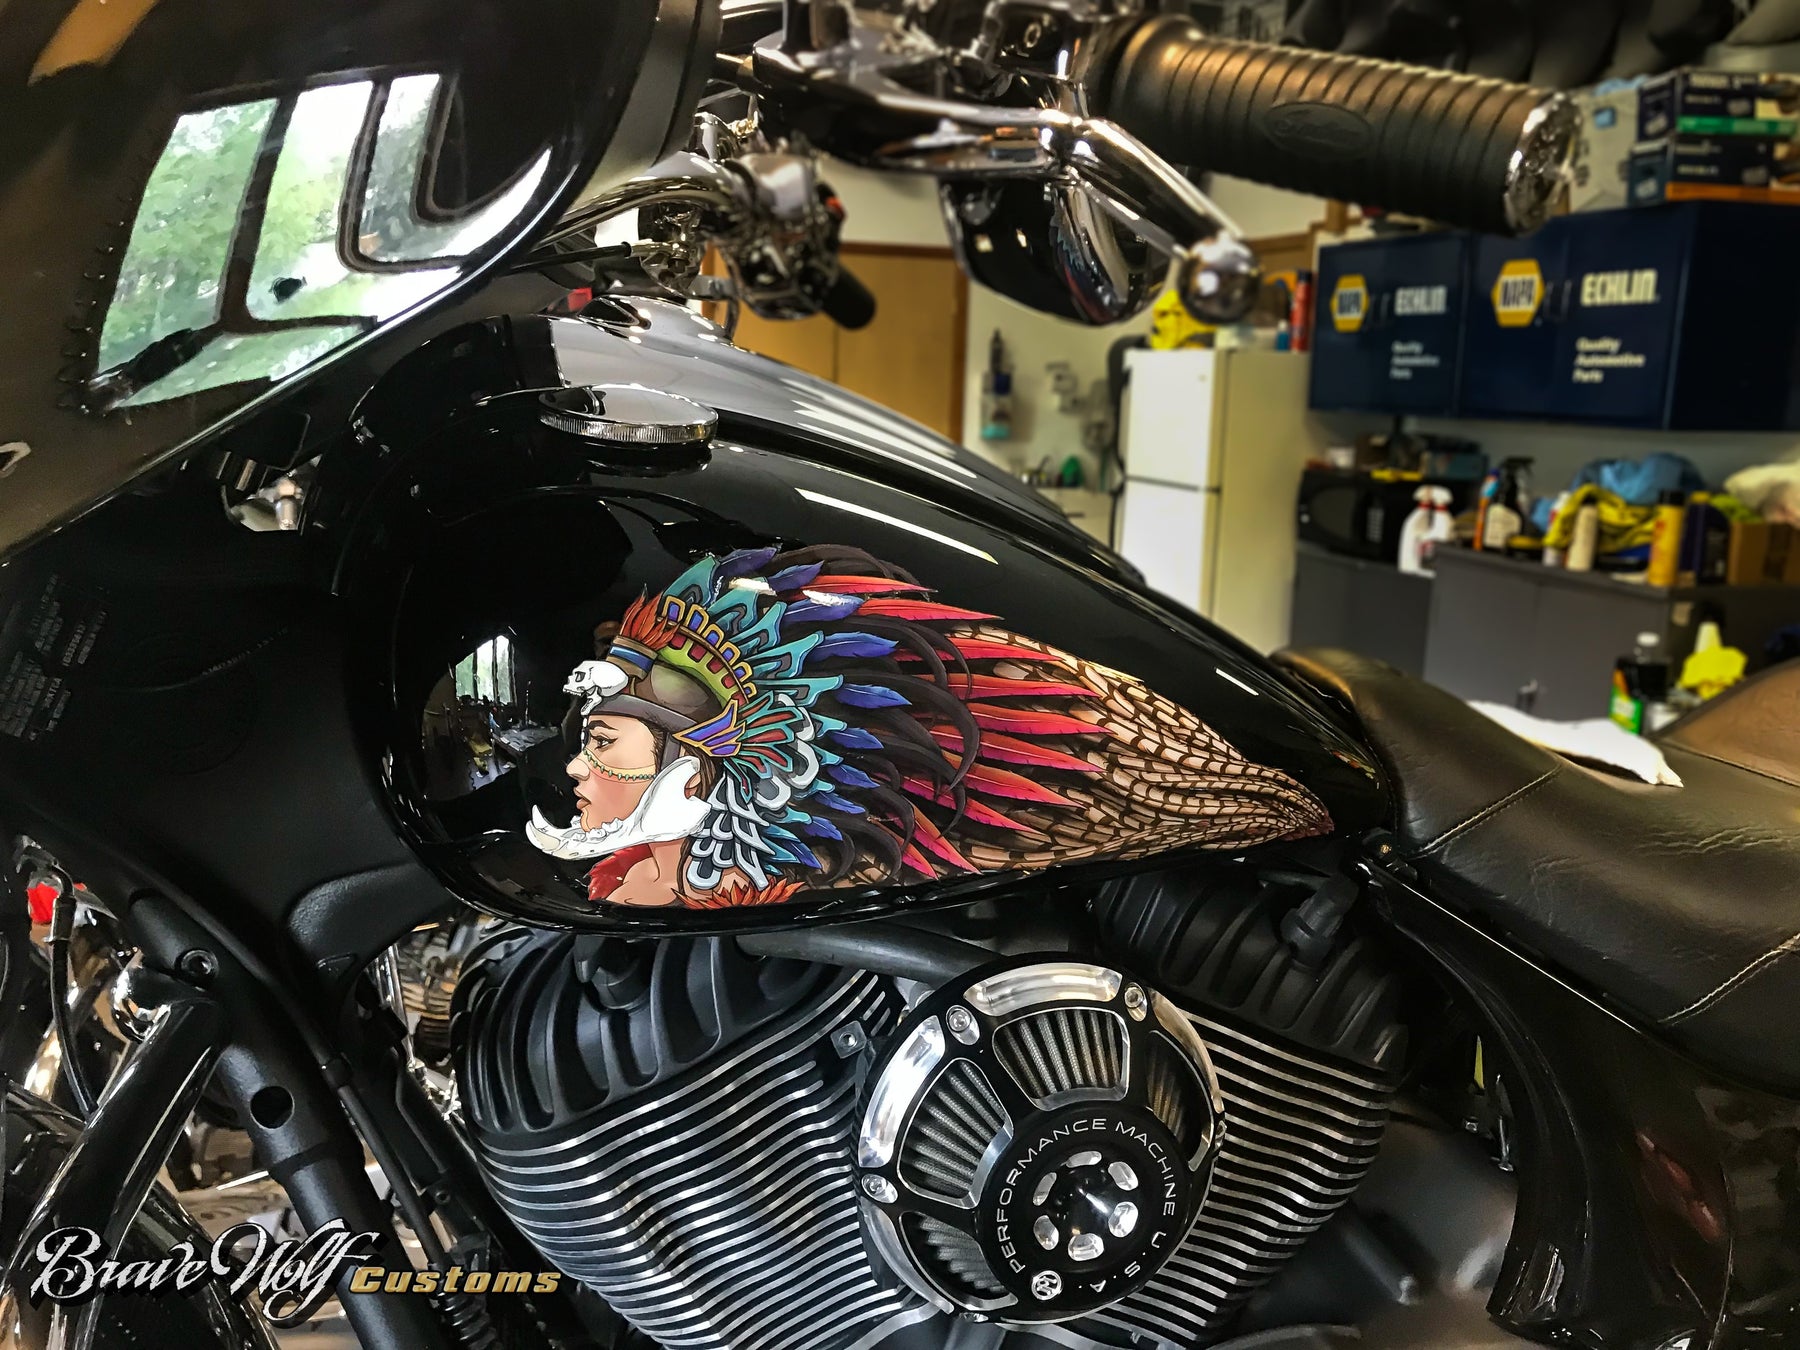
Azteca (B&W) Tank Decal Set for Indian Powerplus lineup
Regular price $110.00
Shipping calculated at checkout.
Stock Notice: (may take approximately 2-3 weeks before shipping if not in stock at time of order)
Tank Decal set for Indian Challenger/Pursuit, Powerplus Chieftain, Powerplus Roadmaster
Size: Covers a large portion of the tank side and should be centered during application for greatest appeal.
The Aztec Jaguar God of the Underworld is featured on our Azteca Challenger fuel tank decals! A unique Native Mesoamerican custom look for your bike starts with these left and right side Aztec/Mayan themed beauties. 
Photo courtesy of Gary Hoffman